Users Manual - English and Spanish
Page 2
... intended for use the proper needle plate. Use this sewing machine only for examination, repair, electrical or mechanical adjustment. 4. Never operate this sewing machine from the electrical outlet immediately after using and before using. Keep ventilation openings of the sewing machine and foot controller free from all instructions before cleaning. Do not operate where aerosol (spray) products are being administered. 8. Do not use extension cords. 6. Do not modify the plug in the outlet, reverse the plug...
... intended for use the proper needle plate. Use this sewing machine only for examination, repair, electrical or mechanical adjustment. 4. Never operate this sewing machine from the electrical outlet immediately after using and before using. Keep ventilation openings of the sewing machine and foot controller free from all instructions before cleaning. Do not operate where aerosol (spray) products are being administered. 8. Do not use extension cords. 6. Do not modify the plug in the outlet, reverse the plug...

Users Manual - English and Spanish
Page 3
... cover. If the problem persists, consult your machine a longer life 1. English To give your local authorized dealer. Use only mild soaps or detergents to inspect and adjust the machine yourself. Always consult this machine in direct sunlight or in high humidity conditions. To repair or adjust the machine If the machine breaks down or needs adjustment, first follow the troubleshooting table to clean the case. When servicing the sewing machine, or when removing covers, the machine...
... cover. If the problem persists, consult your machine a longer life 1. English To give your local authorized dealer. Use only mild soaps or detergents to inspect and adjust the machine yourself. Always consult this machine in direct sunlight or in high humidity conditions. To repair or adjust the machine If the machine breaks down or needs adjustment, first follow the troubleshooting table to clean the case. When servicing the sewing machine, or when removing covers, the machine...
Users Manual - English and Spanish
Page 5
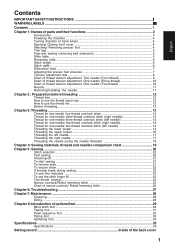
... INSTRUCTIONS I WARNING LABELS ...III Contents ...1 Chapter 1: Names of parts and their functions 2 Accessories ...3 Powering the machine ...4 Turning direction of hand wheel 4 Opening/ Closing front cover 4 Attaching/ Removing presser foot 4 Trim trap ...5 Free-arm sewing (removing bed extension 5 Wide table ...5 Retracting knife ...6 Stitch length ...6 Stitch width ...6 Differential feed ...7 Adjusting the presser foot pressure 7 Tension adjustment dial ...8 Chart of thread tension adjustment, Two needle (Four-thread 9 Chart of thread tension adjustment, One needle (Three-thread...
... INSTRUCTIONS I WARNING LABELS ...III Contents ...1 Chapter 1: Names of parts and their functions 2 Accessories ...3 Powering the machine ...4 Turning direction of hand wheel 4 Opening/ Closing front cover 4 Attaching/ Removing presser foot 4 Trim trap ...5 Free-arm sewing (removing bed extension 5 Wide table ...5 Retracting knife ...6 Stitch length ...6 Stitch width ...6 Differential feed ...7 Adjusting the presser foot pressure 7 Tension adjustment dial ...8 Chart of thread tension adjustment, Two needle (Four-thread 9 Chart of thread tension adjustment, One needle (Three-thread...
Users Manual - English and Spanish
Page 6
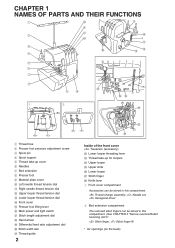
...openings (on the back) Thread change assembly, Needle set, Hexagonal driver 2 Bed extension compartment The removed stitch fingers can be stored in this compartment. (See CHAPTER 5 "Narrow overlock/Rolled hemming stitch". CHAPTER 1 NAMES OF PARTS AND THEIR FUNCTIONS 1 2 1 Thread tree 2 Presser foot pressure adjustment screw 3 Spool pin 4 Spool support 5 Thread take-up cover 6 Needles 7 Bed extension 8 Presser foot 9 Material plate cover 0 Left needle thread tension dial A Right needle thread tension dial B Upper looper thread tension dial C Lower looper thread tension...
...openings (on the back) Thread change assembly, Needle set, Hexagonal driver 2 Bed extension compartment The removed stitch fingers can be stored in this compartment. (See CHAPTER 5 "Narrow overlock/Rolled hemming stitch". CHAPTER 1 NAMES OF PARTS AND THEIR FUNCTIONS 1 2 1 Thread tree 2 Presser foot pressure adjustment screw 3 Spool pin 4 Spool support 5 Thread take-up cover 6 Needles 7 Bed extension 8 Presser foot 9 Material plate cover 0 Left needle thread tension dial A Right needle thread tension dial B Upper looper thread tension dial C Lower looper thread tension...
Users Manual - English and Spanish
Page 7
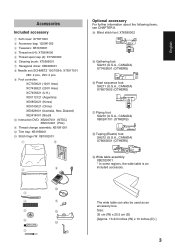
English Accessories Included accessory 1 Soft cover: X77871000 2 Accessory bag: 122991052 3 Tweezers: XB1618001 4 Thread net (4): X75904000 5 Thread spool cap (4): X77260000 6 Cleaning brush: X75906001 7 Hexagonal driver: XB0393001 8 Needle set (SCHMETZ 130/705H): X75917001 #80: 2 pcs., #90: 2 pcs. 9 Foot controller: XC7359021 (120V Area) XC7438321 (230V Area) XC7456321 (U.K.) XD0112121 (Argentina) XD0852021 (Korea) XD0105021 (China) XE0629001 (Australia, New Zealand) XE3414001 (Brazil) 0 Instruction DVD: XB2007001 (NTSC) XB2014001 (PAL) A Thread change assembly: XB1991001 B Trim trap: ...
English Accessories Included accessory 1 Soft cover: X77871000 2 Accessory bag: 122991052 3 Tweezers: XB1618001 4 Thread net (4): X75904000 5 Thread spool cap (4): X77260000 6 Cleaning brush: X75906001 7 Hexagonal driver: XB0393001 8 Needle set (SCHMETZ 130/705H): X75917001 #80: 2 pcs., #90: 2 pcs. 9 Foot controller: XC7359021 (120V Area) XC7438321 (230V Area) XC7456321 (U.K.) XD0112121 (Argentina) XD0852021 (Korea) XD0105021 (China) XE0629001 (Australia, New Zealand) XE3414001 (Brazil) 0 Instruction DVD: XB2007001 (NTSC) XB2014001 (PAL) A Thread change assembly: XB1991001 B Trim trap: ...
Users Manual - English and Spanish
Page 11
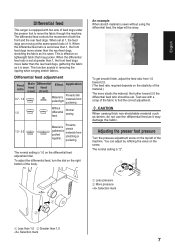
... in removing the rippling when serging stretch fabrics. Adjusting the presser foot pressure Turn the pressure adjustment screw on the differential feed adjustment dial. Prevents stretch materials from puckering 1.0 Without differential feed. When the differential feed ratio is set at 1, the feed dogs are moving at the same speed (ratio of 1). Normal sewing 1.0 - 2.0 Material is pulled tight. The normal setting is "2". 1 2 1 Less pressure 2 More pressure Selection mark 1 Less than 1.0 2 Greater than the rear feed dogs, gathering the fabric...
... in removing the rippling when serging stretch fabrics. Adjusting the presser foot pressure Turn the pressure adjustment screw on the differential feed adjustment dial. Prevents stretch materials from puckering 1.0 Without differential feed. When the differential feed ratio is set at 1, the feed dogs are moving at the same speed (ratio of 1). Normal sewing 1.0 - 2.0 Material is pulled tight. The normal setting is "2". 1 2 1 Less pressure 2 More pressure Selection mark 1 Less than 1.0 2 Greater than the rear feed dogs, gathering the fabric...
Users Manual - English and Spanish
Page 17
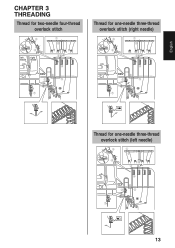
English CHAPTER 3 THREADING Thread for two-needle four-thread overlock stitch 3 4 left needle right needle 1 2 3 4 6 7 5 7 Thread for one-needle three-thread overlock stitch (right needle) 3 1 2 4 3 4 6 7 5 7 Thread for one-needle three-thread overlock stitch (left needle) 3 1 2 4 3 4 6 7 5 7 13
English CHAPTER 3 THREADING Thread for two-needle four-thread overlock stitch 3 4 left needle right needle 1 2 3 4 6 7 5 7 Thread for one-needle three-thread overlock stitch (right needle) 3 1 2 4 3 4 6 7 5 7 Thread for one-needle three-thread overlock stitch (left needle) 3 1 2 4 3 4 6 7 5 7 13
Users Manual - English and Spanish
Page 18
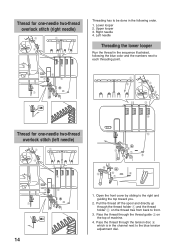
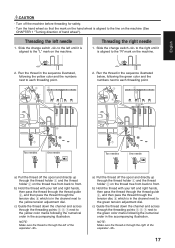
... spool and directly up through the thread holder 1 and the thread holder 2 on the top of machine. 4. Pass the thread through the tension disc 4 which is in the channel next to the blue tension adjustment dial. Open the front cover by sliding to front. 3. Thread for one -needle two-thread overlock stitch (right needle) 3 1 2 4 3 4 6 7 5 7 Threading has to be done in the following the blue color and the numbers next to each threading point. 1 2 3 4 3 4 Thread...
... spool and directly up through the thread holder 1 and the thread holder 2 on the top of machine. 4. Pass the thread through the tension disc 4 which is in the channel next to the blue tension adjustment dial. Open the front cover by sliding to front. 3. Thread for one -needle two-thread overlock stitch (right needle) 3 1 2 4 3 4 6 7 5 7 Threading has to be done in the following the blue color and the numbers next to each threading point. 1 2 3 4 3 4 Thread...
Users Manual - English and Spanish
Page 21
... color and the numbers next to each threading point. 3 1 2 4 3 4 6 7 5 7 Two needles One needle a) Pull the thread off the spool and directly up through the thread holder 1 and the thread holder 2 on the thread tree from back to front. Run the thread in the channel next to the green tension adjustment dial. b) Hold the thread with your left and right hands, then pass the thread through the thread guide 3, and then...
... color and the numbers next to each threading point. 3 1 2 4 3 4 6 7 5 7 Two needles One needle a) Pull the thread off the spool and directly up through the thread holder 1 and the thread holder 2 on the thread tree from back to front. Run the thread in the channel next to the green tension adjustment dial. b) Hold the thread with your left and right hands, then pass the thread through the thread guide 3, and then...
Users Manual - English and Spanish
Page 24
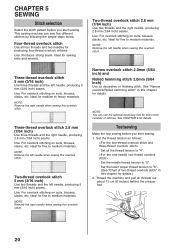
...) seams. Use: For overlock stitching on suits, blouses, slacks, etc. NOTE: Remove the right needle when sewing this overlock stitch. NOTE: Remove the left needle when sewing this overlock stitch. Set the thread tension as decorative or finishing stitch. Thread the machine and pull all threads out about 15 cm (6 inches) behind the presser foot. 20 CHAPTER 5 SEWING Stitch selection Select the stitch pattern before you start sewing. 1. Ideal for producing four-thread overlock stitches. NOTE: Remove the right needle when sewing this overlock stitch. Test sewing Make the...
...) seams. Use: For overlock stitching on suits, blouses, slacks, etc. NOTE: Remove the right needle when sewing this overlock stitch. NOTE: Remove the left needle when sewing this overlock stitch. Set the thread tension as decorative or finishing stitch. Thread the machine and pull all threads out about 15 cm (6 inches) behind the presser foot. 20 CHAPTER 5 SEWING Stitch selection Select the stitch pattern before you start sewing. 1. Ideal for producing four-thread overlock stitches. NOTE: Remove the right needle when sewing this overlock stitch. Test sewing Make the...
Users Manual - English and Spanish
Page 25
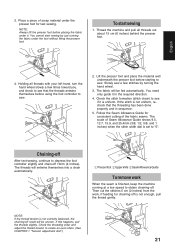
... a low speed to depress the foot controller slightly and chain-off is uniform. You need only guide it in sequence. 5. Check the stitch formation (stitch chain) to sew. 2. If this happens, pull the threads slightly. If feeding for test sewing. NOTE: Always lift the presser foot before using the foot controller to see if it . NOTE: If the thread tension is finished, keep the machine running the fabric under it...
... a low speed to depress the foot controller slightly and chain-off is uniform. You need only guide it in sequence. 5. Check the stitch formation (stitch chain) to sew. 2. If this happens, pull the threads slightly. If feeding for test sewing. NOTE: Always lift the presser foot before using the foot controller to see if it . NOTE: If the thread tension is finished, keep the machine running the fabric under it...
Users Manual - English and Spanish
Page 27
English If threads break during sewing Remove the material and re-thread in the fabric when sewing as they will damage the needles and knives. CAUTION Do not leave straight pins in the correct order, Lower looper, Upper looper, right needle and then the left needle (to allow sewing of curves. (See CHAPTER 1 "Adjusting the presser foot pressure".) 2. Loosen the thread tension, but remember that if the tension is too loose, the thread may break and stitches may...
English If threads break during sewing Remove the material and re-thread in the fabric when sewing as they will damage the needles and knives. CAUTION Do not leave straight pins in the correct order, Lower looper, Upper looper, right needle and then the left needle (to allow sewing of curves. (See CHAPTER 1 "Adjusting the presser foot pressure".) 2. Loosen the thread tension, but remember that if the tension is too loose, the thread may break and stitches may...
Users Manual - English and Spanish
Page 29
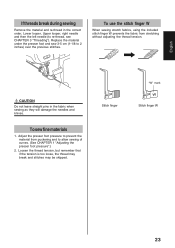
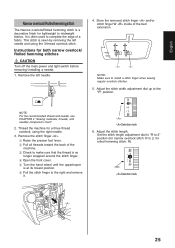
... the machine. 3 Check to make sure that the thread is no longer wrapped around the stitch finger. 4 Open the front cover. 5 Turn the hand wheel until the upperlooper is often used to 2, for a three thread overlock, using the 3-thread overlock stitch. Remove the stitch finger . 1 Raise the presser foot lever. 2 Pull all threads toward the back of the bed extension. Set the stitch length adjustment dial to "R to 2" position (for narrow overlock stitch: R to complete the edge of a fabric...
... the machine. 3 Check to make sure that the thread is no longer wrapped around the stitch finger. 4 Open the front cover. 5 Turn the hand wheel until the upperlooper is often used to 2, for a three thread overlock, using the 3-thread overlock stitch. Remove the stitch finger . 1 Raise the presser foot lever. 2 Pull all threads toward the back of the bed extension. Set the stitch length adjustment dial to "R to 2" position (for narrow overlock stitch: R to complete the edge of a fabric...
Users Manual - English and Spanish
Page 31
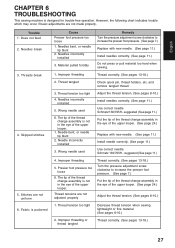
... CHAPTER 6 TROUBLESHOOTING This sewing machine is puckered Cause Presser foot pressure too loose 1. Needles incorrectly installed 5. Improper threading 5. Stitches are not made properly. Thread tensions are not adjusted properly Thread correctly. (See pages 13-18.) Turn the pressure adjustment screw clockwise to increase the presser foot pressure. (See page 7.) Replace with new needle. (See page 11.) Install needle correctly. (See page 11.) Use correct needle. Needles incorrectly installed 3. suggested (See page 11.) Put the tip of the thread change assembly in...
... CHAPTER 6 TROUBLESHOOTING This sewing machine is puckered Cause Presser foot pressure too loose 1. Needles incorrectly installed 5. Improper threading 5. Stitches are not made properly. Thread tensions are not adjusted properly Thread correctly. (See pages 13-18.) Turn the pressure adjustment screw clockwise to increase the presser foot pressure. (See page 7.) Replace with new needle. (See page 11.) Install needle correctly. (See page 11.) Use correct needle. Needles incorrectly installed 3. suggested (See page 11.) Put the tip of the thread change assembly in...
Users Manual - English and Spanish
Page 33
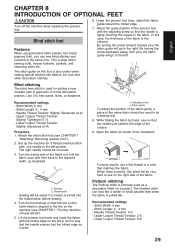
... Thread Tension: 6-9 29 Adjust the guide position of the fabric out, fold the fabric once and then back to the right. For best results, use a fine thread in the left position. Use it sews. 3 Adjusting screw 4 Fabric guide To adjust the position of the fabric guide, a piece of hand wheel"). 5. Stitch Length: 3 - 4 mm - Lower the presser foot lever, adjust the fabric guide toward you) the fabric guide will be removed. 3. Blind stitching The blind hem stitch is lightly touching the crease in such a way that the needle is used for 3 thread overlock stitch...
... Thread Tension: 6-9 29 Adjust the guide position of the fabric out, fold the fabric once and then back to the right. For best results, use a fine thread in the left position. Use it sews. 3 Adjusting screw 4 Fabric guide To adjust the position of the fabric guide, a piece of hand wheel"). 5. Stitch Length: 3 - 4 mm - Lower the presser foot lever, adjust the fabric guide toward you) the fabric guide will be removed. 3. Blind stitching The blind hem stitch is lightly touching the crease in such a way that the needle is used for 3 thread overlock stitch...
Users Manual - English and Spanish
Page 34
... left . Set up the machine for narrow overlock stitching. (Refer to your project. Set up the machine for 3 thread overlock with an iron. 1 Making lines 2 Fold in the upper looper adds an accent to CHAPTER 5 "Narrow overlock/Rolled hemming stitch".) 3. Adjust the guide position of the presser foot with the adjusting screw so that the needle moves down the fold. 30 9. While holding the fabric pieces together, sew at a constant speed down to a position 1/8 inch...
... left . Set up the machine for narrow overlock stitching. (Refer to your project. Set up the machine for 3 thread overlock with an iron. 1 Making lines 2 Fold in the upper looper adds an accent to CHAPTER 5 "Narrow overlock/Rolled hemming stitch".) 3. Adjust the guide position of the presser foot with the adjusting screw so that the needle moves down the fold. 30 9. While holding the fabric pieces together, sew at a constant speed down to a position 1/8 inch...

Users Manual - English and Spanish
Page 35
... foot (see CHAPTER 1 "Turning direction of the materials will be used.) How to 12mm width can be set at the same time beautifully. - Set the stitch width control dial at "0". 5. " 3 Adjusting screw 4 Fabric guide 9. Correct minor contractions by hand. Also attaching elastics is suitable for reinforcement on the machine (see CHAPTER 1 "Attaching/ Removing presser foot"). 2. Flip open the tape guide 1, then set the elastic / tape 14 5 2 3 1. Continue sewing until all marked lines have been sewn. Insert...
... foot (see CHAPTER 1 "Turning direction of the materials will be used.) How to 12mm width can be set at the same time beautifully. - Set the stitch width control dial at "0". 5. " 3 Adjusting screw 4 Fabric guide 9. Correct minor contractions by hand. Also attaching elastics is suitable for reinforcement on the machine (see CHAPTER 1 "Attaching/ Removing presser foot"). 2. Flip open the tape guide 1, then set the elastic / tape 14 5 2 3 1. Continue sewing until all marked lines have been sewn. Insert...
Users Manual - English and Spanish
Page 36
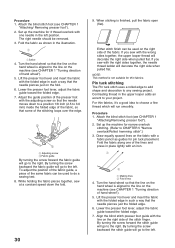
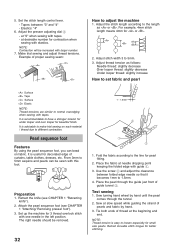
... tapes. Pearl sequence foot Features By using the pearl sequence foot, you can be increased with tapes. - Adjust the presser adjusting dial 2 - It is easy to have a stronger tension for under looper and over looper for small size pearls. Use the screw 2 and adjust the clearance between "3" and "4" - Test sewing 1. Set the stitch length control lever. - For example, 4mm stitch length means 4mm for better stitching. Attach the pearl sequence foot (see CHAPTER...
... tapes. Pearl sequence foot Features By using the pearl sequence foot, you can be increased with tapes. - Adjust the presser adjusting dial 2 - It is easy to have a stronger tension for under looper and over looper for small size pearls. Use the screw 2 and adjust the clearance between "3" and "4" - Test sewing 1. Set the stitch length control lever. - For example, 4mm stitch length means 4mm for better stitching. Attach the pearl sequence foot (see CHAPTER...

Users Manual - English and Spanish
Page 37
... attached after sewing. Turn both fabric and piping tape before sewing. NOTE: For easy sewing, bast the both sides of stitch): - 2 needle 4 thread overlock - 1 needle 3 thread overlock (the right needle should be removed) How to 6mm 3. In case of piping foot and start sewing. Preparation Attach the piping foot (see CHAPTER 1 "Attaching/ Removing presser foot"). Set stitch length at the edge of fabric (pajamas, sports ware), cover for furniture, cushion, bag, etc. Put piping tape between the 2 pcs of fabric and adjust...
... attached after sewing. Turn both fabric and piping tape before sewing. NOTE: For easy sewing, bast the both sides of stitch): - 2 needle 4 thread overlock - 1 needle 3 thread overlock (the right needle should be removed) How to 6mm 3. In case of piping foot and start sewing. Preparation Attach the piping foot (see CHAPTER 1 "Attaching/ Removing presser foot"). Set stitch length at the edge of fabric (pajamas, sports ware), cover for furniture, cushion, bag, etc. Put piping tape between the 2 pcs of fabric and adjust...

Users Manual - English and Spanish
Page 38
... sitich length between the gathering foot and the guide 3 on the machine (see CHAPTER 1 "Attaching/ Removing presser foot"). Lower the presser foot lever. Adjust the other settings to those used .) How to set fabric 3 1 2 1 Surface 2 Reverse 1. Test sewing 1. Set the stitch width to 3mm. 2. NOTE: Do not pull or stretch the fabric. - 2 needle 4 thread overlock - 1 needle 3 thread overlock (Either needle can create beautiful gathers using the gathering foot on various garment and home decorating applications. Position the top piece of the bottom fabric 1. 5. Set the stitch length to...
... sitich length between the gathering foot and the guide 3 on the machine (see CHAPTER 1 "Attaching/ Removing presser foot"). Lower the presser foot lever. Adjust the other settings to those used .) How to set fabric 3 1 2 1 Surface 2 Reverse 1. Test sewing 1. Set the stitch width to 3mm. 2. NOTE: Do not pull or stretch the fabric. - 2 needle 4 thread overlock - 1 needle 3 thread overlock (Either needle can create beautiful gathers using the gathering foot on various garment and home decorating applications. Position the top piece of the bottom fabric 1. 5. Set the stitch length to...


