Brother International LX3817G Support and Manuals
Get Help and Manuals for this Brother International item
View All Support Options Below
Free Brother International LX3817G manuals!
Problems with Brother International LX3817G?
Ask a Question
Free Brother International LX3817G manuals!
Problems with Brother International LX3817G?
Ask a Question
Popular Brother International LX3817G Manual Pages
Operation Manual - Page 3
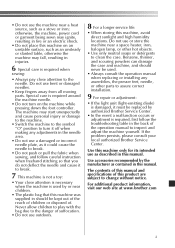
If the problem persists, please consult your local authorized Brother Service Center. The contents of this manual and specifications of . Do not use bent or damaged needles.
• Keep fingers away from all moving parts. Do not use or store the machine near a space heater, iron, halogen lamp, or other parts to assure correct installation.
9 For repair or adjustment:
• If...
Operation Manual - Page 5

... SEWING MACHINE 7
Connecting plugs 7 Main power and sewing light switch 8 Foot controller 8 Checking the needle 8 Replacing the needle 8 Changing the presser foot 10
THE CONTROLS 11
Pattern selection dial 11 Patterns and stitch names 11 Reverse sewing lever 12
THREADING THE MACHINE 13
Winding the bobbin 13 Lower threading 15 Lower threading (for models equipped with a quick-set...
Operation Manual - Page 6
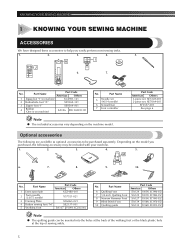
... purchased separately.
No. Part Name
5
Needle set : XE7064-001
XF3557-001 See page 6
Optional accessories
The following accessory may be inserted into the holes at the back of the walking foot or the black plastic hole at the top of sewing ankle.
5
A
A
I
I "
XE9369-001
4
Bobbin (One is on the machine model.
Part Name
Part Code
Americas
Others
1 Extra...
Operation Manual - Page 7
....)
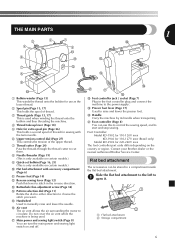
9 Quick-set bobbin (Page 16, 21) (This is used . Contact your Brother dealer or the nearest authorized Brother Service Center.
C Buttonhole fine-adjustment screw (Page 34)
D Pattern selection dial (Page 11) Rotate the dial in either direction to manually raise and lower the needle.
THE MAIN PARTS
3
2
1
1
J
4
5
D
6
C
E
7
B
8
F
9
0
A
1 Bobbin winder (Page 13) This winds...
Operation Manual - Page 8
... sewing machine is not to the machine.
● Make sure that the plugs on the machine. Electric shock may result in to
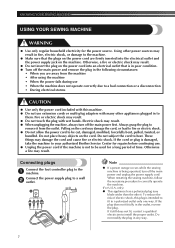
them. Connecting plugs
Connect the foot controller plug to correctly operate the machine.
(For U.S.A. Always grasp the plug to
remove it still does not fit, contact a qualified electrician to your authorized Brother Service Center for repairs...
Operation Manual - Page 9

...so that nothing is accidentally pressed and the machine starts sewing.
● Only use sewing machine needles for home use . only) ● Foot Controller: Model KD-1902
This foot controller can be ...Turn off .
Replacing the needle
CAUTION
● Always turn on or off the machine.
1
Raise the needle by turning the 2 handwheel toward you press harder, the machine's speed will easily...
Operation Manual - Page 10
...
3
1
1 Use a screwdriver 2 Needle stopper 3 Needle
Install the twin needle in the needle plate. KNOWING YOUR SEWING MACHINE
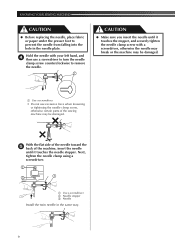
CAUTION
● Before replacing the needle, place fabric or paper under the presser foot to... certain parts of the machine, insert the needle
until it touches the needle stopper.
With the flat side of the needle toward the 5 back of the sewing machine may be...
Operation Manual - Page 12

...(1/8) -
29, 38
2 (1/16) -
29, 38
3 (1/8) -
29, 35, 36, 38, 39
11 KNOWING YOUR SEWING MACHINE
THE CONTROLS
Pattern selection dial
CAUTION
● When you use the pattern selection dial to choose a pattern, raise the needle by ... the down position when you (counterclockwise) so that the mark on certain models.
To choose a stitch, simply turn the pattern selection dial, the needle...
Operation Manual - Page 14

...)
This model
Other models
1
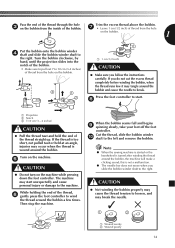
1 Pull the thread in completely.
2 3
1 Pre-tension disk
2 Bobbin winder shaft
Pull up the spool pin and put a spool of thread is Class 15 type bobbin. SA156 is in the groove on this machine. Only use bobbins from the spool 2 with this machine or bobbins of the same type (part code: SA156...
Operation Manual - Page 15
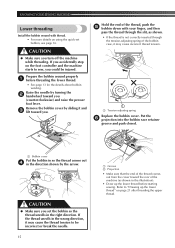
... injury or damage to wind
the thread around the bobbin, the machine will make a clicking sound;
While holding the end of thread from...machine may break the needle.
1
2
1 Wound evenly 2 Wound poorly
14 Note
● When the sewing machine is started or the handwheel is not a malfunction.
● The needle bar does not move when you follow the instructions carefully. Turn on the machine...
Operation Manual - Page 16
... spring
Replace the bobbin cover.
Remove the bobbin cover by the arrow. Prepare the bobbin wound properly 1 before starting sewing.
CAUTION...SEWING MACHINE
Lower threading
Install the bobbin wound with your finger, and then
pass the thread through the tension-adjusting spring of the thread, push the 5 bobbin down with thread. • For more details on using the quick-set...
Operation Manual - Page 18
...wrong place, or is set incorrectly, the thread may...instructions. CAUTION
● If the spool of 4 thread on this pin.
1
1 Presser foot lever
Raise the needle by turning the 3 handwheel toward you
(counterclockwise) so that the mark on the wheel points up lever 5 Mark on the wheel
17 KNOWING YOUR SEWING MACHINE
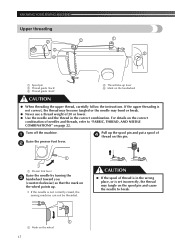
Upper threading
2
2
3 4
1 5
1 Spool pin 2 Thread guide (back) 3 Thread guide...
Operation Manual - Page 19

...Make sure you raise the needle by turning the handwheel toward you may cause sewing problems.
18 toward you (counterclockwise) so that the mark on the wheel points up...sewing machine is lowered, the upper thread can easily be wrapped around the thread take -up lever. thread in your left
as shown in the 6 following illustration.
1
4 2
1 1 Needle bar thread guide
53
Make sure you guide...
Operation Manual - Page 20

... using the
needle threader.
KNOWING YOUR SEWING MACHINE
Using the needle threader (for models equipped with a needle threader)
This feature...While lowering the needle threader lever, 4 hook the thread onto the guide.
2
1
1 Needle holder 2 Needle threader lever
1 2
3
1 Needle holder 2 Needle threader lever 3 Guide
Pull down the needle threader lever as 5 much as transparent nylon thread...
Operation Manual - Page 22

... by hand to lower and then raise the needle.
■ For models equipped with a quick-set bobbin
You can begin sewing immediately without cutting it there
without drawing up the bobbin thread. Draw... leave it . Replace the bobbin cover.
4
2
1 Upper thread 2 Lower thread
Pull out about 10 cm (4 inches) of both 3 threads and put the bobbin back in. KNOWING YOUR SEWING MACHINE
Drawing up the ...
Brother International LX3817G Reviews
We have not received any reviews for Brother International yet.