
Users Manual - English
Page 5
... the Print Head Cartridge 7-6 Replacing the Transfer Roll Cartridge (TR-11CL 7-11 Transfer Roll Cartridge Handling Precautions 7-11 Handling Precautions ...7-11 Replacing the Transfer Roll Cartridge 7-12 Replacing the Fuser unit (FP-12CL 7-14 Fuser unit Handling Precautions 7-14 Replacing the Fuser unit ...7-15 Printing Reports and Lists ...7-18 Confirming Printer Configuration and Network Settings 7-19 Checking...
... the Print Head Cartridge 7-6 Replacing the Transfer Roll Cartridge (TR-11CL 7-11 Transfer Roll Cartridge Handling Precautions 7-11 Handling Precautions ...7-11 Replacing the Transfer Roll Cartridge 7-12 Replacing the Fuser unit (FP-12CL 7-14 Fuser unit Handling Precautions 7-14 Replacing the Fuser unit ...7-15 Printing Reports and Lists ...7-18 Confirming Printer Configuration and Network Settings 7-19 Checking...
Users Manual - English
Page 6
Consumable Items ...A-2 Toner Cartridges (TN-12BK/TN12-Y/TN12-M/TN12-C A-2 Print Head Cartridge (PH-12CL A-2 Transfer Roll Cartridge (TR-11CL A-2 Fuser unit (FP-12CL) ...A-2 Getting Product Support Information A-3 General Specifications ...A-4 Printer Specifications ...A-4 Network Specifications ...A-7 Common Specifications ...A-7 TCP/IP Specifications ...A-7 NetBIOS Specifications ...A-7 NetWare Specifications ...A-7 AppleTalk Specifications ...A-7 Printable Area ...A-8 Important information for choosing your paper A-8 Life Span...
Consumable Items ...A-2 Toner Cartridges (TN-12BK/TN12-Y/TN12-M/TN12-C A-2 Print Head Cartridge (PH-12CL A-2 Transfer Roll Cartridge (TR-11CL A-2 Fuser unit (FP-12CL) ...A-2 Getting Product Support Information A-3 General Specifications ...A-4 Printer Specifications ...A-4 Network Specifications ...A-7 Common Specifications ...A-7 TCP/IP Specifications ...A-7 NetBIOS Specifications ...A-7 NetWare Specifications ...A-7 AppleTalk Specifications ...A-7 Printable Area ...A-8 Important information for choosing your paper A-8 Life Span...
Users Manual - English
Page 23
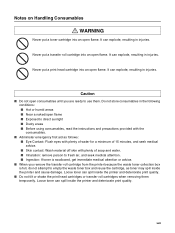
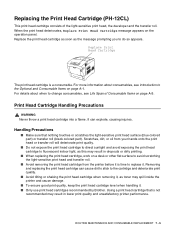
Never put a print head cartridge into an open flame. Caution ■ Do not open consumables until you remove the transfer roll cartridge from the printer because the waste toner collection box is swallowed, get immediate medical attention or advice. ■ When you are ready to...resulting in injuries. Notes on Handling Consumables WARNING Never put a transfer roll cartridge into an open flame. Loose toner can spill inside the printer and cause damage. Do not store consumables in injuries. It can spill inside the printer and deteriorate print quality. ■ Do not tilt or shake ...
Never put a print head cartridge into an open flame. Caution ■ Do not open consumables until you remove the transfer roll cartridge from the printer because the waste toner collection box is swallowed, get immediate medical attention or advice. ■ When you are ready to...resulting in injuries. Notes on Handling Consumables WARNING Never put a transfer roll cartridge into an open flame. Loose toner can spill inside the printer and cause damage. Do not store consumables in injuries. It can spill inside the printer and deteriorate print quality. ■ Do not tilt or shake ...
Users Manual - English
Page 33
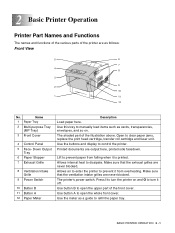
...upper part of the front cover. Use button A to prevent paper from overheating. 2 Basic Printer Operation Printer Part Names and Functions The names and functions of the various parts of the printer are as cards, transparencies, envelopes, and so on and O to refill the paper tray.... print head cartridge, transfer roll cartridge and fuser unit. The printer's power switch. Open to prevent it off. Press I to turn the printer on . Use the meter as a guide to turn it from falling when it is printed. Allows internal heat to control the printer. Make sure that the...
...upper part of the front cover. Use button A to prevent paper from overheating. 2 Basic Printer Operation Printer Part Names and Functions The names and functions of the various parts of the printer are as cards, transparencies, envelopes, and so on and O to refill the paper tray.... print head cartridge, transfer roll cartridge and fuser unit. The printer's power switch. Open to prevent it off. Press I to turn the printer on . Use the meter as a guide to turn it from falling when it is printed. Allows internal heat to control the printer. Make sure that the...
Users Manual - English
Page 35
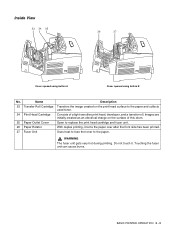
... 24 Print Head Cartridge 25 Paper Outlet Cover 26 Paper Rotator 27 Fuser Unit Description Transfers the image created on the surface of a light-sensitive print head, developer, and a transfer roll. Uses heat to fuse the toner to replace the print head cartridge and fuser unit. Open to the paper. WARNING The fuser... touch it turns the paper over after the front side has been printed. Consists of this drum. Touching the fuser unit can cause burns. BASIC PRINTER OPERATION 2 - 3
... 24 Print Head Cartridge 25 Paper Outlet Cover 26 Paper Rotator 27 Fuser Unit Description Transfers the image created on the surface of a light-sensitive print head, developer, and a transfer roll. Uses heat to fuse the toner to replace the print head cartridge and fuser unit. Open to the paper. WARNING The fuser... touch it turns the paper over after the front side has been printed. Consists of this drum. Touching the fuser unit can cause burns. BASIC PRINTER OPERATION 2 - 3
Users Manual - English
Page 96
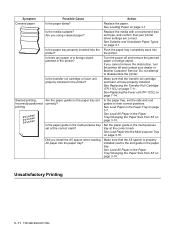
... type, and confirm that your dealer or Brother Customer Service. See Replacing the Print Head Cartridge (PH-12CL) on page 7-14 5 - 7 TROUBLESHOOTING Recurring smudges Dirt in the paper path. The print head cartridge, transfer roll cartridge or fuser unit is defective. See Replacing...unit (FP-12CL) on page 7-5. See Help. Check the print head cartridge, transfer roll cartridge and fuser unit and replace them as necessary. Replace the paper. Contact your printer driver settings are correct. See Suitable and Unsuitable Paper Types on page 7-5. Replace the...
... type, and confirm that your dealer or Brother Customer Service. See Replacing the Print Head Cartridge (PH-12CL) on page 7-14 5 - 7 TROUBLESHOOTING Recurring smudges Dirt in the paper path. The print head cartridge, transfer roll cartridge or fuser unit is defective. See Replacing...unit (FP-12CL) on page 7-5. See Help. Check the print head cartridge, transfer roll cartridge and fuser unit and replace them as necessary. Replace the paper. Contact your printer driver settings are correct. See Suitable and Unsuitable Paper Types on page 7-5. Replace the...
Users Manual - English
Page 97
... type, and confirm that your printer driver settings are correct. See Replacing the Transfer Roll Cartridge (TR-11CL) on page 3-1. TROUBLESHOOTING 5 - 8 Replace the media with the Registration Mark option selected in the PostScript driver? Replace the transfer roll cartridge. Symptom Ink smears when ... 7-11. around black time (especially in the printer driver. See Loading Paper on page 3-7. See Loading Paper on page 3-7. halftone printing Replace the paper. Is the media suitable? Select the AI Registration color setting in a dry environment). Possible Cause Is ...
... type, and confirm that your printer driver settings are correct. See Replacing the Transfer Roll Cartridge (TR-11CL) on page 3-1. TROUBLESHOOTING 5 - 8 Replace the media with the Registration Mark option selected in the PostScript driver? Replace the transfer roll cartridge. Symptom Ink smears when ... 7-11. around black time (especially in the printer driver. See Loading Paper on page 3-7. See Loading Paper on page 3-7. halftone printing Replace the paper. Is the media suitable? Select the AI Registration color setting in a dry environment). Possible Cause Is ...
Users Manual - English
Page 98
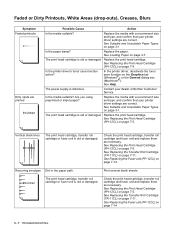
...Print Head Cartridge (PH-12CL) on page 1-1. See Adjusting Color Registration on page 7-5. See Loading Paper on page 7-5. Make sure that your printer driver settings are correct. Check the print head cartridge, transfer roll cartridge and fuser unit and replace them as necessary. See Replacing...and type, and confirm that the transfer roll cartridge or fuser unit is old or damaged. Is the transfer roll cartridge or fuser unit properly installed in the printer? Symptom White spots appear in areas of printing is properly installed. Color around the edge of dense black ...
...Print Head Cartridge (PH-12CL) on page 1-1. See Adjusting Color Registration on page 7-5. See Loading Paper on page 7-5. Make sure that your printer driver settings are correct. Check the print head cartridge, transfer roll cartridge and fuser unit and replace them as necessary. See Replacing...and type, and confirm that the transfer roll cartridge or fuser unit is old or damaged. Is the transfer roll cartridge or fuser unit properly installed in the printer? Symptom White spots appear in areas of printing is properly installed. Color around the edge of dense black ...
Users Manual - English
Page 100
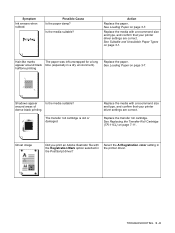
... paper guides in the paper tray set the side and end guides to their correct positions. Set the paper guide in the printer? Make sure that the transfer roll cartridge and fuser unit are correct. See Load A5 Paper in the Paper Tray/Changing the Paper Size from A5 on page ...paper. Are you install the A5 spacer when loading A5 paper into printer? Replace the media with a recommend size and type, and confirm that your dealer or Brother Customer Service. If you cannot remove the obstruction, turn the printer off and remove the jammed paper or foreign object. See Load Paper...
... paper guides in the paper tray set the side and end guides to their correct positions. Set the paper guide in the printer? Make sure that the transfer roll cartridge and fuser unit are correct. See Load A5 Paper in the Paper Tray/Changing the Paper Size from A5 on page ...paper. Are you install the A5 spacer when loading A5 paper into printer? Replace the media with a recommend size and type, and confirm that your dealer or Brother Customer Service. If you cannot remove the obstruction, turn the printer off and remove the jammed paper or foreign object. See Load Paper...
Users Manual - English
Page 105
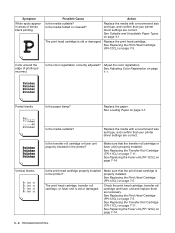
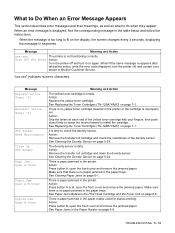
...after taking this action, write the error code displayed, turn the printer off and turn it on page 6-9. Action: Remove the transfer roll cartridge and check the cleanliness of the yellow toner cartridge with your dealer or Brother Customer Service. There is no paper jammed in the Paper Rotator ...time to do when they appear. See Cleaning the Density Sensor on page 6-6. Make sure that there is improperly set. Action: Remove the transfer roll cartridge and clean the density sensor. See Clearing Paper Jams on page 6-1. There is paper jammed in the paper trays. It is empty...
...after taking this action, write the error code displayed, turn the printer off and turn it on page 6-9. Action: Remove the transfer roll cartridge and check the cleanliness of the yellow toner cartridge with your dealer or Brother Customer Service. There is no paper jammed in the Paper Rotator ...time to do when they appear. See Cleaning the Density Sensor on page 6-6. Make sure that there is improperly set. Action: Remove the transfer roll cartridge and clean the density sensor. See Clearing Paper Jams on page 6-1. There is paper jammed in the paper trays. It is empty...
Users Manual - English
Page 107
... improperly. See Cancel Printing at the printer's Control Panel on the computer. The transfer roll cartridge is not inserted in the printer or the cartridge is set improperly. See Replacing the Print Head Cartridge (PH-12CL) on your computer, reconfigure any that specified on page 3-7. Message Replace Transfer Roll Reinsert Transfer Roll Replace Print Head Cartridge Set Print...
... improperly. See Cancel Printing at the printer's Control Panel on the computer. The transfer roll cartridge is not inserted in the printer or the cartridge is set improperly. See Replacing the Print Head Cartridge (PH-12CL) on your computer, reconfigure any that specified on page 3-7. Message Replace Transfer Roll Reinsert Transfer Roll Replace Print Head Cartridge Set Print...
Users Manual - English
Page 113
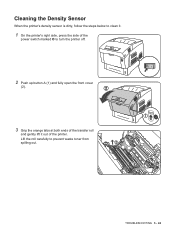
Cleaning the Density Sensor When the printer's density sensor is dirty, follow the steps below to clean it out of the printer. TROUBLESHOOTING 5 - 24 Lift the roll carefully to turn the printer off. 2 Push up button A (1) and fully open the front cover (2). 3 Grip the orange tabs at both ends of the transfer roll and gently lift it . 1 On the printer's right side, press the side of the power switch marked O to prevent waste toner from spilling out.
Cleaning the Density Sensor When the printer's density sensor is dirty, follow the steps below to clean it out of the printer. TROUBLESHOOTING 5 - 24 Lift the roll carefully to turn the printer off. 2 Push up button A (1) and fully open the front cover (2). 3 Grip the orange tabs at both ends of the transfer roll and gently lift it . 1 On the printer's right side, press the side of the power switch marked O to prevent waste toner from spilling out.
Users Manual - English
Page 114
Grip the orange U-shaped tabs as shown. 6 Insert the pins at both ends of the transfer roll cartridge into the bearings inside the printer. 7 To lock the transfer roll cartridge into the printer, push down on the tabs until you hear a click. 5 - 25 TROUBLESHOOTING Do not allow anything hard to clean the window. 5 Replace the transfer roll cartridge. 4 Gently wipe the density sensor window with the density sensor window. Do not use excessive force to come in contact with a clean dry cloth or cotton swab.
Grip the orange U-shaped tabs as shown. 6 Insert the pins at both ends of the transfer roll cartridge into the bearings inside the printer. 7 To lock the transfer roll cartridge into the printer, push down on the tabs until you hear a click. 5 - 25 TROUBLESHOOTING Do not allow anything hard to clean the window. 5 Replace the transfer roll cartridge. 4 Gently wipe the density sensor window with the density sensor window. Do not use excessive force to come in contact with a clean dry cloth or cotton swab.
Users Manual - English
Page 131
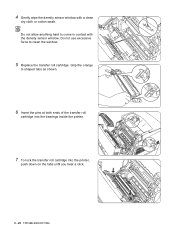
...is time to replace it . ■ Only use print head cartridges recommended by Brother. For details about consumables, see Life Span of the light-sensitive print head, the developer and the transfer roll. Handling Precautions ■ Make sure that is not recommended may result in dropouts ... head cartridge that nothing touches or scratches the light-sensitive print head surface (blue colored part) or transfer roll (black colored part). Replace the print head cartridge as soon as this may spill inside the printer and cause damage. ■ To ensure good print quality, keep the print head...
...is time to replace it . ■ Only use print head cartridges recommended by Brother. For details about consumables, see Life Span of the light-sensitive print head, the developer and the transfer roll. Handling Precautions ■ Make sure that is not recommended may result in dropouts ... head cartridge that nothing touches or scratches the light-sensitive print head surface (blue colored part) or transfer roll (black colored part). Replace the print head cartridge as soon as this may spill inside the printer and cause damage. ■ To ensure good print quality, keep the print head...
Users Manual - English
Page 135
...the transfer roll Do not touch the transfer roll (black part). Protective sheet 2. Scratches, dirt or oil from your hands onto the roll deteriorates print quality. 12 Close the paper outlet cover. Orange rollers ■ Lowering the cartridge into the printer. 1. Make sure that nothing touches or scratches the roll ... in front of the print head cartridge with anything. 11 Pull the protective sheet on the printer, and gently lower the cartridge into the printer without correctly aligning the roll with the slots can damage the cartridge. ■ Do not allow the surface covered with ...
...the transfer roll Do not touch the transfer roll (black part). Protective sheet 2. Scratches, dirt or oil from your hands onto the roll deteriorates print quality. 12 Close the paper outlet cover. Orange rollers ■ Lowering the cartridge into the printer. 1. Make sure that nothing touches or scratches the roll ... in front of the print head cartridge with anything. 11 Pull the protective sheet on the printer, and gently lower the cartridge into the printer without correctly aligning the roll with the slots can damage the cartridge. ■ Do not allow the surface covered with ...

Users Manual - English
Page 137
... the transfer roll cartridge from the printer before it . Transfer Roll Cartridge Handling Precautions WARNING Never throw a used transfer roll cartridge into a fire. Toner may spill inside the printer, causing damage. When the transfer roll cartridge deteriorates, Replace Transfer Roll message appears on page A-1. The printer will ... AND CONSUMABLE REPLACEMENT 7 - 11 Replace the transfer roll cartridge as soon as toner may spill inside the printer and cause damage. ■ Avoid removing the transfer roll cartridge from the printer because the waste toner collection box is full,...
... the transfer roll cartridge from the printer before it . Transfer Roll Cartridge Handling Precautions WARNING Never throw a used transfer roll cartridge into a fire. Toner may spill inside the printer, causing damage. When the transfer roll cartridge deteriorates, Replace Transfer Roll message appears on page A-1. The printer will ... AND CONSUMABLE REPLACEMENT 7 - 11 Replace the transfer roll cartridge as soon as toner may spill inside the printer and cause damage. ■ Avoid removing the transfer roll cartridge from the printer because the waste toner collection box is full,...
Users Manual - English
Page 138
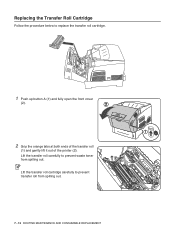
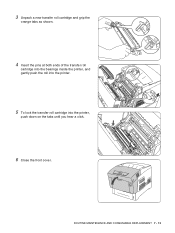
Lift the transfer roll cartridge carefully to prevent waste toner from spilling out. 7 - 12 ROUTINE MAINTENANCE AND CONSUMABLE REPLACEMENT Lift the transfer roll carefully to prevent transfer roll from spilling out. Replacing the Transfer Roll Cartridge Follow the procedure below to replace the transfer roll cartridge. 1 Push up button A (1) and fully open the front cover (2). 2 Grip the orange tabs at both ends of the transfer roll (1) and gently lift it out of the printer (2).
Lift the transfer roll cartridge carefully to prevent waste toner from spilling out. 7 - 12 ROUTINE MAINTENANCE AND CONSUMABLE REPLACEMENT Lift the transfer roll carefully to prevent transfer roll from spilling out. Replacing the Transfer Roll Cartridge Follow the procedure below to replace the transfer roll cartridge. 1 Push up button A (1) and fully open the front cover (2). 2 Grip the orange tabs at both ends of the transfer roll (1) and gently lift it out of the printer (2).
Users Manual - English
Page 139
ROUTINE MAINTENANCE AND CONSUMABLE REPLACEMENT 7 - 13 3 Unpack a new transfer roll cartridge and grip the orange tabs as shown. 4 Insert the pins at both ends of the transfer roll cartridge into the bearings inside the printer, and gently push the roll into the printer. 5 To lock the transfer roll cartridge into the printer, push down on the tabs until you hear a click. 6 Close the front cover.
ROUTINE MAINTENANCE AND CONSUMABLE REPLACEMENT 7 - 13 3 Unpack a new transfer roll cartridge and grip the orange tabs as shown. 4 Insert the pins at both ends of the transfer roll cartridge into the bearings inside the printer, and gently push the roll into the printer. 5 To lock the transfer roll cartridge into the printer, push down on the tabs until you hear a click. 6 Close the front cover.
Users Manual - English
Page 152
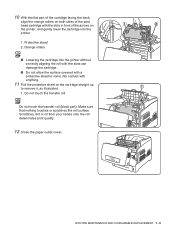
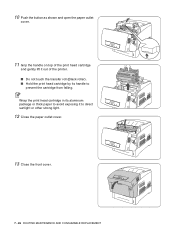
10 Push the button as shown and open the paper outlet cover. 11 Grip the handle on top of the printer. ■ Do not touch the transfer roll (Black roller). ■ Hold the print head cartridge by its aluminum package or thick paper to avoid exposing it out of the print head cartridge and gently lift it to prevent the cartridge from falling. Wrap the print head cartridge in its handle to direct sunlight or other strong light. 12 Close the paper outlet cover. 13 Close the front cover. 7 - 26 ROUTINE MAINTENANCE AND CONSUMABLE REPLACEMENT
10 Push the button as shown and open the paper outlet cover. 11 Grip the handle on top of the printer. ■ Do not touch the transfer roll (Black roller). ■ Hold the print head cartridge by its aluminum package or thick paper to avoid exposing it out of the print head cartridge and gently lift it to prevent the cartridge from falling. Wrap the print head cartridge in its handle to direct sunlight or other strong light. 12 Close the paper outlet cover. 13 Close the front cover. 7 - 26 ROUTINE MAINTENANCE AND CONSUMABLE REPLACEMENT
Users Manual - English
Page 156
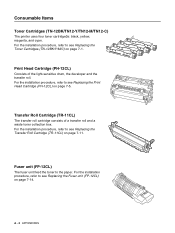
...For the installation procedure, refer to the paper. Transfer Roll Cartridge (TR-11CL) The transfer roll cartridge consists of the light-sensitive drum, the developer and the transfer roll. Print Head Cartridge (PH-12CL) Consists of a transfer roll and a waste toner collection box. For the ...installation procedure, refer to see Replacing the Transfer Roll Cartridge (TR-11CL) on page 7-5. Consumable Items Toner Cartridges (TN-12BK/TN12-Y/TN12-M/TN12-C) The printer ...
...For the installation procedure, refer to the paper. Transfer Roll Cartridge (TR-11CL) The transfer roll cartridge consists of the light-sensitive drum, the developer and the transfer roll. Print Head Cartridge (PH-12CL) Consists of a transfer roll and a waste toner collection box. For the ...installation procedure, refer to see Replacing the Transfer Roll Cartridge (TR-11CL) on page 7-5. Consumable Items Toner Cartridges (TN-12BK/TN12-Y/TN12-M/TN12-C) The printer ...


