
Users Manual - English and Spanish
Page 2
... dealer. 10. Keep fingers away from all instructions before replacing the light bulb. Special care is being administered. 8. The wrong plate can cause the needle to the nearest authorized dealer or service center for examination, repair, electrical or mechanical adjustment. 4. Do not pull or push fabric...the following . Place the machine near children. 2. Replace the light bulb with this sewing machine only for use the proper needle plate. Do not use bent needles. 13. To disconnect, turn the main switch to ensure that they do not play with same type rated 15 watts....
... dealer. 10. Keep fingers away from all instructions before replacing the light bulb. Special care is being administered. 8. The wrong plate can cause the needle to the nearest authorized dealer or service center for examination, repair, electrical or mechanical adjustment. 4. Do not pull or push fabric...the following . Place the machine near children. 2. Replace the light bulb with this sewing machine only for use the proper needle plate. Do not use bent needles. 13. To disconnect, turn the main switch to ensure that they do not play with same type rated 15 watts....
Users Manual - English and Spanish
Page 6
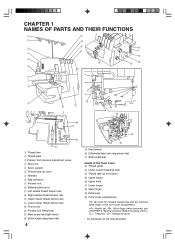
... 5 6 7 8 L O 9 0 E NM P Q 1 Thread tree 2 Thread plate 3 Presser foot pressure adjustment screw 4 Spool pin 5 Spool support 6 Thread take-up cover 7 Needles 8 Bed extension 9 Presser foot 0 Material plate cover A Left needle thread tension dial B Right needle thread tension dial C Upper looper thread tension dial D Lower looper thread tension dial E Front cover...You can hold the included accessories and the removed stitch finger in this front cover compartment. : Needle set, : Stitch finger (when removed, see CHAPTER 5 "Narrow overlock/ Rolled hemming stitch"), : Tweezers, : ...
... 5 6 7 8 L O 9 0 E NM P Q 1 Thread tree 2 Thread plate 3 Presser foot pressure adjustment screw 4 Spool pin 5 Spool support 6 Thread take-up cover 7 Needles 8 Bed extension 9 Presser foot 0 Material plate cover A Left needle thread tension dial B Right needle thread tension dial C Upper looper thread tension dial D Lower looper thread tension dial E Front cover...You can hold the included accessories and the removed stitch finger in this front cover compartment. : Needle set, : Stitch finger (when removed, see CHAPTER 5 "Narrow overlock/ Rolled hemming stitch"), : Tweezers, : ...
Users Manual - English and Spanish
Page 17
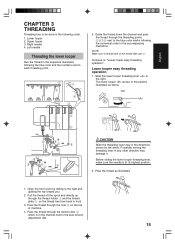
... color marks following the numerical order in the accompanying illustration. Pass the thread through the thread holder 1 and the thread plate 2 on the thread tree from back to the right. Continue on the top of the thread take ups 7. Pass ... 4 3 4 5 0 9 8 7 6 0 9 8 7 6 5. Open the front cover by the arrow. Lower looper 2. Slide the lower looper threading lever to front. 3. Right needle 4. Pull the thread off the spool and directly up through the tension disc 4 which is at its highest position. 2. English CHAPTER 3 THREADING Threading has to...
... color marks following the numerical order in the accompanying illustration. Pass the thread through the thread holder 1 and the thread plate 2 on the thread tree from back to the right. Continue on the top of the thread take ups 7. Pass ... 4 3 4 5 0 9 8 7 6 0 9 8 7 6 5. Open the front cover by the arrow. Lower looper 2. Slide the lower looper threading lever to front. 3. Right needle 4. Pull the thread off the spool and directly up through the tension disc 4 which is at its highest position. 2. English CHAPTER 3 THREADING Threading has to...

Users Manual - English and Spanish
Page 20
...numbers next to each threading point. 3 1 2 4 3 4 6 7 5 8 7 8 8 1. Pass the thread through the tension disc 4 which is through the right needle 8 from back to the yellow color marks following the yellow color and the numbers next to the pink tension adjustment dial. 4. Guide the thread down... to the yellow tension adjustment dial. 4. Pass the thread through the tension disc 4 which is through the thread holder 1 and the thread plate 2 on the top of the separater . 5. Pull the thread off the spool and directly up through the threading points 5 6 7 next...
...numbers next to each threading point. 3 1 2 4 3 4 6 7 5 8 7 8 8 1. Pass the thread through the tension disc 4 which is through the right needle 8 from back to the yellow color marks following the yellow color and the numbers next to the pink tension adjustment dial. 4. Guide the thread down... to the yellow tension adjustment dial. 4. Pass the thread through the tension disc 4 which is through the thread holder 1 and the thread plate 2 on the top of the separater . 5. Pull the thread off the spool and directly up through the threading points 5 6 7 next...

User Manual - French
Page 2
... any air openings blocked. Fully plug the machine directly into water. Read all moving parts. 6. Do not use the proper needle plate. CAUTION To use extension cords. 9. only) 2. If the plug does not fit fully in a polarized outlet only one blade wider than the other moving parts.... changing presser foot, etc. 15. To disconnect, turn the main switch to reduce the risk of electric shock. 1. The wrong plate can cause the needle to fit in the outlet, reverse the plug. (For U.S.A. Do not pull or push fabric while stitching. If there is not working properly, if ...
... any air openings blocked. Fully plug the machine directly into water. Read all moving parts. 6. Do not use the proper needle plate. CAUTION To use extension cords. 9. only) 2. If the plug does not fit fully in a polarized outlet only one blade wider than the other moving parts.... changing presser foot, etc. 15. To disconnect, turn the main switch to reduce the risk of electric shock. 1. The wrong plate can cause the needle to fit in the outlet, reverse the plug. (For U.S.A. Do not pull or push fabric while stitching. If there is not working properly, if ...

User Manual - French
Page 6
... 5 6 7 8 L O 9 0 E NM P Q 1 Thread tree 2 Thread plate 3 Presser foot pressure adjustment screw 4 Spool pin 5 Spool support 6 Thread take-up cover 7 Needles 8 Bed extension 9 Presser foot 0 Material plate cover A Left needle thread tension dial B Right needle thread tension dial C Upper looper thread tension dial D Lower looper thread tension dial E Front cover...You can hold the included accessories and the removed stitch finger in this front cover compartment. : Needle set, : Stitch finger (when removed, see CHAPTER 5 "Narrow overlock/ Rolled hemming stitch"), : Tweezers, : ...
... 5 6 7 8 L O 9 0 E NM P Q 1 Thread tree 2 Thread plate 3 Presser foot pressure adjustment screw 4 Spool pin 5 Spool support 6 Thread take-up cover 7 Needles 8 Bed extension 9 Presser foot 0 Material plate cover A Left needle thread tension dial B Right needle thread tension dial C Upper looper thread tension dial D Lower looper thread tension dial E Front cover...You can hold the included accessories and the removed stitch finger in this front cover compartment. : Needle set, : Stitch finger (when removed, see CHAPTER 5 "Narrow overlock/ Rolled hemming stitch"), : Tweezers, : ...

User Manual - French
Page 17
...shown by sliding to the right and guiding the top toward you. 2. Pass the thread through the thread holder 1 and the thread plate 2 on the thread tree from back to thread both of machine. 4. NOTE: Make sure to front. 3. Pull the thread off...which is at its highest position. 2. Lower looper 2. The lower looper moves to each threading point. 1 3 2 4 3 4 5 0 9 8 7 6 0 9 8 7 6 5. Right needle 4. Left needle Threading the lower looper Run the thread in any other direction may damage it. Lower looper easy threading operation 1. Pass the thread thourgh the hole...
...shown by sliding to the right and guiding the top toward you. 2. Pass the thread through the thread holder 1 and the thread plate 2 on the thread tree from back to thread both of machine. 4. NOTE: Make sure to front. 3. Pull the thread off...which is at its highest position. 2. Lower looper 2. The lower looper moves to each threading point. 1 3 2 4 3 4 5 0 9 8 7 6 0 9 8 7 6 5. Right needle 4. Left needle Threading the lower looper Run the thread in any other direction may damage it. Lower looper easy threading operation 1. Pass the thread thourgh the hole...

User Manual - French
Page 20
...to the pink color marks following the numerical order in the accompanying illustration. Guide the thread down through the needle bar thread guide and through the thread holder 1 and the thread plate 2 on the thread tree from front to front. 2. Bring the thread down the channel and across ...of machine. 3. Pull the thread off the spool and directly up through the right needle 8 from back to back. (: two needles/ : one needle) 18 Pass the thread through the thread holder 1 and the thread plate 2 on the thread tree from front to the yellow tension adjustment dial. 4. ...
...to the pink color marks following the numerical order in the accompanying illustration. Guide the thread down through the needle bar thread guide and through the thread holder 1 and the thread plate 2 on the thread tree from front to front. 2. Bring the thread down the channel and across ...of machine. 3. Pull the thread off the spool and directly up through the right needle 8 from back to back. (: two needles/ : one needle) 18 Pass the thread through the thread holder 1 and the thread plate 2 on the thread tree from front to the yellow tension adjustment dial. 4. ...

