
Users Manual - English and Spanish
Page 2
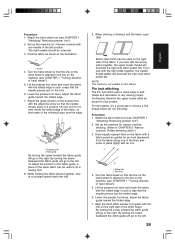
.... If water is not intended for use by the manufacturer as threading needle, changing needle, or changing presser foot, etc. 15. Place the machine near children. 2. Never operate this sewing machine if it has a damaged cord or plug, if it has been dropped or damaged, or dropped into water. Never drop or insert any air openings blocked. The wrong plate can cause the needle to install the proper outlet. 4. Young children...
.... If water is not intended for use by the manufacturer as threading needle, changing needle, or changing presser foot, etc. 15. Place the machine near children. 2. Never operate this sewing machine if it has a damaged cord or plug, if it has been dropped or damaged, or dropped into water. Never drop or insert any air openings blocked. The wrong plate can cause the needle to install the proper outlet. 4. Young children...

Users Manual - English and Spanish
Page 3
..., use plugs with this equipment, it should never be fitted in a live socket outlet. To repair or adjust the machine If the machine breaks down or needs adjustment, first follow the troubleshooting table to clean the case. When servicing the sewing machine, or when removing covers or changing the light bulb, the machine or the electrical set must be disconnected from the supply by ASTA to make sure you replace or fit the presser foot, needle, or...
..., use plugs with this equipment, it should never be fitted in a live socket outlet. To repair or adjust the machine If the machine breaks down or needs adjustment, first follow the troubleshooting table to clean the case. When servicing the sewing machine, or when removing covers or changing the light bulb, the machine or the electrical set must be disconnected from the supply by ASTA to make sure you replace or fit the presser foot, needle, or...

Users Manual - English and Spanish
Page 5
... 1: Names of parts and their functions 4 Accessories ...5 Powering the machine ...6 Turning direction of hand wheel 6 Opening/ Closing front cover 6 Attaching/ Removing presser foot 6 Trim trap ...7 Free-arm sewing (removing bed extension 7 Retracting knife ...8 Stitch length ...8 Stitch width ...8 Differential feed ...9 Adjusting the presser foot pressure 9 Tension adjustment dial ...10 Chart of thread tension adjustment, Two needle (Four-thread 11 Chart of thread tension adjustment, One needle (Three-thread 12 Needle ...13 Removing/ Installing the needle 13 Chapter 2 : Preparation...
... 1: Names of parts and their functions 4 Accessories ...5 Powering the machine ...6 Turning direction of hand wheel 6 Opening/ Closing front cover 6 Attaching/ Removing presser foot 6 Trim trap ...7 Free-arm sewing (removing bed extension 7 Retracting knife ...8 Stitch length ...8 Stitch width ...8 Differential feed ...9 Adjusting the presser foot pressure 9 Tension adjustment dial ...10 Chart of thread tension adjustment, Two needle (Four-thread 11 Chart of thread tension adjustment, One needle (Three-thread 12 Needle ...13 Removing/ Installing the needle 13 Chapter 2 : Preparation...
Users Manual - English and Spanish
Page 6
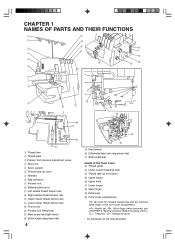
...1 Thread tree 2 Thread plate 3 Presser foot pressure adjustment screw 4 Spool pin 5 Spool support 6 Thread take-up cover 7 Needles 8 Bed extension 9 Presser foot 0 Material plate cover A Left needle thread tension dial B Right needle thread tension dial C Upper looper thread tension dial D Lower looper thread tension dial E Front cover F Presser foot lifting lever G Main power and light switch H Stitch length adjustment dial 4 R S I Hand wheel J Differential feed ratio adjustment dial K Stitch width dial Inside of the front cover L Thread guide M Lower looper threading lever N Thread take...
...1 Thread tree 2 Thread plate 3 Presser foot pressure adjustment screw 4 Spool pin 5 Spool support 6 Thread take-up cover 7 Needles 8 Bed extension 9 Presser foot 0 Material plate cover A Left needle thread tension dial B Right needle thread tension dial C Upper looper thread tension dial D Lower looper thread tension dial E Front cover F Presser foot lifting lever G Main power and light switch H Stitch length adjustment dial 4 R S I Hand wheel J Differential feed ratio adjustment dial K Stitch width dial Inside of the front cover L Thread guide M Lower looper threading lever N Thread take...

Users Manual - English and Spanish
Page 22
... the thread tension to heavy materials. Three-thread overlock stitch 5 mm (3/16 inch) Use three threads and the left needle when sewing this overlock stitch. 3. Set all threads out about 15 cm (6 inches) behind the presser foot. This sewing machine can use the optional accessory foot for medium to "4". 2. Ideal for producing four-thread overlock stitches. Test sewing Test-sew before placing the fabric under the foot without lifting the presser foot. 20 See "Narrow overlock/ Rolled hemming stitch" in this overlock stitch. Ideal...
... the thread tension to heavy materials. Three-thread overlock stitch 5 mm (3/16 inch) Use three threads and the left needle when sewing this overlock stitch. 3. Set all threads out about 15 cm (6 inches) behind the presser foot. This sewing machine can use the optional accessory foot for medium to "4". 2. Ideal for producing four-thread overlock stitches. Test sewing Test-sew before placing the fabric under the foot without lifting the presser foot. 20 See "Narrow overlock/ Rolled hemming stitch" in this overlock stitch. Ideal...
Users Manual - English and Spanish
Page 25
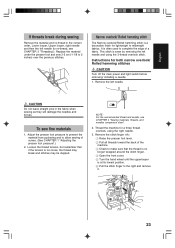
... needle, see CHAPTER 3 "Threading"). Thread the machine for a three thread overlock, using the 3-thread overlock stitch. It is a decorative finish for both narrow overlock/ Rolled hemming stitches CAUTION Turn off the main power and light switch before removing/ installing a needle. 1. English If threads break during sewing Remove the material and re-thread in the fabric when sewing as they will damage the needles and knives. To sew fine materials 1. CAUTION Do not leave straight pins in the correct order, Lower looper, Upper...
... needle, see CHAPTER 3 "Threading"). Thread the machine for a three thread overlock, using the 3-thread overlock stitch. It is a decorative finish for both narrow overlock/ Rolled hemming stitches CAUTION Turn off the main power and light switch before removing/ installing a needle. 1. English If threads break during sewing Remove the material and re-thread in the fabric when sewing as they will damage the needles and knives. To sew fine materials 1. CAUTION Do not leave straight pins in the correct order, Lower looper, Upper...
Users Manual - English and Spanish
Page 29
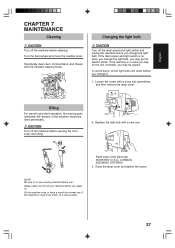
... a new one. Parts code of the machine should be injured. If the machine is on the foot controller, you may be oiled periodically. Periodically clean dust, trimmed fabric and thread with a cross slot screwdriver, and then remove the lamp cover. CAUTION Turn off the machine before you change the light bulb. Always clean the lint off your sewing machine before you apply oil. NOTE: Be sure to oil your machine before use . English CHAPTER 7 MAINTENANCE Cleaning CAUTION...
... a new one. Parts code of the machine should be injured. If the machine is on the foot controller, you may be oiled periodically. Periodically clean dust, trimmed fabric and thread with a cross slot screwdriver, and then remove the lamp cover. CAUTION Turn off the machine before you change the light bulb. Always clean the lint off your sewing machine before you apply oil. NOTE: Be sure to oil your machine before use . English CHAPTER 7 MAINTENANCE Cleaning CAUTION...

Users Manual - English and Spanish
Page 30
... left position. The finished stitch can sew blind stitches and overlock at the same time. Stitch Length: 2 - 4 mm - Lower the presser foot lever, adjust the fabric guide toward you ) the fabric guide will go to the line on this stitch will be removed. 3. In this case, the thickness of the crease. 9. Lift the presser foot lever and insert the fabric with the adjusting screw so that the needle just catches the edge of the fabric is the criterion. Recommended settings - By...
... left position. The finished stitch can sew blind stitches and overlock at the same time. Stitch Length: 2 - 4 mm - Lower the presser foot lever, adjust the fabric guide toward you ) the fabric guide will go to the line on this stitch will be removed. 3. In this case, the thickness of the crease. 9. Lift the presser foot lever and insert the fabric with the adjusting screw so that the needle just catches the edge of the fabric is the criterion. Recommended settings - By...
Users Manual - English and Spanish
Page 31
... to do a sewing test. 8. Lift the presser foot lever and insert the fabric with the folded edge in such a way that the needle pierces just the folded edge. 6. To adjust the position of the fabric guide, a piece of the same fabric can be used to your project. Contrasting thread in place lightly with one of hand wheel"). 5. Set up the machine for 3 thread overlock with an iron. 1 Making lines 2 Fold...
... to do a sewing test. 8. Lift the presser foot lever and insert the fabric with the folded edge in such a way that the needle pierces just the folded edge. 6. To adjust the position of the fabric guide, a piece of the same fabric can be used to your project. Contrasting thread in place lightly with one of hand wheel"). 5. Set up the machine for 3 thread overlock with an iron. 1 Making lines 2 Fold...

Users Manual - English and Spanish
Page 32
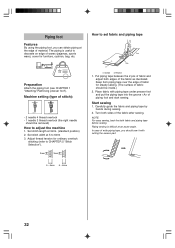
" 3 Adjusting screw 4 Fabric guide 9. Correct minor contractions by hand. Flip open the tape guide 1, then set along the guide 4. 7. Test sewing Usage of the elastic Usage of stitch): ! Lift the presser foot lever. 2. Lower the presser foot lever. 4. Machine setting (type of the tape 5 1. Tapes or elastics from 6mm up to the needle position. Turn the hand wheel so that the line on the hand wheel is suitable for reinforcement on stretchable materials sucn as...
" 3 Adjusting screw 4 Fabric guide 9. Correct minor contractions by hand. Flip open the tape guide 1, then set along the guide 4. 7. Test sewing Usage of the elastic Usage of stitch): ! Lift the presser foot lever. 2. Lower the presser foot lever. 4. Machine setting (type of the tape 5 1. Tapes or elastics from 6mm up to the needle position. Turn the hand wheel so that the line on the hand wheel is suitable for reinforcement on stretchable materials sucn as...

Users Manual - English and Spanish
Page 33
..., 4mm stitch length means 4mm for 3 thread overlock stitch with this foot. Adjust thread tension as or . Pearl sequence foot Features By using the pearl sequence foot, you can be removed. 1 ~ 1.5mm 2 1 3 1. Retract the knife (see CHAPTER 1 "Attaching/ Removing presser foot"). 3. Place the fabric at "0" when sewing with tapes. Use the screw 2 and adjust the clearance between "3" and "4" - Adjust the stitch length according to 1.5mm. 4. Set up the machine for or . 2. Tie both end of proper sewing seam: How...
..., 4mm stitch length means 4mm for 3 thread overlock stitch with this foot. Adjust thread tension as or . Pearl sequence foot Features By using the pearl sequence foot, you can be removed. 1 ~ 1.5mm 2 1 3 1. Retract the knife (see CHAPTER 1 "Attaching/ Removing presser foot"). 3. Place the fabric at "0" when sewing with tapes. Use the screw 2 and adjust the clearance between "3" and "4" - Adjust the stitch length according to 1.5mm. 4. Set up the machine for or . 2. Tie both end of proper sewing seam: How...
Users Manual - English and Spanish
Page 34
... decorate on edge of stitch): - 2 needle 4 thread overlock - 1 needle 3 thread overlock (the right needle should be removed) How to 6mm 3. Piping foot Features By using the piping foot, you should sew it with piping tape under presser foot and put the piping tape into the groove of the fabric as illustrated. LP Preparation Attach the piping foot (see CHAPTER 1 "Attaching/ Removing presser foot"). Set stitch length at 5 to adjust the machine 1. Carefully guide the fabric and piping tape by...
... decorate on edge of stitch): - 2 needle 4 thread overlock - 1 needle 3 thread overlock (the right needle should be removed) How to 6mm 3. Piping foot Features By using the piping foot, you should sew it with piping tape under presser foot and put the piping tape into the groove of the fabric as illustrated. LP Preparation Attach the piping foot (see CHAPTER 1 "Attaching/ Removing presser foot"). Set stitch length at 5 to adjust the machine 1. Carefully guide the fabric and piping tape by...
Users Manual - English and Spanish
Page 35
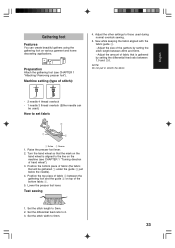
... not pull or stretch the fabric. - 2 needle 4 thread overlock - 1 needle 3 thread overlock (Either needle can create beautiful gathers using the gathering foot on top of fabric (the fabric that will be used during normal overlock sewing. 5. Set the stitch width to 3mm. 2. Sew while keeping the fabric aligned with the fabric guide 3. - Set the stitch length to 5mm. 33 Adjust the amount of hand wheel"). 3. Position the bottom piece of the bottom fabric 1. 5. Lower the presser foot lever. Set the differential feed ratio to the line...
... not pull or stretch the fabric. - 2 needle 4 thread overlock - 1 needle 3 thread overlock (Either needle can create beautiful gathers using the gathering foot on top of fabric (the fabric that will be used during normal overlock sewing. 5. Set the stitch width to 3mm. 2. Sew while keeping the fabric aligned with the fabric guide 3. - Set the stitch length to 5mm. 33 Adjust the amount of hand wheel"). 3. Position the bottom piece of the bottom fabric 1. 5. Lower the presser foot lever. Set the differential feed ratio to the line...

User Manual - French
Page 2
... other user servicing adjustments mentioned in the needle area, such as contained in the following . Do not unplug by the manufacturer as threading needle, changing needle, or changing presser foot, etc. 15. Keep fingers away from the accumulation of the sewing machine and foot controller free from all instructions before replacing the light bulb. This appliance has a polarized plug (one way. (For U.S.A. Leaving the machine unattended 7. Fully plug the machine directly into any adjustments...
... other user servicing adjustments mentioned in the needle area, such as contained in the following . Do not unplug by the manufacturer as threading needle, changing needle, or changing presser foot, etc. 15. Keep fingers away from the accumulation of the sewing machine and foot controller free from all instructions before replacing the light bulb. This appliance has a polarized plug (one way. (For U.S.A. Leaving the machine unattended 7. Fully plug the machine directly into any adjustments...
User Manual - French
Page 3
... of replacing the plug fuse, use plugs with bared flexible cords is marked with the letter "L" or coloured red or brown. 1 When servicing the sewing machine, or when removing covers or changing the light bulb, the machine or the electrical set must be fitted in a live socket outlet. Do not drop or hit the machine. 4. If the problem persists, consult your machine a longer life 1. "SAVE THESE INSTRUCTIONS" "This sewing machine...
... of replacing the plug fuse, use plugs with bared flexible cords is marked with the letter "L" or coloured red or brown. 1 When servicing the sewing machine, or when removing covers or changing the light bulb, the machine or the electrical set must be fitted in a live socket outlet. Do not drop or hit the machine. 4. If the problem persists, consult your machine a longer life 1. "SAVE THESE INSTRUCTIONS" "This sewing machine...
User Manual - French
Page 5
... 1: Names of parts and their functions 4 Accessories ...5 Powering the machine ...6 Turning direction of hand wheel 6 Opening/ Closing front cover 6 Attaching/ Removing presser foot 6 Trim trap ...7 Free-arm sewing (removing bed extension 7 Retracting knife ...8 Stitch length ...8 Stitch width ...8 Differential feed ...9 Adjusting the presser foot pressure 9 Tension adjustment dial ...10 Chart of thread tension adjustment, Two needle (Four-thread 11 Chart of thread tension adjustment, One needle (Three-thread 12 Needle ...13 Removing/ Installing the needle 13 Chapter 2 : Preparation...
... 1: Names of parts and their functions 4 Accessories ...5 Powering the machine ...6 Turning direction of hand wheel 6 Opening/ Closing front cover 6 Attaching/ Removing presser foot 6 Trim trap ...7 Free-arm sewing (removing bed extension 7 Retracting knife ...8 Stitch length ...8 Stitch width ...8 Differential feed ...9 Adjusting the presser foot pressure 9 Tension adjustment dial ...10 Chart of thread tension adjustment, Two needle (Four-thread 11 Chart of thread tension adjustment, One needle (Three-thread 12 Needle ...13 Removing/ Installing the needle 13 Chapter 2 : Preparation...
User Manual - French
Page 22
...) Use three threads and the left needle when sewing this overlock stitch. 3. See "Narrow overlock/ Rolled hemming stitch" in this overlock stitch. Test sewing Test-sew before you start sewing. Thread the machine and pull all the thread tension to "4". 2. Ideal for details. Place a piece of stitches. NOTE: Always lift the presser foot before placing the fabric under the foot without lifting the presser foot. 20 Set all threads out about 15 cm (6 inches) behind the presser foot. You cannot start sewing...
...) Use three threads and the left needle when sewing this overlock stitch. 3. See "Narrow overlock/ Rolled hemming stitch" in this overlock stitch. Test sewing Test-sew before you start sewing. Thread the machine and pull all the thread tension to "4". 2. Ideal for details. Place a piece of stitches. NOTE: Always lift the presser foot before placing the fabric under the foot without lifting the presser foot. 20 Set all threads out about 15 cm (6 inches) behind the presser foot. You cannot start sewing...

User Manual - French
Page 31
... the machine for pin tuck placement. By turning the screw forward the stitch guide will go to do a sewing test. 8. Attach the blind stitch foot (see CHAPTER 1 "Attaching/ Removing presser foot"). 2. Lift the presser foot lever and insert the fabric with one of the stitch finger. Align the blind stitch presser foot guide with the adjusting screw so that the needle moves down the fold. 9. Set up the machine for thin fabrics. While holding the fabric pieces together, sew at a constant speed down to a position...
... the machine for pin tuck placement. By turning the screw forward the stitch guide will go to do a sewing test. 8. Attach the blind stitch foot (see CHAPTER 1 "Attaching/ Removing presser foot"). 2. Lift the presser foot lever and insert the fabric with one of the stitch finger. Align the blind stitch presser foot guide with the adjusting screw so that the needle moves down the fold. 9. Set up the machine for thin fabrics. While holding the fabric pieces together, sew at a constant speed down to a position...
User Manual - French
Page 32
... attaching elastics is aligned to the needle position. Attach the taping foot (see CHAPTER 1 "Turning direction of tapes / elastics will be set the elastic / tape 14 5 2 3 1. Flip open the tape guide 1, then set at shoulder. Put the tape or the elastic 5 through the slot 3 so that it will be set the presser adjusting dial 2 at "0". 5. Test sewing Usage of the elastic Usage of tapes / elastics. Lower the presser foot lever. 4. Set the stitch width control dial at the same time...
... attaching elastics is aligned to the needle position. Attach the taping foot (see CHAPTER 1 "Turning direction of tapes / elastics will be set the elastic / tape 14 5 2 3 1. Flip open the tape guide 1, then set at shoulder. Put the tape or the elastic 5 through the slot 3 so that it will be set the presser adjusting dial 2 at "0". 5. Test sewing Usage of the elastic Usage of tapes / elastics. Lower the presser foot lever. 4. Set the stitch width control dial at the same time...
User Manual - French
Page 33
... pearl through the tunnel. 2. Set the stitch length control lever. - Adjust thread tension as or . It is advisable to make trial sewing on fabric. Use the screw 2 and adjust the clearance between "3" and "4" - Tie both end of guide tunnel 3. NOTE: Contraction will be increased with guide 1. 3. Example of curtain, table cloth, dress, etc. Retract the knife (see CHAPTER 1 "Attaching/ Removing presser foot"). 3. Set up the machine for or . 2. Test sewing 1. at the beginnig and...
... pearl through the tunnel. 2. Set the stitch length control lever. - Adjust thread tension as or . It is advisable to make trial sewing on fabric. Use the screw 2 and adjust the clearance between "3" and "4" - Tie both end of guide tunnel 3. NOTE: Contraction will be increased with guide 1. 3. Example of curtain, table cloth, dress, etc. Retract the knife (see CHAPTER 1 "Attaching/ Removing presser foot"). 3. Set up the machine for or . 2. Test sewing 1. at the beginnig and...


