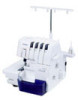
Brother International 3034D Support Question
Brother International 3034D Support Question
Find answers below for this question about Brother International 3034D.Need a Brother International 3034D manual? We have 2 online manuals for this item!
Question posted by laurenvcraig on January 7th, 2013
Re-installing The Stitch Finger To A Brother 3034d
I can not put my stitch finger back into the machine. I followed the directions in reverse as to how to remove, but it just keeps falling out. I just purchased my machine a few weeks ago. I have looked at online chats and all the solutions I saw involved using a lever just near the stitch finger, but my machine does not have a lever.
Current Answers
Related Brother International 3034D Manual Pages
Users Manual - English and Spanish - Page 2

... not pull or push fabric while stitching. CAUTION
To use extension cords. 9. When you are using the machine - If you are checking or cleaning the machine - Fully plug the machine directly into any object into the wall. Do not use the machine safely
1. Do not touch the cord with this sewing machine from the electrical outlet immediately after...
Users Manual - English and Spanish - Page 4
... its performance. It is 1,300 stitches per minute for the ordinary foot-operated sewing machine.
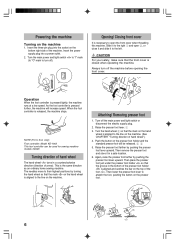
- Enjoy yourself! Notes on the side opposite the hand wheel.
CAUTION When threading, replacing needle or light bulb, the main power and light switch of service. When the machine is running, sparks can be removed from the air openings on...
Users Manual - English and Spanish - Page 8

... is pressed further, the machine will be used for sewing machine models 3034D.
As the foot controller is pressed lightly, the machine runs at a low speed. Turn off ). Raise the presser foot lever. 1 3. Again, raise the presser foot farther by pushing the presser foot lever upward. Then place the presser foot just under the presser foot...
Users Manual - English and Spanish - Page 9
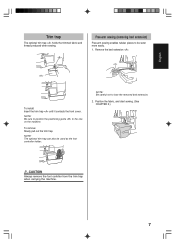
...: The optional trim trap can also be sewn more easily. 1. Position the fabric, and start sewing. (See CHAPTER 5.)
CAUTION
Always remove the foot contrller from the trim trap when carrying the machine.
7 To install: Insert the trim trap until it contacts the front cover. NOTE: Be sure to position the positioning guide to lose...
Users Manual - English and Spanish - Page 15
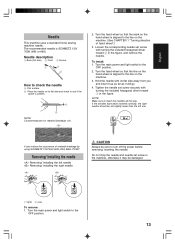
... 2 Loosen
To remove: 1. Removing/ Installing the needle
Removing/ installing the left one. Hold the needle with turning the included hexagonal driver toward 1 in the machine, otherwise it will go.
4.
Turn the hand wheel so that the mark on the hand wheel is SCHMETZ 130/ 705H (#80 or #90). English
Needle
This machine uses a standard home sewing machine needle.
NOTE...
Users Manual - English and Spanish - Page 22

... left needle when sewing this overlock stitch.
NOTE: You can sew five different stitches by just running the fabric under it. Thread the machine and pull all the thread tension to "4". 2.
You cannot start sewing by following the simple steps below:
Four-thread overlock stitch
Use all four threads and two needles for sewing knits and wovens. NOTE: Remove the right...
Users Manual - English and Spanish - Page 25

... a three thread overlock, using the 3-thread overlock stitch. To sew fine materials
1. Thread the machine for both narrow overlock/ Rolled hemming stitches
CAUTION
Turn off the main power and light switch before removing/ installing a needle.
1. English
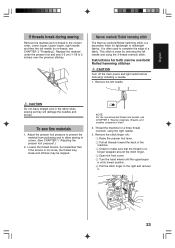
If threads break during sewing
Remove the material and re-thread in the fabric when sewing as they will damage the needles and...
Users Manual - English and Spanish - Page 26
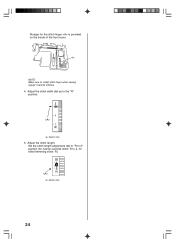
...length adjustment dial to "R to 2" position (for narrow overlock stitch: R to 2, for the stitch finger is provided on the inside of the front cover. Storage for rolled hemming stitch: R). 3
Selection mark
24 Adjust the stitch width dial up to install stitch finger when sewing regular overlock stitches. 4. Selection mark
5. Adjust the stitch length. NOTE: Make sure to the "R" position.
Users Manual - English and Spanish - Page 28

... 13.)
2. Thread tangled
Do not press or pull material too hard when sewing. and remove tangled thread.
3. However, the following chart indicates trouble which may occur if basic adjustments are not adjusted properly
1. Thread tension too tight 4. Needles incorrectly installed 5. Skipped stitches
1. Schmetz 130/705H - suggested (See page 13.)
4. Presser foot pressure too...
Users Manual - English and Spanish - Page 30

.... 8.
Needle Thread Tension: 0-3 -
The stitch guide on this stitch will be removed. 3. Blind stitching
The blind hem stitch is ironed into the folded fabric before sewing. 4. Attach the blind stitch foot (see CHAPTER 1 "Turning direction of the fabric is lightly touching the crease in such a way that the needle pierces just the folded edge as shown in a color that...
Users Manual - English and Spanish - Page 31
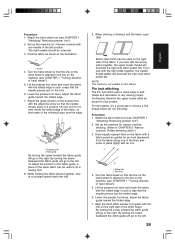
... the machine (see CHAPTER 1 "Turning direction of the same fabric can be used to your project. Turn the hand wheel so that the needle pierces just on the hand wheel is aligned to the left . Contrasting thread in such a way that the line on the fold.
6. Attach the blind stitch foot (see CHAPTER 1
"Attaching/ Removing...
User Manual - French - Page 2

... 7. If you are using the machine - Keep fingers away from the electrical outlet immediately after using and before cleaning.
2. Do not disassenble the machine. If you notice any adjustments in the needle area, such as
contained in this sewing machine from all instructions before replacing the light bulb. Fully plug the machine directly into any way. 5. Read all...
User Manual - French - Page 4

... recommended that you need more information regarding the use product. Continuous operation of the machines normal operation.
2 It is disconnected from the socket-outlet. If you study this sewing machine is 1,300 stitches per minute for the ordinary foot-operated sewing machine.
- CAUTION When threading, replacing needle or light bulb, the main power and light switch...
User Manual - French - Page 8
...2 4 Turning direction of hand wheel
The hand wheel turns in the bottom of the presser foot holder is pressed further, the machine will be used for sewing machine models 3034D. Raise the ... the hand
wheel is the same direction as an ordinary home sewing machine.
CAUTION
For your safety, make sure that the mark on the machine.
2
Attaching/ Removing presser foot
1. NOTE (For U.S.A....
User Manual - French - Page 9

... .
Position the fabric, and start sewing. (See CHAPTER 5.)
CAUTION
Always remove the foot contrller from the trim trap when carrying the machine.
7 Free-arm sewing (removing bed extension)
Free-arm sewing enables tubular pieces to be used as the foot controller holder. To remove: Slowly pull out the trim trap. To install: Insert the trim trap until it...
User Manual - French - Page 15

... .
2. To install: 1. It can reduce the occurrence of hand wheel".)
3. English
Needle
This machine uses a standard home sewing machine needle. Hold the needle with its flat side and check to turn off the power before removing/ inserting the needle. Turn the main power and light switch to the line on the machine. (See CHAPTER 1 "Turning direction of...
User Manual - French - Page 25
... the stitch finger to complete the edge of a fabric. NOTE: For the recommended thread and needle, see CHAPTER 3 "Threading"). Thread the machine for both narrow overlock/ Rolled hemming stitches
CAUTION
Turn off the main power and light switch before removing/ installing a needle.
1.
Replace the material under the presser foot and sew 3-5 cm (1-1/8 to midweight fabrics. This stitch is...
User Manual - French - Page 26

...length.
Storage for rolled hemming stitch: R). 3
Selection mark
24 Adjust the stitch width dial up to install stitch finger when sewing regular overlock stitches. 4. Set the stitch length adjustment dial to "R to 2" position (for narrow overlock stitch: R to 2, for the stitch finger is provided on the inside of the front cover. Selection mark
5. NOTE: Make sure to the "R" position...
User Manual - French - Page 28

... or thread tangled
Thread correctly. (See pages 15-18.)
26 CHAPTER 6 TROUBLESHOOTING
This sewing machine is puckered
5.
Needles incorrectly installed
Install needles correctly. (See page 13.)
3.
Improper threading
Use correct needle. Improper threading 2. However, the following chart indicates trouble which may occur if basic adjustments are not uniform 6. Wrong...
User Manual - French - Page 31

... 2 Fold in the upper looper adds an accent to any sewing project. Draw equally spaced lines on the machine (see CHAPTER 1 "Turning direction of the same fabric can be used to 3.0 mm) inside the folded edge of the fabric, so that some of the stitch finger. Fold the fabric as guides for 3 thread overlock with...
Similar Questions

Looking For Service Manual Of Brother 3034d
Hi,I have searched everywhere for the service manual of Brother 3034D Overlock machine. May I know w...
Hi,I have searched everywhere for the service manual of Brother 3034D Overlock machine. May I know w...
(Posted by margaretvlng 3 years ago)

Where Is A Parts Guide Or Service Manual For Brother Jx2517 Sewing Machine?
the inside of my brother JX2517 sewing machine broke. Its a plastic piece,gear, at end by the needle...
the inside of my brother JX2517 sewing machine broke. Its a plastic piece,gear, at end by the needle...
(Posted by Discogypsy 9 years ago)

Overclock machine replacement
where I can buy the upper looper machine overlock3034D THANKS
where I can buy the upper looper machine overlock3034D THANKS
(Posted by lilianmarleneruiz 10 years ago)

Does Anyone Know Where I Can Purchase The Trim Catcher For The 3034d?
I am looking to purchase the trim catcher or trap for the Brother serger Lock 3034D. I have tried a ...
I am looking to purchase the trim catcher or trap for the Brother serger Lock 3034D. I have tried a ...
(Posted by donnamarienakos 11 years ago)

What Model Number Bobbins Should Be Used On Brother Sc9500 Sewing Machine
Please provide me with the model/style bobbin that fits on a Brother SC9500 sewing machine. Thanks.
Please provide me with the model/style bobbin that fits on a Brother SC9500 sewing machine. Thanks.
(Posted by ezth2 11 years ago)