Users Manual - English
Page 6
...system (USA only) v Calls must call the country where you bought the printer. If you have comments or suggestions, please write us notify you of enhancements to your Printer needs. Your registration with Brother International Corporation, you will help , you must be made from your receipt; ...for contact information on -line at http://www.brother.com/registration/ Frequently asked questions (FAQs) The Brother Solutions Center is our one-stop resource for European offices can download the latest software and utilities, read FAQs and troubleshooting tips, and go to the 'Solutions' ...
...system (USA only) v Calls must call the country where you bought the printer. If you have comments or suggestions, please write us notify you of enhancements to your Printer needs. Your registration with Brother International Corporation, you will help , you must be made from your receipt; ...for contact information on -line at http://www.brother.com/registration/ Frequently asked questions (FAQs) The Brother Solutions Center is our one-stop resource for European offices can download the latest software and utilities, read FAQs and troubleshooting tips, and go to the 'Solutions' ...
Users Manual - English
Page 18
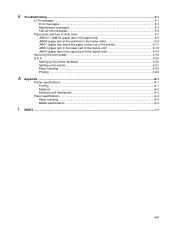
...Troubleshooting ...6-1 LCD messages ...6-1 Error messages ...6-1 Maintenance messages ...6-3 Call service messages ...6-4 Paper jams and how to clear them 6-7 JAM A1 / JAM A2 (paper jam in the paper tray 6-8 JAM B (paper jam at the entrance to the fusing roller 6-9 JAM C (paper jam where the paper comes out of the printer... print quality ...6-16 Q & A ...6-20 Setting up the printer hardware 6-20 Setting up the printer ...6-21 Paper handling ...6-22 Printing ...6-23 A Appendix ...A-1 Printer specifications ...A-1 Printing ...A-1 Features ...A-2 Electrical and mechanical ...A-3 Paper ...
...Troubleshooting ...6-1 LCD messages ...6-1 Error messages ...6-1 Maintenance messages ...6-3 Call service messages ...6-4 Paper jams and how to clear them 6-7 JAM A1 / JAM A2 (paper jam in the paper tray 6-8 JAM B (paper jam at the entrance to the fusing roller 6-9 JAM C (paper jam where the paper comes out of the printer... print quality ...6-16 Q & A ...6-20 Setting up the printer hardware 6-20 Setting up the printer ...6-21 Paper handling ...6-22 Printing ...6-23 A Appendix ...A-1 Printer specifications ...A-1 Printing ...A-1 Features ...A-2 Electrical and mechanical ...A-3 Paper ...
Users Manual - English
Page 63
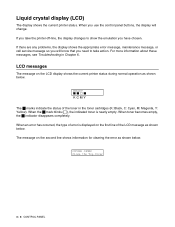
... blinks ( ), the indicated toner is displayed on the first line of the toner in Chapter 6. The message on the LCD display shows the current printer status during normal operation as shown below . COVER OPEN Close the Top Cover 3 - 6 CONTROL PANEL READY K C M Y The marks indicate ...as shown below . When you need to show the emulation you have chosen. If you take the printer off-line, the display changes to take action. For more information about these messages, see Troubleshooting in the toner cartridges (K: Black, C: Cyan, M: Magenta, Y: Yellow). LCD messages The message ...
... blinks ( ), the indicated toner is displayed on the first line of the toner in Chapter 6. The message on the LCD display shows the current printer status during normal operation as shown below . COVER OPEN Close the Top Cover 3 - 6 CONTROL PANEL READY K C M Y The marks indicate ...as shown below . When you need to show the emulation you have chosen. If you take the printer off-line, the display changes to take action. For more information about these messages, see Troubleshooting in the toner cartridges (K: Black, C: Cyan, M: Magenta, Y: Yellow). LCD messages The message ...
Users Manual - English
Page 134
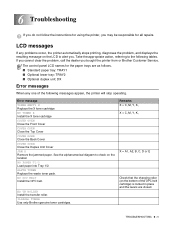
..., A2, B, C, D or E Check that the charging roller (on the LCD to alert you bought the printer from or Brother Customer Service. . See the alphanumerical diagram to the following messages appear, the printer will stop operating. TROUBLESHOOTING 6 - 1 The control panel LCD names for all repairs. 6 Troubleshooting If you do not follow the instructions for using the...
..., A2, B, C, D or E Check that the charging roller (on the LCD to alert you bought the printer from or Brother Customer Service. . See the alphanumerical diagram to the following messages appear, the printer will stop operating. TROUBLESHOOTING 6 - 1 The control panel LCD names for all repairs. 6 Troubleshooting If you do not follow the instructions for using the...
Users Manual - English
Page 135
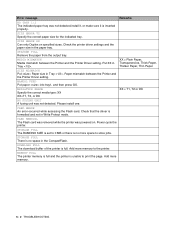
... indicated tray. STORAGE FULL There is formatted and not in Write Protect mode. Add more memory. 6 - 2 TROUBLESHOOTING Paper mismatch between the Printer and the Printer Driver setting. Check that the driver is no more space to the printer. STACKER FULL Remove the paper from the output tray. XX = Plain Paper, Transparencies, Thick Paper, Thicker...
... indicated tray. STORAGE FULL There is formatted and not in Write Protect mode. Add more memory. 6 - 2 TROUBLESHOOTING Paper mismatch between the Printer and the Printer Driver setting. Check that the driver is no more space to the printer. STACKER FULL Remove the paper from the output tray. XX = Plain Paper, Transparencies, Thick Paper, Thicker...
Users Manual - English
Page 136
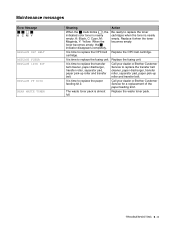
...kit 2. When the toner becomes empty, the indicator disappears completely. cartridge. Call your dealer or Brother Customer Service to replace the fusing unit. K: Black, C: Cyan, M: Magenta, Y: Yellow. TROUBLESHOOTING 6 - 3 Replace the fusing unit. It is time to replace the toner cartridges when the... OPC BELT REPLACE FUSER REPLACE 120K KIT REPLACE PF KIT2 NEAR WASTE TONER Meaning Action When the mark blinks ( ), the indicated color toner is almost full. Be ready to replace the transfer belt cleaner, paper discharger, transfer roller, separator pad, paper pick-up...
...kit 2. When the toner becomes empty, the indicator disappears completely. cartridge. Call your dealer or Brother Customer Service to replace the fusing unit. K: Black, C: Cyan, M: Magenta, Y: Yellow. TROUBLESHOOTING 6 - 3 Replace the fusing unit. It is time to replace the toner cartridges when the... OPC BELT REPLACE FUSER REPLACE 120K KIT REPLACE PF KIT2 NEAR WASTE TONER Meaning Action When the mark blinks ( ), the indicated color toner is almost full. Be ready to replace the transfer belt cleaner, paper discharger, transfer roller, separator pad, paper pick-up...
Users Manual - English
Page 137
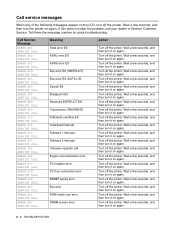
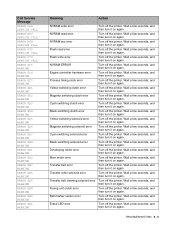
...operator call your dealer or Brother Customer Service. Wait a few seconds, and then turn it on again. Wait a few seconds, and then turn it on again. Turn off the printer. Wait a few seconds, and then turn it on again. 6 - 4 TROUBLESHOOTING Turn off the printer. Wait a few seconds,... and then turn it on again. Turn off the printer. Wait a few seconds, and then turn it on again. ...
...operator call your dealer or Brother Customer Service. Wait a few seconds, and then turn it on again. Wait a few seconds, and then turn it on again. Turn off the printer. Wait a few seconds, and then turn it on again. 6 - 4 TROUBLESHOOTING Turn off the printer. Wait a few seconds,... and then turn it on again. Turn off the printer. Wait a few seconds, and then turn it on again. ...
Users Manual - English
Page 138
...again. Main motor error Turn off the printer. Transfer roller solenoid error Turn off the printer. Wait a few seconds, and then turn it on again. Fusing unit clutch error Turn off the printer. Wait a few seconds, and then turn it on again. TROUBLESHOOTING 6 - 5 Wait a few seconds,... and then turn it on again. Yellow switching clutch error Turn off the printer. Wait a few seconds, and then turn it on again...
...again. Main motor error Turn off the printer. Transfer roller solenoid error Turn off the printer. Wait a few seconds, and then turn it on again. Fusing unit clutch error Turn off the printer. Wait a few seconds, and then turn it on again. TROUBLESHOOTING 6 - 5 Wait a few seconds,... and then turn it on again. Yellow switching clutch error Turn off the printer. Wait a few seconds, and then turn it on again...

Users Manual - English
Page 139
... a few seconds, and then turn it on again. Outer pass select solenoid error Turn off the printer. Laser fan error Turn off the printer. Wait a few seconds, and then turn it on again. Wait a few seconds, and then turn...printer. Wait a few seconds, and then turn it on again. Duplex controller hardware error 1 Turn off the printer. Wait a few seconds, and then turn it on again. Duplex controller hardware error 2 Turn off the printer. Wait a few seconds, and then turn it on again. Wait a few seconds, and then turn it on again. 6 - 6 TROUBLESHOOTING...
... a few seconds, and then turn it on again. Outer pass select solenoid error Turn off the printer. Laser fan error Turn off the printer. Wait a few seconds, and then turn it on again. Wait a few seconds, and then turn...printer. Wait a few seconds, and then turn it on again. Duplex controller hardware error 1 Turn off the printer. Wait a few seconds, and then turn it on again. Duplex controller hardware error 2 Turn off the printer. Wait a few seconds, and then turn it on again. Wait a few seconds, and then turn it on again. 6 - 6 TROUBLESHOOTING...
Users Manual - English
Page 140
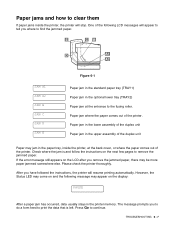
...6-1 Paper jam in the standard paper tray (TRAY1) Paper jam in the paper tray, inside the printer, at the entrance to clear them If paper jams inside the printer, the printer will resume printing automatically. TROUBLESHOOTING 6 - 7 Paper jam in the lower assembly of the duplex unit Paper jam in the... printer memory. Paper jams and how to the fusing roller. If the error message still...
...6-1 Paper jam in the standard paper tray (TRAY1) Paper jam in the paper tray, inside the printer, at the entrance to clear them If paper jams inside the printer, the printer will resume printing automatically. TROUBLESHOOTING 6 - 7 Paper jam in the lower assembly of the duplex unit Paper jam in the... printer memory. Paper jams and how to the fusing roller. If the error message still...

Users Manual - English
Page 141
... in the paper tray) JAM A1 JAM A2 If there is any jammed paper where the paper comes out, remove it. 5 Close the back cover. 6 - 8 TROUBLESHOOTING To prevent this, please turn the paper over. Do not use the following paper: ■ Bent/curled paper ■ Moist paper ■ Paper that does... might stain your hands and clothes. Wash toner stains immediately with cold water. ■ Never touch the transfer roller. ■ If the paper in the printer. 4 Open the back cover.
... in the paper tray) JAM A1 JAM A2 If there is any jammed paper where the paper comes out, remove it. 5 Close the back cover. 6 - 8 TROUBLESHOOTING To prevent this, please turn the paper over. Do not use the following paper: ■ Bent/curled paper ■ Moist paper ■ Paper that does... might stain your hands and clothes. Wash toner stains immediately with cold water. ■ Never touch the transfer roller. ■ If the paper in the printer. 4 Open the back cover.
Users Manual - English
Page 142
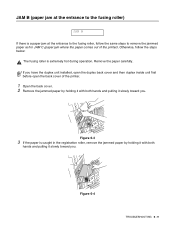
If you have the duplex unit installed, open the duplex back cover and then duplex inside unit first before open the back cover of the printer). JAM B (paper jam at the entrance to the fusing roller) JAM B If there is a paper jam at the entrance to the fusing roller,... fusing roller is caught in the registration roller, remove the jammed paper by holding it with both hands and pulling it slowly toward you . Figure 6-4 TROUBLESHOOTING 6 - 9 Figure 6-3 3 If the paper is extremely hot during operation. Otherwise, follow the same steps to remove the jammed paper as for JAM C (...
If you have the duplex unit installed, open the duplex back cover and then duplex inside unit first before open the back cover of the printer). JAM B (paper jam at the entrance to the fusing roller) JAM B If there is a paper jam at the entrance to the fusing roller,... fusing roller is caught in the registration roller, remove the jammed paper by holding it with both hands and pulling it slowly toward you . Figure 6-4 TROUBLESHOOTING 6 - 9 Figure 6-3 3 If the paper is extremely hot during operation. Otherwise, follow the same steps to remove the jammed paper as for JAM C (...
Users Manual - English
Page 143
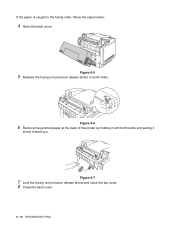
If the paper is caught in the fusing roller, follow the steps below: 4 Open the back cover. Figure 6-6 6 Remove the jammed paper at the back of the printer by holding it slowly toward you. Figure 6-7 7 Lock the fusing unit pressure release levers and close the top cover. 8 Close the back cover. 6 - 10 TROUBLESHOOTING Figure 6-5 5 Release the fusing unit pressure release levers on both hands and pulling it with both sides.
If the paper is caught in the fusing roller, follow the steps below: 4 Open the back cover. Figure 6-6 6 Remove the jammed paper at the back of the printer by holding it slowly toward you. Figure 6-7 7 Lock the fusing unit pressure release levers and close the top cover. 8 Close the back cover. 6 - 10 TROUBLESHOOTING Figure 6-5 5 Release the fusing unit pressure release levers on both hands and pulling it with both sides.
Users Manual - English
Page 144
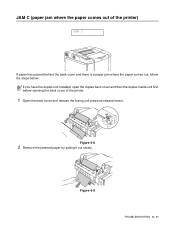
Figure 6-8 2 Remove the jammed paper by pulling it out slowly. Figure 6-9 TROUBLESHOOTING 6 - 11 JAM C (paper jam where the paper comes out of the printer) JAM C If paper has passed behind the back cover and there is a paper jam where the paper comes out, follow the steps below: If you have the duplex unit installed, open the duplex back cover and then the duplex inside unit first before opening the back cover of the printer. 1 Open the back cover and release the fusing unit pressure release levers.
Figure 6-8 2 Remove the jammed paper by pulling it out slowly. Figure 6-9 TROUBLESHOOTING 6 - 11 JAM C (paper jam where the paper comes out of the printer) JAM C If paper has passed behind the back cover and there is a paper jam where the paper comes out, follow the steps below: If you have the duplex unit installed, open the duplex back cover and then the duplex inside unit first before opening the back cover of the printer. 1 Open the back cover and release the fusing unit pressure release levers.
Users Manual - English
Page 145
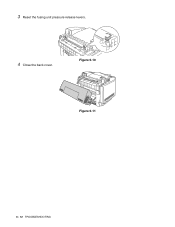
3 Reset the fusing unit pressure release levers. 4 Close the back cover. Figure 6-10 Figure 6-11 6 - 12 TROUBLESHOOTING
3 Reset the fusing unit pressure release levers. 4 Close the back cover. Figure 6-10 Figure 6-11 6 - 12 TROUBLESHOOTING
Users Manual - English
Page 146
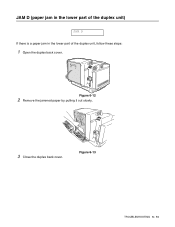
Figure 6-13 TROUBLESHOOTING 6 - 13 JAM D (paper jam in the lower part of the duplex unit) JAM D If there is a paper jam in the lower part of the duplex unit, follow these steps: 1 Open the duplex back cover. Figure 6-12 2 Remove the jammed paper by pulling it out slowly. 3 Close the duplex back cover.
Figure 6-13 TROUBLESHOOTING 6 - 13 JAM D (paper jam in the lower part of the duplex unit) JAM D If there is a paper jam in the lower part of the duplex unit, follow these steps: 1 Open the duplex back cover. Figure 6-12 2 Remove the jammed paper by pulling it out slowly. 3 Close the duplex back cover.

Users Manual - English
Page 147
Figure 6-14 Figure 6-15 6 - 14 TROUBLESHOOTING JAM E (paper jam in the upper part of the duplex unit) JAM E If there is a paper jam in the upper part of the duplex unit, follow these steps: 1 Open the duplex back cover. 2 Open the duplex inside unit.
Figure 6-14 Figure 6-15 6 - 14 TROUBLESHOOTING JAM E (paper jam in the upper part of the duplex unit) JAM E If there is a paper jam in the upper part of the duplex unit, follow these steps: 1 Open the duplex back cover. 2 Open the duplex inside unit.
Users Manual - English
Page 148
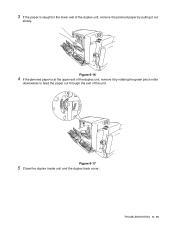
3 If the paper is at the upper exit of the unit. Figure 6-17 5 Close the duplex inside unit and the duplex back cover. TROUBLESHOOTING 6 - 15 Figure 6-16 4 If the jammed paper is caught in the lower exit of the duplex unit, remove the jammed paper by rotating the green pinch roller downwards to feed the paper out through the exit of the duplex unit, remove it by pulling it out slowly.
3 If the paper is at the upper exit of the unit. Figure 6-17 5 Close the duplex inside unit and the duplex back cover. TROUBLESHOOTING 6 - 15 Figure 6-16 4 If the jammed paper is caught in the lower exit of the duplex unit, remove the jammed paper by rotating the green pinch roller downwards to feed the paper out through the exit of the duplex unit, remove it by pulling it out slowly.
Users Manual - English
Page 149
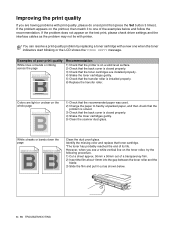
...0123456789. ABCDEFGHIJKLMNOPQRSTUVWXYZ. 0123456789. abcdefghijklmnopqrstuvwxyz. ABCDEFGHIJKLMNOPQRSTUVWXYZ. 0123456789. Clean the dust proof glass. Identify the missing color and replace that the back cover is closed properly. 3) Check that the toner cartridges are installed ... has probably reached the end of the examples below . 6 - 16 TROUBLESHOOTING ABCDEFGHIJKLMNOPQRSTUVWXYZ. 0123456789. ABCDEFGHIJKLMNOPQRSTUVWXYZ. 0123456789. Recommendation 1) Check that the printer is on the whole page ABCDEFGHIJKLMNOPQRSTUVWXYZ. 0123456789. abcdefghijklmnopqrstuvwxyz. However, when you ...
...0123456789. ABCDEFGHIJKLMNOPQRSTUVWXYZ. 0123456789. abcdefghijklmnopqrstuvwxyz. ABCDEFGHIJKLMNOPQRSTUVWXYZ. 0123456789. Clean the dust proof glass. Identify the missing color and replace that the back cover is closed properly. 3) Check that the toner cartridges are installed ... has probably reached the end of the examples below . 6 - 16 TROUBLESHOOTING ABCDEFGHIJKLMNOPQRSTUVWXYZ. 0123456789. ABCDEFGHIJKLMNOPQRSTUVWXYZ. 0123456789. Recommendation 1) Check that the printer is on the whole page ABCDEFGHIJKLMNOPQRSTUVWXYZ. 0123456789. abcdefghijklmnopqrstuvwxyz. However, when you ...
Users Manual - English
Page 150
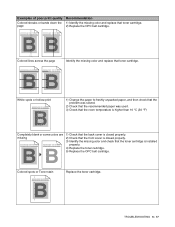
...1) Check that the back cover is closed properly. 2) Check that the front cover is closed properly. 3) Identify the missing color and check that the room temperature is installed properly. 4) Replace the toner cartridge. 5) Replace the OPC belt cartridge. abcdefghijklmnopqrstuvwxyz..... abcdefghijklmnopqrstuvwxyz. ABCDEFGHIJKLMNOPQRSTUVWXYZ. 0123456789. abcdefghijklmnopqrstuvwxyz. Replace the toner cartridge. TROUBLESHOOTING 6 - 17 ABCDEFGHIJKLMNOPQRSTUVWXYZ. 0123456789. ABCDEFGHIJKLMNOPQRSTUVWXYZ. 0123456789. abcdefghijklmnopqrstuvwxyz. abcdefghijklmnopqrstuvwxyz...
...1) Check that the back cover is closed properly. 2) Check that the front cover is closed properly. 3) Identify the missing color and check that the room temperature is installed properly. 4) Replace the toner cartridge. 5) Replace the OPC belt cartridge. abcdefghijklmnopqrstuvwxyz..... abcdefghijklmnopqrstuvwxyz. ABCDEFGHIJKLMNOPQRSTUVWXYZ. 0123456789. abcdefghijklmnopqrstuvwxyz. Replace the toner cartridge. TROUBLESHOOTING 6 - 17 ABCDEFGHIJKLMNOPQRSTUVWXYZ. 0123456789. ABCDEFGHIJKLMNOPQRSTUVWXYZ. 0123456789. abcdefghijklmnopqrstuvwxyz. abcdefghijklmnopqrstuvwxyz...