User Guide
Page 101
... 3 CONTROL PANEL Setting Menu PRINT SETTINGS Description Print the Configuration page. VERSION Sub-Setting Menu SER.NO=######### Description Printer serial number. PRINT FONTS Print the font list and samples. ROM VER=#### ROM firmware version (only Network users)... NET DATE ##/##/## Network date RAM SIZE=###MB The size of memory in this printer. MAINTENANCE PAGE COUNTER =###### REMAIN DRUM =###### REMAIN PF KIT1 =###### REMAIN PF KIT2 =###### REMAIN FUSER =###### REMAIN LASER =###### 3-21 PRINT TEST Print the test page. PRINT FILE LIST Print the file...
... 3 CONTROL PANEL Setting Menu PRINT SETTINGS Description Print the Configuration page. VERSION Sub-Setting Menu SER.NO=######### Description Printer serial number. PRINT FONTS Print the font list and samples. ROM VER=#### ROM firmware version (only Network users)... NET DATE ##/##/## Network date RAM SIZE=###MB The size of memory in this printer. MAINTENANCE PAGE COUNTER =###### REMAIN DRUM =###### REMAIN PF KIT1 =###### REMAIN PF KIT2 =###### REMAIN FUSER =###### REMAIN LASER =###### 3-21 PRINT TEST Print the test page. PRINT FILE LIST Print the file...
User Guide
Page 142
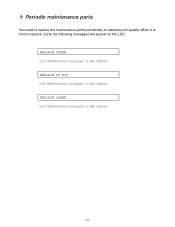
When it is time to maintain print quality. REPLACE PF KIT See "Maintenance messages" in this chapter. REPLACE FUSER See "Maintenance messages" in this chapter. 5-2 REPLACE LASER See "Maintenance messages" in this chapter. ™ Periodic maintenance parts You need to replace the maintenance parts periodically to replace parts, the following messages will appear on the LCD.
When it is time to maintain print quality. REPLACE PF KIT See "Maintenance messages" in this chapter. REPLACE FUSER See "Maintenance messages" in this chapter. 5-2 REPLACE LASER See "Maintenance messages" in this chapter. ™ Periodic maintenance parts You need to replace the maintenance parts periodically to replace parts, the following messages will appear on the LCD.
User Guide
Page 165
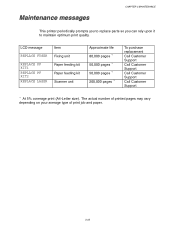
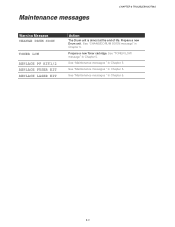
Maintenance messages CHAPTER 5 MAINTENANCE This printer periodically prompts you to replace parts so you can rely upon it to maintain optimum print quality. LCD message REPLACE FUSER REPLACE PF KIT1 REPLACE PF KIT2 REPLACE LASER Item Fixing unit Paper feeding kit Paper feeding kit Scanner unit Approximate life 80,000 pages *1 50,000 pages...
Maintenance messages CHAPTER 5 MAINTENANCE This printer periodically prompts you to replace parts so you can rely upon it to maintain optimum print quality. LCD message REPLACE FUSER REPLACE PF KIT1 REPLACE PF KIT2 REPLACE LASER Item Fixing unit Paper feeding kit Paper feeding kit Scanner unit Approximate life 80,000 pages *1 50,000 pages...
User Guide
Page 167
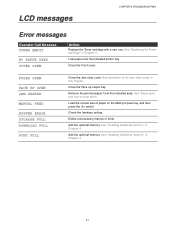
... TONER EMPTY NO PAPER XXXX COVER OPEN AAccttiioonn Replace the Toner cartridge with a new one. See "Replacing the Toner cartridge" in Chapter 4. FUSER OPEN FACE UP OPEN JAM XXXXXX MANUAL FEED BUFFER ERROR STORAGE FULL DOWNLOAD FULL FONT FULL Close the Jam clear cover. Load the correct size... Jam clear cover in Chapter 4. 6-1 Remove the jammed paper from the indicated area. Add the optional memory. Load paper into the indicated printer tray. See "Installing additional memory" in this chapter. Delete unnecessary macros or fonts. Close the Face up output tray.
... TONER EMPTY NO PAPER XXXX COVER OPEN AAccttiioonn Replace the Toner cartridge with a new one. See "Replacing the Toner cartridge" in Chapter 4. FUSER OPEN FACE UP OPEN JAM XXXXXX MANUAL FEED BUFFER ERROR STORAGE FULL DOWNLOAD FULL FONT FULL Close the Jam clear cover. Load the correct size... Jam clear cover in Chapter 4. 6-1 Remove the jammed paper from the indicated area. Add the optional memory. Load paper into the indicated printer tray. See "Installing additional memory" in this chapter. Delete unnecessary macros or fonts. Close the Face up output tray.
User Guide
Page 169
See "Maintenance messages " in Chapter 5. See "TONER LOW message" in Chapter 5. 6-3 Prepare a new Drum unit. See "Maintenance messages " in Chapter 5. Maintenance messages CHAPTER 6 TROUBLESHOOTING WWaarrnniinngg MMeessssaaggee CHANGE DRUM SOON TONER LOW REPLACE PF KIT1/2 REPLACE FUSER KIT REPLACE LASER KIT AAccttiioonn The Drum unit is almost at the end of life. See "CHANGE DRUM SOON message" in Chapter 5. Prepare a new Toner cartridge. See "Maintenance messages " in Chapter 5.
See "Maintenance messages " in Chapter 5. See "TONER LOW message" in Chapter 5. 6-3 Prepare a new Drum unit. See "Maintenance messages " in Chapter 5. Maintenance messages CHAPTER 6 TROUBLESHOOTING WWaarrnniinngg MMeessssaaggee CHANGE DRUM SOON TONER LOW REPLACE PF KIT1/2 REPLACE FUSER KIT REPLACE LASER KIT AAccttiioonn The Drum unit is almost at the end of life. See "CHANGE DRUM SOON message" in Chapter 5. Prepare a new Toner cartridge. See "Maintenance messages " in Chapter 5.
User Guide
Page 182
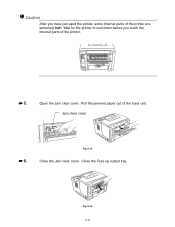
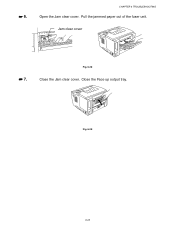
Wait for the printer to cool down before you have just used the printer, some internal parts of the printer are extremely hot! Open the Jam clear cover. Jam clear cover ☛ 6. Fig. 6-15 6-16 ! Caution After you touch the internal parts of the fuser unit. Pull the jammed paper out of the printer. ☛ 5. Fig. 6-14 Close the Jam clear cover. Close the Face up output tray.
Wait for the printer to cool down before you have just used the printer, some internal parts of the printer are extremely hot! Open the Jam clear cover. Jam clear cover ☛ 6. Fig. 6-15 6-16 ! Caution After you touch the internal parts of the fuser unit. Pull the jammed paper out of the printer. ☛ 5. Fig. 6-14 Close the Jam clear cover. Close the Face up output tray.
User Guide
Page 184
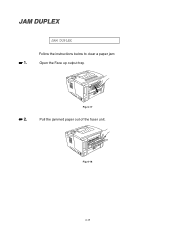
Fig. 6-18 6-18 JAM DUPLEX Follow the instructions below to clear a paper jam: Open the Face up output tray. ☛ 2. Fig. 6-17 Pull the jammed paper out of the fuser unit. JAM DUPLEX ☛ 1.
Fig. 6-18 6-18 JAM DUPLEX Follow the instructions below to clear a paper jam: Open the Face up output tray. ☛ 2. Fig. 6-17 Pull the jammed paper out of the fuser unit. JAM DUPLEX ☛ 1.
User Guide
Page 189
☛ 6. CHAPTER 6 TROUBLESHOOTING Open the Jam clear cover. Close the Face up output tray. Pull the jammed paper out of the fuser unit. Jam clear cover ☛ 7. Fig. 6-28 Close the Jam clear cover. Fig. 6-29 6-23
☛ 6. CHAPTER 6 TROUBLESHOOTING Open the Jam clear cover. Close the Face up output tray. Pull the jammed paper out of the fuser unit. Jam clear cover ☛ 7. Fig. 6-28 Close the Jam clear cover. Fig. 6-29 6-23


