
Assembly Manual
Page 6
... not tighten hardware from the Right Frame Rail (Item #2) into the corresponding holes in Figure 1. 4 F O Place (2) 3/8" Washers (Item #O) over the end of the Cross Bar. Slide the Rod Box into Rod Box Frame first. Rear Cross Bar • Item #F - (6) 3/8" X 3/4" Hex Head Bolts • Item #O - (6) 3/8" Washers Do not unwrap cables. Place (3) 1/4" Washers...
... not tighten hardware from the Right Frame Rail (Item #2) into the corresponding holes in Figure 1. 4 F O Place (2) 3/8" Washers (Item #O) over the end of the Cross Bar. Slide the Rod Box into Rod Box Frame first. Rear Cross Bar • Item #F - (6) 3/8" X 3/4" Hex Head Bolts • Item #O - (6) 3/8" Washers Do not unwrap cables. Place (3) 1/4" Washers...
Assembly Manual
Page 8
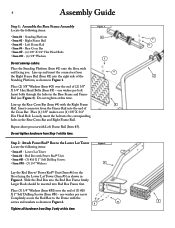
...9 35 11 34 10 R G 8 2 O 8 Place (1) 3/8" Washer (Item #O) and (1) 3/8" Nylock Nut (Item #R) over the ends of (1) 3/8" X 5" Hex Head Bolt (Item #I), and slide the bolt through the lower holes in the Squat Frame Rails and Seat Rail, as shown in Figure 5. Secure the Foot Assembly using (2) 3/8" X 3/4" Hex Head...8226; Item #R - (1) 3/8" Nylock Nut Do not unwrap cables. Right Squat Frame Rail • Item #9 - Before you install the Squat Frame Rails, slide the 6 Squat Pulley (Item #34) over the end of the Right Squat Frame Rail (Item #8), and the 6 Squat Pulley (Item #35) over the ...
...9 35 11 34 10 R G 8 2 O 8 Place (1) 3/8" Washer (Item #O) and (1) 3/8" Nylock Nut (Item #R) over the ends of (1) 3/8" X 5" Hex Head Bolt (Item #I), and slide the bolt through the lower holes in the Squat Frame Rails and Seat Rail, as shown in Figure 5. Secure the Foot Assembly using (2) 3/8" X 3/4" Hex Head...8226; Item #R - (1) 3/8" Nylock Nut Do not unwrap cables. Right Squat Frame Rail • Item #9 - Before you install the Squat Frame Rails, slide the 6 Squat Pulley (Item #34) over the end of the Right Squat Frame Rail (Item #8), and the 6 Squat Pulley (Item #35) over the ...

Assembly Manual
Page 9
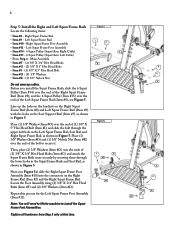
... the other Chest Pulley over the Left Arm. Step 7: Secure Pulley Arms and Attach Chest Pulleys Locate the following items: • Items #12 and #13 - Slide one washer per bolt. Do not tighten hardware from Step 7 at this time. Main Assembly • Item #C - (2) 1/4" X 1/2" Socket Head Cap Bolts • Item #K ...each Pulley Arm - Thread the bolts through the both ends of each Threaded Stud. Repeat this prevents the Slider Pulleys from the Rod Pack. Slide the (2) 1/2" X 9 1/2" Threaded Studs (Item #K) all the way through the bolt holes in the Frame Rail bracket and the Right ...
... the other Chest Pulley over the Left Arm. Step 7: Secure Pulley Arms and Attach Chest Pulleys Locate the following items: • Items #12 and #13 - Slide one washer per bolt. Do not tighten hardware from Step 7 at this time. Main Assembly • Item #C - (2) 1/4" X 1/2" Socket Head Cap Bolts • Item #K ...each Pulley Arm - Thread the bolts through the both ends of each Threaded Stud. Repeat this prevents the Slider Pulleys from the Rod Pack. Slide the (2) 1/2" X 9 1/2" Threaded Studs (Item #K) all the way through the bolt holes in the Frame Rail bracket and the Right ...
Assembly Manual
Page 15
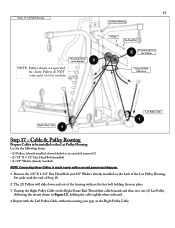
... the Machine NOTE: Pulleys shown are seperated for clarity. Pulleys do NOT come apart on your grip on the Right Pulley Cable. The (2) Pulleys will slide down and out of the Lat Pulley Housing.
... the Machine NOTE: Pulleys shown are seperated for clarity. Pulleys do NOT come apart on your grip on the Right Pulley Cable. The (2) Pulleys will slide down and out of the Lat Pulley Housing.
Assembly Manual
Page 16
While continuing to push the Power Rod® Unit out of the Machine Step 18 - Slide both Pulleys back into the slot in the Lat Pulley Housing, lining up the bolt holes in Figure 18. Place the 3/8" Washer over the (1) 3/8" X 4 1/2" Hex ... the Front of the Machine Lat Pulley Housing Washer Hex Head Bolt Towards the Rear of the way for the sake of Step 17, and slide that bolt through the aligned holes in the Lat Pulley Housing and Lat Pulleys, as shown in the Pulleys with a second person assisting you removed...
While continuing to push the Power Rod® Unit out of the Machine Step 18 - Slide both Pulleys back into the slot in the Lat Pulley Housing, lining up the bolt holes in Figure 18. Place the 3/8" Washer over the (1) 3/8" X 4 1/2" Hex ... the Front of the Machine Lat Pulley Housing Washer Hex Head Bolt Towards the Rear of the way for the sake of Step 17, and slide that bolt through the aligned holes in the Lat Pulley Housing and Lat Pulleys, as shown in the Pulleys with a second person assisting you removed...
Assembly Manual
Page 19
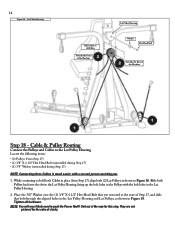
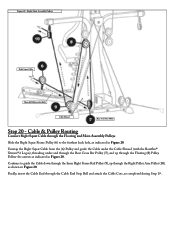
..., as indicated in Figure 20. Unwrap the Right Squat Cable from the (6) Pulley and guide the Cable under the Cable Shroud (with the Bowflex® Xtreme®2 Logos), threading under and through the Rear Cross Bar Pulley (7), and up through the Floating (8) Pulley. Right Main Assembly Pulleys Right... the Right Pulley Arm Pulley (10), as indicated in Figure 20. Finally, insert the Cable End through the Floating and Main Assembly Pulleys Slide the Right Squat Frame Pulley (6) to this Hole Cable Shroud Rear Cross Bar Pulley Step 20 - Follow the arrows as shown in Figure 20...
..., as indicated in Figure 20. Unwrap the Right Squat Cable from the (6) Pulley and guide the Cable under the Cable Shroud (with the Bowflex® Xtreme®2 Logos), threading under and through the Rear Cross Bar Pulley (7), and up through the Floating (8) Pulley. Right Main Assembly Pulleys Right... the Right Pulley Arm Pulley (10), as indicated in Figure 20. Finally, insert the Cable End through the Floating and Main Assembly Pulleys Slide the Right Squat Frame Pulley (6) to this Hole Cable Shroud Rear Cross Bar Pulley Step 20 - Follow the arrows as shown in Figure 20...

Assembly Manual
Page 21
Lock Knob • Item #19 - Slide the Foam Rollers (Item #21) onto the ends of both Tubes, then secure each Roller with the hole in the Backbone, and screw the Lock ... the Seat Backbone (see Step 10). Select the correct lower hole for your height - Note: You may adjust the Seat for your height once the Xtreme²™ has been fully assembled. 19 Step 21: Install the Leg Extension Locate the following items: • Item #20 - (2) Chrome Roller Tubes • Item...
Lock Knob • Item #19 - Slide the Foam Rollers (Item #21) onto the ends of both Tubes, then secure each Roller with the hole in the Backbone, and screw the Lock ... the Seat Backbone (see Step 10). Select the correct lower hole for your height - Note: You may adjust the Seat for your height once the Xtreme²™ has been fully assembled. 19 Step 21: Install the Leg Extension Locate the following items: • Item #20 - (2) Chrome Roller Tubes • Item...
Owners Manual
Page 6
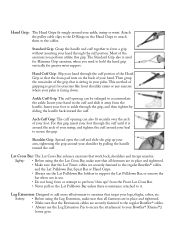
...the foam pad rests on the Hand Grips to attach them to your heel to secure the grip. Shoulder Grip: Spread open the cuff and slide the grip up your arm, tightening the grip around your foot. Leg Extension: Designed to add more effectiveness to accommodate the ankle. This method...ankle, instep or wrist. Attach the pulley cable clips to the D-Rings on the back of your instep, and tighten the cuff around your Bowflex® Xtreme®2 home gym. Lat Cross Bar: The Lat Cross Bar enhance exercises that is resistance attached to hold the hand grip vertically for Hammer...
...the foam pad rests on the Hand Grips to attach them to your heel to secure the grip. Shoulder Grip: Spread open the cuff and slide the grip up your arm, tightening the grip around your foot. Leg Extension: Designed to add more effectiveness to accommodate the ankle. This method...ankle, instep or wrist. Attach the pulley cable clips to the D-Rings on the back of your instep, and tighten the cuff around your Bowflex® Xtreme®2 home gym. Lat Cross Bar: The Lat Cross Bar enhance exercises that is resistance attached to hold the hand grip vertically for Hammer...
Owners Manual
Page 24
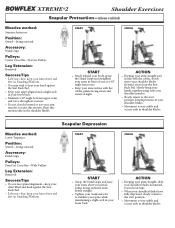
... position. • Movement is very subtle and occurs only in your lower back. FINISH ACTION • Keeping your arms straight, slide your shoulder blades downward, toward your hips. • When your shoulder blades have fully depressed, slowly return to stabilize your spine ...the start position, keeping tension in your shoulder blades. • Movement is very subtle and occurs only in the shoulder blades. XTREME®2 Shoulder Exercises Scapular Protraction-(elbows stabilized) Muscles worked: Serratus Anteriors Position: Seated-facing outward Accessory: Hand Grips Pulleys: Center ...
... position. • Movement is very subtle and occurs only in your lower back. FINISH ACTION • Keeping your arms straight, slide your shoulder blades downward, toward your hips. • When your shoulder blades have fully depressed, slowly return to stabilize your spine ...the start position, keeping tension in your shoulder blades. • Movement is very subtle and occurs only in the shoulder blades. XTREME®2 Shoulder Exercises Scapular Protraction-(elbows stabilized) Muscles worked: Serratus Anteriors Position: Seated-facing outward Accessory: Hand Grips Pulleys: Center ...
Owners Manual
Page 25
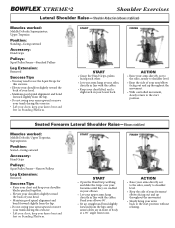
... this exercise. • Lift your chest, keep your lower back. START FINISH START • Open the Hand Grip webbing and slide the Grips over your forearms until arms/cables are cradled in your elbows. • Let your upper arms hang directly in your ...knees bent and feet on Standing Platform. XTREME®2 Shoulder Exercises Lateral Shoulder Raise-Shoulder Abduction (elbows stabilized) Muscles worked: Middle Deltoids; Upper Trapezius Position: Standing-facing outward Accessory:...
... this exercise. • Lift your chest, keep your lower back. START FINISH START • Open the Hand Grip webbing and slide the Grips over your forearms until arms/cables are cradled in your elbows. • Let your upper arms hang directly in your ...knees bent and feet on Standing Platform. XTREME®2 Shoulder Exercises Lateral Shoulder Raise-Shoulder Abduction (elbows stabilized) Muscles worked: Middle Deltoids; Upper Trapezius Position: Standing-facing outward Accessory:...
Owners Manual
Page 28
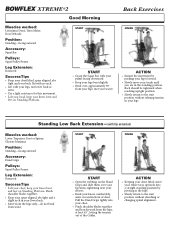
... Frame Leg Extension: Removed Success Tips • Lift your chest, keep your legs. START FINISH START • Open the webbing on the Hand Grips and slide them over , approximately 90˚ from your hips (not your waist) Back Exercises FINISH ACTION • Initiate the movement by pivoting at least 45˚... pushing your hips forward. • Slowly move your trunk until you are in your chest. • Pinch shoulder blades together and lean forward from waist. XTREME®2 Good Morning Muscles worked: Latissimus Dorsi; Teres Major;
... Frame Leg Extension: Removed Success Tips • Lift your chest, keep your legs. START FINISH START • Open the webbing on the Hand Grips and slide them over , approximately 90˚ from your hips (not your waist) Back Exercises FINISH ACTION • Initiate the movement by pivoting at least 45˚... pushing your hips forward. • Slowly move your trunk until you are in your chest. • Pinch shoulder blades together and lean forward from waist. XTREME®2 Good Morning Muscles worked: Latissimus Dorsi; Teres Major;