
Assembly Manual
Page 1
P/N 001-6931 RevB (07/2006) Accessory Rack Assembly Instructions
P/N 001-6931 RevB (07/2006) Accessory Rack Assembly Instructions

Assembly Manual
Page 2
Table of Contents Safety Requirements 3 Product Specifications 3 Complete Rack Component Diagram 4 Parts List 4 Assembly Steps 5 Storing Your Accessories 9 Warranty Information 10 Contact Information 11 2
Table of Contents Safety Requirements 3 Product Specifications 3 Complete Rack Component Diagram 4 Parts List 4 Assembly Steps 5 Storing Your Accessories 9 Warranty Information 10 Contact Information 11 2
Assembly Manual
Page 3
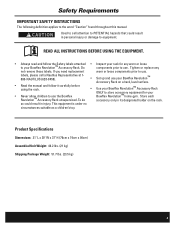
...Assembled Unit Weight: 46.2 lbs. (21 kg) Shipping Package Weight: 51.7 lbs. (23.5 kg) 3 so could result in personal injury or damage to equipment. READ ALL INSTRUCTIONS BEFORE USING THE EQUIPMENT. • Always read and follow it carefully before using the rack. • Never allow children to use the Bowflex Revolution.... • Read the manual and follow the Safety labels attached • Inspect your rack for your Bowflex Revolution™ Accessory Rack. labels, please call attention to POTENTIAL hazards that could result in injury. Safety Requirements ...
...Assembled Unit Weight: 46.2 lbs. (21 kg) Shipping Package Weight: 51.7 lbs. (23.5 kg) 3 so could result in personal injury or damage to equipment. READ ALL INSTRUCTIONS BEFORE USING THE EQUIPMENT. • Always read and follow it carefully before using the rack. • Never allow children to use the Bowflex Revolution.... • Read the manual and follow the Safety labels attached • Inspect your rack for your Bowflex Revolution™ Accessory Rack. labels, please call attention to POTENTIAL hazards that could result in injury. Safety Requirements ...
Assembly Manual
Page 4
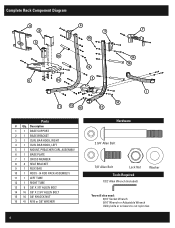
Complete Rack Component Diagram � � � � � � �� � �� � � �� Parts # Qty. Description 1 1 BASE SUPPORT 2 1 BASE BRACKET 3 1 CURL BAR HOOK, RIGHT 4 1 CURL BAR HOOK, LEFT 5 1 MOUNT, PREACHER CURL ASSEMBLY 6 1 BASE PLATE 7 1 CROSS MEMBER 8 4 SEAT BRACKET 9 1 FLEX BAG 10 1 RODS - (4 ROD PACK ASSEMBLY) 11 1 LEFT TUBE...
Complete Rack Component Diagram � � � � � � �� � �� � � �� Parts # Qty. Description 1 1 BASE SUPPORT 2 1 BASE BRACKET 3 1 CURL BAR HOOK, RIGHT 4 1 CURL BAR HOOK, LEFT 5 1 MOUNT, PREACHER CURL ASSEMBLY 6 1 BASE PLATE 7 1 CROSS MEMBER 8 4 SEAT BRACKET 9 1 FLEX BAG 10 1 RODS - (4 ROD PACK ASSEMBLY) 11 1 LEFT TUBE...
Assembly Manual
Page 6
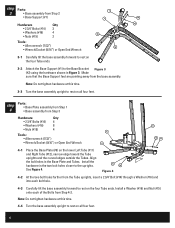
... Nuts (#15) 2 Tools: • Allen wrench (7/32") �� • Wrench/Socket (9/16") or Open End Wrench 3-1 Carefully tilt the base assembly forward to rest on the four Tube ends. 3-2 Attach the Base Support (#1) to rest on the four Tube ends. See Figure 4. step Parts: 3 •... Base assembly from Step 3 Hardware Qty • 2 3/4" Bolts (#14) 4 • Washers (#16) 8 • Nuts (#15) 4 � Tools: • Allen ...
... Nuts (#15) 2 Tools: • Allen wrench (7/32") �� • Wrench/Socket (9/16") or Open End Wrench 3-1 Carefully tilt the base assembly forward to rest on the four Tube ends. 3-2 Attach the Base Support (#1) to rest on the four Tube ends. See Figure 4. step Parts: 3 •... Base assembly from Step 3 Hardware Qty • 2 3/4" Bolts (#14) 4 • Washers (#16) 8 • Nuts (#15) 4 � Tools: • Allen ...

Assembly Manual
Page 7
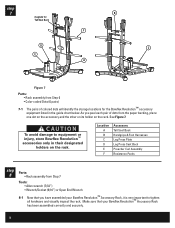
... Steps 2 - 4 and 6-1 to adjust the unit. 6-3 Fasten the Flex Bag (#9) to the Left Tube (#11) as the Curl Bar Hooks. Parts: • Rack base assembly from Step 4 • Right Curl Bar Hook (#3) • Left Curl Bar Hook (#4) • Rods (#10) Hardware Qty • 2 3/4" Bolts (#14) ... Install the Right Curl Bar Hook (#3) at the two top, outside bolt holes on all hardware from Steps 2 - 4. Parts: • Rack assembly from the Base Plate. Tighten hardware completely. 6-2 Completely tighten all four feet. Tighten hardware completely. 5-2 Install the Left Curl Bar Hook (#4) ...
... Steps 2 - 4 and 6-1 to adjust the unit. 6-3 Fasten the Flex Bag (#9) to the Left Tube (#11) as the Curl Bar Hooks. Parts: • Rack base assembly from Step 4 • Right Curl Bar Hook (#3) • Left Curl Bar Hook (#4) • Rods (#10) Hardware Qty • 2 3/4" Bolts (#14) ... Install the Right Curl Bar Hook (#3) at the two top, outside bolt holes on all hardware from Steps 2 - 4. Parts: • Rack assembly from the Base Plate. Tighten hardware completely. 6-2 Completely tighten all four feet. Tighten hardware completely. 5-2 Install the Left Curl Bar Hook (#4) ...
Assembly Manual
Page 8
...flex Revolution™ accessories only in the guide chart below. Make sure that you peel each pair of colored dots will identify the storage locations for the Bowflex Revolution™ accessory equipment listed in their designated holders on the rack. As you have assembled your Bowflex Revolution™ Accessory Rack has been assembled correctly and...
...flex Revolution™ accessories only in the guide chart below. Make sure that you peel each pair of colored dots will identify the storage locations for the Bowflex Revolution™ accessory equipment listed in their designated holders on the rack. As you have assembled your Bowflex Revolution™ Accessory Rack has been assembled correctly and...

Assembly Manual
Page 10
...NOT COVER 1. Nautilus, Inc. Nautilus will be required. are warranted to the retail purchaser to apply a limited credit reimbursement toward another Bowflex® exercise product of purchase will have the option in a manner or environment for any exercise product(s), which require warranty service, ... of an amount of the purchase price of law or otherwise, including, but not limited to normal wear and tear. 3. Service calls, assembly, transportation, and/or delivery expenses are in connection with this warranty or, at : Nautilus, Inc. 16400 SE Nautilus Dr. Vancouver, Washington...
...NOT COVER 1. Nautilus, Inc. Nautilus will be required. are warranted to the retail purchaser to apply a limited credit reimbursement toward another Bowflex® exercise product of purchase will have the option in a manner or environment for any exercise product(s), which require warranty service, ... of an amount of the purchase price of law or otherwise, including, but not limited to normal wear and tear. 3. Service calls, assembly, transportation, and/or delivery expenses are in connection with this warranty or, at : Nautilus, Inc. 16400 SE Nautilus Dr. Vancouver, Washington...

