User Manual
Page 2
Content Accessories ...02 Unit Installation...03 Wire Connection...03 Parking Brake Connection ...04 Speaker connection...05 Button Description...06 Remote Control...07 Main Menu...10 Radio Operation...10 DVD Operation...11 USB /SD Operation...12 Settings Operation ...12 Bluetooth Operation...15 Aux-In Operation ...16 Notes of Disc...17 Troubleshooting ...18 General Specification...20 To ensure safety while driving and to comply with laws, drivers should not watch video or operate the video device while driving. 01
Content Accessories ...02 Unit Installation...03 Wire Connection...03 Parking Brake Connection ...04 Speaker connection...05 Button Description...06 Remote Control...07 Main Menu...10 Radio Operation...10 DVD Operation...11 USB /SD Operation...12 Settings Operation ...12 Bluetooth Operation...15 Aux-In Operation ...16 Notes of Disc...17 Troubleshooting ...18 General Specification...20 To ensure safety while driving and to comply with laws, drivers should not watch video or operate the video device while driving. 01
User Manual
Page 4
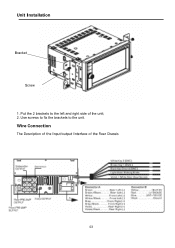
Wire Connection The Description of the Input/output Interface of the unit; 2. Use screws to fix the brackets to the left and right side of the Rear Chassis 03 Put the 2 brackets to the unit. Unit Installation Bracket Screw 1.
Wire Connection The Description of the Input/output Interface of the unit; 2. Use screws to fix the brackets to the left and right side of the Rear Chassis 03 Put the 2 brackets to the unit. Unit Installation Bracket Screw 1.

User Manual
Page 5
Parking Brake Connection In order to view videos, the parking brake wire must be connected, and the vehicle stopped Connecting the reversing line to taillight on the car 04
Parking Brake Connection In order to view videos, the parking brake wire must be connected, and the vehicle stopped Connecting the reversing line to taillight on the car 04
User Manual
Page 14
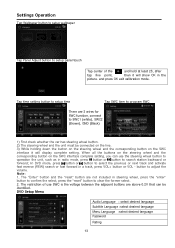
... corresponding button on the SWC interface it will display complete setting. The "Enter" button and the "reset" button are 3 wires for SWC function, connect to adjust the volume. Note: 1. DVD Setup Menu Audio Language : select desired language Subtitle Language :select desired language Menu Language :select desired language Password Rating 13 and press...
... corresponding button on the SWC interface it will display complete setting. The "Enter" button and the "reset" button are 3 wires for SWC function, connect to adjust the volume. Note: 1. DVD Setup Menu Audio Language : select desired language Subtitle Language :select desired language Menu Language :select desired language Password Rating 13 and press...
User Manual
Page 16
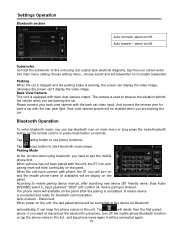
... disconnect the bluetooth connection, turn on and the mobile phone name (if available) will be connected again. 15 And connect the reverse wire for bluetooth communication. Tap music button to use phone functions. It means device is working, the screen can display the video image, ...the panel. The camera is completed. Rear view camera picture will available on the panel after searching new device (BT friendly name: Boss Audio BV9358B) select it will be enabled when you are backing the car. The phone name will be connected to observe the situation behind the...
... disconnect the bluetooth connection, turn on and the mobile phone name (if available) will be connected again. 15 And connect the reverse wire for bluetooth communication. Tap music button to use phone functions. It means device is working, the screen can display the video image, ...the panel. The camera is completed. Rear view camera picture will available on the panel after searching new device (BT friendly name: Boss Audio BV9358B) select it will be enabled when you are backing the car. The phone name will be connected to observe the situation behind the...
User Manual
Page 18
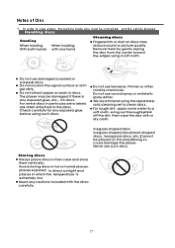
Notes of Disc — In order to view videos, the parking brake wire must be connected, and the vehicle stopped 17
Notes of Disc — In order to view videos, the parking brake wire must be connected, and the vehicle stopped 17
User Manual
Page 19
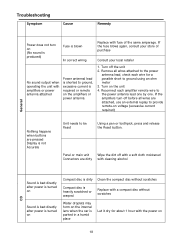
... shorted to the power antenna lead one by one. Turn off before all wires attached to the power antenna lead, check each amplifier remote wire to ground, excessive current is blown In correct wiring Replace with the power on 18 Troubleshooting Symptom Cause Remedy General Power does not... turn off the unit 2. If the fuse blows again, consult your store of the same amperage. Remove all wires are attached, use an external replay to provide remote-on voltage (excessive current required) Nothing happens when buttons are dirty with a compact ...
... shorted to the power antenna lead one by one. Turn off before all wires attached to the power antenna lead, check each amplifier remote wire to ground, excessive current is blown In correct wiring Replace with the power on 18 Troubleshooting Symptom Cause Remedy General Power does not... turn off the unit 2. If the fuse blows again, consult your store of the same amperage. Remove all wires are attached, use an external replay to provide remote-on voltage (excessive current required) Nothing happens when buttons are dirty with a compact ...

User Manual
Page 20
... off until the ambient temperature is too high returns to normal No sound Volume is in minimum Adjust volume to a desired level Wiring is not properly connected Check wiring connection The operation keys do not work The built-in microcomputer is not operating properly due to noise Front panel is not properly...
... off until the ambient temperature is too high returns to normal No sound Volume is in minimum Adjust volume to a desired level Wiring is not properly connected Check wiring connection The operation keys do not work The built-in microcomputer is not operating properly due to noise Front panel is not properly...


