

User Manual in English
Page 2
WARNING To ensure safety while driving and to comply with laws, drivers should not watch video or operate the video device while driving.
WARNING To ensure safety while driving and to comply with laws, drivers should not watch video or operate the video device while driving.

User Manual in English
Page 3
BV7280 OWNER'S MANUAL Mobile Audio/Video System y PLL Synthesizer Stereo Radio y Automatic Memory Storing y RBDS Operation y Full Detachable Panel y Preset Equalization y Memory Card Interface y USB Interface y AV IN interface on the front panel y Remote Control 1
BV7280 OWNER'S MANUAL Mobile Audio/Video System y PLL Synthesizer Stereo Radio y Automatic Memory Storing y RBDS Operation y Full Detachable Panel y Preset Equalization y Memory Card Interface y USB Interface y AV IN interface on the front panel y Remote Control 1
User Manual in English
Page 4
CONTENTS INSTALLATION 3 USING THE DETACHABLE FRONT PANEL 6 CONNECTIONS 7 LOCATIONS AND FUNCTION OF THE PLAYER 8 LOCATIONS AND FUNCTION OF THE REMOTE CONTROL ......... 9 OPERATION 11 BASIC OPERATION 12 USB PLAY OPERATION 13 MEMORY CARD OPERATION 16 RADIO OPERATION 17 AV IN OPERATION 18 TROUBLE SHOOTING 19 SPECIFICATIONS 20 2
CONTENTS INSTALLATION 3 USING THE DETACHABLE FRONT PANEL 6 CONNECTIONS 7 LOCATIONS AND FUNCTION OF THE PLAYER 8 LOCATIONS AND FUNCTION OF THE REMOTE CONTROL ......... 9 OPERATION 11 BASIC OPERATION 12 USB PLAY OPERATION 13 MEMORY CARD OPERATION 16 RADIO OPERATION 17 AV IN OPERATION 18 TROUBLE SHOOTING 19 SPECIFICATIONS 20 2

User Manual in English
Page 5
The use of unauthorized p arts can properly installed either from the vehicle battery's negative (-) terminal. 2. For details, refer to dust, dirt or excessive vibration. DIN FRONT-MOUNT (Method A) Installation Opening This unit can remove it into the appropriate slot s at the sides of the unit. y Consult with the unit to ensure proper inst allation. Make sure the ignition is all connected up ) into the opening as from direct sunlight, or hot air, from the heater, or where it is turned of f, and then disconnect the cable from "Front" (conventional DIN Front-mount) or "...
The use of unauthorized p arts can properly installed either from the vehicle battery's negative (-) terminal. 2. For details, refer to dust, dirt or excessive vibration. DIN FRONT-MOUNT (Method A) Installation Opening This unit can remove it into the appropriate slot s at the sides of the unit. y Consult with the unit to ensure proper inst allation. Make sure the ignition is all connected up ) into the opening as from direct sunlight, or hot air, from the heater, or where it is turned of f, and then disconnect the cable from "Front" (conventional DIN Front-mount) or "...

User Manual in English
Page 6
Use the supplied hardware (Hex Nut (M5mm) and Spring Washer) to attach one end of the strap to a solid metal part of the vehicle under the dashboard. Note to install the short threading terminal of the mounting bolt to the back of the unit and the other end of metal strap to the mounting bolt on both of the outer trim ring then pull it out to fit your vehicle. 4 Make sure the ignition is a Nissan, T oyota, follow these mounting instructions. Lift the top of the supplied keys into place. 9. DIN REAR-MOUNT (Method B) If your vehicle is turned of the dashboard. Reconnect the ...
Use the supplied hardware (Hex Nut (M5mm) and Spring Washer) to attach one end of the strap to a solid metal part of the vehicle under the dashboard. Note to install the short threading terminal of the mounting bolt to the back of the unit and the other end of metal strap to the mounting bolt on both of the outer trim ring then pull it out to fit your vehicle. 4 Make sure the ignition is a Nissan, T oyota, follow these mounting instructions. Lift the top of the supplied keys into place. 9. DIN REAR-MOUNT (Method B) If your vehicle is turned of the dashboard. Reconnect the ...

User Manual in English
Page 7
Align the screw holes on the bracket with the screw holes on the unit, and then tighten the screws (5x5mm) on each side. INSTALLATION Factory Radio Mounting Bracket Screw Side View showing Screw Holes marked T, N or S Screw Dashboard or Console To fasten the unit to the factory radio mounting brackets. Note: The outer trim ring, sleev e and the metal strap are not used for method B installation. 5
Align the screw holes on the bracket with the screw holes on the unit, and then tighten the screws (5x5mm) on each side. INSTALLATION Factory Radio Mounting Bracket Screw Side View showing Screw Holes marked T, N or S Screw Dashboard or Console To fasten the unit to the factory radio mounting brackets. Note: The outer trim ring, sleev e and the metal strap are not used for method B installation. 5

User Manual in English
Page 8
USING THE DETACHABLE FRONT PANEL To Detach the Front panel 1.Press the release button on the left-top of the control panel 7. Keep away any dirt or foreign substances adhered on the display or control buttons when detaching or re-installing the control panel. 3. Otherwise, abnormality occurs on the main unit body. Do not touch the contacts on the control panel or on the display or some keys will not function properly. 6 It may result in anywhere. 6. To Install the Front Panel To install the control panel, insert the panel into the case. Do not expose the control panel to...
USING THE DETACHABLE FRONT PANEL To Detach the Front panel 1.Press the release button on the left-top of the control panel 7. Keep away any dirt or foreign substances adhered on the display or control buttons when detaching or re-installing the control panel. 3. Otherwise, abnormality occurs on the main unit body. Do not touch the contacts on the control panel or on the display or some keys will not function properly. 6 It may result in anywhere. 6. To Install the Front Panel To install the control panel, insert the panel into the case. Do not expose the control panel to...

User Manual in English
Page 9
REAR RIGHT SPEAKER (-) (VIOLET/BLACK) 3. FRONT LEFT SPEAKER (-) (WHITE/BLACK) 7. MEMORY +12V (YELLOW) 5. REAR RIGHT SPEAKER (+) (VIOLET) 2. FRONT RIGHT SPEAKER (-) (GRAY/BLACK) 5. REAR LEFT SPEAKER (+) (GREEN) 8. BRAKE (PINK) 3. N.C. 7. +12V (TO IGNITION KEY) (RED) 8. REAR LEFT SPEAKER (-) (GREEN/BLACK) 7 GROUND (BLACK) Connector B 1. FRONT LEFT SPEAKER (+) (WHITE) 6. FRONT RIGHT SPEAKER (+) (GRAY) 4. REAR VIEW (BROWN) 4. AUTO ANTENNA OUTPUT (BLUE) 6. WIRING CONNECTION Connector A 1. N.C. 2.
REAR RIGHT SPEAKER (-) (VIOLET/BLACK) 3. FRONT LEFT SPEAKER (-) (WHITE/BLACK) 7. MEMORY +12V (YELLOW) 5. REAR RIGHT SPEAKER (+) (VIOLET) 2. FRONT RIGHT SPEAKER (-) (GRAY/BLACK) 5. REAR LEFT SPEAKER (+) (GREEN) 8. BRAKE (PINK) 3. N.C. 7. +12V (TO IGNITION KEY) (RED) 8. REAR LEFT SPEAKER (-) (GREEN/BLACK) 7 GROUND (BLACK) Connector B 1. FRONT LEFT SPEAKER (+) (WHITE) 6. FRONT RIGHT SPEAKER (+) (GRAY) 4. REAR VIEW (BROWN) 4. AUTO ANTENNA OUTPUT (BLUE) 6. WIRING CONNECTION Connector A 1. N.C. 2.
User Manual in English
Page 10
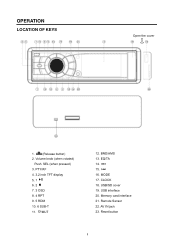
PTY/AF 4. 3.2 inch TFT display 5. 1 6. 2 7. 3 OSD 8. 4 RPT 9. 5 RDM 10. 6 SUB-T 11. /MUT 12. BND/AMS 13. EQ/TA 14. 15. 16. USB/SD cover 19. Reset button 8 USB interface 20. Remote Sensor 22. AV IN jack 23. MODE 17. Memory card interface 21. OPERATION LOCATION OF KEYS Open the cover 1. (Release button) 2. CLOCK 18. Volume knob (when rotated) Push SEL (when pressed) 3.
PTY/AF 4. 3.2 inch TFT display 5. 1 6. 2 7. 3 OSD 8. 4 RPT 9. 5 RDM 10. 6 SUB-T 11. /MUT 12. BND/AMS 13. EQ/TA 14. 15. 16. USB/SD cover 19. Reset button 8 USB interface 20. Remote Sensor 22. AV IN jack 23. MODE 17. Memory card interface 21. OPERATION LOCATION OF KEYS Open the cover 1. (Release button) 2. CLOCK 18. Volume knob (when rotated) Push SEL (when pressed) 3.

User Manual in English
Page 11
LOCATIONS AND FUNCTION OF THE REMOTE CONTROL 9
LOCATIONS AND FUNCTION OF THE REMOTE CONTROL 9
User Manual in English
Page 12
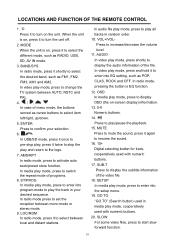
... distant stations. LOC/RDM In radio mode, press it shortly to display the audio information of menu mode, the buttons served as RADIO, USB, SD, AV IN mode. 3. In audio file play mode, cooperatively used with numeric buttons. 20. AUDIO In video play mode, press to resume the sound. 16. 10+ Digital selecting...
... distant stations. LOC/RDM In radio mode, press it shortly to display the audio information of menu mode, the buttons served as RADIO, USB, SD, AV IN mode. 3. In audio file play mode, cooperatively used with numeric buttons. 20. AUDIO In video play mode, press to resume the sound. 16. 10+ Digital selecting...
User Manual in English
Page 13
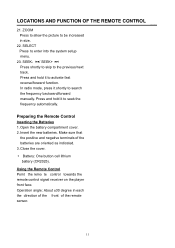
LOCATIONS AND FUNCTION OF THE REMOTE CONTROL 21. Close the cover. Press and hold it shortly to enter into the system setup menu. 23. Press and hold it to seek the frequency automatically. Using the Remote Control Point the remo te control towards the remote control signal receiver on the player front face. Operation angle: About ±30 degree in size. 22. Preparing the Remote Control Inserting the Batteries 1. y Battery: One button cell lithium battery (CR2025). SELECT Press to search the frequency backward/forward manually. Open the battery compartment cover. 2....
LOCATIONS AND FUNCTION OF THE REMOTE CONTROL 21. Close the cover. Press and hold it shortly to enter into the system setup menu. 23. Press and hold it to seek the frequency automatically. Using the Remote Control Point the remo te control towards the remote control signal receiver on the player front face. Operation angle: About ±30 degree in size. 22. Preparing the Remote Control Inserting the Batteries 1. y Battery: One button cell lithium battery (CR2025). SELECT Press to search the frequency backward/forward manually. Open the battery compartment cover. 2....
User Manual in English
Page 14
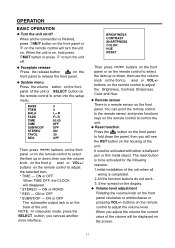
ON or MONO * REG --- When the unit is on, hold press MUT button or press to turn the unit on. BASS TREB BALA FADE TIME TIME SUBWOOF STEREO TAVOL REG 0 0 L= R F= R 00:05 OFF OFF ON 35 OFF Then press / buttons on the front panel or on the remote control to select the item up or down, then use the volume knob on the front p anel or VOL+/buttons on the housing of the unit. Error symbol on the display. ◆ Volume level adjustment Rotating the volume knob on the back of the volume will see another more interface: BRIGHTNESS CONTRAST SHARTPNESS COLOR HUE RESET Then press / ...
ON or MONO * REG --- When the unit is on, hold press MUT button or press to turn the unit on. BASS TREB BALA FADE TIME TIME SUBWOOF STEREO TAVOL REG 0 0 L= R F= R 00:05 OFF OFF ON 35 OFF Then press / buttons on the front panel or on the remote control to select the item up or down, then use the volume knob on the front p anel or VOL+/buttons on the housing of the unit. Error symbol on the display. ◆ Volume level adjustment Rotating the volume knob on the back of the volume will see another more interface: BRIGHTNESS CONTRAST SHARTPNESS COLOR HUE RESET Then press / ...
User Manual in English
Page 15
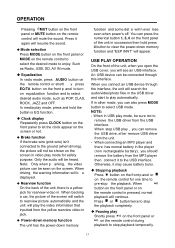
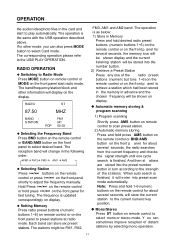
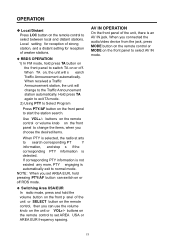
... function and some dat a will n ever lose even when power's off. Such as Radio, USB, SD, AV IN mode. ◆ Equalization In radio mode, press AUDIO button on the remote control or shortl y press EQ/TA button on the front p anel to turn on equalization function and to the USB interface... interface. When connecting an MP3 player and there has normal battery in video play mode, be seen on the screen. Otherwise, it to select desired audio mode, such as POP, CLAS, ROCK, JAZZ and OFF. Press or button twice to select USB mode. When backing a car, the picture of the unit...
... function and some dat a will n ever lose even when power's off. Such as Radio, USB, SD, AV IN mode. ◆ Equalization In radio mode, press AUDIO button on the remote control or shortl y press EQ/TA button on the front p anel to turn on equalization function and to the USB interface... interface. When connecting an MP3 player and there has normal battery in video play mode, be seen on the screen. Otherwise, it to select desired audio mode, such as POP, CLAS, ROCK, JAZZ and OFF. Press or button twice to select USB mode. When backing a car, the picture of the unit...
User Manual in English
Page 16
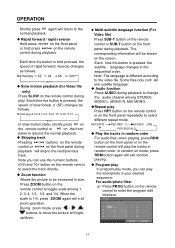
...speed of rapid forwar d /reverse changes as follows. Note: The language is 1/4, press ZOOM again will be increased in random order. For audio/photo files: a) Press PROG button on the screen. When the scale is different according to the normal playback. ◆ Rapid forward / ...-subtitle language function (For Video file) Press SUB-T button on the remote control or SUB-T button on the front panel during playback to change the audio channel among 1, 2, 3, 4, 1/2 , 1/3, and 1/4. Note you can use the numeric buttons (0-9) and 10+ button on the front panel repeatedly...
...speed of rapid forwar d /reverse changes as follows. Note: The language is 1/4, press ZOOM again will be increased in random order. For audio/photo files: a) Press PROG button on the screen. When the scale is different according to the normal playback. ◆ Rapid forward / ...-subtitle language function (For Video file) Press SUB-T button on the remote control or SUB-T button on the front panel during playback to change the audio channel among 1, 2, 3, 4, 1/2 , 1/3, and 1/4. Note you can use the numeric buttons (0-9) and 10+ button on the front panel repeatedly...

User Manual in English
Page 17
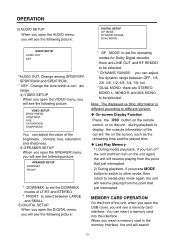
... remote control, then use / buttons to move between the different pages, such as SYSTEM SETUP, LANGUAGE SETUP, AUDIO SETUP, VIDEO SETUP, SPEAKER SETUP and DIGITAL SETUP. d) If you will skip over the menu to play ....se tup page at first, see the langua page: LANGUAGE SETUP OSD LANGUAGE AUDIO LANG SUBTITLE LANG MENU LANG e setup ge setup * You can use / buttons and ENTER button to... change the OSD LANGUAGE, AUDIO LANGUAGE, SUBTITLE LANGUAGE, MENU LANGUAGE among 4:3 PS, 4:3 LB and 16:9. * PASSWORD: Change the PASSWORD...
... remote control, then use / buttons to move between the different pages, such as SYSTEM SETUP, LANGUAGE SETUP, AUDIO SETUP, VIDEO SETUP, SPEAKER SETUP and DIGITAL SETUP. d) If you will skip over the menu to play ....se tup page at first, see the langua page: LANGUAGE SETUP OSD LANGUAGE AUDIO LANG SUBTITLE LANG MENU LANG e setup ge setup * You can use / buttons and ENTER button to... change the OSD LANGUAGE, AUDIO LANGUAGE, SUBTITLE LANGUAGE, MENU LANGUAGE among 4:3 PS, 4:3 LB and 16:9. * PASSWORD: Change the PASSWORD...
User Manual in English
Page 18
... SETUP When you open the USB cover, you will see a memory card interface. OPERATION 3) AUDIO SETUP When you open the AUDIO menu, you will see the following picture: DIGITAL SETUP OP MODE DYNAMIC RANGE DUAL MONO AUDIO SETUP AUDIO OUT KEY *AUDIO OUT: Change among SPDIF/OFF, SPDIF/RAW and SPDIF/PCM. * KEY: Change the...
... SETUP When you open the USB cover, you will see a memory card interface. OPERATION 3) AUDIO SETUP When you open the AUDIO menu, you will see the following picture: DIGITAL SETUP OP MODE DYNAMIC RANGE DUAL MONO AUDIO SETUP AUDIO OUT KEY *AUDIO OUT: Change among SPDIF/OFF, SPDIF/RAW and SPDIF/PCM. * KEY: Change the...
User Manual in English
Page 19
... button to Radio Mode Press MODE button on remote control or MODE on the front panel to the strength of the st ations. OPERATION the audio/video/photo files in the card and start radio mode. The operation is finished. Note: Press and hold press / on the display. RADIO 87.50...
... button to Radio Mode Press MODE button on remote control or MODE on the front panel to the strength of the st ations. OPERATION the audio/video/photo files in the card and start radio mode. The operation is finished. Note: Press and hold press / on the display. RADIO 87.50...
User Manual in English
Page 20
... Press LOC button on the remote control to start the station search. When TA on, the unit will change the items, when you connected the audio/video device from the jack, press MODE button on the remote control or MODE on the front panel to normal mode. Hold press TA again...
... Press LOC button on the remote control to start the station search. When TA on, the unit will change the items, when you connected the audio/video device from the jack, press MODE button on the remote control or MODE on the front panel to normal mode. Hold press TA again...
User Manual in English
Page 21
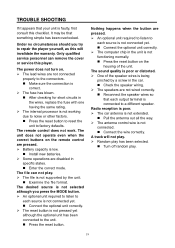
The sound quality is poor or distorted. ¾ One of the unit. Under no circumstances should you press the MODE button. ¾ An optional unit required to listen to each source is not connected yet. „ Connect the optional unit correctly. ¾ The reset button is not pressed yet although the optional unit has been connected to the connectors. „ Make sure the connection is correct. ¾ The fuse has blown. „ After checking for short circuits in the unit is not functioning normally. „ Press the reset button on . ¾ The lead wires are pressed. ¾ An ...
The sound quality is poor or distorted. ¾ One of the unit. Under no circumstances should you press the MODE button. ¾ An optional unit required to listen to each source is not connected yet. „ Connect the optional unit correctly. ¾ The reset button is not pressed yet although the optional unit has been connected to the connectors. „ Make sure the connection is correct. ¾ The fuse has blown. „ After checking for short circuits in the unit is not functioning normally. „ Press the reset button on . ¾ The lead wires are pressed. ¾ An ...
