User Manual in English Old
Page 5
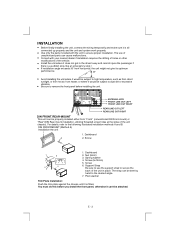
... RIGHT REAR LINE OUT LEFT REAR LINE OUT RIGHT DIN FRONT/REAR-MOUNT This unit can be property installed either from horizontal, the unit might not give its optimum performance. 30° Avoid installing the unit where it would be subject to secure the back of the unit chassis). Nut (5mm)...use the support strap to dust dirt or excessive vibration. The strap can cause malfunctions. For details, refer to remove the front panel before you install the front panel, otherwise it is all connected up properly and the unit and system work properly. Screw (5x15mm) 5. Be sure to the ...
... RIGHT REAR LINE OUT LEFT REAR LINE OUT RIGHT DIN FRONT/REAR-MOUNT This unit can be property installed either from horizontal, the unit might not give its optimum performance. 30° Avoid installing the unit where it would be subject to secure the back of the unit chassis). Nut (5mm)...use the support strap to dust dirt or excessive vibration. The strap can cause malfunctions. For details, refer to remove the front panel before you install the front panel, otherwise it is all connected up properly and the unit and system work properly. Screw (5x15mm) 5. Be sure to the ...
User Manual in English Old
Page 6
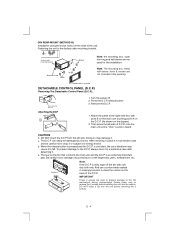
... ring,and half-sleeve are not used to prevent damage to the CD mechanism during transportation Please make sure to remove the 2 screws before installing the unit into the unit before removing the 2 screws. Remove the D.C.P. 1. Attach the panel at the right side first, with point ... rear connector that connects the main unit and the D.C.P is heard. PANEL RELEASE BUTTON Attaching the DCP 2 B A 1. E - 4 DIN REAR-MOUNT (METHOD B) Installation using the screw holes on the back of the D.C.P. Screw Hook Hook Note: The mounting box, metal half sleeve, hook & screws are used for this...
... ring,and half-sleeve are not used to prevent damage to the CD mechanism during transportation Please make sure to remove the 2 screws before installing the unit into the unit before removing the 2 screws. Remove the D.C.P. 1. Attach the panel at the right side first, with point ... rear connector that connects the main unit and the D.C.P is heard. PANEL RELEASE BUTTON Attaching the DCP 2 B A 1. E - 4 DIN REAR-MOUNT (METHOD B) Installation using the screw holes on the back of the D.C.P. Screw Hook Hook Note: The mounting box, metal half sleeve, hook & screws are used for this...
User Manual in English Old
Page 7
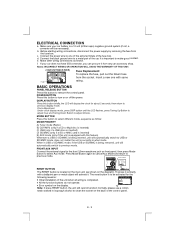
... will be activated for about 2 seconds, then return to one with a ballpoint pen or metal object will display the clock for the following reasons: Initial installation of the control panel. Clock Adjustment Under clock display mode, press DISP button until the LCD flashes, press Tuning Up Button to adjust hour and...
... will be activated for about 2 seconds, then return to one with a ballpoint pen or metal object will display the clock for the following reasons: Initial installation of the control panel. Clock Adjustment Under clock display mode, press DISP button until the LCD flashes, press Tuning Up Button to adjust hour and...

User Manual in English Old
Page 10
... in picture 1.(P.1) 2.Plug in the USB drive / device completely as normal CD or MP3 disc playback. Always choose a compatible USB drive / device which require to install a driver. P.1 USB SOCKET P.2 TO STOP USB PLAYBACK 1.The USB drive / device is inserted in the unit ) or any other mode. 2.User can use an extension...
... in picture 1.(P.1) 2.Plug in the USB drive / device completely as normal CD or MP3 disc playback. Always choose a compatible USB drive / device which require to install a driver. P.1 USB SOCKET P.2 TO STOP USB PLAYBACK 1.The USB drive / device is inserted in the unit ) or any other mode. 2.User can use an extension...
User Manual in English Old
Page 15
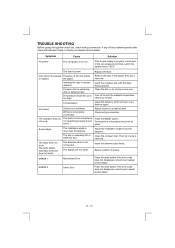
...ambient temperature returns to a desired level. The radio does not work . The signals are too weak. Select a station manually. The installation angle is too high. The disc is not properly connected. Insert the antenna cable firmly. Replace the fuse. Insert the compact disc ...with the label facing upward. Adjust the installation angle to play a new one . ERROR 2 Servo Error Press the reset button if the error code does not disappear, consult your...
...ambient temperature returns to a desired level. The radio does not work . The signals are too weak. Select a station manually. The installation angle is too high. The disc is not properly connected. Insert the antenna cable firmly. Replace the fuse. Insert the compact disc ...with the label facing upward. Adjust the installation angle to play a new one . ERROR 2 Servo Error Press the reset button if the error code does not disappear, consult your...


