User Manual in English Old
Page 2
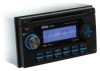
MP3-Compatible Double-Din In Dash CD Receiver with USB and SD Memory Card Ports and Front Panel AUX Input
MP3-Compatible Double-Din In Dash CD Receiver with USB and SD Memory Card Ports and Front Panel AUX Input

User Manual in English Old
Page 3
LOCATION OF CONTROLS PANEL RELEASE POWER BUTTON BUTTON PRESET MEMORY BUTTONS CD SLOT (M1-M6) MODE MONO EJECT BUTTON BUTTON BUTTON SCAN BUTTON CD PAUSE BUTTON DSP BUTTON MUTE BUTTON DISPLAY/ ID3 TAG INFORMATION BUTTON AMS/MP3 MENU BUTTON BAND/ LOUDNESS/ MP3 ENTER BUTTON LOCAL BUTTON CD SCAN BUTTON CD REPEAT BUTTON CD SHUFFLE BUTTON DIRECTORY UP/ DOWN TUNING / SEEK / TRACK / MP3 FILES SEARCH UP/DOWN BUTTON ENCODER VOLUME KNOB FUNCTION SELECT BUTTON POWER BUTTON MP3/AMS BUTTON TUNING / SEEK / CD TRACK UP / DOWN BUTTON BAND / LOUDNESS / MP3 ENTER BUTTON VOLUME UP...
LOCATION OF CONTROLS PANEL RELEASE POWER BUTTON BUTTON PRESET MEMORY BUTTONS CD SLOT (M1-M6) MODE MONO EJECT BUTTON BUTTON BUTTON SCAN BUTTON CD PAUSE BUTTON DSP BUTTON MUTE BUTTON DISPLAY/ ID3 TAG INFORMATION BUTTON AMS/MP3 MENU BUTTON BAND/ LOUDNESS/ MP3 ENTER BUTTON LOCAL BUTTON CD SCAN BUTTON CD REPEAT BUTTON CD SHUFFLE BUTTON DIRECTORY UP/ DOWN TUNING / SEEK / TRACK / MP3 FILES SEARCH UP/DOWN BUTTON ENCODER VOLUME KNOB FUNCTION SELECT BUTTON POWER BUTTON MP3/AMS BUTTON TUNING / SEEK / CD TRACK UP / DOWN BUTTON BAND / LOUDNESS / MP3 ENTER BUTTON VOLUME UP...

User Manual in English Old
Page 4
...not expose the discs to stop spinning and may cause malfunction or ruin your discs. In such a case, remove the disc and wait for this occur, the unit will not operate properly. To keep the disc clean, do not use the discs explained below, the sticky residue can be played. (For more...direct sunlight or heat sources such as follows. Wipe each disc from under the stickers). Labels are paste residue. Should this unit and do not touch the surface (P.1). To enjoy optimum sound, handle the disc as hot air-ducts, or leave them in a car parked in temperature inside the unit...
...not expose the discs to stop spinning and may cause malfunction or ruin your discs. In such a case, remove the disc and wait for this occur, the unit will not operate properly. To keep the disc clean, do not use the discs explained below, the sticky residue can be played. (For more...direct sunlight or heat sources such as follows. Wipe each disc from under the stickers). Labels are paste residue. Should this unit and do not touch the surface (P.1). To enjoy optimum sound, handle the disc as hot air-ducts, or leave them in a car parked in temperature inside the unit...
User Manual in English Old
Page 5
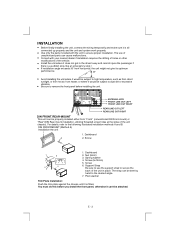
..., such as from direct sunlight, or from hot air, from "Front" (conventional DIN Front-mount) or "Rear"(DIN Rear-mount installation, utilizing threaded screw holes at the sides of the unit chassis). Screw 100 1 6 7 4 2 5 3 1. Spring washer 4. Be sure to remove the front panel before you install the front panel, otherwise it can be subject to ensure proper installation. ANTENNA JACK FRONT LINE OUT...
..., such as from direct sunlight, or from hot air, from "Front" (conventional DIN Front-mount) or "Rear"(DIN Rear-mount installation, utilizing threaded screw holes at the sides of the unit chassis). Screw 100 1 6 7 4 2 5 3 1. Spring washer 4. Be sure to remove the front panel before you install the front panel, otherwise it can be subject to ensure proper installation. ANTENNA JACK FRONT LINE OUT...
User Manual in English Old
Page 6
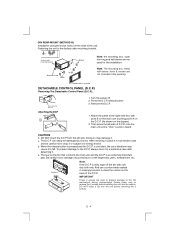
... in isopropyl alcohol to the factory radio mounting bracket. Be careful not to strong shocks. Socket Note: If the D.C.P is unlocked, the car's vibrations may damage it to remove the 2 screws before installing the unit into the unit before removing the 2 screws. IMPORTANT These 2 screws are used for this installation. Dashboard or console DETACHABLE CONTROL PANEL (D.C.P.) Removing The Detachable Control Panel (D.C.P.). Turn the power off the dirt with...
... in isopropyl alcohol to the factory radio mounting bracket. Be careful not to strong shocks. Socket Note: If the D.C.P is unlocked, the car's vibrations may damage it to remove the 2 screws before installing the unit into the unit before removing the 2 screws. IMPORTANT These 2 screws are used for this installation. Dashboard or console DETACHABLE CONTROL PANEL (D.C.P.) Removing The Detachable Control Panel (D.C.P.). Turn the power off the dirt with...
User Manual in English Old
Page 7
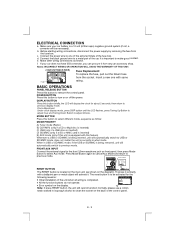
... being inserted, unit will activate it. f. Clock Adjustment Under clock display mode, press DISP button until the LCD flashes, press Tuning Up Button to adjust hour and Tuning Down Button to previous mode. FRONT CABINET LEFT TRACK RIGHT TRACK GROUND AUX IN RESET BUTTON The RESET button is inserted) E) AUX mode (only if this button to a metal part of the fuse box. ELECTRICAL CONNECTION a. Connect the black ground wire to turn on the diagram). Make other wiring connections as follow: MODE PRIORITY A) Tuner mode (Radio) B) CDP/MP3...
... being inserted, unit will activate it. f. Clock Adjustment Under clock display mode, press DISP button until the LCD flashes, press Tuning Up Button to adjust hour and Tuning Down Button to previous mode. FRONT CABINET LEFT TRACK RIGHT TRACK GROUND AUX IN RESET BUTTON The RESET button is inserted) E) AUX mode (only if this button to a metal part of the fuse box. ELECTRICAL CONNECTION a. Connect the black ground wire to turn on the diagram). Make other wiring connections as follow: MODE PRIORITY A) Tuner mode (Radio) B) CDP/MP3...

User Manual in English Old
Page 8
... OF FUNCTION: VOLUME(VOL) -> BASS(BAS) -> TREBLE(TRE) ->BALANCE(BAL) ->FADER(FAD) While the selected function is pressed. SCAN BUTTON Press this control to select stereo or monaural reception for a few seconds. FM MONO / STEREO BUTTON (MONO) Use this button, the radio will tune up to search stations, the available stations will show on the left side of the chassis to EURO frequency. Press it long to turn Volume Knob to adjust the level...
... OF FUNCTION: VOLUME(VOL) -> BASS(BAS) -> TREBLE(TRE) ->BALANCE(BAL) ->FADER(FAD) While the selected function is pressed. SCAN BUTTON Press this control to select stereo or monaural reception for a few seconds. FM MONO / STEREO BUTTON (MONO) Use this button, the radio will tune up to search stations, the available stations will show on the left side of the chassis to EURO frequency. Press it long to turn Volume Knob to adjust the level...

User Manual in English Old
Page 9
... 6 strongest stations into the 6 preset memories. Press the Track Down button during play all the preset stations in the memories, you press this button the mode will move and the functions will shown on the display, turn the encoder volume knob up to previous skip. CD OPERATIONS CD SLOT Insert the disc into memory. PROGRAMMABLE OPTIONALS To use this function keep press long SEL Button for few seconds, each time you...
... 6 strongest stations into the 6 preset memories. Press the Track Down button during play all the preset stations in the memories, you press this button the mode will move and the functions will shown on the display, turn the encoder volume knob up to previous skip. CD OPERATIONS CD SLOT Insert the disc into memory. PROGRAMMABLE OPTIONALS To use this function keep press long SEL Button for few seconds, each time you...

User Manual in English Old
Page 10
... "USB PLAY" to indicate that the USB drive / device is being plugged in correctly & the download has begun. 3.Does not matter the unit is in what mode (TUNER, CD, SD/MMC, etc), once a USB drive / device is being plugged into the unit, unit will cause permanent & serious damage to the unit & the USB drive / device. Or user can use mode button to switch to other modes, when they are in the unit ) or any mode. USB SPECIFICATION * SUPPORT MAX IG USB FLASH MEMORY * SUPPORT MAX...
... "USB PLAY" to indicate that the USB drive / device is being plugged in correctly & the download has begun. 3.Does not matter the unit is in what mode (TUNER, CD, SD/MMC, etc), once a USB drive / device is being plugged into the unit, unit will cause permanent & serious damage to the unit & the USB drive / device. Or user can use mode button to switch to other modes, when they are in the unit ) or any mode. USB SPECIFICATION * SUPPORT MAX IG USB FLASH MEMORY * SUPPORT MAX...

User Manual in English Old
Page 11
...files playback function is being inserted in (P.5). 3. SD/MMC SPECIFICATION * SUPPORT MAX 1G SD/MMC CARD * SUPPORT MAX 255 SONGS CAUTION 2.Please make sure to insert the SD or MMC card in the correct direction / orientation as indicated in the unit, unit will automatically switch to SD / MMC mode. 7. Once...PLAY" to indicate that the SD or MMC card is correctly inserted. Wrong insert will automatically switch to previous mode. 2.User can use the mode button to choose SD / MMC mode (only if SD or MMC is inserted in the unit ) or any other modes, when they are in what mode (Tuner,CD, USB...
...files playback function is being inserted in (P.5). 3. SD/MMC SPECIFICATION * SUPPORT MAX 1G SD/MMC CARD * SUPPORT MAX 255 SONGS CAUTION 2.Please make sure to insert the SD or MMC card in the correct direction / orientation as indicated in the unit, unit will automatically switch to SD / MMC mode. 7. Once...PLAY" to indicate that the SD or MMC card is correctly inserted. Wrong insert will automatically switch to previous mode. 2.User can use the mode button to choose SD / MMC mode (only if SD or MMC is inserted in the unit ) or any other modes, when they are in what mode (Tuner,CD, USB...

User Manual in English Old
Page 12
... DSP MUTE DISP B) Turn the Encoder Volume knob to skip the current track. (2) By directory or Track Name Under MP3 Play Mode, press MP3 Menu button twice, the display shows " * " , enter the name directly, Press Mp3 Enter button to confirm. Maximum number of alphabetical characters are four ways to select the desired directory. Disc written by one level. Supports Max 255 songs for MP3 Disc, USB device or...
... DSP MUTE DISP B) Turn the Encoder Volume knob to skip the current track. (2) By directory or Track Name Under MP3 Play Mode, press MP3 Menu button twice, the display shows " * " , enter the name directly, Press Mp3 Enter button to confirm. Maximum number of alphabetical characters are four ways to select the desired directory. Disc written by one level. Supports Max 255 songs for MP3 Disc, USB device or...

User Manual in English Old
Page 13
...file is available with ID3 TAG, pressing the display button repeatedly will show information in the following sequence: SONG TITLE > ARTIST> ALBUM TITLE If any of the ID3-TAG information is not available, pressing the DISPLAY button repeatedly will show information in the following sequence: ... MP3 file is without ID3 TAG, pressing the DISPLAY button, & "NO ID3 TAG" will scroll repeatedly through the display during the playing of the MP3 file will be displayed. E - 11 ID3 TAG Press DISPLAY button repeatedly to Display ID3 TAG information. The file name & track number of the MP3 file.
...file is available with ID3 TAG, pressing the display button repeatedly will show information in the following sequence: SONG TITLE > ARTIST> ALBUM TITLE If any of the ID3-TAG information is not available, pressing the DISPLAY button repeatedly will show information in the following sequence: ... MP3 file is without ID3 TAG, pressing the DISPLAY button, & "NO ID3 TAG" will scroll repeatedly through the display during the playing of the MP3 file will be displayed. E - 11 ID3 TAG Press DISPLAY button repeatedly to Display ID3 TAG information. The file name & track number of the MP3 file.

User Manual in English Old
Page 14
E - 12 SPECIFICATIONS CD PLAYER System Usable disc Sampling frequency No of quantization bits Frequency Number of channels S/N Ration RADIO SECTION FM Frequency Range Intermediate Frequency Usable Sensitivity Stereo Separation S/N Ratio AM (MW) Frequency Range Intermediate Frequency Usable Sensitivity S/N Ratio GENERAL Power Supply Polarity Speaker impedance Power Output Compact disc audio system Compact disc, CD-R, CD-RW (AUDIO/MP3 format) 44.1KHz 1bit 5-20,000Hz 2 stereo 70dB 87.5 - 107.9 Mhz(USA) 87.5 - 108 Mhz(Europe) 10...
E - 12 SPECIFICATIONS CD PLAYER System Usable disc Sampling frequency No of quantization bits Frequency Number of channels S/N Ration RADIO SECTION FM Frequency Range Intermediate Frequency Usable Sensitivity Stereo Separation S/N Ratio AM (MW) Frequency Range Intermediate Frequency Usable Sensitivity S/N Ratio GENERAL Power Supply Polarity Speaker impedance Power Output Compact disc audio system Compact disc, CD-R, CD-RW (AUDIO/MP3 format) 44.1KHz 1bit 5-20,000Hz 2 stereo 70dB 87.5 - 107.9 Mhz(USA) 87.5 - 108 Mhz(Europe) 10...
User Manual in English Old
Page 15
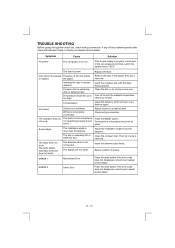
... the compact disc. Insert the compact disc with the label facing upward. The built-in minimum. Front panel is not properly connected. Adjust the installation angle to "ACC" The fuse is blown. Select a station manually. ERROR 2 Servo Error Press the reset button if the error code does not disappear, consult your nearest sevice dealer. Condensation. Wiring is not properly fixed into its place Sound skips. Check wiring connection. The radio station automatic selection does not work . The...
... the compact disc. Insert the compact disc with the label facing upward. The built-in minimum. Front panel is not properly connected. Adjust the installation angle to "ACC" The fuse is blown. Select a station manually. ERROR 2 Servo Error Press the reset button if the error code does not disappear, consult your nearest sevice dealer. Condensation. Wiring is not properly fixed into its place Sound skips. Check wiring connection. The radio station automatic selection does not work . The...


