Operating guide
Page 6
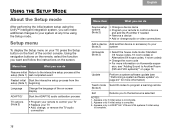
vi TAB 8 TAB 7 TAB 6 TAB 5 TAB 4 TAB 3 TAB 2 English USING THE SETUP MODE 18 About the Setup mode 18 Setup menu 18 ADDING SOUND TO ANOTHER ROOM (V25 AND V35 SYSTEMS)* 19 Expanding your system 19 Expansion guidelines 19 CARE AND MAINTENANCE 20 Replacing the batteries 20 Cleaning 20 Viewing system information 20 Troubleshooting 21 Resetting the system 24 Pairing the remote with the console 24 Performing a system software update 24 Contacting customer service 24 Limited warranty 25 Technical information 25 *Not applicable to systems sold in Japan.
vi TAB 8 TAB 7 TAB 6 TAB 5 TAB 4 TAB 3 TAB 2 English USING THE SETUP MODE 18 About the Setup mode 18 Setup menu 18 ADDING SOUND TO ANOTHER ROOM (V25 AND V35 SYSTEMS)* 19 Expanding your system 19 Expansion guidelines 19 CARE AND MAINTENANCE 20 Replacing the batteries 20 Cleaning 20 Viewing system information 20 Troubleshooting 21 Resetting the system 24 Pairing the remote with the console 24 Performing a system software update 24 Contacting customer service 24 Limited warranty 25 Technical information 25 *Not applicable to systems sold in Japan.
Operating guide
Page 11
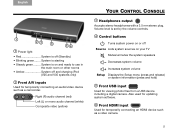
... 2 TAB 3 TAB 4 1 23 4 56 1 Power light • Red System is on your TV Mutes/unmutes the system speakers Decreases system volume Increases system volume Setup Displays the Setup menu (press and release) or system information (press and hold) 5 Front USB input Used for viewing photo files from a USB device including a digital camera.
... 2 TAB 3 TAB 4 1 23 4 56 1 Power light • Red System is on your TV Mutes/unmutes the system speakers Decreases system volume Increases system volume Setup Displays the Setup menu (press and release) or system information (press and hold) 5 Front USB input Used for viewing photo files from a USB device including a digital camera.
Operating guide
Page 12
... a minimum, the system operates in a very low power state when in standby (off) mode. However, if you programmed your remote during the initial setup, press the TV power button on your TV. The power LED on -screen controls. 6 To keep energy consumption to blinking green while the system starts...English Turning on your TV If you decide to use the remote that came with your TV. Otherwise, use . Setup Pressing the Setup button on the console also starts your system and puts the Setup menu on the console. TAB 8 TAB 7 TAB 6 TAB 5 POWER ON/OFF CONTROLS Starting your system Press the...
... a minimum, the system operates in a very low power state when in standby (off) mode. However, if you programmed your remote during the initial setup, press the TV power button on your TV. The power LED on -screen controls. 6 To keep energy consumption to blinking green while the system starts...English Turning on your TV If you decide to use the remote that came with your TV. Otherwise, use . Setup Pressing the Setup button on the console also starts your system and puts the Setup menu on the console. TAB 8 TAB 7 TAB 6 TAB 5 POWER ON/OFF CONTROLS Starting your system Press the...

Operating guide
Page 13
...)" and "Input 2 (HDMI)." • If you select a device that is not turned on, a message will appear on the screen reminding you named a device during the setup process, the assigned name appears in the following example: 2. Unnamed devices appear as generic inputs such as shown in the list.
...)" and "Input 2 (HDMI)." • If you select a device that is not turned on, a message will appear on the screen reminding you named a device during the setup process, the assigned name appears in the following example: 2. Unnamed devices appear as generic inputs such as shown in the list.

Operating guide
Page 14
...the TV Input button to first select the input for channel numbers using the tuner in your TV programs. 2. Use the dash button for the Bose system, then press the SOURCE button and select another source. Tune to last selected channel. Tune to select a station from the program guide. ... into your TV. TAB 8 TAB 7 TAB 6 TAB 5 OPERATING YOUR CONNECTED DEVICES Watching TV Your TV may need to point the Bose® remote at your TV to operate it during the setup process. 1. TAB 4 TAB 3 TAB 2 English 3. Tuning to a TV station You can tune to a TV station." Press the ...
...the TV Input button to first select the input for channel numbers using the tuner in your TV programs. 2. Use the dash button for the Bose system, then press the SOURCE button and select another source. Tune to last selected channel. Tune to select a station from the program guide. ... into your TV. TAB 8 TAB 7 TAB 6 TAB 5 OPERATING YOUR CONNECTED DEVICES Watching TV Your TV may need to point the Bose® remote at your TV to operate it during the setup process. 1. TAB 4 TAB 3 TAB 2 English 3. Tuning to a TV station You can tune to a TV station." Press the ...
Operating guide
Page 15
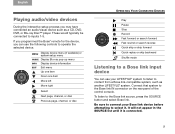
If you programmed the Bose® remote for the device, you may have connected an audio/visual device such as another LIFESTYLE® system. It will not appear in the SOURCE list until it . MENU Display device menu (if available) or system setup menu GUIDE Display Blu-ray pop-up menu INFO ...as a CD, DVD, DVR, or Blu-ray Disc™ player. These would typically be connected to the Bose link IN connector on the rear panel of the control console. To listen to select it is connected. 9 Be sure to connect your LIFESTYLE® system to listen to operate the selected device.
If you programmed the Bose® remote for the device, you may have connected an audio/visual device such as another LIFESTYLE® system. It will not appear in the SOURCE list until it . MENU Display device menu (if available) or system setup menu GUIDE Display Blu-ray pop-up menu INFO ...as a CD, DVD, DVR, or Blu-ray Disc™ player. These would typically be connected to the Bose link IN connector on the rear panel of the control console. To listen to select it is connected. 9 Be sure to connect your LIFESTYLE® system to listen to operate the selected device.
Operating guide
Page 24
...™ intelligent integration system, you can do Resume initial Return to the interactive setup process at any time using the Setup mode. Appears only if initial setup is complete. 18 Appears only in LIFESTYLE® V25 and V35 systems if initial setup is incomplete. 2. sion, see "Performing a system software update" on page 24" for more...
...™ intelligent integration system, you can do Resume initial Return to the interactive setup process at any time using the Setup mode. Appears only if initial setup is complete. 18 Appears only in LIFESTYLE® V25 and V35 systems if initial setup is incomplete. 2. sion, see "Performing a system software update" on page 24" for more...

Operating guide
Page 25
..., select Homewide in the Setup menu and then select house code. English TAB 2 TAB 3 TAB 4 TAB 5 TAB 6 TAB 7 TAB 8 ADDING SOUND TO ANOTHER ROOM (V25 AND V35 SYSTEMS)* Expanding your system Your LIFESTYLE® system can deliver Bose® quality sound in up a Bose link-compatible system in another...the same time, they can only listen to the same station. *Not applicable to zero (0). • Using HDMI connections - Connecting a Bose link-compatible product to 14 additional rooms in your home. Expansion guidelines To set to match the house code in another room to purchase ...
..., select Homewide in the Setup menu and then select house code. English TAB 2 TAB 3 TAB 4 TAB 5 TAB 6 TAB 7 TAB 8 ADDING SOUND TO ANOTHER ROOM (V25 AND V35 SYSTEMS)* Expanding your system Your LIFESTYLE® system can deliver Bose® quality sound in up a Bose link-compatible system in another...the same time, they can only listen to the same station. *Not applicable to zero (0). • Using HDMI connections - Connecting a Bose link-compatible product to 14 additional rooms in your home. Expansion guidelines To set to match the house code in another room to purchase ...
Operating guide
Page 26
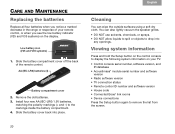
..., or when you see the low battery indicator (V25 and V35 systems) on the display. Viewing system information Press and hold the Setup button on the control console to drop into place. Slide the battery cover back into any openings. Remove the old batteries. 3. Low...Radio software version • TV connection status • Remote control ID number and software version • House code • Connected Bose® link rooms • Device connections Press the Setup button again to the markings inside the battery compartment. 4. AA (IEC-LR6) batteries (4) Battery compartment cover 2.
..., or when you see the low battery indicator (V25 and V35 systems) on the display. Viewing system information Press and hold the Setup button on the control console to drop into place. Slide the battery cover back into any openings. Remove the old batteries. 3. Low...Radio software version • TV connection status • Remote control ID number and software version • House code • Connected Bose® link rooms • Device connections Press the Setup button again to the markings inside the battery compartment. 4. AA (IEC-LR6) batteries (4) Battery compartment cover 2.
Operating guide
Page 27
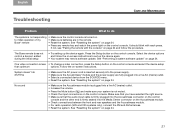
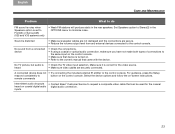
... system. System doesn't do The system is not responding to initial operation of my Bose® remote • Make sure the control console is less • To change a video connection, press the Setup button on -screen instructions to do anything • Make sure the AC power cord... a live AC (mains) outlet. • Select a connected device from the SOURCE menu. • Reset the system. The Bose remote does not control a device I added during the initial setup • Try setting up the device again. • Your system may need a software update. Follow the on the control console...
... system. System doesn't do The system is not responding to initial operation of my Bose® remote • Make sure the control console is less • To change a video connection, press the Setup button on -screen instructions to do anything • Make sure the AC power cord... a live AC (mains) outlet. • Select a connected device from the SOURCE menu. • Reset the system. The Bose remote does not control a device I added during the initial setup • Try setting up the device again. • Your system may need a software update. Follow the on the control console...
Operating guide
Page 29
...OPTIONS menu to the control console. Make sure it is turned on -screen instructions. remote commands Intermittent audio dropouts • Contact Bose® Customer Service to button on coaxial digital audio digital audio connection. Set Speakers option to Stereo(2) in the rear speakers. For... guidance, press the Setup respond consistently to request a composite video cable that came with the device. A connected device does not • Try connecting the included...
...OPTIONS menu to the control console. Make sure it is turned on -screen instructions. remote commands Intermittent audio dropouts • Contact Bose® Customer Service to button on coaxial digital audio digital audio connection. Set Speakers option to Stereo(2) in the rear speakers. For... guidance, press the Setup respond consistently to request a composite video cable that came with the device. A connected device does not • Try connecting the included...
Operating guide
Page 30
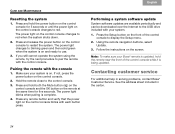
...the control console. 2. If not, press the power button on the control console changes to red when the system shuts down. 2. Press the Setup button on . Contacting customer service For additional help in the carton. 24 Make sure your system is on the front of the control console ... with the control console. Hold the remote close to red. Follow the instructions on and ready to display the Setup menu. 2. See the address sheet included in solving problems, contact Bose® Customer Service. The power light changes to pair the remote with the console 1. Note: To make sure...
...the control console. 2. If not, press the power button on the control console changes to red when the system shuts down. 2. Press the Setup button on . Contacting customer service For additional help in the carton. 24 Make sure your system is on the front of the control console ... with the control console. Hold the remote close to red. Follow the instructions on and ready to display the Setup menu. 2. See the address sheet included in solving problems, contact Bose® Customer Service. The power light changes to pair the remote with the console 1. Note: To make sure...
Operating guide
Page 31
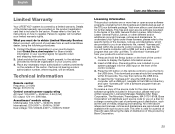
... Your LIFESTYLE® system is valid for the open source software programs included in this product, please mail your rights under these licenses, please refer to the specific terms of the control console to display the System Information screen. 2. What you in your country/region (visit Global.Bose.com/...and distributed as the cost of the limited warranty are reproduced and available with proof of the control console. 3. Press and hold the Setup button on the front of the licenses, notices, and disclaimers, which are provided to you must do to : Licensing Manager, Mailstop 6A2...
... Your LIFESTYLE® system is valid for the open source software programs included in this product, please mail your rights under these licenses, please refer to the specific terms of the control console to display the System Information screen. 2. What you in your country/region (visit Global.Bose.com/...and distributed as the cost of the limited warranty are reproduced and available with proof of the control console. 3. Press and hold the Setup button on the front of the licenses, notices, and disclaimers, which are provided to you must do to : Licensing Manager, Mailstop 6A2...
Installation guide
Page 3
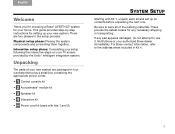
... instructions for your new system. If any necessary shipping or transporting. For Bose contact information, refer to the setup process: Physical setup phase: Placing the system components and connecting them together. English TAB 2 TAB 3 TAB 4 Welcome Thank you for choosing a Bose® LIFESTYLE® system for setting up its contents before unpacking the next one...
... instructions for your new system. If any necessary shipping or transporting. For Bose contact information, refer to the setup process: Physical setup phase: Placing the system components and connecting them together. English TAB 2 TAB 3 TAB 4 Welcome Thank you for choosing a Bose® LIFESTYLE® system for setting up its contents before unpacking the next one...
Installation guide
Page 4
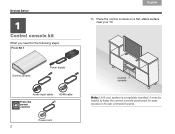
Control console Power supply Audio input cable From the power cord kit HDMI cable Power cord 2 Control console Note: Until your TV. Place the control console on a flat, stable surface near your system is completely installed, it may be helpful to its rear connection panel. TAB 8 TAB 7 SYSTEM SETUP TAB 6 11 Control console kit What you need for easy access to keep the control console positioned for the following steps: From Kit 1 TAB 5 TAB 4 TAB 3 TAB 2 English 1.
Control console Power supply Audio input cable From the power cord kit HDMI cable Power cord 2 Control console Note: Until your TV. Place the control console on a flat, stable surface near your system is completely installed, it may be helpful to its rear connection panel. TAB 8 TAB 7 SYSTEM SETUP TAB 6 11 Control console kit What you need for easy access to keep the control console positioned for the following steps: From Kit 1 TAB 5 TAB 4 TAB 3 TAB 2 English 1.

Installation guide
Page 5
If an HDMI cable is already connected to an HDMI input on your TV, you are using into an HDMI INPUT connector on your TV. Just disconnect the other end of the HDMI cable into the connector labeled HDMI OUT Video to TV 3 HDMI OUT Video to TV on the control console. English TAB 2 TAB 3 TAB 4 2. Plug one end of the HDMI cable you can use this one. TAB 5 TAB 6 TAB 7 TAB 8 SYSTEM SETUP 3. Plug the other end.
If an HDMI cable is already connected to an HDMI input on your TV, you are using into an HDMI INPUT connector on your TV. Just disconnect the other end of the HDMI cable into the connector labeled HDMI OUT Video to TV 3 HDMI OUT Video to TV on the control console. English TAB 2 TAB 3 TAB 4 2. Plug one end of the HDMI cable you can use this one. TAB 5 TAB 6 TAB 7 TAB 8 SYSTEM SETUP 3. Plug the other end.
Installation guide
Page 6
... cable on the control console. Make sure the flat surface with Kit 2 on the plug faces up the next kit. TAB 8 TAB 7 TAB 6 TAB 5 SYSTEM SETUP 4.
... cable on the control console. Make sure the flat surface with Kit 2 on the plug faces up the next kit. TAB 8 TAB 7 TAB 6 TAB 5 SYSTEM SETUP 4.

Installation guide
Page 7
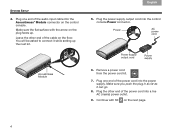
Acoustimass module Acoustimass module From the power cord kit Power cord 2. Place the Acoustimass module on its side and locate the connector panel. Lay the module on the floor at the same end of the room as the TV. Connector panel 5 English TAB 2 TAB 3 TAB 4 2 Acoustimass® module kit What you need for the following steps: From Kit 2 TAB 5 TAB 6 TAB 7 TAB 8 SYSTEM SETUP 1. Make sure there is a live AC outlet nearby.
Acoustimass module Acoustimass module From the power cord kit Power cord 2. Place the Acoustimass module on its side and locate the connector panel. Lay the module on the floor at the same end of the room as the TV. Connector panel 5 English TAB 2 TAB 3 TAB 4 2 Acoustimass® module kit What you need for the following steps: From Kit 2 TAB 5 TAB 6 TAB 7 TAB 8 SYSTEM SETUP 1. Make sure there is a live AC outlet nearby.

Installation guide
Page 8
... the Acoustimass module. Plug the free end of the power cord into the AC Power connector on its front or back end. 3. TAB 8 TAB 7 SYSTEM SETUP TAB 6 TAB 5 CAUTION: DO NOT stand the Acoustimass® module on the Acoustimass module.
... the Acoustimass module. Plug the free end of the power cord into the AC Power connector on its front or back end. 3. TAB 8 TAB 7 SYSTEM SETUP TAB 6 TAB 5 CAUTION: DO NOT stand the Acoustimass® module on the Acoustimass module.

Installation guide
Page 9
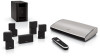
... these accessories, contact your local Bose dealer or visit www.Bose.com. 7 English TAB 2 TAB 3 3 Speaker kit What you need for the following steps: From Kit 3: System speakers (one set of the three types shown) Jewel Cube® speakers TAB 4 TAB 5 TAB 6 Front speaker cables TAB 7 TAB 8 SYSTEM SETUP Left front (L) White Center...
... these accessories, contact your local Bose dealer or visit www.Bose.com. 7 English TAB 2 TAB 3 3 Speaker kit What you need for the following steps: From Kit 3: System speakers (one set of the three types shown) Jewel Cube® speakers TAB 4 TAB 5 TAB 6 Front speaker cables TAB 7 TAB 8 SYSTEM SETUP Left front (L) White Center...


