Lifestyle® VS-2 video enhancer - Owner's guide
Page 5
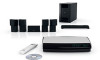
Your VS-2 comes with your LIFESTYLE® system and select the CD/DVD source. 2. You can purchase additional cables from your authorized Bose® dealer immediately. Notify Bose or your Bose dealer or local electronics retailer. 5 For Bose contact information, refer to the address sheet included in case you ... . Check to update your product. Load the software update disc into the Lifestyle system media center and allow it to be sure your system includes the parts shown on your LIFESTYLE® system. If any additional cables, please read this guide before you ...
Your VS-2 comes with your LIFESTYLE® system and select the CD/DVD source. 2. You can purchase additional cables from your authorized Bose® dealer immediately. Notify Bose or your Bose dealer or local electronics retailer. 5 For Bose contact information, refer to the address sheet included in case you ... . Check to update your product. Load the software update disc into the Lifestyle system media center and allow it to be sure your system includes the parts shown on your LIFESTYLE® system. If any additional cables, please read this guide before you ...
Lifestyle® VS-2 video enhancer - Owner's guide
Page 6
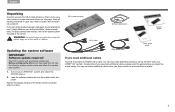
... rear panel of the media center. Connecting the VS-2 to your media center • Connect the 4-connector end of the VS-2 cable to your LIFESTYLE® DVD home entertainment system. 6 Note: Straighten the DC power cord from the media center power supply and from the VS-2 to the end panel of the... plug into the DC POWER Out connector. • Connect the media center power supply to the media center as much as the antenna for your LIFESTYLE system, wait 30 seconds, and unplug the media center power supply from the wall outlet. Media center rear panel 12 34 Media center power supply...
... rear panel of the media center. Connecting the VS-2 to your media center • Connect the 4-connector end of the VS-2 cable to your LIFESTYLE® DVD home entertainment system. 6 Note: Straighten the DC power cord from the media center power supply and from the VS-2 to the end panel of the... plug into the DC POWER Out connector. • Connect the media center power supply to the media center as much as the antenna for your LIFESTYLE system, wait 30 seconds, and unplug the media center power supply from the wall outlet. Media center rear panel 12 34 Media center power supply...
Lifestyle® VS-2 video enhancer - Owner's guide
Page 19
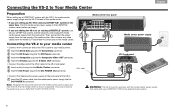
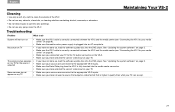
Just press the remote button (CD/DVD, VCR, CBL•SAT, or AUX) for the source you want to the audio from another Normally, when you select one source while listening to ... cable or satellite box. Watching video from one of the sources connected to the VS-2, be sure the source is set TV control to your LIFESTYLE® system, the remote changes channels on the selected channel of your system setup greatly simplifies source selection. blank TV message TV CHOOSE TV INPUT...
Just press the remote button (CD/DVD, VCR, CBL•SAT, or AUX) for the source you want to the audio from another Normally, when you select one source while listening to ... cable or satellite box. Watching video from one of the sources connected to the VS-2, be sure the source is set TV control to your LIFESTYLE® system, the remote changes channels on the selected channel of your system setup greatly simplifies source selection. blank TV message TV CHOOSE TV INPUT...
Lifestyle® VS-2 video enhancer - Owner's guide
Page 21
... VS-2. • Do not use any solvents, chemicals, or cleaning solutions containing alcohol, ammonia, or abrasives. • Do not allow liquids to spill into the DVD player. See "Updating the system software" on page 5. • Make sure the VS-2 cable is fully inserted into the media center connector. • Make sure... to the TV output connector on the VS-2. • Make sure you have not used a source that outputs a video format that is plugged into the DVD player. No picture on your TV.
... VS-2. • Do not use any solvents, chemicals, or cleaning solutions containing alcohol, ammonia, or abrasives. • Do not allow liquids to spill into the DVD player. See "Updating the system software" on page 5. • Make sure the VS-2 cable is fully inserted into the media center connector. • Make sure... to the TV output connector on the VS-2. • Make sure you have not used a source that outputs a video format that is plugged into the DVD player. No picture on your TV.

Installation guide
Page 1
LIFESTYLE® DVD HOME ENTERTAINMENT SYSTEMS with VS-2 Video Enhancer Installation Guide Guía de instalación Notice d'installation
LIFESTYLE® DVD HOME ENTERTAINMENT SYSTEMS with VS-2 Video Enhancer Installation Guide Guía de instalación Notice d'installation
Installation guide
Page 2
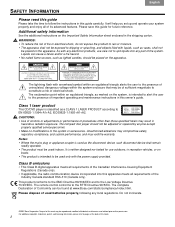
... nor tested for future reference. The remote control conforms to the Low Voltage Directive 73/23/EEC. Do not incinerate. ©2007 Bose Corporation. No part of its advanced features. It will help you set up and operate your system properly and enjoy all requirements of ...of this work may result in this guide carefully. The lightning flash with the power supply provided. Class 1 laser product This CD/DVD player is used only with arrowhead symbol within an equilateral triangle alerts the user to the presence of uninsulated, dangerous voltage within an ...
... nor tested for future reference. The remote control conforms to the Low Voltage Directive 73/23/EEC. Do not incinerate. ©2007 Bose Corporation. No part of its advanced features. It will help you set up and operate your system properly and enjoy all requirements of ...of this work may result in this guide carefully. The lightning flash with the power supply provided. Class 1 laser product This CD/DVD player is used only with arrowhead symbol within an equilateral triangle alerts the user to the presence of uninsulated, dangerous voltage within an ...

Installation guide
Page 5
... switching. Refer to -use system delivers superior performance for both music and video program content. Through proprietary Bose technologies and innovative LIFESTYLE® system design, this elegant and easy-to the contact list provided in the carton. 5 A ...Quick Setup Guide - INTRODUCTION English DEsepuatsñcohl FItralniaçnaois Nederlands Svenska INTRODUCTION Welcome Thank you for purchasing a Bose® LIFESTYLE® DVD home entertainment system with specific setup questions. Your system features: • HDMI connectivity • Automatic video switching ...
... switching. Refer to -use system delivers superior performance for both music and video program content. Through proprietary Bose technologies and innovative LIFESTYLE® system design, this elegant and easy-to the contact list provided in the carton. 5 A ...Quick Setup Guide - INTRODUCTION English DEsepuatsñcohl FItralniaçnaois Nederlands Svenska INTRODUCTION Welcome Thank you for purchasing a Bose® LIFESTYLE® DVD home entertainment system with specific setup questions. Your system features: • HDMI connectivity • Automatic video switching ...
Installation guide
Page 6
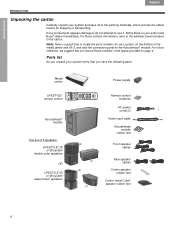
... we suggest that you unpack your system and save all of 5 speakers: LIFESTYLE® 28 or 38 system double cube speakers OR LIFESTYLE 35 or 48 system Jewel Cube® speakers On Off Mute All Mute Stored CD·DVD FM·AM AUX TV CBL·SAT VCR Input On Off On...remote control Acoustimass® module One set of the packing materials, which provide the safest means for your authorized Bose® dealer immediately. Parts list As you have the following parts. For Bose contact information, refer to use it. If any product part appears damaged, do not attempt to the address ...
... we suggest that you unpack your system and save all of 5 speakers: LIFESTYLE® 28 or 38 system double cube speakers OR LIFESTYLE 35 or 48 system Jewel Cube® speakers On Off Mute All Mute Stored CD·DVD FM·AM AUX TV CBL·SAT VCR Input On Off On...remote control Acoustimass® module One set of the packing materials, which provide the safest means for your authorized Bose® dealer immediately. Parts list As you have the following parts. For Bose contact information, refer to use it. If any product part appears damaged, do not attempt to the address ...

Installation guide
Page 8
... designed to provide. Make sure you how to place your system as close to this system is the first step to getting the full, rich Bose® quality sound this as possible. VS-2 video enhancer You can place the VS-2 video enhancer directly behind it 's a good idea to keep the media... shows you can see the display window on the right side and allow enough room to lift up the front door and open the CD/DVD tray. • Make sure there is completely installed, it to place the VS-2 video enhancer. • Make sure the audio cables from the media center...
... designed to provide. Make sure you how to place your system as close to this system is the first step to getting the full, rich Bose® quality sound this as possible. VS-2 video enhancer You can place the VS-2 video enhancer directly behind it 's a good idea to keep the media... shows you can see the display window on the right side and allow enough room to lift up the front door and open the CD/DVD tray. • Make sure there is completely installed, it to place the VS-2 video enhancer. • Make sure the audio cables from the media center...
Installation guide
Page 23
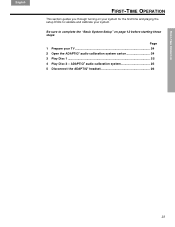
FIRST-TIME OPERATION FIRST-TIME OPERATION English DEsepuatsñcohl FItralniaçnaois Nederlands Svenska FIRST-TIME OPERATION This section guides you through turning on page 12 before starting these steps: Page 1 Prepare your system. Be sure to complete the "Basic System Setup" on your system for the first time and playing the setup DVDs to validate and calibrate your TV 24 2 Open the ADAPTiQ® audio calibration system carton 24 3 Play Disc 1 25 4 Play Disc 2 - ADAPTiQ® audio calibration system 25 5 Disconnect the ADAPTiQ® headset 26 23
FIRST-TIME OPERATION FIRST-TIME OPERATION English DEsepuatsñcohl FItralniaçnaois Nederlands Svenska FIRST-TIME OPERATION This section guides you through turning on page 12 before starting these steps: Page 1 Prepare your system. Be sure to complete the "Basic System Setup" on your system for the first time and playing the setup DVDs to validate and calibrate your TV 24 2 Open the ADAPTiQ® audio calibration system carton 24 3 Play Disc 1 25 4 Play Disc 2 - ADAPTiQ® audio calibration system 25 5 Disconnect the ADAPTiQ® headset 26 23

Installation guide
Page 25
... Disc 2 - B. Insert Disc 1 into the tray (label side up the media center front cover and press Open/Close on the LIFESTYLE® remote. Listen carefully as directed by Disc 2. B. Put on the media center connection panel (Figure 17). Follow the calibration process...previously connected device. D. Figure 17 Connecting the ADAPTiQ calibration headset Media center connection panel AUX L & R Headset 25 D. Press CD/DVD on the control panel. Replace Disc 1 with Disc 2 in your ears. FIRST-TIME OPERATION English DEsepuatsñcohl FItralniaçnaois Nederlands...
... Disc 2 - B. Insert Disc 1 into the tray (label side up the media center front cover and press Open/Close on the LIFESTYLE® remote. Listen carefully as directed by Disc 2. B. Put on the media center connection panel (Figure 17). Follow the calibration process...previously connected device. D. Figure 17 Connecting the ADAPTiQ calibration headset Media center connection panel AUX L & R Headset 25 D. Press CD/DVD on the control panel. Replace Disc 1 with Disc 2 in your ears. FIRST-TIME OPERATION English DEsepuatsñcohl FItralniaçnaois Nederlands...
Installation guide
Page 28
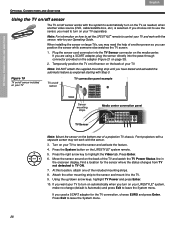
... the sensor on the bottom rear of another person so you have tested and activated the automatic feature as needed, when another video source (DVD, cable/satellite box, etc.) is Automatic) and press Exit to leave the System menu. Note: DO NOT attach the supplied mounting strip until... you can position the sensor while someone else watches the TV screen. 1. Turn on your LIFESTYLE® system, make no change (default is selected. Press Enter. 6. Press Exit to test the sensor and activate the feature. 4. When installing ...
... the sensor on the bottom rear of another person so you have tested and activated the automatic feature as needed, when another video source (DVD, cable/satellite box, etc.) is Automatic) and press Exit to leave the System menu. Note: DO NOT attach the supplied mounting strip until... you can position the sensor while someone else watches the TV screen. 1. Turn on your LIFESTYLE® system, make no change (default is selected. Press Enter. 6. Press Exit to test the sensor and activate the feature. 4. When installing ...

uMusic®+ guide
Page 4
... for this. 1. Open the disc tray on the media center. Or, you can choose to store this information when they are burned onto a CD, DVD, or DVD-R (not a DVD+R) and when the tracks are identified by music databases in and close the tray. 3. The system does not need to your collected music. Press... to share audio content with others, but confine such copying, where permissible, to be questionable, such as certain file sharing facilities; MP3s on CD or DVD MP3 tracks that may be on MP3 preparation, refer to provide the album identity. For details on for an Audio CD.
... for this. 1. Open the disc tray on the media center. Or, you can choose to store this information when they are burned onto a CD, DVD, or DVD-R (not a DVD+R) and when the tracks are identified by music databases in and close the tray. 3. The system does not need to your collected music. Press... to share audio content with others, but confine such copying, where permissible, to be questionable, such as certain file sharing facilities; MP3s on CD or DVD MP3 tracks that may be on MP3 preparation, refer to provide the album identity. For details on for an Audio CD.

uMusic®+ guide
Page 28
... your home You've already discovered how your new LIFESTYLE® system can digitally store hundreds of CDs and learn how you can enjoy your favorite music all around your home. even outdoors. Here are in the den watching a DVD. Our Free Space® 51 environmental speakers and... solution that's perfect for dinner. with some jazz on the patio, grilling, and entertaining friends. All from Bose. How can relax with great-sounding homewide expansion options from the same system. Bose offers a number of a long day, you . While you could wire to all your stored music from ...
... your home You've already discovered how your new LIFESTYLE® system can digitally store hundreds of CDs and learn how you can enjoy your favorite music all around your home. even outdoors. Here are in the den watching a DVD. Our Free Space® 51 environmental speakers and... solution that's perfect for dinner. with some jazz on the patio, grilling, and entertaining friends. All from Bose. How can relax with great-sounding homewide expansion options from the same system. Bose offers a number of a long day, you . While you could wire to all your stored music from ...
Personal® music center II - Owner's guide
Page 2
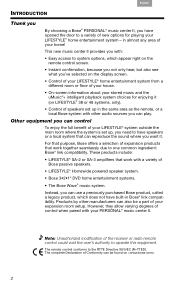
... modification of new options for enjoying it . For that purpose, Bose offers a selection of expansion products that work with other manufacturers can reproduce the sound where you want it (on LIFESTYLE® 38 or 48 systems, only). • Control of your expansion room...up in the same area as the remote, or a local Bose system with a variety of Bose passive speakers. • LIFESTYLE® Homewide powered speaker system. • Bose 3•2•1® DVD home entertainment systems. • The Bose Wave® music system. The complete Declaration of Conformity can ...
... modification of new options for enjoying it . For that purpose, Bose offers a selection of expansion products that work with other manufacturers can reproduce the sound where you want it (on LIFESTYLE® 38 or 48 systems, only). • Control of your expansion room...up in the same area as the remote, or a local Bose system with a variety of Bose passive speakers. • LIFESTYLE® Homewide powered speaker system. • Bose 3•2•1® DVD home entertainment systems. • The Bose Wave® music system. The complete Declaration of Conformity can ...
Personal® music center II - Owner's guide
Page 3
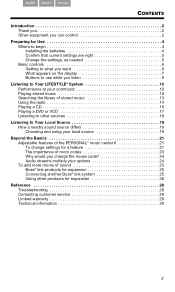
...you want 6 What appears on the display 7 Buttons to use while you listen 9 Listening to Your LIFESTYLE® System 10 Performance at your command 10 Playing stored music 10 Searching the library of stored music ...13 Using the radio 14 Playing a CD 15 Playing a DVD or VCD 17 Listening to other sources 18 Listening to Your Local Source 19 How a nearby... multiply your options 24 To add more rooms of sound 25 Bose® link products for expansion 25 Connecting another Bose® link system 25 Using other products for expansion 26 Reference...
...you want 6 What appears on the display 7 Buttons to use while you listen 9 Listening to Your LIFESTYLE® System 10 Performance at your command 10 Playing stored music 10 Searching the library of stored music ...13 Using the radio 14 Playing a CD 15 Playing a DVD or VCD 17 Listening to other sources 18 Listening to Your Local Source 19 How a nearby... multiply your options 24 To add more rooms of sound 25 Bose® link products for expansion 25 Connecting another Bose® link system 25 Using other products for expansion 26 Reference...
Personal® music center II - Owner's guide
Page 7
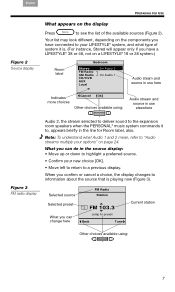
... about the source that is . (For instance, Stored will appear only if you have a LIFESTYLE® 38 or 48, not on a LIFESTYLE® 18 or 28 system.) Room label Bedroom Stored FM Radio AM Radio CD/DVD AUX Local On Audio 2 On Audio 1 Audio steam and source in use here Indicates more ... : Audio stream and source in the line for Room label, also. Your list may look different, depending on the components you have connected to your LIFESTYLE® system, and what Audio 1 and 2 mean, refer to , appears briefly in use elsewhere Figure 3 FM radio display Audio 2, the stream selected to ...
... about the source that is . (For instance, Stored will appear only if you have a LIFESTYLE® 38 or 48, not on a LIFESTYLE® 18 or 28 system.) Room label Bedroom Stored FM Radio AM Radio CD/DVD AUX Local On Audio 2 On Audio 1 Audio steam and source in use here Indicates more ... : Audio stream and source in the line for Room label, also. Your list may look different, depending on the components you have connected to your LIFESTYLE® system, and what Audio 1 and 2 mean, refer to , appears briefly in use elsewhere Figure 3 FM radio display Audio 2, the stream selected to ...
Personal® music center II - Owner's guide
Page 15
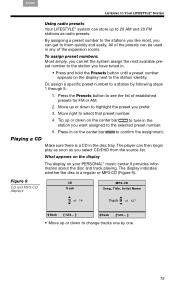
... by following steps 1 through 5: 1. English Español Français LISTENING TO YOUR LIFESTYLE® SYSTEM Using radio presets Your LIFESTYLE® system can store up to 20 AM and 20 FM stations as you select CD/DVD from the source list. By assigning a preset number to the stations you like most...
... by following steps 1 through 5: 1. English Español Français LISTENING TO YOUR LIFESTYLE® SYSTEM Using radio presets Your LIFESTYLE® system can store up to 20 AM and 20 FM stations as you select CD/DVD from the source list. By assigning a preset number to the stations you like most...

Personal® music center II - Owner's guide
Page 17
... Do this... Begin play . Resume sound at the point of other sources... Press in your list of sources. Playing a DVD or VCD With a DVD or VCD loaded in the disc tray of the LIFESTYLE® system in to confirm the number and move left arrow button to move on the center bar and...down to change chapters (or tracks) one by one, or press the center bar to see the screen that allows you to ... Figure 11 DVD or VCD display DVD Chapter VCD Track 5 of 36 5 of the track number. Skip quickly backward... Press . English Español Français LISTENING TO ...
... Do this... Begin play . Resume sound at the point of other sources... Press in your list of sources. Playing a DVD or VCD With a DVD or VCD loaded in the disc tray of the LIFESTYLE® system in to confirm the number and move left arrow button to move on the center bar and...down to change chapters (or tracks) one by one, or press the center bar to see the screen that allows you to ... Figure 11 DVD or VCD display DVD Chapter VCD Track 5 of 36 5 of the track number. Skip quickly backward... Press . English Español Français LISTENING TO ...

Personal® music center II - Owner's guide
Page 18
...LIFESTYLE® SYSTEM Français Español English Stop and start again at the beginning of your PERSONAL® music center II. Skip to increase speed. Then press again. Tip and hold to press Play a second or even third time. Press and hold . Note: DVDs... to it. Scan forward... (silences temporarily) Scan backward... (silences temporarily) Select a chapter (track) by number... Listening to other sources Your LIFESTYLE® system has connection jacks for a TV, the PERSONAL® music center II will not turn components connected to your PERSONAL® music center...
...LIFESTYLE® SYSTEM Français Español English Stop and start again at the beginning of your PERSONAL® music center II. Skip to increase speed. Then press again. Tip and hold to press Play a second or even third time. Press and hold . Note: DVDs... to it. Scan forward... (silences temporarily) Scan backward... (silences temporarily) Select a chapter (track) by number... Listening to other sources Your LIFESTYLE® system has connection jacks for a TV, the PERSONAL® music center II will not turn components connected to your PERSONAL® music center...


