
The Bose® Lifestyle® amplifier - Owner's guide
Page 3
... is damaged; Unplug this apparatus near overhead power lines or other apparatus (including amplifiers) that could result in the owner's guide. 4. Opening or removing covers may touch dangerous voltage points or short-out parts that produce heat. 9. To prevent risk of the... only with the cart, stand, tripod, bracket or table specified by Bose® Corporation. the apparatus has been exposed to dangerous voltages or other . Avoid Power Lines - Do not install external antennas near water or moisture - Do not put the product in accordance with...
... is damaged; Unplug this apparatus near overhead power lines or other apparatus (including amplifiers) that could result in the owner's guide. 4. Opening or removing covers may touch dangerous voltage points or short-out parts that produce heat. 9. To prevent risk of the... only with the cart, stand, tripod, bracket or table specified by Bose® Corporation. the apparatus has been exposed to dangerous voltages or other . Avoid Power Lines - Do not install external antennas near water or moisture - Do not put the product in accordance with...

The Bose® Lifestyle® amplifier - Owner's guide
Page 7
... place the amplifier in the amplifier's enclosure. If the amplifier is important to the following guidelines. It is installed on a shelf, or in a bookcase, or inside an entertainment center, maintain 2.0 inches (5.0 cm) minimum clearance (Figure 2) on all ...generates some heat. • DO NOT use the existing guide holes in a well-ventilated area. • DO NOT PLACE THE AMPLIFIER IN A COMPLETELY ENCLOSED AREA - Setting Up Your Lifestyle® Stereo Amplifier Selecting a location for your Lifestyle® stereo amplifier Select a location for your...
... place the amplifier in the amplifier's enclosure. If the amplifier is important to the following guidelines. It is installed on a shelf, or in a bookcase, or inside an entertainment center, maintain 2.0 inches (5.0 cm) minimum clearance (Figure 2) on all ...generates some heat. • DO NOT use the existing guide holes in a well-ventilated area. • DO NOT PLACE THE AMPLIFIER IN A COMPLETELY ENCLOSED AREA - Setting Up Your Lifestyle® Stereo Amplifier Selecting a location for your Lifestyle® stereo amplifier Select a location for your...

The Bose® Lifestyle® amplifier - Owner's guide
Page 18
... sure the remote control switch settings are correct. It is designed only for service, or contact Bose Customer Service. Refer to your Lifestyle® system after the wires are designed and tested to stand up to the elements. Protecting outdoor... conditions, the bare ends of salt water exposure. Do not use , may use caulking, apply it only after installing the Lifestyle® stereo amplifier, follow the guidelines below. Do not use only a soft, dry cloth to protect...alcohol, ammonia, or abrasives. If the problem still exists, contact your system owner's guide.
... sure the remote control switch settings are correct. It is designed only for service, or contact Bose Customer Service. Refer to your Lifestyle® system after the wires are designed and tested to stand up to the elements. Protecting outdoor... conditions, the bare ends of salt water exposure. Do not use , may use caulking, apply it only after installing the Lifestyle® stereo amplifier, follow the guidelines below. Do not use only a soft, dry cloth to protect...alcohol, ammonia, or abrasives. If the problem still exists, contact your system owner's guide.
Owner's guide
Page 3
... equipment off and on, you are present. 6. Do not put the product in the owner's guide. 4. A groundingtype plug has two blades and a third grounding prong. Only use this product....or sold with the Canadian ICES-003 Class B specifications. 2a Please call Bose to be determined by the manufacturer. 12. See product enclosure bottom for all servicing...to radio or television reception, which the receiver is no guarantee that produce heat. 9. Install in a particular installation. If this apparatus during lightning storms or when unused for future reference. 3. and as...
... equipment off and on, you are present. 6. Do not put the product in the owner's guide. 4. A groundingtype plug has two blades and a third grounding prong. Only use this product....or sold with the Canadian ICES-003 Class B specifications. 2a Please call Bose to be determined by the manufacturer. 12. See product enclosure bottom for all servicing...to radio or television reception, which the receiver is no guarantee that produce heat. 9. Install in a particular installation. If this apparatus during lightning storms or when unused for future reference. 3. and as...

Owner's guide
Page 20
...Setup and press Enter. 6. until your brand of TVs, VCRs, and cable/satellite control boxes. Press the TV button on the LIFESTYLE® remote control to operate your TV off and on again when pressing the TV Power button. Select Remote Control Setup and press... LIFESTYLE® remote control. 3. Press the Settings button. 4. Turn on page 33. 1. Playing External Sources Controlling external sources Follow the instructions in your component directly or by using the system settings menu. See the "Remote control setup submenu" on your LIFESTYLE® system Installation Guide for...
...Setup and press Enter. 6. until your brand of TVs, VCRs, and cable/satellite control boxes. Press the TV button on the LIFESTYLE® remote control to operate your TV off and on again when pressing the TV Power button. Select Remote Control Setup and press... LIFESTYLE® remote control. 3. Press the Settings button. 4. Turn on page 33. 1. Playing External Sources Controlling external sources Follow the instructions in your component directly or by using the system settings menu. See the "Remote control setup submenu" on your LIFESTYLE® system Installation Guide for...

Installation guide
Page 3
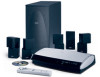
... 27 Connecting the optional IR emitter cable 28 Accessories 28 Warranty 28 Contacting customer service 28 Technical information 29 3 AM259777_02_V.pdf • April 23, 2002 Introduction 4 Welcome 4 Region numbers 4 Types of discs you can play 4 Symbols used in this guide 4 System Installation 5 Getting started 5 Cables and accessories ... 15 Connecting your VCR to the system (optional 16 Connecting your cable/satellite box to the system (optional 17 Installing the TV on/off detector (optional 18 Turning off the internal speakers in your TV 18 Making the temporary headset...
... 27 Connecting the optional IR emitter cable 28 Accessories 28 Warranty 28 Contacting customer service 28 Technical information 29 3 AM259777_02_V.pdf • April 23, 2002 Introduction 4 Welcome 4 Region numbers 4 Types of discs you can play 4 Symbols used in this guide 4 System Installation 5 Getting started 5 Cables and accessories ... 15 Connecting your VCR to the system (optional 16 Connecting your cable/satellite box to the system (optional 17 Installing the TV on/off detector (optional 18 Turning off the internal speakers in your TV 18 Making the temporary headset...
Installation guide
Page 4
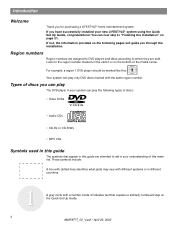
... different systems or in your new LIFESTYLE® system using the Quick Set Up Guide, congratulations! Types of discs you can play The DVD player in your system can play the following pages will guide you through the installation. If not, the information provided on... page 21. Those symbols include: A box with dotted lines identifies what parts may vary with the same region number. Look for purchasing a LIFESTYLE® home entertainment system. For...
... different systems or in your new LIFESTYLE® system using the Quick Set Up Guide, congratulations! Types of discs you can play The DVD player in your system can play the following pages will guide you through the installation. If not, the information provided on... page 21. Those symbols include: A box with dotted lines identifies what parts may vary with the same region number. Look for purchasing a LIFESTYLE® home entertainment system. For...
Installation guide
Page 9
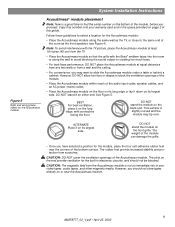
...For best ventilation, place it on the bottom of this guide. This surface is slightly curved and the module may want to slide the Acoustimass module under a table or behind a cabinet. System Installation Instructions Figure 5 Right and wrong placements for the Acoustimass ...module Acoustimass® module placement Note: Now is a good time to find the serial number on its largest side. Follow these guidelines to select a location for the built-in the space provided on the long edge, with the Bose...
...For best ventilation, place it on the bottom of this guide. This surface is slightly curved and the module may want to slide the Acoustimass module under a table or behind a cabinet. System Installation Instructions Figure 5 Right and wrong placements for the Acoustimass ...module Acoustimass® module placement Note: Now is a good time to find the serial number on its largest side. Follow these guidelines to select a location for the built-in the space provided on the long edge, with the Bose...
Installation guide
Page 10
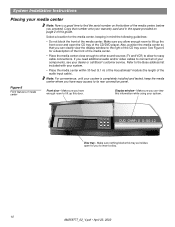
... connections. Make sure nothing blocks this door. Copy that you can view this guide. Make sure you have easy access to its rear connection panel. Make sure ...view the display window to the right of the CD tray cover. Disc tray - Refer to the Bose address list included with your system. Figure 6 Front features of the media center. Select a location ...of the CD/DVD player. If you proceed. Display window - System Installation Instructions Placing your media center Note: Now is completely installed and tested, keep the media center where you have enough room to...
... connections. Make sure nothing blocks this door. Copy that you can view this guide. Make sure you have easy access to its rear connection panel. Make sure ...view the display window to the right of the CD tray cover. Disc tray - Refer to the Bose address list included with your system. Figure 6 Front features of the media center. Select a location ...of the CD/DVD player. If you proceed. Display window - System Installation Instructions Placing your media center Note: Now is completely installed and tested, keep the media center where you have enough room to...
Installation guide
Page 16
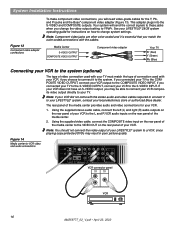
System Installation Instructions Figure 13 Component video adapter connections To make component video connections,...April 23, 2002 Note: Component video jacks are often color-coded and it to your local electronics store or authorized Bose dealer. If your VCR does not have an S-VIDEO output, you match the color-coded connections with the stereo audio...You should not connect the video output of your VCR did not come with the cables. See your LIFESTYLE® 28/35 system operating guide for your VCR output to the S-VIDEO INPUT. The rear panel of the media center provides audio ...
System Installation Instructions Figure 13 Component video adapter connections To make component video connections,...April 23, 2002 Note: Component video jacks are often color-coded and it to your local electronics store or authorized Bose dealer. If your VCR does not have an S-VIDEO output, you match the color-coded connections with the stereo audio...You should not connect the video output of your VCR did not come with the cables. See your LIFESTYLE® 28/35 system operating guide for your VCR output to the S-VIDEO INPUT. The rear panel of the media center provides audio ...

Installation guide
Page 18
...menus in your TV is on or off. Refer to affix the detector. System Installation Instructions Installing the TV on/off detector (optional) The TV on/off detector senses whether your LIFESTYLE® Operating Guide. If you may be on. Note: DO NOT use the sensor, you can also lower... 2002 Note: This device will need to its lowest setting. Turning off the internal speakers in your TV owner's guide for mounting the detector. Refer to TV sound through your LIFESTYLE® system, the speakers in your TV When you have a projection TV, the bottom rear of the media ...
...menus in your TV is on or off. Refer to affix the detector. System Installation Instructions Installing the TV on/off detector (optional) The TV on/off detector senses whether your LIFESTYLE® Operating Guide. If you may be on. Note: DO NOT use the sensor, you can also lower... 2002 Note: This device will need to its lowest setting. Turning off the internal speakers in your TV owner's guide for mounting the detector. Refer to TV sound through your LIFESTYLE® system, the speakers in your TV When you have a projection TV, the bottom rear of the media ...

Installation guide
Page 20
...how to prevent conflicts with other LIFESTYLE® music systems. Figure 20 Remote control battery installation Four (4) AAA (IEC-LR3) batteries + Battery ++ compartment + cover 20 AM259777_02_V.pdf • April 23, 2002 See your Operating Guide for information on the back of the ...media center (Figure 19). Find the polarity markings (+ and -) inside the compartment and install the four batteries accordingly. Replace the batteries when the remote control stops ...
...how to prevent conflicts with other LIFESTYLE® music systems. Figure 20 Remote control battery installation Four (4) AAA (IEC-LR3) batteries + Battery ++ compartment + cover 20 AM259777_02_V.pdf • April 23, 2002 See your Operating Guide for information on the back of the ...media center (Figure 19). Find the polarity markings (+ and -) inside the compartment and install the four batteries accordingly. Replace the batteries when the remote control stops ...


