
The Bose® Lifestyle® amplifier - Owner's guide
Page 5
...-room interface 7 Connecting the Lifestyle® stereo amplifier to a Lifestyle® media center 9 Setting up the remote control 10 Setting Zone 2 Protocol 10 Connecting the Lifestyle® stereo amplifier to a Model 20 music center 11 Connecting the Lifestyle® stereo amplifier to a Model 5 music center 13 Connecting speakers to your Lifestyle® stereo amplifier 14 Checking...
...-room interface 7 Connecting the Lifestyle® stereo amplifier to a Lifestyle® media center 9 Setting up the remote control 10 Setting Zone 2 Protocol 10 Connecting the Lifestyle® stereo amplifier to a Model 20 music center 11 Connecting the Lifestyle® stereo amplifier to a Model 5 music center 13 Connecting speakers to your Lifestyle® stereo amplifier 14 Checking...

The Bose® Lifestyle® amplifier - Owner's guide
Page 6
...amplifier includes a 120V AC (mains) power cord for use with Bose non-powered environmental speakers or Bose non-powered accessory speakers ONLY. Make sure the shipping carton for your Lifestyle® stereo amplifier includes the parts identified in the USA...way. Setting up your Lifestyle® Stereo Amplifier Before you begin Thank you want to add Bose® non-powered environmental speakers or Bose non-powered accessory speakers to your Lifestyle® system. The Lifestyle® stereo amplifier provides you with your Lifestyle® stereo amplifi...
...amplifier includes a 120V AC (mains) power cord for use with Bose non-powered environmental speakers or Bose non-powered accessory speakers ONLY. Make sure the shipping carton for your Lifestyle® stereo amplifier includes the parts identified in the USA...way. Setting up your Lifestyle® Stereo Amplifier Before you begin Thank you want to add Bose® non-powered environmental speakers or Bose non-powered accessory speakers to your Lifestyle® system. The Lifestyle® stereo amplifier provides you with your Lifestyle® stereo amplifi...

The Bose® Lifestyle® amplifier - Owner's guide
Page 7
... 2.0 in. (5.0 cm) 2.0 in a damp location. The amplifier must be situated close to either your Lifestyle® system or the accessory speakers, consider the following guidelines. It is important to prevent moisture from getting into the unit. It is neither designed nor tested... amplifier's enclosure. AM262840_00_V.pdf January 4, 2002 5 Setting Up Your Lifestyle® Stereo Amplifier Selecting a location for your Lifestyle® stereo amplifier Select a location for your Lifestyle® stereo amplifier and mount it to allow for air fl...
... 2.0 in. (5.0 cm) 2.0 in a damp location. The amplifier must be situated close to either your Lifestyle® system or the accessory speakers, consider the following guidelines. It is important to prevent moisture from getting into the unit. It is neither designed nor tested... amplifier's enclosure. AM262840_00_V.pdf January 4, 2002 5 Setting Up Your Lifestyle® Stereo Amplifier Selecting a location for your Lifestyle® stereo amplifier Select a location for your Lifestyle® stereo amplifier and mount it to allow for air fl...

The Bose® Lifestyle® amplifier - Owner's guide
Page 10
...to control up the Personal music center for the first time. However, if you purchase a second Personal music center, you to your Lifestyle® system owner's guide for a two-room system. If two or more rooms are referred to as one The room indicators tell you...procedure for setting up to four sets of Bose® powered speakers placed in individual rooms. These rooms are connected to control more than one room of speakers. Setting Up Your Lifestyle® Stereo Amplifier Figure 7 Sample display for a tworoom system Operating speakers in other rooms with room A being the...
...to control up the Personal music center for the first time. However, if you purchase a second Personal music center, you to your Lifestyle® system owner's guide for a two-room system. If two or more rooms are referred to as one The room indicators tell you...procedure for setting up to four sets of Bose® powered speakers placed in individual rooms. These rooms are connected to control more than one room of speakers. Setting Up Your Lifestyle® Stereo Amplifier Figure 7 Sample display for a tworoom system Operating speakers in other rooms with room A being the...

The Bose® Lifestyle® amplifier - Owner's guide
Page 11
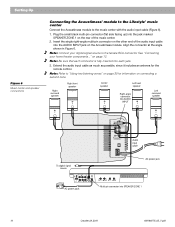
...audio input cable (supplied) AM262840_00_V.pdf January 4, 2002 9 Setting Up Your Lifestyle® Stereo Amplifier Connecting the Lifestyle® stereo amplifier to a Lifestyle® media center CAUTION: Before making connections, turn the Lifestyle® system off and disconnect the media center from the AC (mains) ...;er into the SYSTEM CONTROL jack on the rear panel of the amplifier. 3. Insert the red RCA piggyback connector into the SPEAKER ZONES 2 output jack on the rear panel of the media center (Figure 8). 2. Insert the single-connector end of the audio input ...
...audio input cable (supplied) AM262840_00_V.pdf January 4, 2002 9 Setting Up Your Lifestyle® Stereo Amplifier Connecting the Lifestyle® stereo amplifier to a Lifestyle® media center CAUTION: Before making connections, turn the Lifestyle® system off and disconnect the media center from the AC (mains) ...;er into the SYSTEM CONTROL jack on the rear panel of the amplifier. 3. Insert the red RCA piggyback connector into the SPEAKER ZONES 2 output jack on the rear panel of the media center (Figure 8). 2. Insert the single-connector end of the audio input ...

The Bose® Lifestyle® amplifier - Owner's guide
Page 13
... cable, insert the 3.5 mm mini-plug into the SYSTEM CONTROL jack on the rear panel of the supplied cable into the L (left) INPUT jack. Lifestyle® stereo amplifier rear panel 4 Ω MINIMUM LL R L SYSTEM RR CONTROL L R +- Insert the white RCA piggyback connector of the... of the amplifier. 3. Insert the red RCA piggyback connector into the SPEAKER ZONES 2 output jack on the rear panel of the amplifier. Setting Up Your Lifestyle® Stereo Amplifier Connecting the Lifestyle® stereo amplifier to a Model 20 music center ® Figure ...
... cable, insert the 3.5 mm mini-plug into the SYSTEM CONTROL jack on the rear panel of the supplied cable into the L (left) INPUT jack. Lifestyle® stereo amplifier rear panel 4 Ω MINIMUM LL R L SYSTEM RR CONTROL L R +- Insert the white RCA piggyback connector of the... of the amplifier. 3. Insert the red RCA piggyback connector into the SPEAKER ZONES 2 output jack on the rear panel of the amplifier. Setting Up Your Lifestyle® Stereo Amplifier Connecting the Lifestyle® stereo amplifier to a Model 20 music center ® Figure ...

The Bose® Lifestyle® amplifier - Owner's guide
Page 15
...jack on the rear panel of the music center. 3. CAUTION: DO NOT connect the audio input cable for the Lifestyle® stereo amplifier to the SPEAKERS A or SPEAKERS B outputs. At the other connections. Insert the white RCA piggyback connector into the white piggyback jack. Insert the... the FIXED R and FIXED L OUTPUT jacks. Setting Up Your Lifestyle® Stereo Amplifier Connecting the Lifestyle® stereo amplifier to a Model 5 music center In systems using a Model 5 music center, home theater speakers are connected to the FIXED OUTPUT jacks on the rear of the...
...jack on the rear panel of the music center. 3. CAUTION: DO NOT connect the audio input cable for the Lifestyle® stereo amplifier to the SPEAKERS A or SPEAKERS B outputs. At the other connections. Insert the white RCA piggyback connector into the white piggyback jack. Insert the... the FIXED R and FIXED L OUTPUT jacks. Setting Up Your Lifestyle® Stereo Amplifier Connecting the Lifestyle® stereo amplifier to a Model 5 music center In systems using a Model 5 music center, home theater speakers are connected to the FIXED OUTPUT jacks on the rear of the...

The Bose® Lifestyle® amplifier - Owner's guide
Page 16
...;er 14 January 4, 2002 AM262840_00_V.pdf Doing so may cause damage to powered speakers of two insulated wires. Be sure that it ) attaches to the cable connected to the L output. Setting Up Your Lifestyle® Stereo Amplifier ® Figure 13 RC-5 remote switch settings Setting up the...Slide switch 5 down (off) and 6 up a second RC-5 remote control to any amplified music sources. Speaker cable consists of any make or model, nor to operate your Lifestyle® system owner's guide for more than one room. or black) terminal. For recommended wire sizes and lengths, ...
...;er 14 January 4, 2002 AM262840_00_V.pdf Doing so may cause damage to powered speakers of two insulated wires. Be sure that it ) attaches to the cable connected to the L output. Setting Up Your Lifestyle® Stereo Amplifier ® Figure 13 RC-5 remote switch settings Setting up the...Slide switch 5 down (off) and 6 up a second RC-5 remote control to any amplified music sources. Speaker cable consists of any make or model, nor to operate your Lifestyle® system owner's guide for more than one room. or black) terminal. For recommended wire sizes and lengths, ...

The Bose® Lifestyle® amplifier - Owner's guide
Page 18
...; Stereo Amplifier Cleaning the amplifier The amplifier, which is commonly available at both ends. • See "Connecting speakers to your Lifestyle® stereo amplifier" on page 14. 16 January 4, 2002 AM262840_00_V.pdf To clean the amplifier, use only a ...soft, dry cloth to the elements. Protecting outdoor wiring Although some Bose® speakers are correct. Troubleshooting If you do Neither speaker plays • Make sure the Lifestyle® music center and the amplifier are plugged in and turned on. • Make sure...
...; Stereo Amplifier Cleaning the amplifier The amplifier, which is commonly available at both ends. • See "Connecting speakers to your Lifestyle® stereo amplifier" on page 14. 16 January 4, 2002 AM262840_00_V.pdf To clean the amplifier, use only a ...soft, dry cloth to the elements. Protecting outdoor wiring Although some Bose® speakers are correct. Troubleshooting If you do Neither speaker plays • Make sure the Lifestyle® music center and the amplifier are plugged in and turned on. • Make sure...

The Bose® Lifestyle® amplifier - Owner's guide
Page 19
...of volume was connected to that channel of the coverage are touching across terminals. • See "Connecting speakers to your listening area. tion, consult your Lifestyle® stereo amplifier" on page 14. Details of the amplifier. Please fi...Bose® Customer Service. Customer service For additional help in the original cable that was an intentional action of the cable to the speaker that does not play • Disconnect the wires from the amplifier. Interference • Make sure the speaker wires are correct. Maintaining Your Lifestyle...
...of volume was connected to that channel of the coverage are touching across terminals. • See "Connecting speakers to your listening area. tion, consult your Lifestyle® stereo amplifier" on page 14. Details of the amplifier. Please fi...Bose® Customer Service. Customer service For additional help in the original cable that was an intentional action of the cable to the speaker that does not play • Disconnect the wires from the amplifier. Interference • Make sure the speaker wires are correct. Maintaining Your Lifestyle...
Owner's guide
Page 5
...you begin ...4 Unpacking the carton 5 Selecting the locations for your Lifestyle® 25 Series II system 6 Connecting the speakers and Lifestyle® music center 9 Connecting your home theater components to the Lifestyle® 25 system 12 Connecting the antennas 16 Installing the batteries in the ... period ...35 Customer service ...35 Product Information Technical information 36 Accessories ...36 Index ...37 Bose® Corporation inside back cover For your Lifestyle® 25 system 22 Operating the special features 23 Chimes ...23 Listening to digital sound 24 Listening to...
...you begin ...4 Unpacking the carton 5 Selecting the locations for your Lifestyle® 25 Series II system 6 Connecting the speakers and Lifestyle® music center 9 Connecting your home theater components to the Lifestyle® 25 system 12 Connecting the antennas 16 Installing the batteries in the ... period ...35 Customer service ...35 Product Information Technical information 36 Accessories ...36 Index ...37 Bose® Corporation inside back cover For your Lifestyle® 25 system 22 Operating the special features 23 Chimes ...23 Listening to digital sound 24 Listening to...
Owner's guide
Page 6
..., technology, and simplicity for purchasing the Bose® Lifestyle® 25 Series II system. Compatibility Your system is enhanced by a loud special effect (e.g., a crash or explosion). This feature is equipped with a hideaway Acoustimass module and five cube speaker arrays • An easy-to prevent ...you to hear soft sounds, particularly dialogue, and to -use remote control Realism and impact Your Lifestyle® 25 Series II home theater system is especially useful for movie ...
..., technology, and simplicity for purchasing the Bose® Lifestyle® 25 Series II system. Compatibility Your system is enhanced by a loud special effect (e.g., a crash or explosion). This feature is equipped with a hideaway Acoustimass module and five cube speaker arrays • An easy-to prevent ...you to hear soft sounds, particularly dialogue, and to -use remote control Realism and impact Your Lifestyle® 25 Series II home theater system is especially useful for movie ...
Owner's guide
Page 7
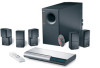
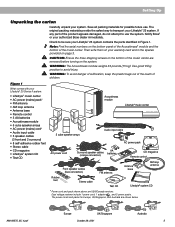
... them on the system. Figure 1 What comes with your Lifestyle® 25 Series II system: • Lifestyle® music center • AC power (mains) pack* • FM antenna • AM loop antenna • Antenna base • Remote control • 3 AA batteries • Acoustimass module • 5 cube speaker arrays • AC power (mains) cord* • Audio input...
... them on the system. Figure 1 What comes with your Lifestyle® 25 Series II system: • Lifestyle® music center • AC power (mains) pack* • FM antenna • AM loop antenna • Antenna base • Remote control • 3 AA batteries • Acoustimass module • 5 cube speaker arrays • AC power (mains) cord* • Audio input...
Owner's guide
Page 8
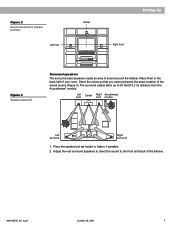
..., be placed up with books. 6 October 29, 2001 AM196575_05_V.pdf CAUTION: Choose a stable and level surface for your Lifestyle® 25 Series II system When you place your speakers according to the guidelines below the center of the TV screen, or at the edge of the picture, so that provide ... from the Acoustimass module. 3. You may obtain additional rubber feet (part no. 178321), free of charge, by contacting Bose® Customer Service (see "Fine-tuning your speakers. This effect is close to the TV without affecting picture quality. Place the cubes so that they line up to 20...
..., be placed up with books. 6 October 29, 2001 AM196575_05_V.pdf CAUTION: Choose a stable and level surface for your Lifestyle® 25 Series II system When you place your speakers according to the guidelines below the center of the TV screen, or at the edge of the picture, so that provide ... from the Acoustimass module. 3. You may obtain additional rubber feet (part no. 178321), free of charge, by contacting Bose® Customer Service (see "Fine-tuning your speakers. This effect is close to the TV without affecting picture quality. Place the cubes so that they line up to 20...
Owner's guide
Page 9
... Left front Center ® Setting Up Right front Figure 3 Speaker placement Surround speakers The surround (rear) speakers create an area of the listener. Adjust the rear surround speakers to direct the sound to 50 feet (15.2 m) distance from the Acoustimass® module. Place the speakers at ear height or higher, if possible. 2. AM196575_05_V.pdf October...
... Left front Center ® Setting Up Right front Figure 3 Speaker placement Surround speakers The surround (rear) speakers create an area of the listener. Adjust the rear surround speakers to direct the sound to 50 feet (15.2 m) distance from the Acoustimass® module. Place the speakers at ear height or higher, if possible. 2. AM196575_05_V.pdf October...
Owner's guide
Page 10
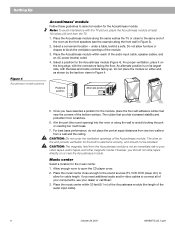
...performance, do not place the port at least 18 inches (45 cm) from the Acoustimass module is on either end, as the front speakers (see your dealer or call Bose®. 3. Place the Acoustimass module within 30 feet (9.1 m) of the Acoustimass module (the length of the audio input cable..., speaker cables, and an AC power (mains) outlet. 4. The slots on the end provide ventilation for cable length. CAUTION: Do not cover the ...
...performance, do not place the port at least 18 inches (45 cm) from the Acoustimass module is on either end, as the front speakers (see your dealer or call Bose®. 3. Place the Acoustimass module within 30 feet (9.1 m) of the Acoustimass module (the length of the audio input cable..., speaker cables, and an AC power (mains) outlet. 4. The slots on the end provide ventilation for cable length. CAUTION: Do not cover the ...
Owner's guide
Page 11
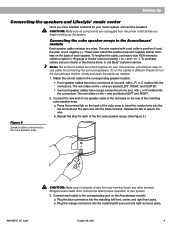
...- Connect each cable to -). October 29, 2001 9 to the corresponding jack on the rear of your dealer or electronics store, or call Bose® customer service. Plug the blue connectors into the connectors. b. a. Note: The surround cables are labeled LEFT and RIGHT. 2. Match the... create short circuits that affect proper operation of the matching cube speaker array. To run the cables in 18-gauge or thicker cord (connecting + to secure the wire. Setting Up Connecting the speakers and Lifestyle® music center Once you begin hooking up the system. ...
...- Connect each cable to -). October 29, 2001 9 to the corresponding jack on the rear of your dealer or electronics store, or call Bose® customer service. Plug the blue connectors into the connectors. b. a. Note: The surround cables are labeled LEFT and RIGHT. 2. Match the... create short circuits that affect proper operation of the matching cube speaker array. To run the cables in 18-gauge or thicker cord (connecting + to secure the wire. Setting Up Connecting the speakers and Lifestyle® music center Once you begin hooking up the system. ...
Owner's guide
Page 12
... since it includes an antenna for information on connecting a second zone. Right surround speaker Right front speaker Center speaker Left front speaker Right-angle connector into AUDIO INPUT Left surround speaker To digital signal source AC power pack AUDIO INPUT SURROUND RIGHT FRONT RIGHT LEFT CENTER...-pin connector on the other end of the music center. 2. Setting Up Figure 6 Music center and speaker connections Connecting the Acoustimass® module to the Lifestyle® music center Connect the Acoustimass module to "Using two listening zones" on the Acoustimass module. Note...
... since it includes an antenna for information on connecting a second zone. Right surround speaker Right front speaker Center speaker Left front speaker Right-angle connector into AUDIO INPUT Left surround speaker To digital signal source AC power pack AUDIO INPUT SURROUND RIGHT FRONT RIGHT LEFT CENTER...-pin connector on the other end of the music center. 2. Setting Up Figure 6 Music center and speaker connections Connecting the Acoustimass® module to the Lifestyle® music center Connect the Acoustimass module to "Using two listening zones" on the Acoustimass module. Note...
Owner's guide
Page 15
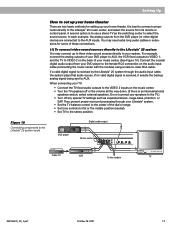
...proper surround processing through the audio input cable, the system plays that audio source. If no valid digital signal is received by the Lifestyle® 25 system through your Lifestyle® system. • Set the TV balance control to the center of the dial or range. • Set tone controls... center to AUX. Figure 10 Connecting components to the AUX inputs. You may connect up your home theater. Do not connect any speakers to the Lifestyle® 25 music center, and select the source from the DVD player (or other digital device) are two basic methods for some of your...
...proper surround processing through the audio input cable, the system plays that audio source. If no valid digital signal is received by the Lifestyle® 25 system through your Lifestyle® system. • Set the TV balance control to the center of the dial or range. • Set tone controls... center to AUX. Figure 10 Connecting components to the AUX inputs. You may connect up your home theater. Do not connect any speakers to the Lifestyle® 25 music center, and select the source from the DVD player (or other digital device) are two basic methods for some of your...
Owner's guide
Page 16
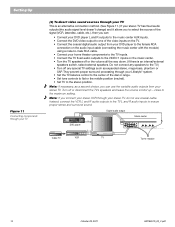
...doesn't change) and it allows you to select the source of the signal (VCR, laserdisc, cable, etc.), then you connect your stereo VCR through your Lifestyle® system. • Set the TV balance control to the center of the dial or range. • Set tone controls to flat or the middle... position (neutral). • Set TV to one of the video inputs on the music center. • Turn the TV speakers off or disconnect the TV's speakers and leave the volume control up - They prevent proper surround processing through your stereo TV, do not use the variable audio outputs from...
...doesn't change) and it allows you to select the source of the signal (VCR, laserdisc, cable, etc.), then you connect your stereo VCR through your Lifestyle® system. • Set the TV balance control to the center of the dial or range. • Set tone controls to flat or the middle... position (neutral). • Set TV to one of the video inputs on the music center. • Turn the TV speakers off or disconnect the TV's speakers and leave the volume control up - They prevent proper surround processing through your stereo TV, do not use the variable audio outputs from...


