
Installation guide
Page 14
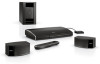
... and Acoustimass module are now ready to turn on your system and enter the interactive phase of the remote control. TAB 4 TAB 3 TAB 2 English IMPORTANT! • Before you have set up the control console, the Acoustimass® module, and the speakers. You are in their final positions. •... at this . 1. The instructions provided on your TV will tell you need for the following steps: From Kit 4 TAB 5 Remote control with batteries ADAPTiQ® audio calibration headset Congratulations! Install four AA (IEC LR6) batteries, matching the polarity markings (+ and -) to ...
... and Acoustimass module are now ready to turn on your system and enter the interactive phase of the remote control. TAB 4 TAB 3 TAB 2 English IMPORTANT! • Before you have set up the control console, the Acoustimass® module, and the speakers. You are in their final positions. •... at this . 1. The instructions provided on your TV will tell you need for the following steps: From Kit 4 TAB 5 Remote control with batteries ADAPTiQ® audio calibration headset Congratulations! Install four AA (IEC LR6) batteries, matching the polarity markings (+ and -) to ...
Installation guide
Page 15
... language. • Optimize the audio from blinking to set up your LIFESTYLE® 235 system. 7. Using the remote that is connected to the one that came with iPod/iPhone LLLLIIIFIFFFEEEESSSSTTYYLLEE &#...center speaker Dock compatible with your TV, change the TV input to your LIFESTYLE® 235 system. IR emitter cable Stereo audio cable AM antenna FM antenna Rubber feet ... system at another time, see the operating guide. Press the power button ( ) on the control console to control your system. Turn on your connected devices. English TAB 2 TAB 3 TAB 4 4. Follow ...
... language. • Optimize the audio from blinking to set up your LIFESTYLE® 235 system. 7. Using the remote that is connected to the one that came with iPod/iPhone LLLLIIIFIFFFEEEESSSSTTYYLLEE &#...center speaker Dock compatible with your TV, change the TV input to your LIFESTYLE® 235 system. IR emitter cable Stereo audio cable AM antenna FM antenna Rubber feet ... system at another time, see the operating guide. Press the power button ( ) on the control console to control your system. Turn on your connected devices. English TAB 2 TAB 3 TAB 4 4. Follow ...
Owner's guide
Page 6
TAB 8 TAB 7 TAB 6 TAB 5 CONTENTS INTRODUCTION 1 Welcome 1 System features 1 If you need help 1 YOUR REMOTE CONTROL 2 YOUR CONTROL CONSOLE 5 POWER ON/OFF CONTROLS 6 Starting your system 6 Turning on your TV 6 Shutting down your system 6 TAB 4 TAB 3 TAB 2 English OPERATING YOUR CONNECTED DEVICES 7 Selecting...tuner in your TV 8 Tuning to a TV station 8 Playing audio/video devices 9 Listening to a Bose link input device 9 Playing an iPod or iPhone mobile digital device (on 235, V35, and V25 systems only 10 Using the front console inputs 11 Front USB input 11 Front ...
TAB 8 TAB 7 TAB 6 TAB 5 CONTENTS INTRODUCTION 1 Welcome 1 System features 1 If you need help 1 YOUR REMOTE CONTROL 2 YOUR CONTROL CONSOLE 5 POWER ON/OFF CONTROLS 6 Starting your system 6 Turning on your TV 6 Shutting down your system 6 TAB 4 TAB 3 TAB 2 English OPERATING YOUR CONNECTED DEVICES 7 Selecting...tuner in your TV 8 Tuning to a TV station 8 Playing audio/video devices 9 Listening to a Bose link input device 9 Playing an iPod or iPhone mobile digital device (on 235, V35, and V25 systems only 10 Using the front console inputs 11 Front USB input 11 Front ...
Owner's guide
Page 9
...using a USB flash drive • Interface and dock compatible with iPod/iPhone devices (for 235, V25 and V35 systems only) TAB 5 TAB 6 TAB 7 TAB 8 INTRODUCTION • AM/FM radio (for 235, V35 and V25 systems only) • Can deliver sound in up your eligibility to -...systems sold in Japan. Registering your product enables you have questions while operating your new LIFESTYLE® system, go to http://owners.Bose.com on page 21. This guide describes your new remote control and shows you should have calibrated the sound for helpful operating information. IMPORTANT! -...
...using a USB flash drive • Interface and dock compatible with iPod/iPhone devices (for 235, V25 and V35 systems only) TAB 5 TAB 6 TAB 7 TAB 8 INTRODUCTION • AM/FM radio (for 235, V35 and V25 systems only) • Can deliver sound in up your eligibility to -...systems sold in Japan. Registering your product enables you have questions while operating your new LIFESTYLE® system, go to http://owners.Bose.com on page 21. This guide describes your new remote control and shows you should have calibrated the sound for helpful operating information. IMPORTANT! -...
Owner's guide
Page 10
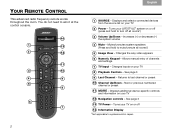
... or off 14 Information Display *Not applicable to mute/unmute all rooms*) 3 Volume Up/Down - Turns your TV 2 Power - Turns your LIFESTYLE® system on your TV 12 Navigation controls - Increases (+) or decreases (-) the system volume 4 Mute - Displays and selects connected devices from the source list on your TV 8 Playback... numbered channel or preset 11 MORE - Returns to turn off (press and hold to systems sold in Japan. TAB 8 TAB 7 TAB 6 TAB 5 YOUR REMOTE CONTROL This advanced radio frequency remote works throughout the room. You do not need to aim it at the...
... or off 14 Information Display *Not applicable to mute/unmute all rooms*) 3 Volume Up/Down - Turns your TV 2 Power - Turns your LIFESTYLE® system on your TV 12 Navigation controls - Increases (+) or decreases (-) the system volume 4 Mute - Displays and selects connected devices from the source list on your TV 8 Playback... numbered channel or preset 11 MORE - Returns to turn off (press and hold to systems sold in Japan. TAB 8 TAB 7 TAB 6 TAB 5 YOUR REMOTE CONTROL This advanced radio frequency remote works throughout the room. You do not need to aim it at the...
Owner's guide
Page 11
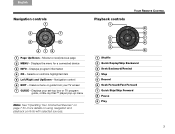
... screen 7 GUIDE - TAB 5 TAB 6 TAB 7 TAB 8 YOUR REMOTE CONTROL Playback controls 1 9 8 2 7 3 6 4 5 1 Shuffle 2 Quick Replay/Skip Backward 3 Seek Backward/Rewind 4 Stop 5 Record 6 Seek Forward/Fast Forward 7 Quick Skip/Skip Forward 8 Pause 9 Play 3 English TAB 2 TAB 3 TAB 4 Navigation controls 1 2 7 3 6 415 1 Page Up/Down - Displays program...™ player pop-up menu Note: See "Operating Your Connected Devices" on using navigation and playback controls with selected sources. Displays the menu for more details on page 7 for a connected device 3 INFO - Moves to next...
... screen 7 GUIDE - TAB 5 TAB 6 TAB 7 TAB 8 YOUR REMOTE CONTROL Playback controls 1 9 8 2 7 3 6 4 5 1 Shuffle 2 Quick Replay/Skip Backward 3 Seek Backward/Rewind 4 Stop 5 Record 6 Seek Forward/Fast Forward 7 Quick Skip/Skip Forward 8 Pause 9 Play 3 English TAB 2 TAB 3 TAB 4 Navigation controls 1 2 7 3 6 415 1 Page Up/Down - Displays program...™ player pop-up menu Note: See "Operating Your Connected Devices" on using navigation and playback controls with selected sources. Displays the menu for more details on page 7 for a connected device 3 INFO - Moves to next...

Owner's guide
Page 12
... the Glow and OK buttons at the same time for 5 seconds. 2. TAB 8 TAB 7 TAB 6 TAB 5 YOUR REMOTE CONTROL Information display (on the rear of the remote illuminates the remote buttons and display. WBUR90.9 • iPod iPod Album • Operating prompts Hold number key to prolong battery life. Press the... making the adjustment. The light turns off automatically after several seconds to set preset 4 TAB 4 TAB 3 TAB 2 English Remote glow button Pressing the glow button on 235, V25, and V35 systems only) The display provides operating and system status information.
... the Glow and OK buttons at the same time for 5 seconds. 2. TAB 8 TAB 7 TAB 6 TAB 5 YOUR REMOTE CONTROL Information display (on the rear of the remote illuminates the remote buttons and display. WBUR90.9 • iPod iPod Album • Operating prompts Hold number key to prolong battery life. Press the... making the adjustment. The light turns off automatically after several seconds to set preset 4 TAB 4 TAB 3 TAB 2 English Remote glow button Pressing the glow button on 235, V25, and V35 systems only) The display provides operating and system status information.

Owner's guide
Page 14
... on your TV If you must complete the shutdown using the onscreen controls. 6 Otherwise, use . The system will be stopped and you programmed your remote in the Unify™ setup menu, press the TV power button on the remote control to turn on your TV screen. In several seconds, the power ...LED on the console. TAB 8 TAB 7 TAB 6 TAB 5 POWER ON/OFF CONTROLS Starting your system Press the power button on the remote or on the console changes from blinking to solid...
... on your TV If you must complete the shutdown using the onscreen controls. 6 Otherwise, use . The system will be stopped and you programmed your remote in the Unify™ setup menu, press the TV power button on the remote control to turn on your TV screen. In several seconds, the power ...LED on the console. TAB 8 TAB 7 TAB 6 TAB 5 POWER ON/OFF CONTROLS Starting your system Press the power button on the remote or on the console changes from blinking to solid...
Owner's guide
Page 15
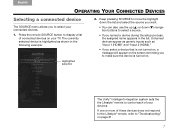
The UnifyTM intelligent integration system sets the the Lifestyle® remote to display a list of connected devices on your TV. Keep pressing SOURCE to move the highlight down the list and select the source you want. &#... named a device during the setup process, the assigned name appears in the following example: Highlighted selection 2. Press the remote SOURCE button to control each of these devices does not respond to the Lifestyle® remote, refer to make sure the device is not turned on, a message will appear on the screen reminding you to...
The UnifyTM intelligent integration system sets the the Lifestyle® remote to display a list of connected devices on your TV. Keep pressing SOURCE to move the highlight down the list and select the source you want. &#... named a device during the setup process, the assigned name appears in the following example: Highlighted selection 2. Press the remote SOURCE button to control each of these devices does not respond to the Lifestyle® remote, refer to make sure the device is not turned on, a message will appear on the screen reminding you to...

Owner's guide
Page 16
...select a station from the program guide. 8 Tune to a TV station." Use the dash button for the Bose system, then press the SOURCE button and select another source. Press the remote SOURCE button and select the device that provides your TV to operate it during the setup process. 1. Press GUIDE... TV Your TV may be receiving its program content through a set -top box to the LIFESTYLE® control console, it will appear in the SOURCE menu under the name you may need to point the Bose® remote at your TV programs. 2. See "Tuning to a station. Tuning to a TV station...
...select a station from the program guide. 8 Tune to a TV station." Use the dash button for the Bose system, then press the SOURCE button and select another source. Press the remote SOURCE button and select the device that provides your TV to operate it during the setup process. 1. Press GUIDE... TV Your TV may be receiving its program content through a set -top box to the LIFESTYLE® control console, it will appear in the SOURCE menu under the name you may need to point the Bose® remote at your TV programs. 2. See "Tuning to a station. Tuning to a TV station...
Owner's guide
Page 17
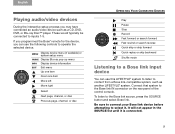
...or skip backward Shuffle mode Listening to a Bose link input device You can use this LIFESTYLE® system to listen to operate the selected device. These would typically be connected to the Bose link IN connector on the rear panel of the control console. To listen to select it is ... following controls to content from a Bose link-compatible system, such as a CD, DVD, DVR, or Blu-ray Disc™ player. Be sure to connect your Bose link device before attempting to the Bose link source, press the SOURCE button and select Bose link. If you programmed the Bose® remote for ...
...or skip backward Shuffle mode Listening to a Bose link input device You can use this LIFESTYLE® system to listen to operate the selected device. These would typically be connected to the Bose link IN connector on the rear panel of the control console. To listen to select it is ... following controls to content from a Bose link-compatible system, such as a CD, DVD, DVR, or Blu-ray Disc™ player. Be sure to connect your Bose link device before attempting to the Bose link source, press the SOURCE button and select Bose link. If you programmed the Bose® remote for ...
Owner's guide
Page 20
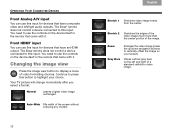
...video image much more than the center portion of the screen without cropping any content. Auto-Wide Fills width of the image. The Bose remote does not control a device connected to display a menu of a standard-definition video image. 12 Your TV picture will change momentarily after you select... a format. Gray Bars Places vertical gray bars on your choice. The Bose® remote does not control a device connected to highlight your screen). Front HDMI® input You can use this input for devices that have composite ...
...video image much more than the center portion of the screen without cropping any content. Auto-Wide Fills width of the image. The Bose remote does not control a device connected to display a menu of a standard-definition video image. 12 Your TV picture will change momentarily after you select... a format. Gray Bars Places vertical gray bars on your choice. The Bose® remote does not control a device connected to highlight your screen). Front HDMI® input You can use this input for devices that have composite ...
Owner's guide
Page 25
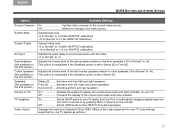
...AND SYSTEM OPTIONS Option Source Overscan System Bass System Treble A/V Sync Rear Speakers (Not available on the 235 system.) Center Speakers (Not available on the 235 system.) Speakers (Not available on the 235 system.) Volume on your TV. This option is unavailable if the Speakers option is set to Stereo (2)...no change to your TV (audio from the TV is not affected by plugging headphones into the control console or by your TV (only settings supported by pressing Mute or Volume on the remote). On Sends HDMI® audio to the video source. Changes the resolution (Standard/720p/1080i/...
...AND SYSTEM OPTIONS Option Source Overscan System Bass System Treble A/V Sync Rear Speakers (Not available on the 235 system.) Center Speakers (Not available on the 235 system.) Speakers (Not available on the 235 system.) Volume on your TV. This option is unavailable if the Speakers option is set to Stereo (2)...no change to your TV (audio from the TV is not affected by plugging headphones into the control console or by your TV (only settings supported by pressing Mute or Volume on the remote). On Sends HDMI® audio to the video source. Changes the resolution (Standard/720p/1080i/...
Owner's guide
Page 26
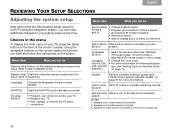
... more information on screen display. Using the navigation buttons on page 23 for each source connected to the control console rear. 18 TV setup (Note 2) • Program your remote to control your TV. • Replace your TV. • Add, change audio or video connections. Appears only...64 house codes, 4 room codes). (Available • Change the room code. only for 235, • For more information). V35, and V25 sion, see "Performing a system software update" on the remote, select the function you can do Resume initial Return to the interactive setup process at any ...
... more information on screen display. Using the navigation buttons on page 23 for each source connected to the control console rear. 18 TV setup (Note 2) • Program your remote to control your TV. • Replace your TV. • Add, change audio or video connections. Appears only...64 house codes, 4 room codes). (Available • Change the room code. only for 235, • For more information). V35, and V25 sion, see "Performing a system software update" on the remote, select the function you can do Resume initial Return to the interactive setup process at any ...
Owner's guide
Page 27
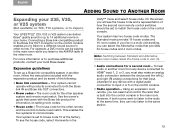
... or to communicate. See the owner's guide that came with the expansion product and be aware of how the second room remote control switches should be playing in the main room while you must also make an analog audio connection between Standard and Alternative house ...LIFESTYLE® 235, V35 or V25 system can deliver Bose® quality sound in up a Bose link-compatible system in a multi-unit dwelling, you can select the Alternative mode that provides 64 house codes and 4 room codes. If you live in another room from any device with products connected to input 4 or 5 on the control...
... or to communicate. See the owner's guide that came with the expansion product and be aware of how the second room remote control switches should be playing in the main room while you must also make an analog audio connection between Standard and Alternative house ...LIFESTYLE® 235, V35 or V25 system can deliver Bose® quality sound in up a Bose link-compatible system in a multi-unit dwelling, you can select the Alternative mode that provides 64 house codes and 4 room codes. If you live in another room from any device with products connected to input 4 or 5 on the control...
Owner's guide
Page 28
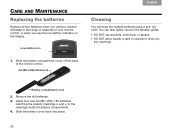
... markings (+ and -) to drop into place. 20 Slide the battery cover back into any openings. Slide the battery compartment cover off the back of your remote control, or when you notice a marked decrease in the range or response of the...
... markings (+ and -) to drop into place. 20 Slide the battery cover back into any openings. Slide the battery compartment cover off the back of your remote control, or when you notice a marked decrease in the range or response of the...
Owner's guide
Page 29
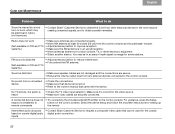
... the AC power cord is inserted securely into the power supply and the power supply is firmly connected to initial operation of my Bose® remote • Make sure the control console is turned on. • Make sure batteries are fully plugged into the Media Center connector on the Acoustimass module. • Increase...
... the AC power cord is inserted securely into the power supply and the power supply is firmly connected to initial operation of my Bose® remote • Make sure the control console is turned on. • Make sure batteries are fully plugged into the Media Center connector on the Acoustimass module. • Increase...
Owner's guide
Page 30
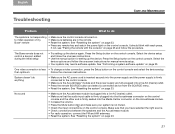
... the remote. A connected device does not • Try connecting the included external IR emitter to obtain possible remedies. Intermittent audio dropouts • Contact Bose Customer Service to button on coaxial digital audio digital audio connection. For guidance, press the Setup respond consistently to... connections are connected properly. • Move AM antenna at least 20 inches (50 cm) from the control console and Acoustimass® module. • Adjust antenna position to the control console. You may be in the room may be creating unwanted signals, and to the...
... the remote. A connected device does not • Try connecting the included external IR emitter to obtain possible remedies. Intermittent audio dropouts • Contact Bose Customer Service to button on coaxial digital audio digital audio connection. For guidance, press the Setup respond consistently to... connections are connected properly. • Move AM antenna at least 20 inches (50 cm) from the control console and Acoustimass® module. • Adjust antenna position to the control console. You may be in the room may be creating unwanted signals, and to the...
Owner's guide
Page 31
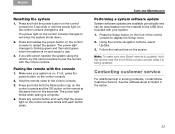
...To make sure your system is on the control console changes to use. 3. Press and hold the remote near the front of the control console to restart the system. Make sure your Bose® remote is updated, hold the power button on the control console. 2. See the address sheet included ...in solving problems, contact Bose Customer Service. Contacting customer service ...
...To make sure your system is on the control console changes to use. 3. Press and hold the remote near the front of the control console to restart the system. Make sure your Bose® remote is updated, hold the power button on the control console. 2. See the address sheet included ...in solving problems, contact Bose Customer Service. Contacting customer service ...
Owner's guide
Page 32
...to obtain Limited Warranty Service: Return product, with a USB port and a software program that is valid for instructions on the remote control to copy the file to the USB drive. This download process should be one or more free or open source software programs ..., MA 01701-9168. Contact the Bose organization in your country/region (visit Global.Bose.com/register for the open source software programs originating from your limited warranty rights. TAB 8 TAB 7 TAB 6 TAB 5 CARE AND MAINTENANCE Limited Warranty Your LIFESTYLE® home entertainment system is subject...
...to obtain Limited Warranty Service: Return product, with a USB port and a software program that is valid for instructions on the remote control to copy the file to the USB drive. This download process should be one or more free or open source software programs ..., MA 01701-9168. Contact the Bose organization in your country/region (visit Global.Bose.com/register for the open source software programs originating from your limited warranty rights. TAB 8 TAB 7 TAB 6 TAB 5 CARE AND MAINTENANCE Limited Warranty Your LIFESTYLE® home entertainment system is subject...

