Owner's guide
Page 2
... of your Lifestyle® music center and the bottom panel of your Acoustimass® module: The lightning flash with arrowhead symbol, within an equilateral triangle, is intended to alert the user to the presence of important operating and maintenance instructions in the Radio Interference Regulations of the Canadian Department of Communications. It will help you set out in this system to follow this owner's guide. CAUTION...
... of your Lifestyle® music center and the bottom panel of your Acoustimass® module: The lightning flash with arrowhead symbol, within an equilateral triangle, is intended to alert the user to the presence of important operating and maintenance instructions in the Radio Interference Regulations of the Canadian Department of Communications. It will help you set out in this system to follow this owner's guide. CAUTION...
Owner's guide
Page 3
... help. Follow all warnings - Do not use this equipment. To ensure reliable operation of the receiver or radio remote control could result in a particular installation. Only use caution when moving the cart/apparatus combination to operate this apparatus near a swimming pool, or anywhere else that will not occur in a fire or electric shock. 17. Please call Bose to be determined by turning...
... help. Follow all warnings - Do not use this equipment. To ensure reliable operation of the receiver or radio remote control could result in a particular installation. Only use caution when moving the cart/apparatus combination to operate this apparatus near a swimming pool, or anywhere else that will not occur in a fire or electric shock. 17. Please call Bose to be determined by turning...

Owner's guide
Page 4
...-in the operating instructions or as per National Electrical Code, ANSI/NFPA 70. In particular, it specifies that provides guidelines for the ground electrode. Plug the product into such circuits or power lines. 20. Antenna grounding Example of antenna grounding as marked on this product, be connected to the grounding system of the building, as close to the point of cable entry as...
...-in the operating instructions or as per National Electrical Code, ANSI/NFPA 70. In particular, it specifies that provides guidelines for the ground electrode. Plug the product into such circuits or power lines. 20. Antenna grounding Example of antenna grounding as marked on this product, be connected to the grounding system of the building, as close to the point of cable entry as...
Owner's guide
Page 5
... your Lifestyle® 20 music system 6 Connect the speakers and Lifestyle® music center 7 Other connections ...8 Connect the antennas 9 Set up the remote control 10 Set radio channel spacing on dual voltage systems 10 Operating Your Lifestyle® 20 Music System Listening to your records Serial numbers are located on the bottom of the music center and the bottom panel of the Acoustimass® module. English Español Français Where to the radio 16 Using the system with this owner's guide. AM178934_09_V.pdf October...
... your Lifestyle® 20 music system 6 Connect the speakers and Lifestyle® music center 7 Other connections ...8 Connect the antennas 9 Set up the remote control 10 Set radio channel spacing on dual voltage systems 10 Operating Your Lifestyle® 20 Music System Listening to your records Serial numbers are located on the bottom of the music center and the bottom panel of the Acoustimass® module. English Español Français Where to the radio 16 Using the system with this owner's guide. AM178934_09_V.pdf October...
Owner's guide
Page 6
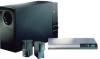
... use remote control • Inputs for two video sound sources, an auxiliary source, and a tape deck • Capability for purchasing the Bose® Lifestyle® 20 music system. Technological innovations that make the Lifestyle® 20 music system possible include the smallest CD changer now available for use and Jewel CubeTM speakers one-half the size of the previous Acoustimass® cube speakers. Your system includes: • A Lifestyle® music center with built-in AM/FM radio and six-disc CD changer • Powered Acoustimass speakers consisting...
... use remote control • Inputs for two video sound sources, an auxiliary source, and a tape deck • Capability for purchasing the Bose® Lifestyle® 20 music system. Technological innovations that make the Lifestyle® 20 music system possible include the smallest CD changer now available for use and Jewel CubeTM speakers one-half the size of the previous Acoustimass® cube speakers. Your system includes: • A Lifestyle® music center with built-in AM/FM radio and six-disc CD changer • Powered Acoustimass speakers consisting...
Owner's guide
Page 7
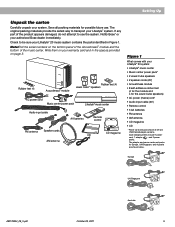
...; AM antenna • CD magazine • CD * Power cord and pack shown at left are shown below. Note:Find the serial numbers on page 3. ® Rubber feet (4) Treble Bass Acoustimass® module Rubber feet (4) Jewel CubeTM speakers ® AC power cord Music center power pack Lifestyle® music center Audio input cable AA batteries MUTE AMLULTE VOLUME OFFON V1IDEO CD V2IDEO RANDOSMTOP PAUSE FMAM TAPE REV SKIP PLAY NEXT DISC PLAY AUX Remote control FM antenna Speaker cords AM antenna THE BOSE SPECIAL EDITION LIFESTYLE MUSIC SYSTEM CD ® CD ® CD...
...; AM antenna • CD magazine • CD * Power cord and pack shown at left are shown below. Note:Find the serial numbers on page 3. ® Rubber feet (4) Treble Bass Acoustimass® module Rubber feet (4) Jewel CubeTM speakers ® AC power cord Music center power pack Lifestyle® music center Audio input cable AA batteries MUTE AMLULTE VOLUME OFFON V1IDEO CD V2IDEO RANDOSMTOP PAUSE FMAM TAPE REV SKIP PLAY NEXT DISC PLAY AUX Remote control FM antenna Speaker cords AM antenna THE BOSE SPECIAL EDITION LIFESTYLE MUSIC SYSTEM CD ® CD ® CD...
Owner's guide
Page 9
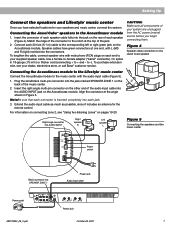
... - CAUTION: Make sure all components of your speakers and music center, connect the system. Connect each jack. 3. Speaker cables have selected locations for the remote control. Plug the small black multi-pin connector into the jack marked SPEAKER ZONE 1 on the back of the jack. 2. English Setting Up Connect the speakers and Lifestyle® music center Once you begin connecting them. Connecting the Jewel CubeTM speakers to -). Align the connector at one end, with the audio input cable (Figure 5). 1. Extend the audio input cable as...
... - CAUTION: Make sure all components of your speakers and music center, connect the system. Connect each jack. 3. Speaker cables have selected locations for the remote control. Plug the small black multi-pin connector into the jack marked SPEAKER ZONE 1 on the back of the jack. 2. English Setting Up Connect the speakers and Lifestyle® music center Once you begin connecting them. Connecting the Jewel CubeTM speakers to -). Align the connector at one end, with the audio input cable (Figure 5). 1. Extend the audio input cable as...
Owner's guide
Page 10
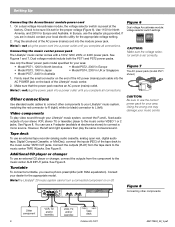
... speakers then play video sound through your Lifestyle® music system, connect the R and L fixed audio outputs of your Lifestyle® music system, matching the red connector to R (right), white (or black) connector to the music center AUX INPUT jacks. In Europe, use an external CD player or changer, connect the outputs from the tape deck to the music center TAPE OUT jacks. Figure 8 Connecting other components to your stereo VCR, stereo TV, or laserdisc player to use an external tape recorder (analog audio cassette, analog open reel, digital audio tape, Digital Compact...
... speakers then play video sound through your Lifestyle® music system, connect the R and L fixed audio outputs of your Lifestyle® music system, matching the red connector to R (right), white (or black) connector to the music center AUX INPUT jacks. In Europe, use an external CD player or changer, connect the outputs from the tape deck to the music center TAPE OUT jacks. Figure 8 Connecting other components to your stereo VCR, stereo TV, or laserdisc player to use an external tape recorder (analog audio cassette, analog open reel, digital audio tape, Digital Compact...
Owner's guide
Page 13
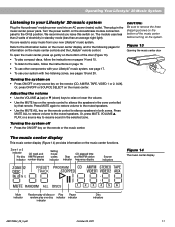
... the remote (CD, AM/FM, TAPE, VIDEO 1 or 2, AUX). Refer to the information below on the Acoustimass module connection panel to enjoy music from your new Lifestyle® music system. Press MUTE ALL to restore volume to the following pages for information on the remote control to your system with your Lifestyle® music system, see pages 19 and 20. Zone 1 or 2 indicator CD track and No disc AM/FM preset indicator number display Setting house codes indicator CD elapsed time...
... the remote (CD, AM/FM, TAPE, VIDEO 1 or 2, AUX). Refer to the information below on the Acoustimass module connection panel to enjoy music from your new Lifestyle® music system. Press MUTE ALL to restore volume to the following pages for information on the remote control to your system with your Lifestyle® music system, see pages 19 and 20. Zone 1 or 2 indicator CD track and No disc AM/FM preset indicator number display Setting house codes indicator CD elapsed time...
Owner's guide
Page 14
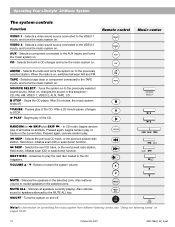
... "Using two listening zones" on , switches between AM and FM. Selects a video sound source connected to play of the CD. Remote control VIDEO 1 VIDEO 2 AUX CD AM/FM - CD, FM, AM, VIDEO 1, VIDEO 2, AUX, TAPE, CD. . . In CD mode, begins random play the next disc loaded in CD changer and turns the music system on all speakers currently playing. Selects the next CD track, or the next preset radio station. MUTE ALL - Pressed again, cancels random play of all tracks on . NEXT DISC - Raises or lowers the system volume. RANDOM Music center SOURCE...
... "Using two listening zones" on , switches between AM and FM. Selects a video sound source connected to play of the CD. Remote control VIDEO 1 VIDEO 2 AUX CD AM/FM - CD, FM, AM, VIDEO 1, VIDEO 2, AUX, TAPE, CD. . . In CD mode, begins random play the next disc loaded in CD changer and turns the music system on all speakers currently playing. Selects the next CD track, or the next preset radio station. MUTE ALL - Pressed again, cancels random play of all tracks on . NEXT DISC - Raises or lowers the system volume. RANDOM Music center SOURCE...
Owner's guide
Page 15
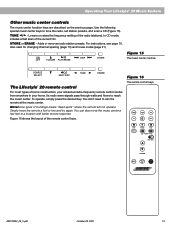
... setting of home construction, your advanced radio-frequency remote control works from anywhere in your home. ON O FF / II VOLUME PLAY/PAUSE SKIP STORE Figure 15 The music center controls SOURCE SELECT NEXT DISC TUNE ERASE The Lifestyle® 20 remote control For most types of the radio (stations). To operate, simply press the desired key. Simply move the music center a few feet to aim the remote at the music center. Figure 16 The remote control keys VIDEO 1 CD VIDEO 2 AM FM AUX TAPE...
... setting of home construction, your advanced radio-frequency remote control works from anywhere in your home. ON O FF / II VOLUME PLAY/PAUSE SKIP STORE Figure 15 The music center controls SOURCE SELECT NEXT DISC TUNE ERASE The Lifestyle® 20 remote control For most types of the radio (stations). To operate, simply press the desired key. Simply move the music center a few feet to aim the remote at the music center. Figure 16 The remote control keys VIDEO 1 CD VIDEO 2 AM FM AUX TAPE...
Owner's guide
Page 17
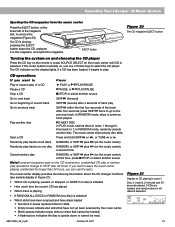
... and have discs loaded • Numbers in boxes represent discs in the magazine, and ejects the magazine. 6 5 4 3 2 1 EJECT 6 DISC MAGAZINE EJECT button Figure 20 The CD magazine EJECT button Turning the system on and choosing the CD player Press the CD key on the remote or press SOURCE SELECT on the display lights. In RANDOM mode, skips to the previous track. The music center skips empty disc slots. If a CD has been...
... and have discs loaded • Numbers in boxes represent discs in the magazine, and ejects the magazine. 6 5 4 3 2 1 EJECT 6 DISC MAGAZINE EJECT button Figure 20 The CD magazine EJECT button Turning the system on and choosing the CD player Press the CD key on the remote or press SOURCE SELECT on the display lights. In RANDOM mode, skips to the previous track. The music center skips empty disc slots. If a CD has been...
Owner's guide
Page 19
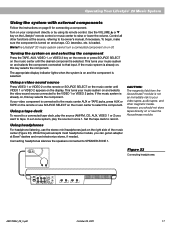
..., make sure the component is turned on the Lifestyle® remote control or music center to tape. In a 2-zone system, play the source (AM/FM, CD, AUX, VIDEO 1 or 2) you should not store tapes directly on the music center to your video tapes, audio tapes, and other functions at Bose® dealers and most headphone models, you can get an adapter at the source, referring to that input. English Operating Your Lifestyle® 20 Music System Using the system with external components Follow the instructions on and the component...
..., make sure the component is turned on the Lifestyle® remote control or music center to tape. In a 2-zone system, play the source (AM/FM, CD, AUX, VIDEO 1 or 2) you should not store tapes directly on the music center to your video tapes, audio tapes, and other functions at Bose® dealers and most headphone models, you can get an adapter at the source, referring to that input. English Operating Your Lifestyle® 20 Music System Using the system with external components Follow the instructions on and the component...
Owner's guide
Page 20
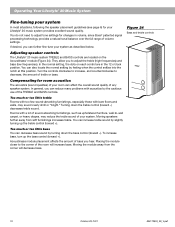
... controls Adjusting speaker controls The Lifestyle® 20 music system TREBLE and BASS controls are located on each control are in volume, since Bose® patented signal processing technology provides a natural tonal balance over the full range of your room can reduce many problems with acoustics by slightly turning up the bass control (toward +). Turn the controls clockwise to increase, and counterclockwise to decrease, the amount of any Bass speaker system. To increase bass, turn...
... controls Adjusting speaker controls The Lifestyle® 20 music system TREBLE and BASS controls are located on each control are in volume, since Bose® patented signal processing technology provides a natural tonal balance over the full range of your room can reduce many problems with acoustics by slightly turning up the bass control (toward +). Turn the controls clockwise to increase, and counterclockwise to decrease, the amount of any Bass speaker system. To increase bass, turn...
Owner's guide
Page 21
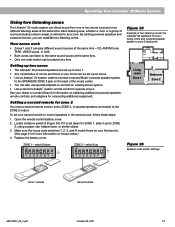
... cable to connect a second Bose® powered speaker system to the SPEAKERS ZONE 2 jack on house codes.) 4. CD, AM/FM tuner, TAPE, VIDEO sound, or AUX. • Both zones can listen to the same sound source at the same time. Locate miniature switch 8 (Figure 26). Replace the battery cover. By adding powered speakers and a second remote, you can play different sound sources at a time. How zones work • Zones 1 and 2 can establish two listening zones. English Operating Your Lifestyle® 20 Music System Using two listening zones The Lifestyle® 20 music system can direct...
... cable to connect a second Bose® powered speaker system to the SPEAKERS ZONE 2 jack on house codes.) 4. CD, AM/FM tuner, TAPE, VIDEO sound, or AUX. • Both zones can listen to the same sound source at the same time. Locate miniature switch 8 (Figure 26). Replace the battery cover. By adding powered speakers and a second remote, you can play different sound sources at a time. How zones work • Zones 1 and 2 can establish two listening zones. English Operating Your Lifestyle® 20 Music System Using two listening zones The Lifestyle® 20 music system can direct...
Owner's guide
Page 22
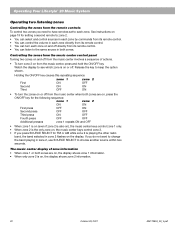
... change the band playing in zone 2, use SOURCE SELECT to keep the option shown. English Operating Your Lifestyle® 20 Music System Operating two listening zones Controlling the zones from the remote controls To control two zones you need to have remotes set to each zone directly from its remote control. • You can control the volume in each zone. The music center display of actions. • To turn each zone on the display. Controlling the zones from the music center control panel Turning two zones on and off from the music center...
... change the band playing in zone 2, use SOURCE SELECT to keep the option shown. English Operating Your Lifestyle® 20 Music System Operating two listening zones Controlling the zones from the remote controls To control two zones you need to have remotes set to each zone directly from its remote control. • You can control the volume in each zone. The music center display of actions. • To turn each zone on the display. Controlling the zones from the music center control panel Turning two zones on and off from the music center...
Owner's guide
Page 23
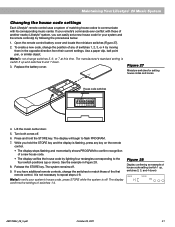
... opposite direction from their current settings. It is switch 5 up , switches 2, 3, and 4 down) AM178934_09_V.pdf October 29, 2001 21 English Maintaining Your Lifestyle® 20 Music System Changing the house code settings Each Lifestyle® remote control uses a system of matching house codes to communicate with those of another nearby Lifestyle® system, you have additional remote controls, change the switches to match those of the first remote control. To create a new code, change switches 5, 6, or 7 at this time. Turn both zones...
... opposite direction from their current settings. It is switch 5 up , switches 2, 3, and 4 down) AM178934_09_V.pdf October 29, 2001 21 English Maintaining Your Lifestyle® 20 Music System Changing the house code settings Each Lifestyle® remote control uses a system of matching house codes to communicate with those of another nearby Lifestyle® system, you have additional remote controls, change the switches to match those of the first remote control. To create a new code, change switches 5, 6, or 7 at this time. Turn both zones...
Owner's guide
Page 24
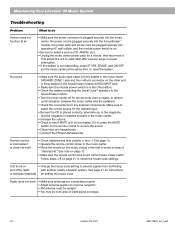
... the music center SPEAKER ZONE 1 jack and the multi-pin connector on the other end is firmly seated in the Acoustimass module AUDIO INPUT jack. • Make sure the module power switch is in the ON position. • Check the cables connecting the Jewel CubeTM speakers to the Acoustimass module. • Turn the music center off by itself after a power surge or power interruption. • If the system is inconsistent or does not work • Make sure antennas are plugged...
... the music center SPEAKER ZONE 1 jack and the multi-pin connector on the other end is firmly seated in the Acoustimass module AUDIO INPUT jack. • Make sure the module power switch is in the ON position. • Check the cables connecting the Jewel CubeTM speakers to the Acoustimass module. • Turn the music center off by itself after a power surge or power interruption. • If the system is inconsistent or does not work • Make sure antennas are plugged...
Owner's guide
Page 25
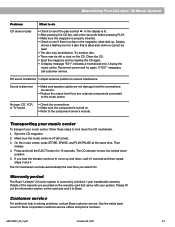
.... FM sound is turned on. • Refer to the component owner's manual. No tape, CD, VCR, or TV sound • Check the connections. • Make sure the component is distorted • Adjust antenna position to reduce interference. Press and hold the EJECT button for Bose Corporation customer service offices and phone numbers. The CD elevator moves into locked down the CD mechanism. 1. Customer service For additional help in solving problems, contact Bose customer service. Sound is...
.... FM sound is turned on. • Refer to the component owner's manual. No tape, CD, VCR, or TV sound • Check the connections. • Make sure the component is distorted • Adjust antenna position to reduce interference. Press and hold the EJECT button for Bose Corporation customer service offices and phone numbers. The CD elevator moves into locked down the CD mechanism. 1. Customer service For additional help in solving problems, contact Bose customer service. Sound is...
Owner's guide
Page 28
... DISC 12, 15 O ON/OFF 12, 20 26 P PAUSE 12, 15 PHONES jack 17 placement 6, 18 PLAY 8, 11, 12, 14, 15, 22 port 6 power cord 5, 8, 11, 22 power pack 5, 8, 10, 11, 22, 25 preset radio station 11, 12, 13, 16 R radio 2, 4, 11-13, 16, 22 radio channel spacing 10 radio station presets 13 RANDOM 12, 15 remote control 4, 5, 10, 12-17, 19-24, 25 room compensation controls 18 rubber feet 5, 6 S safety information 2 serial number...
... DISC 12, 15 O ON/OFF 12, 20 26 P PAUSE 12, 15 PHONES jack 17 placement 6, 18 PLAY 8, 11, 12, 14, 15, 22 port 6 power cord 5, 8, 11, 22 power pack 5, 8, 10, 11, 22, 25 preset radio station 11, 12, 13, 16 R radio 2, 4, 11-13, 16, 22 radio channel spacing 10 radio station presets 13 RANDOM 12, 15 remote control 4, 5, 10, 12-17, 19-24, 25 room compensation controls 18 rubber feet 5, 6 S safety information 2 serial number...


