
The Bose® Lifestyle® amplifier - Owner's guide
Page 5
... a Model 5 music center 13 Connecting speakers to your Lifestyle® stereo amplifier 14 Checking to a Lifestyle® media center 9 Setting up your system 15 Maintaining Your Lifestyle® Stereo Amplifier Cleaning the amplifier 16 Protecting outdoor wiring 16 Troubleshooting 16 Customer service 17 Warranty period 17 Technical information 18 For your records The serial number...
... a Model 5 music center 13 Connecting speakers to your Lifestyle® stereo amplifier 14 Checking to a Lifestyle® media center 9 Setting up your system 15 Maintaining Your Lifestyle® Stereo Amplifier Cleaning the amplifier 16 Protecting outdoor wiring 16 Troubleshooting 16 Customer service 17 Warranty period 17 Technical information 18 For your records The serial number...

The Bose® Lifestyle® amplifier - Owner's guide
Page 6
...;er. If the power cord does not fit your Lifestyle® Stereo Amplifier Before you begin Thank you want to add Bose® non-powered environmental speakers or Bose non-powered accessory speakers to your Lifestyle® stereo amplifier. Setting up your power (mains... (240V) plug adaptor Note: Use only the power cord supplied with Bose non-powered environmental speakers or Bose non-powered accessory speakers ONLY. Dual voltage units include a 120V power cord and a 230V plug adapter. The Lifestyle® stereo amplifier provides you with a simple solution when...
...;er. If the power cord does not fit your Lifestyle® Stereo Amplifier Before you begin Thank you want to add Bose® non-powered environmental speakers or Bose non-powered accessory speakers to your Lifestyle® stereo amplifier. Setting up your power (mains... (240V) plug adaptor Note: Use only the power cord supplied with Bose non-powered environmental speakers or Bose non-powered accessory speakers ONLY. Dual voltage units include a 120V power cord and a 230V plug adapter. The Lifestyle® stereo amplifier provides you with a simple solution when...

The Bose® Lifestyle® amplifier - Owner's guide
Page 7
... heat-sensitive surface, such as electrical wiring or plumbing. Setting Up Your Lifestyle® Stereo Amplifier Selecting a location for your Lifestyle® stereo amplifier Select a location for your Lifestyle® stereo amplifier and mount it according to the following guidelines... when selecting a location for your Lifestyle® system or the accessory speakers, consider the following guidelines. It is installed on a shelf, or in a bookcase, or inside an entertainment center, maintain 2.0 ...
... heat-sensitive surface, such as electrical wiring or plumbing. Setting Up Your Lifestyle® Stereo Amplifier Selecting a location for your Lifestyle® stereo amplifier Select a location for your Lifestyle® stereo amplifier and mount it according to the following guidelines... when selecting a location for your Lifestyle® system or the accessory speakers, consider the following guidelines. It is installed on a shelf, or in a bookcase, or inside an entertainment center, maintain 2.0 ...

The Bose® Lifestyle® amplifier - Owner's guide
Page 10
... D, with room A being the primary room (the one used for the first time. Setting Up Your Lifestyle® Stereo Amplifier Figure 7 Sample display for a tworoom system Operating speakers in other rooms with the Personal® music center Systems that share a source Press the HOUSE button to control ... two or more information on operating your system in individual rooms. These rooms are connected to as one room of Bose® powered speakers placed in more than one room. Note: Refer to your system, the Personal music center displays ROOM and HOUSE buttons, and room ...
... D, with room A being the primary room (the one used for the first time. Setting Up Your Lifestyle® Stereo Amplifier Figure 7 Sample display for a tworoom system Operating speakers in other rooms with the Personal® music center Systems that share a source Press the HOUSE button to control ... two or more information on operating your system in individual rooms. These rooms are connected to as one room of Bose® powered speakers placed in more than one room. Note: Refer to your system, the Personal music center displays ROOM and HOUSE buttons, and room ...

The Bose® Lifestyle® amplifier - Owner's guide
Page 11
Setting Up Your Lifestyle® Stereo Amplifier Connecting the Lifestyle® stereo amplifier to a Lifestyle® media center CAUTION: Before making connections, turn the Lifestyle® system off and disconnect the media center from the AC (mains) power outlet. Insert the...mm mini-plug into the SPEAKER ZONES 2 output jack on the rear panel of the media center (Figure 8). 2. Figure 8 Cable connections between the Lifestyle® media center and the Lifestyle® stereo amplifier Lifestyle® SA-1 stereo amplifier rear panel Lifestyle® media center rear ...
Setting Up Your Lifestyle® Stereo Amplifier Connecting the Lifestyle® stereo amplifier to a Lifestyle® media center CAUTION: Before making connections, turn the Lifestyle® system off and disconnect the media center from the AC (mains) power outlet. Insert the...mm mini-plug into the SPEAKER ZONES 2 output jack on the rear panel of the media center (Figure 8). 2. Figure 8 Cable connections between the Lifestyle® media center and the Lifestyle® stereo amplifier Lifestyle® SA-1 stereo amplifier rear panel Lifestyle® media center rear ...

The Bose® Lifestyle® amplifier - Owner's guide
Page 13
...er. 3. Insert the single multi-pin connector at one end of the music center (Figure 10). 2. Setting Up Your Lifestyle® Stereo Amplifier Connecting the Lifestyle® stereo amplifier to a Model 20 music center ® Figure 10 Cable connections between the Model 20 ...; system off and disconnect the music center from the AC (mains) power outlet. Lifestyle® stereo amplifier rear panel 4 Ω MINIMUM LL R L SYSTEM RR CONTROL L R +- SPEAKER OUTPUTS INPUT Model 20 music center rear panel 30-ft audio input cable (supplied) AM262840_00_V.pdf January 4, ...
...er. 3. Insert the single multi-pin connector at one end of the music center (Figure 10). 2. Setting Up Your Lifestyle® Stereo Amplifier Connecting the Lifestyle® stereo amplifier to a Model 20 music center ® Figure 10 Cable connections between the Model 20 ...; system off and disconnect the music center from the AC (mains) power outlet. Lifestyle® stereo amplifier rear panel 4 Ω MINIMUM LL R L SYSTEM RR CONTROL L R +- SPEAKER OUTPUTS INPUT Model 20 music center rear panel 30-ft audio input cable (supplied) AM262840_00_V.pdf January 4, ...

The Bose® Lifestyle® amplifier - Owner's guide
Page 15
... Ω MINIMUM LL LL SYSTEM RR CONTROL R +- Setting Up Your Lifestyle® Stereo Amplifier Connecting the Lifestyle® stereo amplifier to a Model 5 music center In systems using a Model 5 music center, home theater speakers are connected to the FIXED OUTPUT jacks on the rear panel of the...and disconnect the music center from the FIXED R and FIXED L OUTPUT jacks. The amplifier is designed to the SPEAKERS A or SPEAKERS B outputs. When adding the Lifestyle® amplifier, you have completed all other end of the audio input cable, insert the 3.5 mm mini-plug ...
... Ω MINIMUM LL LL SYSTEM RR CONTROL R +- Setting Up Your Lifestyle® Stereo Amplifier Connecting the Lifestyle® stereo amplifier to a Model 5 music center In systems using a Model 5 music center, home theater speakers are connected to the FIXED OUTPUT jacks on the rear panel of the...and disconnect the music center from the FIXED R and FIXED L OUTPUT jacks. The amplifier is designed to the SPEAKERS A or SPEAKERS B outputs. When adding the Lifestyle® amplifier, you have completed all other end of the audio input cable, insert the 3.5 mm mini-plug ...

The Bose® Lifestyle® amplifier - Owner's guide
Page 16
...amplifier to powered speakers of any make or model, nor to any amplified music sources. Figure 14 Speaker cable connections on page 18. • Connect the right speaker cable to the SPEAKER OUTPUT R terminals (Figure 14). Note: Refer to your Lifestyle® system owner's ...guide for more than one room. Speaker cable consists of the amplifier. Setting...
...amplifier to powered speakers of any make or model, nor to any amplified music sources. Figure 14 Speaker cable connections on page 18. • Connect the right speaker cable to the SPEAKER OUTPUT R terminals (Figure 14). Note: Refer to your Lifestyle® system owner's ...guide for more than one room. Speaker cable consists of the amplifier. Setting...

The Bose® Lifestyle® amplifier - Owner's guide
Page 18
... If you have a problem operating your Bose dealer to remove dust from the outside of salt water exposure. Do not use any openings. It is commonly available at both ends. • See "Connecting speakers to the address list enclosed in your Lifestyle® stereo amplifier" on the...pdf You may become dusty over time. This is selected (AM, FM, CD, AUX, etc.). Troubleshooting If you do Neither speaker plays • Make sure the Lifestyle® music center and the amplifier are plugged in and turned on. • Make sure the plugs are inserted ...
... If you have a problem operating your Bose dealer to remove dust from the outside of salt water exposure. Do not use any openings. It is commonly available at both ends. • See "Connecting speakers to the address list enclosed in your Lifestyle® stereo amplifier" on the...pdf You may become dusty over time. This is selected (AM, FM, CD, AUX, etc.). Troubleshooting If you do Neither speaker plays • Make sure the Lifestyle® music center and the amplifier are plugged in and turned on. • Make sure the plugs are inserted ...

The Bose® Lifestyle® amplifier - Owner's guide
Page 19
... not play , the problem is covered by the Bose limited one-year transferable warranty. Interference • Make sure the speaker wires are connected + to normal. Choosing a lower setting should ensure continuous, even volume. Warranty period The Lifestyle® stereo amplifier is in your Lifestyle® DVD system's owners guide. AM262840_00_V.pdf January...
... not play , the problem is covered by the Bose limited one-year transferable warranty. Interference • Make sure the speaker wires are connected + to normal. Choosing a lower setting should ensure continuous, even volume. Warranty period The Lifestyle® stereo amplifier is in your Lifestyle® DVD system's owners guide. AM262840_00_V.pdf January...

Owner's guide
Page 3
... General System Operation 12 Turning your system on and off 12 Making sound adjustments 12 Volume 12 Changing the number of speakers playing 12 Adjusting surround sound 12 Using the headphones jack 12 System settings 12 Using the sleep timer 12 Changing the... station preset 17 Erasing a station preset 18 Selecting a preset station 18 Playing External Sources 19 Controlling external sources 19 Programming your LIFESTYLE® remote to control your TV 19 Programming your LIFESTYLE remote to control your VCR 19 Programming your LIFESTYLE remote to control your cable/satellite box ...
... General System Operation 12 Turning your system on and off 12 Making sound adjustments 12 Volume 12 Changing the number of speakers playing 12 Adjusting surround sound 12 Using the headphones jack 12 System settings 12 Using the sleep timer 12 Changing the... station preset 17 Erasing a station preset 18 Selecting a preset station 18 Playing External Sources 19 Controlling external sources 19 Programming your LIFESTYLE® remote to control your TV 19 Programming your LIFESTYLE remote to control your VCR 19 Programming your LIFESTYLE remote to control your cable/satellite box ...
Owner's guide
Page 7
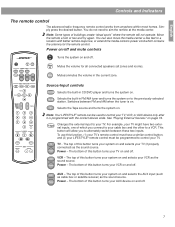
... properly connected) as the sound source. The bottom of this button turns your TV. Note: Some types of this button turns your LIFESTYLE® remote control must be used to a location with the correct device code. Switches between these two inputs. See "Playing External...Guide Exit Settings Tune Seek Enter Channel Chapter Preset Track Volume 1 2 3 4 5 6 7 8 9 Previous 0 PLAYBACK Stop Pause Play Shuffle Repeat Speakers 2-3-5 AUDIO Surround -+ On Off Turns the system on page 19. The top of which contains the antenna for all connected...
... properly connected) as the sound source. The bottom of this button turns your TV. Note: Some types of this button turns your LIFESTYLE® remote control must be used to a location with the correct device code. Switches between these two inputs. See "Playing External...Guide Exit Settings Tune Seek Enter Channel Chapter Preset Track Volume 1 2 3 4 5 6 7 8 9 Previous 0 PLAYBACK Stop Pause Play Shuffle Repeat Speakers 2-3-5 AUDIO Surround -+ On Off Turns the system on page 19. The top of which contains the antenna for all connected...

Owner's guide
Page 8
... Power Power Power MENU / NAVIGATION DVD Menu Guide Exit Settings Tune Seek Enter Channel Chapter Preset Track Volume 1 2 3 4 5 6 7 8 9 Previous 0 PLAYBACK Stop Pause Play Shuffle Repeat Speakers 2-3-5 AUDIO Surround -+ DVD Menu Guide Exit Settings Tune Seek Enter Displays or exits the menu of a menu item. Channel Chapter Preset Track Skips to directly...
... Power Power Power MENU / NAVIGATION DVD Menu Guide Exit Settings Tune Seek Enter Channel Chapter Preset Track Volume 1 2 3 4 5 6 7 8 9 Previous 0 PLAYBACK Stop Pause Play Shuffle Repeat Speakers 2-3-5 AUDIO Surround -+ DVD Menu Guide Exit Settings Tune Seek Enter Displays or exits the menu of a menu item. Channel Chapter Preset Track Skips to directly...

Owner's guide
Page 9
... where the disc was stopped. Channel Chapter Preset Track Volume 1 2 3 4 5 6 7 8 9 Previous 0 PLAYBACK Stop Pause Play Shuffle Repeat Speakers 2-3-5 AUDIO Surround -+ Shuffle Plays CD tracks in random order. English Controls and Indicators The remote control - See "Programming your VCR" on page 19.... Pauses the disc player. Press Repeat again to control your LIFESTYLE® remote to change the repeat mode. Audio controls Speakers Pressing this mode. continued On Off Mute All Mute CD/DVD SOURCE / INPUT FM/AM Tape...
... where the disc was stopped. Channel Chapter Preset Track Volume 1 2 3 4 5 6 7 8 9 Previous 0 PLAYBACK Stop Pause Play Shuffle Repeat Speakers 2-3-5 AUDIO Surround -+ Shuffle Plays CD tracks in random order. English Controls and Indicators The remote control - See "Programming your VCR" on page 19.... Pauses the disc player. Press Repeat again to control your LIFESTYLE® remote to change the repeat mode. Audio controls Speakers Pressing this mode. continued On Off Mute All Mute CD/DVD SOURCE / INPUT FM/AM Tape...

Owner's guide
Page 10
... available source selections. Volume Pressing ▲ raises the volume of the system; On/Off Turns the system on or off the system and all connected speakers (all zones and rooms). All Off Turns off in zone 1. Open/Close Opens/closes the disc tray. Removes custom equalization settings. Enter Confirms...
... available source selections. Volume Pressing ▲ raises the volume of the system; On/Off Turns the system on or off the system and all connected speakers (all zones and rooms). All Off Turns off in zone 1. Open/Close Opens/closes the disc tray. Removes custom equalization settings. Enter Confirms...

Owner's guide
Page 12
...; ▼ buttons on page 22. Making sound adjustments Volume System volume can be raised or lowered using the Surround + / - Changing the number of speakers playing When you must change the video output setting in your TV. For example, when you turn the system on the remote control or the...the settings menus" on page 22, and "Changing the system setup" on the remote control. When you select FM, the front right and left speakers are muted. You can be accessed through the settings menu. buttons on with either On/Off button, the source that source is connected, all &#...
...; ▼ buttons on page 22. Making sound adjustments Volume System volume can be raised or lowered using the Surround + / - Changing the number of speakers playing When you must change the video output setting in your TV. For example, when you turn the system on the remote control or the...the settings menus" on page 22, and "Changing the system setup" on the remote control. When you select FM, the front right and left speakers are muted. You can be accessed through the settings menu. buttons on with either On/Off button, the source that source is connected, all &#...

Owner's guide
Page 20
... can program it to operate your cable/satellite box (connected to that input. Programming your LIFESTYLE® remote to control your cable/satellite box If you want to control your brand of speakers playing. 20 See the "Remote control setup submenu" on and selects the component connected to...external source turns the system on your system on page 37. 1. Turn on in surround (5-speaker) mode. Select Remote Control Setup and press Enter. 6. Select AUX Device Code. AUX Power 9. on the LIFESTYLE® remote control to choose the next device code, and press the AUX Power button ...
... can program it to operate your cable/satellite box (connected to that input. Programming your LIFESTYLE® remote to control your cable/satellite box If you want to control your brand of speakers playing. 20 See the "Remote control setup submenu" on and selects the component connected to...external source turns the system on your system on page 37. 1. Turn on in surround (5-speaker) mode. Select Remote Control Setup and press Enter. 6. Select AUX Device Code. AUX Power 9. on the LIFESTYLE® remote control to choose the next device code, and press the AUX Power button ...
Owner's guide
Page 24
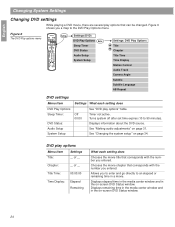
... Power Power Power MENU / NAVIGATION DVD Menu Guide Exit Settings Tune Seek Enter Channel Chapter Preset Track Volume 1 2 3 4 5 6 7 8 9 Previous 0 PLAYBACK Stop Pause Play Shuffle Repeat Speakers 2-3-5 AUDIO Surround -+ Settings Settings (DVD) DVD Play Options Enter Sleep Timer DVD Status Audio Setup System Setup Settings: DVD Play Options Title Chapter Title Time...
... Power Power Power MENU / NAVIGATION DVD Menu Guide Exit Settings Tune Seek Enter Channel Chapter Preset Track Volume 1 2 3 4 5 6 7 8 9 Previous 0 PLAYBACK Stop Pause Play Shuffle Repeat Speakers 2-3-5 AUDIO Surround -+ Settings Settings (DVD) DVD Play Options Enter Sleep Timer DVD Status Audio Setup System Setup Settings: DVD Play Options Title Chapter Title Time...
Owner's guide
Page 26
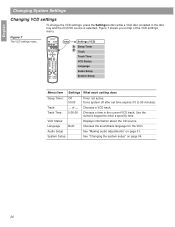
... Power Power Power MENU / NAVIGATION DVD Menu Guide Exit Settings Tune Seek Enter Channel Chapter Preset Track Volume 1 2 3 4 5 6 7 8 9 Previous 0 PLAYBACK Stop Pause Play Shuffle Repeat Speakers 2-3-5 AUDIO Surround -+ Settings Settings (VCD) Sleep Timer Track Track Time VCD Status Language Audio Setup System Setup Menu Item Settings What each setting does Sleep...
... Power Power Power MENU / NAVIGATION DVD Menu Guide Exit Settings Tune Seek Enter Channel Chapter Preset Track Volume 1 2 3 4 5 6 7 8 9 Previous 0 PLAYBACK Stop Pause Play Shuffle Repeat Speakers 2-3-5 AUDIO Surround -+ Settings Settings (VCD) Sleep Timer Track Track Time VCD Status Language Audio Setup System Setup Menu Item Settings What each setting does Sleep...

Owner's guide
Page 27
... Power Power Power MENU / NAVIGATION DVD Menu Guide Exit Settings Tune Seek Enter Channel Chapter Preset Track Volume 1 2 3 4 5 6 7 8 9 Previous 0 PLAYBACK Stop Pause Play Shuffle Repeat Speakers 2-3-5 AUDIO Surround -+ Settings Settings (CD) Sleep Timer Track Track Time CD Status Audio Setup System Setup Menu Item Settings What each setting does Sleep Timer...
... Power Power Power MENU / NAVIGATION DVD Menu Guide Exit Settings Tune Seek Enter Channel Chapter Preset Track Volume 1 2 3 4 5 6 7 8 9 Previous 0 PLAYBACK Stop Pause Play Shuffle Repeat Speakers 2-3-5 AUDIO Surround -+ Settings Settings (CD) Sleep Timer Track Track Time CD Status Audio Setup System Setup Menu Item Settings What each setting does Sleep Timer...


