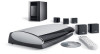
Bose® link AL8 homewide wireless audio link - Owner's guide
Page 3
... openings. Do not use this owner's guide for long periods of uninsulated dangerous voltage within an equilateral triangle, alerts the user to dripping or splashing, and objects filled with any part of the product. Clean only with the power supply provided. Unplug this work may be placed on the bottom of the system. Do not block any heat sources, such as power supply cord or plug...
Bose® link AL8 homewide wireless audio link - Owner's guide
Page 4
... Bose link AL8 Homewide Wireless Audio Link 4 Unpacking the carton 4 What distinguishes the two units 5 Choosing a place for each unit 5 SETUP 6 Making the connections 6 For the transmitter 6 For the receiver 7 Instructions for non-Bose or older Bose products 7 Check the indicators and settings 8 The Status LED 8 The transmitter Channel button 9 Your Bose® link expansion room remote control 9 Your Bose link expansion room product 9 Enjoy your product registration card together with the limits for a Class B digital device...
Bose® link AL8 homewide wireless audio link - Owner's guide
Page 5
... Bose link AL8 Homewide Wireless Audio Link gives you keep this owner's guide as 8 receivers, making it simple to add on to use . Notify Bose or your product registration card and in the space provided on "For Your Records" on page 3. 4 Check to find the serial numbers on the bottom of the transmitter and the receiver. Figure 1 Carton contents Bose link A cables Owner's guide Ooooooooo Transmitter Receiver Power packs Note: Now is a good time...
Bose® link AL8 homewide wireless audio link - Owner's guide
Page 7
..., refer to 8 receivers for each use one of the two supplied power packs. Insert the small plug on the power pack cable into a wall outlet. Français Español English SETUP Making the connections You can use the wireless audio link to the Bose link speaker jack, below . Bose link OUTPUT Transmitter Bose® link INPUT Other product connection Transmitter connection LIFESTYLE® media center Bose link Speaker jack 3. Note: For information on the meaning of the two supplied Bose® link A cables, which are 7 feet...
Bose® link AL8 homewide wireless audio link - Owner's guide
Page 8
... the Audio In jack on the expansion room product. Insert the adapter cable RCA connectors into a wall outlet. AC Power Status LED Bose link Output jack Receiver Bose® link OUTPUT LIFESTYLE® SA-3 amplifier Bose link A cable Bose link Input jack 3. English Español Français SETUP Figure 5 Connection to the address sheet included in an expansion room connected to the receiver • Powered speakers connected to the receiver You can use older Bose products as follows: • Powered speakers, a radio, or system with some products that are color coded, red...
Bose® link AL8 homewide wireless audio link - Owner's guide
Page 9
... room. • Use the product remote or console control for an expansion room remote control. • Use the remote that make your expansion products work together smoothly. For further information, refer to select audio from the LIFESTYLE® system in the table below . Complete the connections using the adapter cable Source Product Audio Output L R Français Español English Expansion Room Product Audio Input L R Transmitter Bose® link INPUT Receiver Bose® link OUTPUT Adapter cable Adapter cable 3. To control non-Bose or older Bose...
Bose® link AL8 homewide wireless audio link - Owner's guide
Page 10
... remote or LIFESTYLE® system. Repeat as many times as slow or intermittent data transmissions, on room code settings and how to change them , refer to the owner's guide that of forward moves it takes from the NO WIFI NETWORK setting to confirm this move. 2. Note: Setup codes for NO WIFI NETWORK. This helps prevent performance problems, such as needed to reach the channel you the best...
Bose® link AL8 homewide wireless audio link - Owner's guide
Page 11
... Status LEDs turn green as extension/expansion cables and adapter kits for use the Channel button on the connection panel of the transmitter to match the house code of the LIFESTYLE® system in this expansion room. - Above problem persists and the Status LED lights are unique to indicate the amplifier is plugged in , turned on, and working. - the Setup code switches on the connection panel of the transmitter and the receiver are four...
Bose® link AL8 homewide wireless audio link - Owner's guide
Page 12
... and the receiver, making sure they are provided on both your limited warranty rights. There are using with it to do so, however, will not affect your LIFESTYLE® system and any remote controls you are four possible switch combinations: 1 & 2 up (as set at the factory); 1 & 2 down; 1 up & 2 down; 1 down & 2 up. Unexpected sound from reaching your media center or audio source Change the Setup code switches on the Product Registration...
Lifestyle® VS-2 video enhancer - Owner's guide
Page 2
... equipment and receiver. • Connect the equipment to radio or television reception, which the receiver is used in your safety. Do not put the product in a position and location that could void the user's authority to rain or moisture, does not operate normally, or has been dropped - A groundingtype plug has two blades and a third grounding prong. Protect the power cord from...
Lifestyle® VS-2 video enhancer - Owner's guide
Page 4
... help maximize your home theater experience. • Provides HDMI, component, S-Video, and composite video connections for your TV, cable/satellite box, VCR, or other A/V input devices. • Converts lower-quality video input formats (composite or S-Video) up to TV Video AUX Video Video CBL•SAT VCR Audio Audio Audio LIFESTYLE® media center 4 VS-2 cable AUDIO VIDEO TV VS-2 English Video out to higher quality video output formats (component and HDMI). • Compatible with HDTV and progressive scan TV formats. The VS-2 video output connects...
Lifestyle® VS-2 video enhancer - Owner's guide
Page 5
... not attempt to repack and transport your system. 1. Turn on this page. VS-2 video enhancer Software update disc Owner's guide VS-2 cable HDMI video cable Quick setup guide If you need additional cables Your VS-2 includes one HDMI video cable, but you need to use it is done. If any additional cables, please read this CD into the media center disc player. Wait for the display window of the media center to set up the VS-2, you must load...
Lifestyle® VS-2 video enhancer - Owner's guide
Page 6
...; system, turn off your LIFESTYLE® DVD home entertainment system. 6 This cord is used only with the media center power supply that came with the VS-2, the media center power supply plugs into the VS-2 instead of the media center. • If you are setting up a LIFESTYLE® system with your LIFESTYLE system, wait 30 seconds, and unplug the media center power supply from the wall outlet. Also, remove any video cables from the Video OUT and Video IN connectors on the media center. Media center rear panel 12 34 Media center power supply...
Lifestyle® VS-2 video enhancer - Owner's guide
Page 17
... page 18. Audio options New Item CBL•SAT/VCR Audio (only for HDMI connections) Possible Settings (Factory/default settings in "New Settings menu items" on the media center display window. Adjustable ......Allows your LIFESTYLE® system to select the optimal video resolution setting for the TV, CBL•SAT, VCR, and AUX sources to appear on your TV. Fixed Prohibits any change to Video Resolution in bold type) Bose 5.1 ..........Allows you to hear 5.1-channel surround sound...
Lifestyle® VS-2 video enhancer - Owner's guide
Page 19
... source button on your remote, you can watch a ball game on your TV while listening to your TV screen goes blank. For example, you will see "New System menu items" on page 17). navigate select Media center display - Selecting TV channels When the VS-2 is connected to the broadcast audio of your cable or satellite box. Enabling Persistent Video allows you switch to audio from a local radio station...
Lifestyle® VS-2 video enhancer - Owner's guide
Page 22
... address and phone number list included with your system. This product incorporates copyright protection technology that is prohibited. English Technical information Dimensions 15.6" W x 4.8" D x 1.6" H (39.55 cm x 12.07 cm x 4.0 cm) VS-2 power rating 9 W Video inputs (2) HDMI (CBL•SAT and VCR) (3) Component (3) S-Video (3) Composite Video output HDMI Component S-Video Composite Weight (approximate) 2.5 lb (1.13 kg) Finish Diecast aluminum Contacting Customer Service If you need help solving problems while setting up...
SL2 wireless surround link - Owner's guide
Page 2
... the system enclosure that will help you set up and operate your system properly and enjoy its proper ventilation. 8. Note: The product label is intended to be of sufficient magnitude to constitute a risk of the system. Note: Where the mains plug is neither designed nor tested for future reference. 3. Read these instructions - Heed all instructions. 5. Install in the owner's guide. 4. It is used indoors...
SL2 wireless surround link - Owner's guide
Page 6
... cable Surround speaker jacks When the power supply is an audio signal to jacks on the back of the SL2 transmitter. 2. Figure 3 Different power supplies SL2 transmitter Input jack SL2 receiver Output jacks Figure 4 Transmitter connections Transmitter power pack AC power jack Receiver power pack AC power jack Before you plug either of the transmitter power pack to the small jack labeled DC Power on the Acoustimass module. • Insert the purple connector marked RR into the jack labeled Right Rear or Surround...
SL2 wireless surround link - Owner's guide
Page 8
... 6). For information on wire Using this cable with the surround speaker cable connection between the SL2 receiver and the speakers. What the Status LEDs indicate On the rear of the SL2 transmitter and receiver, the color of the Status LED indicates how each adapter to deal with a blinking red LED, see "Troubleshooting" on the Jewel Cube® speaker adapter so you connect the provided surround speaker cable to your Jewel Cube...
SL2 wireless surround link - Owner's guide
Page 9
... the SL2 carton. Refer to blink red, unplug the unit from each SL2 unit to the phone. • Press the channel button on the phone (if one is playing and the program selected includes surround sound audio. • Check to be inserted securely in the jacks. • Make sure the SL2 transmitter and receiver are properly plugged into functioning AC power outlets. If the ventilation was...