Owner's guide
Page 2
... this work may be of sufficient magnitude to constitute a risk of important operating and maintenance instructions in the Bose® FreeStyle® powered speaker system. Safety Information The Interface module is to be used only with the Acoustimass® module in this owner's guide. CAUTION RISK OF ELECTRICAL SHOCK DO NOT OPEN CAUTION: TO REDUCE THE RISK OF ELECTRIC SHOCK, DO NOT REMOVE COVER...
... this work may be of sufficient magnitude to constitute a risk of important operating and maintenance instructions in the Bose® FreeStyle® powered speaker system. Safety Information The Interface module is to be used only with the Acoustimass® module in this owner's guide. CAUTION RISK OF ELECTRICAL SHOCK DO NOT OPEN CAUTION: TO REDUCE THE RISK OF ELECTRIC SHOCK, DO NOT REMOVE COVER...
Owner's guide
Page 3
... plan works best 11 Preferred game connection 12 Alternate connection choice 12 Connecting audio to find... Contents Where to the input labeled VIDEO 13 Make the power connection after all the others 13 Turning off the internal speakers in your TV 14 Operation 15 Using the system 15 Using the mute button 15 Using the source buttons 15 Reference 16 Taking care of your FreeStyle speaker system 16 Cleaning the speakers 16 Replacing the remote control battery 16 Troubleshooting...
... plan works best 11 Preferred game connection 12 Alternate connection choice 12 Connecting audio to find... Contents Where to the input labeled VIDEO 13 Make the power connection after all the others 13 Turning off the internal speakers in your TV 14 Operation 15 Using the system 15 Using the mute button 15 Using the source buttons 15 Reference 16 Taking care of your FreeStyle speaker system 16 Cleaning the speakers 16 Replacing the remote control battery 16 Troubleshooting...
Owner's guide
Page 4
... module with this owner's guide. *"Dolby" and the double-D symbol are trademarks of premium five-speaker systems, yet from surround encoded DVDs, and a natural soundstage for connecting source components (like realism from a modest array of equipment. Introduction Before you begin Thank you keep your records The serial number is located on the rear of the Acoustimass module. Using Dolby* Digital® and Bose VideoStage® signal processing technology, FreeStyle speakers provide...
... module with this owner's guide. *"Dolby" and the double-D symbol are trademarks of premium five-speaker systems, yet from surround encoded DVDs, and a natural soundstage for connecting source components (like realism from a modest array of equipment. Introduction Before you begin Thank you keep your records The serial number is located on the rear of the Acoustimass module. Using Dolby* Digital® and Bose VideoStage® signal processing technology, FreeStyle speakers provide...

Owner's guide
Page 5
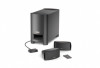
... is a good time to be sure your system includes the parts shown in the space provided on the rear of the Acoustimass® module. System Setup Unpacking Figure 1 Contents of the shipping carton: • 2 Speakers • 4 Rubber feet, large • 1 Acoustimass module • 8 Rubber feet, small • 1 Interface module • 1 extra attachment strip • 1 Remote control (battery installed) • 1 120V power cord (8-foot) • 1 Stereo cable (6-foot)) • 1 Speaker cable (15-foot...
... is a good time to be sure your system includes the parts shown in the space provided on the rear of the Acoustimass® module. System Setup Unpacking Figure 1 Contents of the shipping carton: • 2 Speakers • 4 Rubber feet, large • 1 Acoustimass module • 8 Rubber feet, small • 1 Interface module • 1 extra attachment strip • 1 Remote control (battery installed) • 1 120V power cord (8-foot) • 1 Stereo cable (6-foot)) • 1 Speaker cable (15-foot...
Owner's guide
Page 6
... the Interface module is the part of sight to the FreeStyle remote control Note: If it will connect directly to this system that are offered to ensure the best system performance, you attach the module to the side of the shelf, or the shelf may find other equipment. Note: Keep in mind that the cables of other components, like your FreeStyle® speakers and Interface module Use the...
... the Interface module is the part of sight to the FreeStyle remote control Note: If it will connect directly to this system that are offered to ensure the best system performance, you attach the module to the side of the shelf, or the shelf may find other equipment. Note: Keep in mind that the cables of other components, like your FreeStyle® speakers and Interface module Use the...

Owner's guide
Page 7
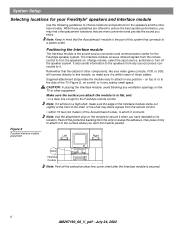
... allow you to experience the audio spaciousness and surround effects that your FreeStyle system is designed to deliver. • Be sure to the address sheet included in an enclosed space can change the overall quality of sound and alter the system performance. • If you are using a bookshelf or a home entertainment unit, place each speaker straight ahead (toward the listening...
... allow you to experience the audio spaciousness and surround effects that your FreeStyle system is designed to deliver. • Be sure to the address sheet included in an enclosed space can change the overall quality of sound and alter the system performance. • If you are using a bookshelf or a home entertainment unit, place each speaker straight ahead (toward the listening...
Owner's guide
Page 8
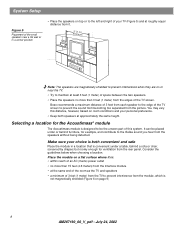
... of the TV screen. Consider the guidelines below when choosing a location. Bose recommends a maximum distance of 3 feet from each speaker to the edge of the TV screen to prevent the sound from becoming too separated from the picture. Place the module on a fl...screened by drapes) but roomy enough for the Acoustimass® module The Acoustimass module is designed to be the unseen part of this distance, however, based on room conditions and your TV (Figure 5) and at approximately the same height. You may vary this system. System Setup Figure 5 Placement of the small speakers...
... of the TV screen. Consider the guidelines below when choosing a location. Bose recommends a maximum distance of 3 feet from each speaker to the edge of the TV screen to prevent the sound from becoming too separated from the picture. Place the module on a fl...screened by drapes) but roomy enough for the Acoustimass® module The Acoustimass module is designed to be the unseen part of this distance, however, based on room conditions and your TV (Figure 5) and at approximately the same height. You may vary this system. System Setup Figure 5 Placement of the small speakers...
Owner's guide
Page 9
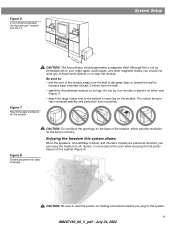
... the wall to decrease bass or toward the wall to your video tapes, audio tapes, and other magnetic media, you plug in circuitry. CAUTION: Be sure to read the section on making connections before you should not store any of these items directly on its side or stand it on the module. Although this system (Figure 8). MUSIC CENTER AC INPUT Figure 8 System placement for ideal coverage...
... the wall to decrease bass or toward the wall to your video tapes, audio tapes, and other magnetic media, you plug in circuitry. CAUTION: Be sure to read the section on making connections before you should not store any of these items directly on its side or stand it on the module. Although this system (Figure 8). MUSIC CENTER AC INPUT Figure 8 System placement for ideal coverage...
Owner's guide
Page 10
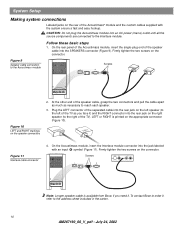
... system ensure a fast and easy hookup. System Setup Making system connections Labeled jacks on the rear of the speaker cable into the SPEAKERS connector (Figure 9). On the rear panel of the Acoustimass module, insert the single-plug end of the Acoustimass® module and the custom cables supplied with an input symbol (Figure 11). On the Acoustimass module, insert the Interface module connector into an AC power (mains) outlet until all the source components are connected to the Acoustimass module Screws SPEAKERS RIGHT LEFT SPEAKERS...
... system ensure a fast and easy hookup. System Setup Making system connections Labeled jacks on the rear of the speaker cable into the SPEAKERS connector (Figure 9). On the rear panel of the Acoustimass module, insert the single-plug end of the Acoustimass® module and the custom cables supplied with an input symbol (Figure 11). On the Acoustimass module, insert the Interface module connector into an AC power (mains) outlet until all the source components are connected to the Acoustimass module Screws SPEAKERS RIGHT LEFT SPEAKERS...
Owner's guide
Page 11
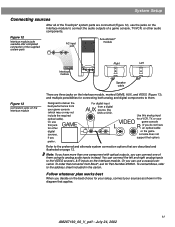
... required optical cable). Follow whatever plan works best When you decide on page 12. System Setup Connecting sources After all of the FreeStyle® system parts are connected (Figure 12), use a coaxial converter. Figure 12 Interface module jacks available after completed connection of a game console, TV/VCR, or other audio components. Refer to connect the audio outputs of the supplied system parts AC input jack Acoustimass® module Figure 13 Connection jacks on the Interface module Interface module Right Left SPEAKERS RIGHT LEFT Speaker cable...
... required optical cable). Follow whatever plan works best When you decide on page 12. System Setup Connecting sources After all of the FreeStyle® system parts are connected (Figure 12), use a coaxial converter. Figure 12 Interface module jacks available after completed connection of a game console, TV/VCR, or other audio components. Refer to connect the audio outputs of the supplied system parts AC input jack Acoustimass® module Figure 13 Connection jacks on the Interface module Interface module Right Left SPEAKERS RIGHT LEFT Speaker cable...
Owner's guide
Page 12
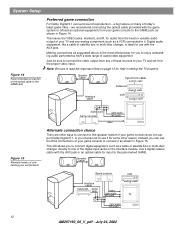
... audio & video TV digital audio Game console right audio left audio 12 AM267190_00_V_pdf • July 24, 2002 Digital audio equipment, like a cable or satellite box or multi-disc changer, is the most efficient way for the proper video input. Instead, you choose not to connect it for input to the GAME jack Preferred game connection For Dolby Digital 5.1 surround sound reproduction - Use a digital coaxial cable with the AUX jack. System Setup Figure 14 Recommended connection of the optical cable...
... audio & video TV digital audio Game console right audio left audio 12 AM267190_00_V_pdf • July 24, 2002 Digital audio equipment, like a cable or satellite box or multi-disc changer, is the most efficient way for the proper video input. Instead, you choose not to connect it for input to the GAME jack Preferred game connection For Dolby Digital 5.1 surround sound reproduction - Use a digital coaxial cable with the AUX jack. System Setup Figure 14 Recommended connection of the optical cable...
Owner's guide
Page 13
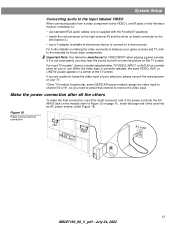
... end of the TV screen. Figure 16 Power cord as the final connection Left Right AC outlet 13 AM267190_00_V_pdf • July 24, 2002 System Setup Connecting audio to the input labeled VIDEO When connecting audio from a video component to the VIDEO L and R jacks on the Interface module, remember to: • use standard RCA audio cables (one is supplied with the FreeStyle® speakers) • match the red connector to the right channel (R) and the white...
... end of the TV screen. Figure 16 Power cord as the final connection Left Right AC outlet 13 AM267190_00_V_pdf • July 24, 2002 System Setup Connecting audio to the input labeled VIDEO When connecting audio from a video component to the VIDEO L and R jacks on the Interface module, remember to: • use standard RCA audio cables (one is supplied with the FreeStyle® speakers) • match the red connector to the right channel (R) and the white...
Owner's guide
Page 14
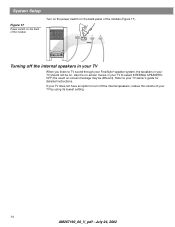
... TV sound through your FreeStyle® speaker system, the speakers in your TV should not be different). SPEAKERS SPEAKERS Turning off the internal speakers, reduce the volume of your TV owner's guide for detailed instructions. Refer to select INTERNAL SPEAKERS: OFF (the exact on-screen message may be on the back panel of the module (Figure 17). System Setup Figure 17 Power switch on the back of the module Turn on the power switch on . Use...
... TV sound through your FreeStyle® speaker system, the speakers in your TV should not be different). SPEAKERS SPEAKERS Turning off the internal speakers, reduce the volume of your TV owner's guide for detailed instructions. Refer to select INTERNAL SPEAKERS: OFF (the exact on-screen message may be on the back panel of the module (Figure 17). System Setup Figure 17 Power switch on the back of the module Turn on the power switch on . Use...

Owner's guide
Page 15
... three source buttons turns the system on or off , use . Use the power button on the component, or on the remote provided with it cannot turn the system off . Figure 18 Remote control buttons ® Using the Mute button Use the Mute button when you will hear through the FreeStyle speakers, it for the source you prefer. • To adjust the volume of the sound you want to the Game, AUX, or Video input. • To change your system on...
... three source buttons turns the system on or off , use . Use the power button on the component, or on the remote provided with it cannot turn the system off . Figure 18 Remote control buttons ® Using the Mute button Use the Mute button when you will hear through the FreeStyle speakers, it for the source you prefer. • To adjust the volume of the sound you want to the Game, AUX, or Video input. • To change your system on...
Owner's guide
Page 16
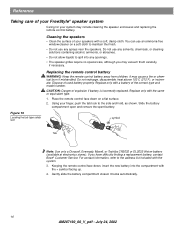
... cloth. Replace only with the system. 3. Using your system may include cleaning the speaker enclosures and replacing the remote control battery. Slide the battery compartment open and remove the spent battery. Figure ...list included with a battery of the correct type and model number. Replace only with the same or equivalent type. 1. Do not use any openings. • The speaker grilles require no special care, although you have difficulty finding a replacement battery, contact Bose® Customer Service. Reference Taking care of your FreeStyle® speaker system...
... cloth. Replace only with the system. 3. Using your system may include cleaning the speaker enclosures and replacing the remote control battery. Slide the battery compartment open and remove the spent battery. Figure ...list included with a battery of the correct type and model number. Replace only with the same or equivalent type. 1. Do not use any openings. • The speaker grilles require no special care, although you have difficulty finding a replacement battery, contact Bose® Customer Service. Reference Taking care of your FreeStyle® speaker system...
Owner's guide
Page 17
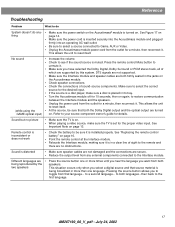
... external components connected to see if the sound source is placed in its tray. • Turn the Acoustimass module off for the proper video input. Reference Troubleshooting Problem What to the remote and there are no picture • Make sure the TV is on page 13. See Figure 17 on thing page 14. • Make sure the power cord is turned on . Press the remote control Mute button to Game, AUX or Video...
... external components connected to see if the sound source is placed in its tray. • Turn the Acoustimass module off for the proper video input. Reference Troubleshooting Problem What to the remote and there are no picture • Make sure the TV is on page 13. See Figure 17 on thing page 14. • Make sure the power cord is turned on . Press the remote control Mute button to Game, AUX or Video...
Owner's guide
Page 18
... service For additional help in running speaker cable through walls, and longer speaker wire, as needed. Please fill out the information section on the product registration card that came with your Bose dealer. Or, to call Bose directly, refer to Bose. Technical information Power rating USA/Canada: 120VAC, 60 Hz, 300W Source Inputs VIDEO, AUX, GAME Dimensions Speakers: 31/2"H x 77/8"W x 51/4"D (8.7 cm x 19.9 cm x 13.6 cm) Acoustimass...
... service For additional help in running speaker cable through walls, and longer speaker wire, as needed. Please fill out the information section on the product registration card that came with your Bose dealer. Or, to call Bose directly, refer to Bose. Technical information Power rating USA/Canada: 120VAC, 60 Hz, 300W Source Inputs VIDEO, AUX, GAME Dimensions Speakers: 31/2"H x 77/8"W x 51/4"D (8.7 cm x 19.9 cm x 13.6 cm) Acoustimass...

Owner's guide
Page 20
©2002 Bose Corporation The Mountain, Framingham, MA 01701-9168 USA 267190 AM Rev.00 JN30416 AM267190_00_V_pdf • July 24, 2002
©2002 Bose Corporation The Mountain, Framingham, MA 01701-9168 USA 267190 AM Rev.00 JN30416 AM267190_00_V_pdf • July 24, 2002


