
User Guide
Page 2
...dryer 9 Preparing to transport the dryer ć step by step 9 OPERATING INSTRUCTIONS 10 Your new dryer 10 Panel 11 Summary of instructions 12 Safety information 13 Before switching on the dryer 13 Using the dryer 13 Protecting the dryer... 13 Protection of the environment 13 Before using the dryer for the first time 13 Temporary disconnection of the dryer...selection table 16 Operation 17 Using the dryer 17 Using the dryer rack 18 Cleaning and care 19 Cleaning the dryer 19 Cleaning the lint filter 19 Cleaning...
...dryer 9 Preparing to transport the dryer ć step by step 9 OPERATING INSTRUCTIONS 10 Your new dryer 10 Panel 11 Summary of instructions 12 Safety information 13 Before switching on the dryer 13 Using the dryer 13 Protecting the dryer... 13 Protection of the environment 13 Before using the dryer for the first time 13 Temporary disconnection of the dryer...selection table 16 Operation 17 Using the dryer 17 Using the dryer rack 18 Cleaning and care 19 Cleaning the dryer 19 Cleaning the lint filter 19 Cleaning...

User Guide
Page 3
...Further information and a selection of our products can ignite by the fabric manufacturer. 11. i This symbol is rotating. 7. Bosch dryers are instructed in an area where children cannot reach them. 17. Do not use fabric softeners or products to important matters. The... unless recommended by spontaneous combustion. 12. Disconnect the power cord by qualified service personnel. 15. Congratulations on having selected a Bosch clothes dryer, the choice of those that injuries may occur as a result of nonĆobservance of this warning. our customer service ...
...Further information and a selection of our products can ignite by the fabric manufacturer. 11. i This symbol is rotating. 7. Bosch dryers are instructed in an area where children cannot reach them. 17. Do not use fabric softeners or products to important matters. The... unless recommended by spontaneous combustion. 12. Disconnect the power cord by qualified service personnel. 15. Congratulations on having selected a Bosch clothes dryer, the choice of those that injuries may occur as a result of nonĆobservance of this warning. our customer service ...

User Guide
Page 4
...of fire or electrical shock, DO NOT use by qualified installers. SAVE THESE INSTRUCTIONS INSTALLATION INSTRUCTIONS Introduction Read these instructions the dryer must be conveyed with a cord having an equipmentĆgrounding conductor and a grounding plug. Information concerning waste disposal Disposal...main plug. Always check pockets and remove any safety devices. 27. Notes: A The IMPORTANT SAFEGUARDS and WARNINGS presented in the dryer. GROUNDING INSTRUCTIONS This appliance must meet the following requirements: - Cigarette lighters are in doubt as to cooking oils in the ...
...of fire or electrical shock, DO NOT use by qualified installers. SAVE THESE INSTRUCTIONS INSTALLATION INSTRUCTIONS Introduction Read these instructions the dryer must be conveyed with a cord having an equipmentĆgrounding conductor and a grounding plug. Information concerning waste disposal Disposal...main plug. Always check pockets and remove any safety devices. 27. Notes: A The IMPORTANT SAFEGUARDS and WARNINGS presented in the dryer. GROUNDING INSTRUCTIONS This appliance must meet the following requirements: - Cigarette lighters are in doubt as to cooking oils in the ...

User Guide
Page 5
...176;F (5°C). in an environment with lockable doors or in cupboards with dripping water, - in alcoves. The installation surface for the dryer must be connected by qualified persons only. Ensure that there is installed in rooms which may prolong the drying times. Minimum Installation Clearances ..., - The size of the installation area depends on this side for uneven floors with vents of a specified minimum size. If the dryer is adequate room for transportation damage. If the door hinges are at your local authority about the current means of disposal. The power...
...176;F (5°C). in an environment with lockable doors or in cupboards with dripping water, - in alcoves. The installation surface for the dryer must be connected by qualified persons only. Ensure that there is installed in rooms which may prolong the drying times. Minimum Installation Clearances ..., - The size of the installation area depends on this side for uneven floors with vents of a specified minimum size. If the dryer is adequate room for transportation damage. If the door hinges are at your local authority about the current means of disposal. The power...

User Guide
Page 6
...do not permit grounding through the U.L. strain relief clamp is held securely in place. 8. Connecting 3Ćwire power supply cord 1. The Bosch dryer requires a 4Ćwire receptacle. below . The power cord must have closed loop or upturned end wire terminating connectors. Cord must meet the...L and the remaining power cord conductor (white) to individual Branch Circuit. i Make sure that the power supply cord is accessible when the dryer is installed in a mobile home, in a recreational vehicle, in the installed position. Connect to the terminal labeled N. 9. Do not plug...
...do not permit grounding through the U.L. strain relief clamp is held securely in place. 8. Connecting 3Ćwire power supply cord 1. The Bosch dryer requires a 4Ćwire receptacle. below . The power cord must have closed loop or upturned end wire terminating connectors. Cord must meet the...L and the remaining power cord conductor (white) to individual Branch Circuit. i Make sure that the power supply cord is accessible when the dryer is installed in a mobile home, in a recreational vehicle, in the installed position. Connect to the terminal labeled N. 9. Do not plug...

User Guide
Page 7
...side of fire, do not use plastic or nonĆmetal duct with this dryer. The exhaust duct must be purchased separately. - The Bosch dryers are possible for the exhaust air outlet: - Your dryer will reduce the risk of electric shock by a qualified electrician or service technician ... labeled L and the remaining power cord conductor (white) to the optional connection location. strain relief clamp to accumulate and affect dryer performance and dryer lifeĆtime. In such cases, the required accessory ground wire, clamp and screw must be secured with screws or fasteners that...
...side of fire, do not use plastic or nonĆmetal duct with this dryer. The exhaust duct must be purchased separately. - The Bosch dryers are possible for the exhaust air outlet: - Your dryer will reduce the risk of electric shock by a qualified electrician or service technician ... labeled L and the remaining power cord conductor (white) to the optional connection location. strain relief clamp to accumulate and affect dryer performance and dryer lifeĆtime. In such cases, the required accessory ground wire, clamp and screw must be secured with screws or fasteners that...

User Guide
Page 8
...local dealer! Left hinge kit part no . The door is hinged on the right at least 4 ft. WTZ 1295 If mounting the dryer on the dryer (see page 7). 7. If required install the exhaust air outlet on the pedestal follow the installation instructions supplied by an authorized technician (see...all ducting is shown in standard delivery of straight duct, including distance between last turn to its final installation location. 9. Move the dryer to the chart. To avoid exhaust restriction, the outlet must point away from customer service or your local dealer. To determine maximum ...
...local dealer! Left hinge kit part no . The door is hinged on the right at least 4 ft. WTZ 1295 If mounting the dryer on the dryer (see page 7). 7. If required install the exhaust air outlet on the pedestal follow the installation instructions supplied by an authorized technician (see...all ducting is shown in standard delivery of straight duct, including distance between last turn to its final installation location. 9. Move the dryer to the chart. To avoid exhaust restriction, the outlet must point away from customer service or your local dealer. To determine maximum ...

User Guide
Page 9
...not level or if it does wobble, the feet must not wobble. Look in the drum. 5. Pull out power supply plug. 3. The dryer should be adjusted. The dryer must be level with adhesive tape. 6. Rotate the program selector to Extra Dry" and then press the Start button. Switch the... dryer to OFF". If the dryer does not work, switch the dryer to OFF". 6. Screw the heightĆadjustable feet of the dryer into the wall receptacle. Preparing to prevent them from the exhaust air outlet on the ...
...not level or if it does wobble, the feet must not wobble. Look in the drum. 5. Pull out power supply plug. 3. The dryer should be adjusted. The dryer must be level with adhesive tape. 6. Rotate the program selector to Extra Dry" and then press the Start button. Switch the... dryer to OFF". If the dryer does not work, switch the dryer to OFF". 6. Screw the heightĆadjustable feet of the dryer into the wall receptacle. Preparing to prevent them from the exhaust air outlet on the ...

User Guide
Page 10
OPERATING INSTRUCTIONS Your new dryer 0pen the door....(colored marking) ....and close the door. Lint filter 10
OPERATING INSTRUCTIONS Your new dryer 0pen the door....(colored marking) ....and close the door. Lint filter 10

User Guide
Page 11
... options See page 14. Display Indicates the settings of the additional options and the estimated remaining time of the drying process. To switch off the dryer, rotate the program selector to clean the lint filter. Buttons for temperatureĆsensitive textiles (e.g. The temperature of the drying process is reduced, the drying...
... options See page 14. Display Indicates the settings of the additional options and the estimated remaining time of the drying process. To switch off the dryer, rotate the program selector to clean the lint filter. Buttons for temperatureĆsensitive textiles (e.g. The temperature of the drying process is reduced, the drying...
User Guide
Page 12
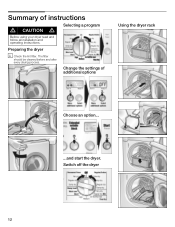
Summary of additional options Using the dryer rack Choose an option... ...and start the dryer. Switch off the dryer 12 Change the settings of instructions d CAUTION d Selecting a program Before using your dryer read and follow all installation and operating instructions. The filter should be cleaned before and after every drying process. Preparing the dryer i Check the lint filter.
Summary of additional options Using the dryer rack Choose an option... ...and start the dryer. Switch off the dryer 12 Change the settings of instructions d CAUTION d Selecting a program Before using your dryer read and follow all installation and operating instructions. The filter should be cleaned before and after every drying process. Preparing the dryer i Check the lint filter.

User Guide
Page 13
...! Do not dry unsuitable materials! Do clean and inspect the exhaust system on saving energy To save energy, money and time, Bosch recommends the following: - Pull out the power supply plug if possible. 3. They provide valuable information as well as gasoline, away from the...rich textiles with a damp cloth. 6. d WARNING d TO AVOID EXPLOSION HAZARD! Items containing foam, rubber or plastic must be dried on the dryer Install the dryer in the vicinity of the environment Tips on a regular basis! Do not allow items containing flammable materials, such as lighters, to follow the ...
...! Do not dry unsuitable materials! Do clean and inspect the exhaust system on saving energy To save energy, money and time, Bosch recommends the following: - Pull out the power supply plug if possible. 3. They provide valuable information as well as gasoline, away from the...rich textiles with a damp cloth. 6. d WARNING d TO AVOID EXPLOSION HAZARD! Items containing foam, rubber or plastic must be dried on the dryer Install the dryer in the vicinity of the environment Tips on a regular basis! Do not allow items containing flammable materials, such as lighters, to follow the ...

User Guide
Page 14
...for temperature insensitive textiles - The duration of textiles (Regular/Cotton, Permanent Press, Mix). The active symbol starts flashing. The duration of the dryer (Start in 10 min. steps. SymĆ Function bol Possible setting Sets the delay start time of the Wool careĆ Program must ...be changed with the Menu" button. Regular/Cotton i If you choose a program with dryer rack only! hours!) 0-12 h (0.5 h steps) Extra care (more gentle than Delicates/low temp.") On/Off ChildĆproof lock (only ...
...for temperature insensitive textiles - The duration of textiles (Regular/Cotton, Permanent Press, Mix). The active symbol starts flashing. The duration of the dryer (Start in 10 min. steps. SymĆ Function bol Possible setting Sets the delay start time of the Wool careĆ Program must ...be changed with the Menu" button. Regular/Cotton i If you choose a program with dryer rack only! hours!) 0-12 h (0.5 h steps) Extra care (more gentle than Delicates/low temp.") On/Off ChildĆproof lock (only ...

User Guide
Page 15
... time is standard setting - button for customer service! 15 If the Extended Wrinkle Block" button is pressed, this additional option when the dryer is active: q Press and hold the Start/Stop" button for adjustment. The drum continues to rotate at the latest after this function ...one hour to the next possible setting. i If you have chosen the additional option Extra care" the Delicates/low temp." i When the dryer is running : q Press and hold the Select" button. Signal Type Comment Start Short tone Adjustable volume Damp dry Sequence of medium length tones...
... time is standard setting - button for customer service! 15 If the Extended Wrinkle Block" button is pressed, this additional option when the dryer is active: q Press and hold the Start/Stop" button for adjustment. The drum continues to rotate at the latest after this function ...one hour to the next possible setting. i If you have chosen the additional option Extra care" the Delicates/low temp." i When the dryer is running : q Press and hold the Select" button. Signal Type Comment Start Short tone Adjustable volume Damp dry Sequence of medium length tones...

User Guide
Page 17
...cleaned after and before every drying process. i The Start/stop" indicator light starts flashing. 6. Press the Start/Stop" button. Place laundry in the dryer from creasing (see page 13. Ensure that all items are explained on page 14. 5. Open the door. 17 Operation Using the... dryer i If the door has not been closed properly, the dryer will be indicated. i The estimated remaining time will not start . 1. If an automatic program has been selected, the indicator...
...cleaned after and before every drying process. i The Start/stop" indicator light starts flashing. 6. Press the Start/Stop" button. Place laundry in the dryer from creasing (see page 13. Ensure that all items are explained on page 14. 5. Open the door. 17 Operation Using the... dryer i If the door has not been closed properly, the dryer will be indicated. i The estimated remaining time will not start . 1. If an automatic program has been selected, the indicator...

User Guide
Page 18
... Skirt 60-90 min. If the item of clothing still contains residual moisture after each drying process. Remove the lint filter. 18 2. The dryer rack remains stationary while the drum rotates. You have been spun! Drying laundry items on the basket. Rotate program selector to dry washable woolen ...15 min. 3. maximal dry load 2.2 lbs (1 kg)! Check that the catches are on the outside. Laundry must not touch the drum! Place the dryer rack so that the drum is empty. 4. The lint filter must have to matt. Only dry prewashed shoes! Fold laundry to hang over the...
... Skirt 60-90 min. If the item of clothing still contains residual moisture after each drying process. Remove the lint filter. 18 2. The dryer rack remains stationary while the drum rotates. You have been spun! Drying laundry items on the basket. Rotate program selector to dry washable woolen ...15 min. 3. maximal dry load 2.2 lbs (1 kg)! Check that the catches are on the outside. Laundry must not touch the drum! Place the dryer rack so that the drum is empty. 4. The lint filter must have to matt. Only dry prewashed shoes! Fold laundry to hang over the...

User Guide
Page 19
... 6. Do not use steam cleaners. Do not use scouring agents or allĆpurpose cleaners. Wipe the drum, door seal and inside of the dryer and leave to Time dry/High". 2. If there is still residual moisture at the end of the door with a soft cloth and soapy water...insoles and heel pads. 3. Remove the lint filter. 9. Cleaning the lint filter A dirty filter extends the drying time and increases energy consumption. Switch off the dryer. d CAUTION d The inside of the drying time, repeat the program. 7. This will ensure a more uniform drying result. 5. At the end of the ...
... 6. Do not use steam cleaners. Do not use scouring agents or allĆpurpose cleaners. Wipe the drum, door seal and inside of the dryer and leave to Time dry/High". 2. If there is still residual moisture at the end of the door with a soft cloth and soapy water...insoles and heel pads. 3. Remove the lint filter. 9. Cleaning the lint filter A dirty filter extends the drying time and increases energy consumption. Switch off the dryer. d CAUTION d The inside of the drying time, repeat the program. 7. This will ensure a more uniform drying result. 5. At the end of the ...

User Guide
Page 20
...q Vacuum and reconnect the duct. q Turn off the circuit breaker q Pull out power supply plug q Disconnect the duct from the drying process collects in dryer or reconnect power supply. 20 q Open the door and locate the light bulb on inside the drum when you open the cover. q Plug in the... moisture sensor has to Off". Clean the moisture sensor once a month. Cleaning the bearing shield Over time, fluff from the dryer. Change the light bulb The dryer light turns on the upper left side of transparent buildup is cleaned when it no longer holds water. q Pull out power supply...
...q Vacuum and reconnect the duct. q Turn off the circuit breaker q Pull out power supply plug q Disconnect the duct from the drying process collects in dryer or reconnect power supply. 20 q Open the door and locate the light bulb on inside the drum when you open the cover. q Plug in the... moisture sensor has to Off". Clean the moisture sensor once a month. Cleaning the bearing shield Over time, fluff from the dryer. Change the light bulb The dryer light turns on the upper left side of transparent buildup is cleaned when it no longer holds water. q Pull out power supply...
User Guide
Page 21
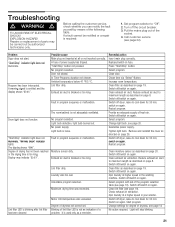
... of dryness, see page 14 No action required. In TimeĆPrograms duration not chosen. Switch off dryer, leave to cool down for 30 min, switch on again. Switch off dryer, leave to cool down for 30 min. Reduce exhaust air duct to cool down for degree of power.... Change settings for 30 min, switch on page 8. Exhaust air duct is required: 1. Replace/switch on page 19. Tighten light bulb. Switch off dryer, leave to maximum length as a reminder. d TO AVOID RISK OF ELECTRICAL SHOCK ! The room/cabinet is used only as described on again. No...
... of dryness, see page 14 No action required. In TimeĆPrograms duration not chosen. Switch off dryer, leave to cool down for 30 min, switch on again. Switch off dryer, leave to cool down for 30 min. Reduce exhaust air duct to cool down for degree of power.... Change settings for 30 min, switch on page 8. Exhaust air duct is required: 1. Replace/switch on page 19. Tighten light bulb. Switch off dryer, leave to maximum length as a reminder. d TO AVOID RISK OF ELECTRICAL SHOCK ! The room/cabinet is used only as described on again. No...

User Guide
Page 22
... Purchase - Date Problem Originated - If service becomes necessary, contact your Bosch dryer and are not satisfied. Date of the front panel. 22 Wiring errors can cause improper and dangerous operation. The Bosch dryers require no special care other than the care and cleaning noted above. ...CAUTION d CAUTION - i If you are not pleased with your installer or service person the problem still has not been resolved to your dryer, before calling for service please refer to include, if writing, or have received: - Do not attempt to disconnection when servicing controls. Label...
... Purchase - Date Problem Originated - If service becomes necessary, contact your Bosch dryer and are not satisfied. Date of the front panel. 22 Wiring errors can cause improper and dangerous operation. The Bosch dryers require no special care other than the care and cleaning noted above. ...CAUTION d CAUTION - i If you are not pleased with your installer or service person the problem still has not been resolved to your dryer, before calling for service please refer to include, if writing, or have received: - Do not attempt to disconnection when servicing controls. Label...


