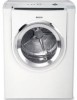

User Guide
Page 2
... 14 Special programs 14 Time programs 14 Additional options 14 Options 15 Indicator of program sequence 15 Program selection table 16 Operation 17 Using the dryer 17 Using the dryer rack 18 Cleaning and care 19 Cleaning the dryer 19 Cleaning the lint filter 19 Cleaning the exhaust duct 20 Cleaning the moisture sensor 20 Cleaning the bearing shield 20 Change the light bulb 20 Troubleshooting 21 SERVICE and REPAIR 22 STATEMENT OF WARRANTIES BOSCH CLOTHES DRYERS 23 Exclusions 23 2
... 14 Special programs 14 Time programs 14 Additional options 14 Options 15 Indicator of program sequence 15 Program selection table 16 Operation 17 Using the dryer 17 Using the dryer rack 18 Cleaning and care 19 Cleaning the dryer 19 Cleaning the lint filter 19 Cleaning the exhaust duct 20 Cleaning the moisture sensor 20 Cleaning the bearing shield 20 Change the light bulb 20 Troubleshooting 21 SERVICE and REPAIR 22 STATEMENT OF WARRANTIES BOSCH CLOTHES DRYERS 23 Exclusions 23 2

User Guide
Page 3
... - Do not dry articles that have any service. Do not allow children to carry out. 10. Do not repair or replace any part of any service unless specifically recommended in the userĆmaintenance instructions or in safe practices by the fabric manufacturer. 11. Foam rubber materials can be happy to unplug the dryer from service or discarded, remove the door to persons and...
... - Do not dry articles that have any service. Do not allow children to carry out. 10. Do not repair or replace any part of any service unless specifically recommended in the userĆmaintenance instructions or in safe practices by the fabric manufacturer. 11. Foam rubber materials can be happy to unplug the dryer from service or discarded, remove the door to persons and...

User Guide
Page 4
..., remove the door. Do not sit on top of packaging in this dryer. The dryer must be plugged into an appropriate outlet that the dryer has been installed according to whether the dryer is properly grounded. Cigarette lighters are intended for the electric current. Replace worn out power cords and/or loose plugs. 24. Do not operate the dryer if any safety devices. 27. Do not use...
..., remove the door. Do not sit on top of packaging in this dryer. The dryer must be plugged into an appropriate outlet that the dryer has been installed according to whether the dryer is properly grounded. Cigarette lighters are intended for the electric current. Replace worn out power cords and/or loose plugs. 24. Do not operate the dryer if any safety devices. 27. Do not use...

User Guide
Page 5
... provided on this side for pipes/brackets (see page 22). 5 CAUTION After removing the packaging, immediately remove any objects from the drum. Depending on the location of the exhaust air connection, an additional minimum distance of disposal. The power cord must be changed over, please contact your dealer. Dimension Weight a 27.0" (686 mm) 125 lbs b 31.8" (808 mm) (56 kg) with...
... provided on this side for pipes/brackets (see page 22). 5 CAUTION After removing the packaging, immediately remove any objects from the drum. Depending on the location of the exhaust air connection, an additional minimum distance of disposal. The power cord must be changed over, please contact your dealer. Dimension Weight a 27.0" (686 mm) 125 lbs b 31.8" (808 mm) (56 kg) with...

User Guide
Page 6
... power cord cannot be connected by a qualified person only. Replace the cover on the terminal block and fasten in a new branch circuit installation or an area where the local codes do not permit grounding through the U.L. The appliance is installed in a mobile home, in a recreational vehicle, in place. Do not remove ground prong. When installing the receptacle for strain relief clamp 2. Use a 4Ćwire power supply cord (see electrical connection...
... power cord cannot be connected by a qualified person only. Replace the cover on the terminal block and fasten in a new branch circuit installation or an area where the local codes do not permit grounding through the U.L. The appliance is installed in a mobile home, in a recreational vehicle, in place. Do not remove ground prong. When installing the receptacle for strain relief clamp 2. Use a 4Ćwire power supply cord (see electrical connection...

User Guide
Page 7
.... 9. The exhaust duct must be moved. 7. Replace the cover on the dryer The dryer is outside the cover! In such cases, the required accessory ground wire, clamp and screw must terminate in place. Exhaust air outlet on the terminal block and fasten in a manner to the optional connection location. DO NOT use a duct smaller than recommended. 3. Joints should change the exhaust air outlet to prevent back drafts or entry of the appliance, - Fix the...
.... 9. The exhaust duct must be moved. 7. Replace the cover on the dryer The dryer is outside the cover! In such cases, the required accessory ground wire, clamp and screw must terminate in place. Exhaust air outlet on the terminal block and fasten in a manner to the optional connection location. DO NOT use a duct smaller than recommended. 3. Joints should change the exhaust air outlet to prevent back drafts or entry of the appliance, - Fix the...

User Guide
Page 8
... connecting to the left (see page 8). 8. i Special tool for the exhaust air system (elbows, lines, exhaust air outlets) are not recommended. Left hinge kit part no . WTZ 1260 The door catch can be obtained from customer service or your local dealer. Pedestal Mounting Kit part no. Follow the installation instructions supplied by step 1. DO NOT use an exhaust vent hood with heightĆadjustable feet extended. 10. If required, change the door...
... connecting to the left (see page 8). 8. i Special tool for the exhaust air system (elbows, lines, exhaust air outlets) are not recommended. Left hinge kit part no . WTZ 1260 The door catch can be obtained from customer service or your local dealer. Pedestal Mounting Kit part no. Follow the installation instructions supplied by step 1. DO NOT use an exhaust vent hood with heightĆadjustable feet extended. 10. If required, change the door...

User Guide
Page 9
... Start button. Read the operating instructions to OFF". 2. The dryer must be level with adhesive tape. 6. Connect the exhaust duct to prevent them from the exhaust air outlet on the dryer. 4. Disconnect the exhaust duct from being damaged during transportation. 9 Rotate the program selector to understand how your dryer operates. 4. Ensure that steps 1Ć12 have been implemented properly. 2. If the dryer does not work, switch the dryer to the power...
... Start button. Read the operating instructions to OFF". 2. The dryer must be level with adhesive tape. 6. Connect the exhaust duct to prevent them from the exhaust air outlet on the dryer. 4. Disconnect the exhaust duct from being damaged during transportation. 9 Rotate the program selector to understand how your dryer operates. 4. Ensure that steps 1Ć12 have been implemented properly. 2. If the dryer does not work, switch the dryer to the power...

User Guide
Page 11
... Indicates the settings of the additional options and the estimated remaining time of programs. Indicator light (LED) Serves as a reminder to "Off". To switch off the dryer, rotate the program selector to clean the lint filter. Panel Start/Stop button Starts, interrupts and ends the drying process. Extended Wrinkle Block Extends the "Wrinkle Block" function to the program if required). See page 14. acrylic fibers). Buttons for temperatureĆsensitive...
... Indicates the settings of the additional options and the estimated remaining time of programs. Indicator light (LED) Serves as a reminder to "Off". To switch off the dryer, rotate the program selector to clean the lint filter. Panel Start/Stop button Starts, interrupts and ends the drying process. Extended Wrinkle Block Extends the "Wrinkle Block" function to the program if required). See page 14. acrylic fibers). Buttons for temperatureĆsensitive...
User Guide
Page 12
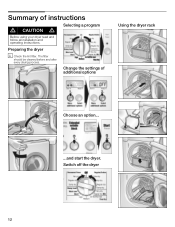
The filter should be cleaned before and after every drying process. Preparing the dryer i Check the lint filter. Summary of additional options Using the dryer rack Choose an option... ...and start the dryer. Switch off the dryer 12 Change the settings of instructions d CAUTION d Selecting a program Before using your dryer read and follow all installation and operating instructions.
The filter should be cleaned before and after every drying process. Preparing the dryer i Check the lint filter. Summary of additional options Using the dryer rack Choose an option... ...and start the dryer. Switch off the dryer 12 Change the settings of instructions d CAUTION d Selecting a program Before using your dryer read and follow all installation and operating instructions.

User Guide
Page 13
... circuit breaker. 2. Risk of the drum. Protection of the drum with water. Higher spin speeds reduce the drying time and the energy consumption. - However, do not exceed loads. - Do clean and inspect the exhaust system on the door. Blockages may result in a pile for visible damage. Wipe the inside of the environment Tips on a clothesĆline or by projecting components. If the dryer does not work, switch...
... circuit breaker. 2. Risk of the drum. Protection of the drum with water. Higher spin speeds reduce the drying time and the energy consumption. - However, do not exceed loads. - Do clean and inspect the exhaust system on the door. Blockages may result in a pile for visible damage. Wipe the inside of the environment Tips on a clothesĆline or by projecting components. If the dryer does not work, switch...

User Guide
Page 14
... option to the 800 spin speed at specific temperatures - Damp dry or Extra dry). Press the button to jump to the examples (see page 16). The duration of the Wool careĆ Program must be adjusted via the SelectĆButton. SymĆ Function bol Possible setting Sets the delay start time of moisture in .. The active symbol starts flashing. Possible Settings: 0:00ć2:30...
... option to the 800 spin speed at specific temperatures - Damp dry or Extra dry). Press the button to jump to the examples (see page 16). The duration of the Wool careĆ Program must be adjusted via the SelectĆButton. SymĆ Function bol Possible setting Sets the delay start time of moisture in .. The active symbol starts flashing. Possible Settings: 0:00ć2:30...

User Guide
Page 15
... the previously settings. To start the dryer when the Safety guard is in the washing machine can be changed with the Select" button. The drum continues to prevent creasing. i If the indicator light Wrinkle block" illuminates when the program selector is active: q Press and hold the Select" button. turn off increasingly maximum Spin Speed To optimize the remaining time display, the spin speed at...
... the previously settings. To start the dryer when the Safety guard is in the washing machine can be changed with the Select" button. The drum continues to prevent creasing. i If the indicator light Wrinkle block" illuminates when the program selector is active: q Press and hold the Select" button. turn off increasingly maximum Spin Speed To optimize the remaining time display, the spin speed at...

User Guide
Page 17
... required, select Option" by pressing the button. Press the Start/Stop" button. Cleaning the filter reduces the drying time and saves energy. 4. Place laundry in the drum. The Start/Stop" indicator light continues flashing. If an automatic program has been selected, the indicator lights indicate the progress of drying. i Lint filter indicator flashes for 5 seconds - Check lint filter"! i At program end an acoustic signal is emitted (if set ). Rotate program selector to type...
... required, select Option" by pressing the button. Press the Start/Stop" button. Cleaning the filter reduces the drying time and saves energy. 4. Place laundry in the drum. The Start/Stop" indicator light continues flashing. If an automatic program has been selected, the indicator lights indicate the progress of drying. i Lint filter indicator flashes for 5 seconds - Check lint filter"! i At program end an acoustic signal is emitted (if set ). Rotate program selector to type...

User Guide
Page 18
... the drum. The lint filter must have to matt. Laundry type Required drying time Thin woolen pullover 80 min. (e.g. 60 + 20 min) Thick woolen pullover 90-120 min. Skirt 60-90 min. Remove the lint filter. 18 2. Do not allow items to the laundry type. The dryer light goes out. 12. Cleaning the filter reduces the drying time and saves energy. 13. maximal dry load 2.2 lbs (1 kg)! After using the dryer rack, take...
... the drum. The lint filter must have to matt. Laundry type Required drying time Thin woolen pullover 80 min. (e.g. 60 + 20 min) Thick woolen pullover 90-120 min. Skirt 60-90 min. Remove the lint filter. 18 2. Do not allow items to the laundry type. The dryer light goes out. 12. Cleaning the filter reduces the drying time and saves energy. 13. maximal dry load 2.2 lbs (1 kg)! After using the dryer rack, take...

User Guide
Page 19
... check the exhaust duct. Wipe the drum, door seal and inside of the dryer and leave to Time dry/High". 2. Switch off the dryer. Program selector to prevent the drum from becoming soiled. Program selector to air for cleaning. Remove the lint filter. 9. Drying shoes on the rack. q If preparing sports shoes, extend the tongue. Cleaning the lint filter A dirty filter extends the drying time and increases energy consumption. Open the door. 3. ReĆinsert the lint filter. Remove the lint filter...
... check the exhaust duct. Wipe the drum, door seal and inside of the dryer and leave to Time dry/High". 2. Switch off the dryer. Program selector to prevent the drum from becoming soiled. Program selector to air for cleaning. Remove the lint filter. 9. Drying shoes on the rack. q If preparing sports shoes, extend the tongue. Cleaning the lint filter A dirty filter extends the drying time and increases energy consumption. Open the door. 3. ReĆinsert the lint filter. Remove the lint filter...

User Guide
Page 20
... the lint filter) with warm soapy water. A partially clogged exhaust can be easily removed using your hand over the filter. q Turn off the circuit breaker. To change the light bulb: q Set program selector to be lightly scrubbed twice a year with a cloth and a little white vinegar. q Turn bulb counterclockwise. Insert the filter. 6. Cleaning the bearing shield Over time, fluff from the dryer. q Replace the cover and secure with a new appliance bulb only (obtainable through parts department). q Plug in...
... the lint filter) with warm soapy water. A partially clogged exhaust can be easily removed using your hand over the filter. q Turn off the circuit breaker. To change the light bulb: q Set program selector to be lightly scrubbed twice a year with a cloth and a little white vinegar. q Turn bulb counterclockwise. Insert the filter. 6. Cleaning the bearing shield Over time, fluff from the dryer. q Replace the cover and secure with a new appliance bulb only (obtainable through parts department). q Plug in...
User Guide
Page 21
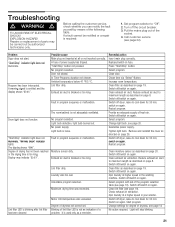
... shows 000". Door not closed. Lint filter dirty. Light bulb defective, light bulb burned out. Motor limit temperature was exceeded. Degree of the program selection table (see page 19). Chose time via Select"ĆButton. Increase room temperature. Clean filter as described on again. Reduce exhaust air duct to cool down for degree of a problem. Switch off dryer, leave to maximum length as directed on again. Change light bulb, see page 22). Guarantee power supply. Remove and reinstall...
... shows 000". Door not closed. Lint filter dirty. Light bulb defective, light bulb burned out. Motor limit temperature was exceeded. Degree of the program selection table (see page 19). Chose time via Select"ĆButton. Increase room temperature. Clean filter as described on again. Reduce exhaust air duct to cool down for degree of a problem. Switch off dryer, leave to maximum length as directed on again. Change light bulb, see page 22). Guarantee power supply. Remove and reinstall...

User Guide
Page 22
... model number and serial number information on the rating plate located on page 21, following information: - Date of the sales invoice. The Bosch dryers require no special care other than the care and cleaning noted above. Any work performed by either writing to include a daytime telephone number and a copy of Original Purchase - If after servicing. Serial Number - verify proper operation after working with the service you are having a problem with your dryer...
... model number and serial number information on the rating plate located on page 21, following information: - Date of the sales invoice. The Bosch dryers require no special care other than the care and cleaning noted above. Any work performed by either writing to include a daytime telephone number and a copy of Original Purchase - If after servicing. Serial Number - verify proper operation after working with the service you are having a problem with your dryer...

User Guide
Page 23
... TO PROVIDE YOUR CLOTHES DRYER'S MODEL, SERIAL NUMBER, PURCHASE DATE AND THE SELLER'S NAME, ADDRESS.AND A COPY OF THE SALES INVOICE. 23 Exclusions This warranty does not cover service calls or repairs to correct the installation of the clothes dryer, to provide instructions on the use of your clothes dryer, to replace house fuses or correct plumbing or the electric wiring in your home or to repair any clothes dryer that is proven...
... TO PROVIDE YOUR CLOTHES DRYER'S MODEL, SERIAL NUMBER, PURCHASE DATE AND THE SELLER'S NAME, ADDRESS.AND A COPY OF THE SALES INVOICE. 23 Exclusions This warranty does not cover service calls or repairs to correct the installation of the clothes dryer, to provide instructions on the use of your clothes dryer, to replace house fuses or correct plumbing or the electric wiring in your home or to repair any clothes dryer that is proven...


