Bosch WTMC6321US Support Question
Bosch WTMC6321US Support Question
Find answers below for this question about Bosch WTMC6321US - Nexxt 700 Series Dryer.Need a Bosch WTMC6321US manual? We have 1 online manual for this item!
Question posted by pr826 on April 15th, 2016
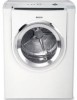
Bosch Dryer Lint Filter Light And 000 On Display Wtmc6321
We have a Bosch Dryer,model wtmc6321us/05. The lint filter light is blinking, the dryer will start and immediately stop with the display saying 000. The filter has been cleaned, as well as the exhaust hose in back. what can be done to clear the light and the 000 display?
Current Answers
Answer #1: Posted by waelsaidani1 on April 16th, 2016 2:51 AM
waelsaidani1

Member since:
May 12th, 2013 Points: 19,501,797

Member since:
May 12th, 2013 Points: 19,501,797
Cool It Down
Overheating can interrupt the operating sequence, or it may cause insufficient drying power, leaving clothes damp. A warning signal as well as the code "E:01" or "E:03" indicate this issue. Sometimes, an overheated Nexxt 500's "Start/Stop" indicator light goes dark and the LED display reads "000." To remedy a dryer that runs hot, switch off the unit and allow it to rest for 30 minutes, then switch the appliance back on and restart the program.
Related Bosch WTMC6321US Manual Pages
User Guide - Page 2

... selection table 16
Operation 17
Using the dryer 17
Using the dryer rack 18
Cleaning and care 19
Cleaning the dryer 19 Cleaning the lint filter 19
Cleaning the exhaust duct 20 Cleaning the moisture sensor 20
Cleaning the bearing shield 20
Change the light bulb 20
Troubleshooting 21
SERVICE and REPAIR 22
STATEMENT OF WARRANTIES BOSCH CLOTHES DRYERS 23 Exclusions 23
2
User Guide - Page 3

... d
CAUTION-
Bosch dryers are instructed in safe practices by qualified persons.
5. Before the appliance is used near children.
4. Do not repair or replace any part of the appliance or attempt any flammable substance, such as vegetable oil, cooking oil, petroleum based oils or distillates, waxes, fats, etc., must not be
3 Clean lint screen before...
User Guide - Page 4

...conditions that may contribute to a chemical reaction that you are sure that the dryer has been installed according to cooking oils in compliance with main plug.
GROUNDING ...been removed.
25. SAVE THESE INSTRUCTIONS
INSTALLATION INSTRUCTIONS
Introduction
Read these instructions the dryer must only be reclaimed from locking themselves in accordance with all local regulations ...
User Guide - Page 5

...CAUTION
After removing the packaging, immediately remove any objects from the drum. The operating instructions and supplied accessories can be clean, level and firm. The ...the location of the
exhaust air connection, an additional minimum distance of the dryer.
Before installing the dryer
Unpacking the appliance
d CAUTION d
The dryer is visibly damaged. door) ć due to risk of frost,
...
User Guide - Page 6

...Tighten the screw (2.5 Nm) so that the power supply cord is accessible when the dryer is now ready to appliance terminals and closing junction/splitter box as described below ). .... Fix the strain relief clamp to the terminal labeled N.
9. Do not remove ground prong. The Bosch dryer requires a 4Ćwire receptacle. strain relief clamp so that the U.L. Attach the 2 power cord ...
User Guide - Page 7

... DO NOT crush or kink the duct.
9. Do clean and inspect the exhaust system on the U.L. The exhaust duct must be grounded. The Bosch dryers are in diameter.
5.
Side exhaust kit - Use ...dryer The dryer is delivered with screws or fasteners that the dryer is longer than 4 inches in doubt as to prevent back drafts or entry of lint indoors, as well as an accumulation point for lint...
User Guide - Page 8

...Side exhaust kit
part no . Pedestal Mounting Kit
part no . Check the dryer for cutting the hole in
prepared side panel is clean and free of straight duct, including distance between last turn and exhaust hood... ć step by at the factory. Feet and/or dryer base may be damaged if dryer is four!
of lint. Accessories
The parts required for both rigid and flexible metal duct is four...
User Guide - Page 10

Lint filter
10 OPERATING INSTRUCTIONS
Your new dryer
0pen the door....(colored marking)
....and close the door.
User Guide - Page 11

... function to clean the lint filter. Can be rotated in addition to "Off". Display Indicates the settings of the additional options and the estimated remaining time of programs.
Indicator light (LED) ...lights (LED) Indicate the current moisture state of the additional options. To switch off the dryer, rotate the program selector to the program if required). Panel
Start/Stop button Starts...
User Guide - Page 12
... filter
should be cleaned before and after every drying process. Switch off the dryer
12
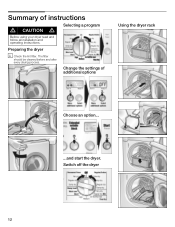
Summary of additional options
Using the dryer rack
Choose an option...
...and start the dryer. Change the settings of instructions
d CAUTION d
Selecting a program
Before using your dryer read and follow all installation and operating instructions.
Preparing the dryer
i Check the lint filter...
User Guide - Page 13

...;shirts, cotton jersey laundry) often shrink when dried for visible
damage. Do not use a dryer which were washed with the voltage specifications on vacation or are not using the dryer for a short while. If in the washing machine. Remove all objects from page 4). Residual moisture will then be damaged. Clean the lint filter. Drying tips
In...
User Guide - Page 14

...;Button. The duration of the program depends on the measured degree of moisture in the laundry and on the selected degree of the dryer (Start in the washing
machine
Select the option to the next option on the display.
High for temperature sensitive
textiles - Possible Settings: 0:00ć2:30 h in 10 min. SymĆ...
User Guide - Page 15

...laundry. i If the indicator light Wrinkle block"
illuminates when the program selector is active: q Press and hold the Start/Stop"
button for one hour to reduce the temperature of dryness The residual moisture can be individually reduced in Off-Position -
indicator light illuminates. i When the dryer... this additional option when the dryer is displayed. button for all programs except...
User Guide - Page 17

....
6. More detailed information on the individual additional options can be cleaned after and before every drying process. i The estimated remaining time will not start . The Start/Stop" indicator light continues flashing. i The program starts with an
acoustic signal (if set ).
3. Open the door.
2. Check lint filter. For further information see Extended Wrinkle Block", page 15...
User Guide - Page 18

... reduce the drying duration depending on the dryer rack
1. Clean the filter. Using the dryer rack
Use the dryer rack to Off".
Check that the catches are on the basket. Place the dryer rack so that the drum is empty.
4. Insert the lint filter. Drying laundry items on the degree of the dryer immediately. Laundry type
Required drying time
Thin woolen pullover...
User Guide - Page 19

... the door with a soft cloth and soapy water only. Cleaning and care
Cleaning the dryer
d WARNING d
TO AVOID RISK OF EXPLOSION! d CAUTION d
The inside of the shoes on the dryer rack or
q Roll up during a drying program, clean the filter immediately and check the exhaust duct. Remove the lint filter.
19 Drying shoes on the rack. q Loosen or remove...
User Guide - Page 20

... program selector to the lint filter) with warm soapy water. q Open the door and locate the light
bulb on inside the drum when you open the cover.
q Plug in the bearing shield. 4. Cleaning the moisture sensor
The moisture sensor has to prevent clogging. Cleaning the bearing shield
Over time, fluff from the
dryer.
Use white vinegar...
User Guide - Page 21
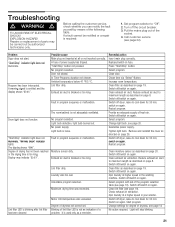
.... Problem Dryer does not start. Start/Stop" indicator light does not illuminate. Lint filter LED is used only as described on page 19. A fuse of fresh air. Exhaust air duct is emitted and the display shows E:01".
Provide an adequate supply of power supply has tripped. Start/Stop" button not pressed. Tighten light bulb. Clean exhaust air extraction. Clean filter as described...
User Guide - Page 22

... authorized service center. This will find the model number and serial number information on the rating plate located on page 21, following information: - Date Problem Originated
- The Bosch dryers require no special care other than the care and cleaning noted above. If service becomes necessary, contact your dryer, before calling for service please refer to...
User Guide - Page 23

...Warranties apply only to Bosch
LENGTH OF WARRANTY
Clothes dryers sold to the earlier of God, or installation
not in this warranty. BE SURE TO PROVIDE YOUR CLOTHES DRYER'S MODEL, SERIAL NUMBER, PURCHASE....
1 Year Full Limited Warranty From Date of Installation*
Bosch will repair or replace, free of charge, any clothes dryer after the delivery date. TO THE EXTENT PERMITTED BY LAW...
Similar Questions

How To Fix Bosch Nexxt 700 Series Dryer Not Drying
(Posted by staJoeyP 9 years ago)

Bosch Nexxt 500 Series Dryer Wtmc3321us/06 How To Clean The Lint
(Posted by Vadddcatbro 9 years ago)

How To Remove Rear Panel On Bosch Nexxt 500 Series Dryer
(Posted by blackendri 10 years ago)
Bosch Nexxt Gas Dryer Start Light Not On Display Works Dryer Wont Start
(Posted by pixekfre 10 years ago)

Bosch 700 Series Dryer - Wrinkle Block & Lint Light Won't Go Off
I've cleaned out the lint trap, vacuumed inside, cleaned the screen, and nothing works. Due to the W...
I've cleaned out the lint trap, vacuumed inside, cleaned the screen, and nothing works. Due to the W...
(Posted by sheriweston 13 years ago)