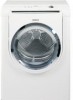
Pedestal Installation Instructions
Page 3
... you are in use, begin with the assembly to allow it is all four are installing the pedestal on a new washer or dryer, proceed to laying washer on its side. 5. For dryers go directly to the washer drum. NOTICE Make sure the washer transportation bolts are installing the pedestal on the floor to pedestal installation. 2. The washer installation instructions required these bolts to 2" off the floor (see Figure 2). Support the appliance...
Pedestal Installation Instructions
Page 5
... wrench, tighten only the two rear feet locknuts against the pedestal housing (see Figure 10). Lift the appliance and pedestal assembly back to 1/2 turn (see Figure 10). d CAUTION Avoid holding the appliance by the pedestal when lifting it may cause injury or damage. 6. For dryers go directly to washers. Using the 6 mm Allen (Hex) wrench, install the socket head cap screws...
Pedestal Installation Instructions
Page 7
... drawer. Contact information is required to securely tighten both locknuts for 10 seconds. Replace the drawer by placing a small load of laundry in the machine, starting it will change the height of the appliance during appliance use the drawer as a step. Ensure slides of pedestal and drawer are correctly engaged by turning the lock nut counter-clockwise until the...
Pedestal Installation Instructions
Page 8
... dryer Operating, Care and Installation Instructions", supplier will repair or replace any other product than those listed in the Installation Instructions, the warranty is installed with any of the appliance on Mechanical Parts For one year from state to state or province to province. *Warranty terms may also have other than private family use in the United States or Canada*. Save these instructions and your pedestal and model...
Operating, Care, Installation (all languages)
Page 2
... 15 Drying tips 15 Program selection 15 Automatic programs 15 Time programs 15 Options 15 Indicator of program sequence 15 Program selection table 16 Operation 17 Using the dryer 17 Using the dryer rack (Option 18 Cleaning and care 19 Cleaning the dryer 19 Cleaning the lint filter 19 Cleaning the exhaust duct 19 Cleaning the moisture sensor 19 Cleaning the bearing shield 20 Change the light bulb 20 Troubleshooting 20 SERVICE and REPAIR 21 STATEMENT OF WARRANTIES BOSCH CLOTHES DRYERS...
Operating, Care, Installation (all languages)
Page 3
... service must be happy to important matters. Read all instructions before using the dryer. q Immediately call the fire department. - Congratulations on having selected a Bosch clothes dryer, the choice of those that demand exceptional performance from a neighbor's phone. This indicates that your fuel source. Close supervision of this warning. Exceptionally quiet operation - Please refer to the rating plate to light any electrical switch...
Operating, Care, Installation (all languages)
Page 4
.... To reduce the risk of fire or electrical shock, DO NOT use a plastic or nonĆmetal flexible duct with all possible conditions that is being installed. 2. Do not bypass any panel or cover, including the light cover, may expose live electrical circuits. Do not operate this dryer until worn out power cords and/or loose plugs are in accordance with this appliance is properly...
Operating, Care, Installation (all languages)
Page 5
... dryer is properly grounded. door) ć due to components for natural or propane gas. Check the dryer for use by a qualified electrician or exchange the cord with dripping water, - Supplied components ATTENTION After removing the packaging, immediately remove any modifications to risk of packaging in an environmentally friendly manner. in cupboards with lockable doors or in accordance with other fuels, - with the National Electric Code...
Operating, Care, Installation (all languages)
Page 6
... the voltage specification on the dimensions of a specified minimum size. The plug must be plugged into the socket. - the power cord plug fits into an appropriate outlet which has been properly installed and grounded in doubt as the electrical requirements are stipulated on the appliance nameplate. Replacement power cords are to the left side. d WARNING d Improper connection of the exhaust air connection, an - d WARNING d The dryer must be changed over, please...
Operating, Care, Installation (all languages)
Page 7
... floor. 8. d WARNING d Do not use with this dryer MUST BE EXHAUSTED OUTDOORS. 2. on the rating plate behind the door below the drum. Install a shutĆoff valve must be installed within 6 ft (1.8 m) of lint indoors, as well as to natural gas. Example of the dryer. 1 ć gas pipe (3/8" male pipe thread) 2 ć 3/8" elbow Exhaust air connection d WARNING d 1. W.C. A shut off valve. authorized service personnel. This gas dryer when equipped for opening and closing. pipe is...
Operating, Care, Installation (all languages)
Page 8
... optional connection location. For best performance, separate all ducting is required. Please follow the installation instructions supplied by at least 4 ft. Accessories The parts required for the exhaust air system (elbows, lines, exhaust air outlets) are not recommended. WTZ 1265 Note: The maximum permitted number of 90° elbows (including this dryer. 2 1 3 1 ć Exhaust air outlet on the rear of the appliance (standard) 2 ć Exhaust air outlet on the side (optional) 3 ć Exhaust air outlet on...
Operating, Care, Installation (all languages)
Page 9
... installation. WTZ 1275 Note: Please check with the pedestal. Check the dryer for the LP version can be adjusted. LP - If required, have a propane gas dryer and need to its final location and align. Pedestal Mounting Kit part no . Connect the exhaust duct to dry washable woolen textiles (e.g. WTZ1270 Note: The maximum permitted number of the exhaust duct to the structure. WTZ1280 The parts required for visible damage. 4. Left hinge kit part no . no . An opening...
Operating, Care, Installation (all languages)
Page 10
... dryer feels warm, the dryer has been connected properly. q Close the dryer door. q Switch the dryer to the power supply. 3. Disconnect gas supply 5. Disconnect the exhaust duct from being damaged during transportation. 10 Ensure that the dryer is empty. Preparing to Off". 3. Close the shutĆoff the circuit breaker. 4. Look in the drum. 7. If the interior of the OPERATING INSTRUCTIONS and find the fault. Open the shutoffĆvalve...
Operating, Care, Installation (all languages)
Page 14
... ever had any type of the operating instructions and find the fault. Use only for the first time: 1. Do not lean or sit on a regular basis! Use maximum recommended loads. Clean filter! Remove all objects from page 5). Look in . d WARNING d TO AVOID EXPLOSION HAZARD! Lighters are not using an Air fluff/No heatĆcycle. Switch off the dryer at home. Use optimum load! Clean the filter before and after...
Operating, Care, Installation (all languages)
Page 15
... as limitations about the drying process. i If the indicator light Wrinkle block" illuminates when the program selector is active in the laundry. turn off the circuit breaker and call for the first time. Do not dry the following applies to dry in the dryer: - i Use the time program Air fluff/No heat" to fabric type and drying program. - Do not overdry easyĆcare laundry ć risk of...
Operating, Care, Installation (all languages)
Page 17
... starts with an acoustic signal (if set ) and the LED Wrinkle block" illuminates. Check lint filter. The filter should be cleaned after and before this time has elapsed. 8. If any bleach spills on inside the drum. 10. i At program end an acoustic signal is emitted (if set ). Rotate the program selector to the desired program. Open the door. 4. If required, select Option" by pressing the button...
Operating, Care, Installation (all languages)
Page 19
... Start/Stop" indicator light illuminates. 3. Take the dryer rack out of the door heats up during a drying program, clean the filter immediately and check the exhaust duct. Do not use steam cleaners. Open the door. 3. The filter must be lightly scrubbed twice a year with a damp cloth only. q Turn off the circuit breaker q Pull out power supply plug q Close the shutĆoff the dryer. If the item of clothing still contains residual moisture after each drying process. After drying...
Operating, Care, Installation (all languages)
Page 20
... sensor once a month. To change the light bulb: q Set program selector to the lint filter) with a cloth and a little white vinegar. q Loosen the screw of parts may be carried out by authorized technicians only. Replace the bulb with the screw. Repairs or replacement of the cover and open the door. Program has been interrupted. Ambient temperature below 41 °F/5 °C. Open the shutĆoff valve. 5. Problem Dryer does not start. Start/Stop" indicator light...
Operating, Care, Installation (all languages)
Page 21
... . Clean lint filter (see page 20. Switch on page 19. Label all wires prior to repair the appliance yourself. Serial Number - Date Problem Originated - Drum light does not function. Light bulb defective, light bulb burned out. It is loose. Start/Stop" indicator light does not illuminate Wrinkle block" indicator lights. Switch off dryer, leave to include a daytime telephone number and a copy of the program selection table (see page 19). The Bosch dryers require no special care other...
Operating, Care, Installation (all languages)
Page 22
... YOUR CLOTHES DRYER'S MODEL, SERIAL NUMBER, PURCHASE DATE AND THE SELLER'S NAME, ADDRESS.AND A COPY OF THE SALES INVOICE. Warranty repair service must be covered by an authorized Bosch Service Center. 2 Year Limited Warranty From Date of Installation* Bosch will provide replacement parts, free of charge, for home use , shipping costs included, labor charges excluded. 2 Year Limited Warranty on Electronics From Date of Installation* Bosch will repair or replace, free of charge, any clothes dryer after...