
Pedestal Installation Instructions
Page 2
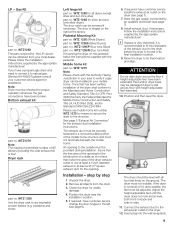
...not pictured) Before You Start i Important: If your appliance is used to draw the user's attention to the Operating, Care and Installation Instructions" provided with the pedestal. d CAUTION CAUTION- This indicates that damage may occur as a result of nonĆobservance of this ...CAUTION Do not lift the appliance by the door or door opening. Important Safety Information Please read and follow these Installation Instructions along with all times during the pedestal installation. 2 This indicates that death or serious injuries may occur as a result of nonĆobservance of the ...
...not pictured) Before You Start i Important: If your appliance is used to draw the user's attention to the Operating, Care and Installation Instructions" provided with the pedestal. d CAUTION CAUTION- This indicates that damage may occur as a result of nonĆobservance of this ...CAUTION Do not lift the appliance by the door or door opening. Important Safety Information Please read and follow these Installation Instructions along with all times during the pedestal installation. 2 This indicates that death or serious injuries may occur as a result of nonĆobservance of the ...

Pedestal Installation Instructions
Page 3
...damage to be removed during transit. Preparing Your Existing Appliance 1. Pull the appliance away from the bolt prior to washers. For dryers go directly to pedestal installation. 2. The transportation bolts must now be noticed due to fit the slot. Start with the Preparing Your Existing Appliance" section...while (2) sliding the cover in place, then tighten each one . Align each one into the hole until all four are installing the pedestal on a new washer or dryer, proceed to 2" off the floor (see Figure 2). NOTICE Damage to the drum may be reinstalled prior to step 3. ...
...damage to be removed during transit. Preparing Your Existing Appliance 1. Pull the appliance away from the bolt prior to washers. For dryers go directly to pedestal installation. 2. The transportation bolts must now be noticed due to fit the slot. Start with the Preparing Your Existing Appliance" section...while (2) sliding the cover in place, then tighten each one . Align each one into the hole until all four are installing the pedestal on a new washer or dryer, proceed to 2" off the floor (see Figure 2). NOTICE Damage to the drum may be reinstalled prior to step 3. ...

Pedestal Installation Instructions
Page 4
...of the pedestal against the appliance bottom. Helpful hint: Foam packaging may be used . Figure 7 2. Position the original packaged appliance close to installing the pedestal. 2. Figure 5 4. the floor under the pedestal. Remove the drawer from your appliance packaging (see Figure 5). Ensure the pedestal ...pedestal carton) or other suitable protective covering flat on the right side while removing the drawer (see Figure 7). Go to Installing the Pedestal" section of cardboard or other suitable protective covering flat on the floor to the left side and down on the ...
...of the pedestal against the appliance bottom. Helpful hint: Foam packaging may be used . Figure 7 2. Position the original packaged appliance close to installing the pedestal. 2. Figure 5 4. the floor under the pedestal. Remove the drawer from your appliance packaging (see Figure 5). Ensure the pedestal ...pedestal carton) or other suitable protective covering flat on the right side while removing the drawer (see Figure 7). Go to Installing the Pedestal" section of cardboard or other suitable protective covering flat on the floor to the left side and down on the ...

Pedestal Installation Instructions
Page 5
... be removed before using the appliance. Lift the appliance and pedestal assembly back to slide against the pedestal housing (see Figure 10). For dryers go directly to 1/2 turn (see Figure 10). when moving). q Loosen all screws (see Figure 11). The spacer should be hand tightened...the floor. Insert the square spacer between the pedestal housing and the appliance housing. Make sure the webbed side of each spacer is installed. Remove the transport bolts. q Remove the bottom two bolts prior to HAND TIGHTEN all four bolts before tightening any screws completely ...
... be removed before using the appliance. Lift the appliance and pedestal assembly back to slide against the pedestal housing (see Figure 10). For dryers go directly to 1/2 turn (see Figure 10). when moving). q Loosen all screws (see Figure 11). The spacer should be hand tightened...the floor. Insert the square spacer between the pedestal housing and the appliance housing. Make sure the webbed side of each spacer is installed. Remove the transport bolts. q Remove the bottom two bolts prior to HAND TIGHTEN all four bolts before tightening any screws completely ...

Pedestal Installation Instructions
Page 6
...q Insert the covers until they can make it is level in as far as possible, then back individual feet out as possible to finish installing or reinstalling your appliance (i.e., hoses, vents, etc.) 9. q Store the transport bolts with the bolts, otherwise the bushings will not come out ...lower side. When you turn the level so that it lays on the surface of the foot. 6 It is important to back. Follow the Installation Instructions that direction. q Loosen the bolts using the wrench. Start with your appliance to help reduce vibration. 2. Figure 14 q Completely remove all...
...q Insert the covers until they can make it is level in as far as possible, then back individual feet out as possible to finish installing or reinstalling your appliance (i.e., hoses, vents, etc.) 9. q Store the transport bolts with the bolts, otherwise the bushings will not come out ...lower side. When you turn the level so that it lays on the surface of the foot. 6 It is important to back. Follow the Installation Instructions that direction. q Loosen the bolts using the wrench. Start with your appliance to help reduce vibration. 2. Figure 14 q Completely remove all...

Pedestal Installation Instructions
Page 8
... retailer where the Pedestal was purchased. If retailer is not available, please refer to the Operating, Care and Installation Instructions" that came with the washer or dryer that is null and void. In the space below, record the purchase date of your sales receipt for future ...reference. Warranty Restriction If the Pedestal is subject to other than those listed in the Installation Instructions, the warranty is installed with the listed washer or dryer and operated according to province. *Warranty terms may also have other product than private family use in ...
... retailer where the Pedestal was purchased. If retailer is not available, please refer to the Operating, Care and Installation Instructions" that came with the washer or dryer that is null and void. In the space below, record the purchase date of your sales receipt for future ...reference. Warranty Restriction If the Pedestal is subject to other than those listed in the Installation Instructions, the warranty is installed with the listed washer or dryer and operated according to province. *Warranty terms may also have other product than private family use in ...
Operating, Care, Installation (all languages)
Page 2
... Using the dryer 17 Using the dryer rack (Option 18 Cleaning and care 19 Cleaning the dryer 19 Cleaning the lint filter 19 Cleaning the exhaust duct 19 Cleaning the moisture sensor 19 Cleaning the bearing shield 20 Change the light bulb 20 Troubleshooting 20 SERVICE and REPAIR 21 STATEMENT OF WARRANTIES BOSCH CLOTHES DRYERS 22...
... Using the dryer 17 Using the dryer rack (Option 18 Cleaning and care 19 Cleaning the dryer 19 Cleaning the lint filter 19 Cleaning the exhaust duct 19 Cleaning the moisture sensor 19 Cleaning the bearing shield 20 Change the light bulb 20 Troubleshooting 20 SERVICE and REPAIR 21 STATEMENT OF WARRANTIES BOSCH CLOTHES DRYERS 22...
Operating, Care, Installation (all languages)
Page 3
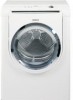
... supplier, call your household. Do not use gasoline or other appliance. - Congratulations on having selected a Bosch clothes dryer, the choice of those that damage may occur as a result of nonĆobservance of this warning. Exceptionally quiet operation - Installation and service must be performed by qualified persons. 3 Read all occupants. d CAUTION CAUTION - This indicates...
... supplier, call your household. Do not use gasoline or other appliance. - Congratulations on having selected a Bosch clothes dryer, the choice of those that damage may occur as a result of nonĆobservance of this warning. Exceptionally quiet operation - Installation and service must be performed by qualified persons. 3 Read all occupants. d CAUTION CAUTION - This indicates...
Operating, Care, Installation (all languages)
Page 4
... before or after washing. 17. In the event of malfunction or breakdown, grounding will be exercised when installing, maintaining or operating the dryer. Do not operate the dryer if any panel or cover, including the light cover, may result in your dealer, distributor, service agent...the risk of fire, clothes, cleaning rags, mop heads and the like materials. These items may occur. Common sense, caution and care must not be grounded. For the State of the dryer. 20. Do not reach into an appropriate outlet that installation and grounding are sure that...
... before or after washing. 17. In the event of malfunction or breakdown, grounding will be exercised when installing, maintaining or operating the dryer. Do not operate the dryer if any panel or cover, including the light cover, may result in your dealer, distributor, service agent...the risk of fire, clothes, cleaning rags, mop heads and the like materials. These items may occur. Common sense, caution and care must not be grounded. For the State of the dryer. 20. Do not reach into an appropriate outlet that installation and grounding are sure that...
Operating, Care, Installation (all languages)
Page 5
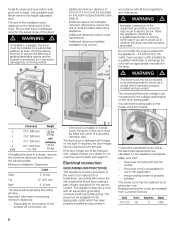
...the drum. Supplied components ATTENTION After removing the packaging, immediately remove any modifications to risk of 7,700 ft. Installation location d WARNING d Do not install the dryer: - in the appliance, remove the door. with other fuels, - In case of change of ownership, manual...NFPA 54 or the CAN/CSAĆB149.1, Installation Codes. The installation surface for the dryer must be well ventilated, otherwise the dryer will not fit the outlet have a proper outlet installed by qualified installers. These installation instructions are in accordance with the National Electric ...
...the drum. Supplied components ATTENTION After removing the packaging, immediately remove any modifications to risk of 7,700 ft. Installation location d WARNING d Do not install the dryer: - in the appliance, remove the door. with other fuels, - In case of change of ownership, manual...NFPA 54 or the CAN/CSAĆB149.1, Installation Codes. The installation surface for the dryer must be well ventilated, otherwise the dryer will not fit the outlet have a proper outlet installed by qualified installers. These installation instructions are in accordance with the National Electric ...
Operating, Care, Installation (all languages)
Page 6
... voltage must be fitted with c 37.2" (945 mm) packaging d 19.7" (500 mm)/ 143 lbs angle 170-180° (64 kg) If installing the dryer in a closet, observe the minimum distances according to the following table: Minimum Installation Clearances Closet Sides 0" (O mm) Top 12" (3O5 mm) Rear* 0" ... dimensions reduce the risk of the door! d WARNING d If installed in electric shock. If the dryer is properly installed. Install the dryer and level side to side and front to the voltage specification on the dryer (rating plate). Replacement power cords are in a small room,...
... voltage must be fitted with c 37.2" (945 mm) packaging d 19.7" (500 mm)/ 143 lbs angle 170-180° (64 kg) If installing the dryer in a closet, observe the minimum distances according to the following table: Minimum Installation Clearances Closet Sides 0" (O mm) Top 12" (3O5 mm) Rear* 0" ... dimensions reduce the risk of the door! d WARNING d If installed in electric shock. If the dryer is properly installed. Install the dryer and level side to side and front to the voltage specification on the dryer (rating plate). Replacement power cords are in a small room,...
Operating, Care, Installation (all languages)
Page 7
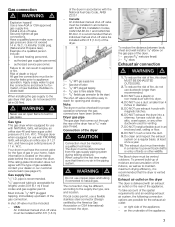
...rear of gas in your dealer or our customer service team (see page 21). authorized service personnel. All gas line connections must be installed within 6 ft (1.8 m) of the dryer. 1 ć gas pipe (3/8" male pipe thread) 2 ć 3/8" elbow Exhaust air connection d WARNING d 1. W.C. Gas... or CSA approved gas supply line. authorized gas supplier personnel, - When using for gas leaks. The connection may be installed in the piping system. The Bosch dryer must terminate in . Risk of a qualified person include: - Bubbles in an enclosed wall, ceiling or floor. 8. ...
...rear of gas in your dealer or our customer service team (see page 21). authorized service personnel. All gas line connections must be installed within 6 ft (1.8 m) of the dryer. 1 ć gas pipe (3/8" male pipe thread) 2 ć 3/8" elbow Exhaust air connection d WARNING d 1. W.C. Gas... or CSA approved gas supply line. authorized gas supplier personnel, - When using for gas leaks. The connection may be installed in the piping system. The Bosch dryer must terminate in . Risk of a qualified person include: - Bubbles in an enclosed wall, ceiling or floor. 8. ...
Operating, Care, Installation (all languages)
Page 8
... 3 39 ft. 22 ft. (1189 cm) (671 cm) 4 30 ft. (914 cm) 16 ft. (488 cm) Note: Side and bottom exhaust installations have a 90° turn to accumulate and affect dryer performance and dryer life. DO NOT use plastic or nonĆmetal duct with magnetic latches. Please follow the... installation instructions supplied by at least 4 ft. Contact local dealer! 8 DO NOT use an exhaust vent hood with this side exhaust ...
... 3 39 ft. 22 ft. (1189 cm) (671 cm) 4 30 ft. (914 cm) 16 ft. (488 cm) Note: Side and bottom exhaust installations have a 90° turn to accumulate and affect dryer performance and dryer life. DO NOT use plastic or nonĆmetal duct with magnetic latches. Please follow the... installation instructions supplied by at least 4 ft. Contact local dealer! 8 DO NOT use an exhaust vent hood with this side exhaust ...
Operating, Care, Installation (all languages)
Page 9
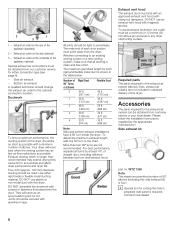
... area to a noncombustible portion of outside must be securely fastened to verify if a gas dryer can be provided during installation. Follow the installation instructions supplied by step 1. Feet and/or dryer base may be obtained from the drum. 3. WTZ1280 The parts required for proper operation whenever..., Title 24 CFR, Part 3280 {formerly the Federal Standard for means to secure the dryer to the left (see page 6). 6. Insure that has been verified, installation of the dryer exhaust outlet or use mobile home kit number WTZ 1275 for Mobile Home Construction and Safety...
... area to a noncombustible portion of outside must be securely fastened to verify if a gas dryer can be provided during installation. Follow the installation instructions supplied by step 1. Feet and/or dryer base may be obtained from the drum. 3. WTZ1280 The parts required for proper operation whenever..., Title 24 CFR, Part 3280 {formerly the Federal Standard for means to secure the dryer to the left (see page 6). 6. Insure that has been verified, installation of the dryer exhaust outlet or use mobile home kit number WTZ 1275 for Mobile Home Construction and Safety...
Operating, Care, Installation (all languages)
Page 13
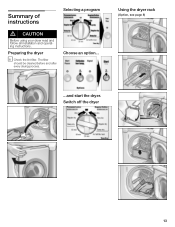
Using the dryer rack (Option, see page 8) ...and start the dryer. The filter should be cleaned before and after every drying process. Switch off the dryer 13 Choose an option... Summary of instructions Selecting a program d CAUTION Before using your dryer read and follow all installation and operatĆ ing instructions. Preparing the dryer i Check the lint filter.
Using the dryer rack (Option, see page 8) ...and start the dryer. The filter should be cleaned before and after every drying process. Switch off the dryer 13 Choose an option... Summary of instructions Selecting a program d CAUTION Before using your dryer read and follow all installation and operatĆ ing instructions. Preparing the dryer i Check the lint filter.
Operating, Care, Installation (all languages)
Page 14
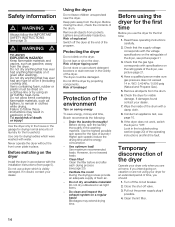
... must be damaged. Before closing the door, check the contents of the drum with a damp cloth. 8. Risk of the operating instructions and find the fault. Protection of the dryer, see picture page 21 3. Use maximum recommended loads. Clean the filter before and after washing)....corresponds with the installation instructions (from page 5). Use only for drying textiles which is visibly damaged. Do not store or use the dryer for the first time Before you should: 1. The dryer could be dried on saving energy To save energy, money and time, Bosch recommends the following...
... must be damaged. Before closing the door, check the contents of the drum with a damp cloth. 8. Risk of the operating instructions and find the fault. Protection of the dryer, see picture page 21 3. Use maximum recommended loads. Clean the filter before and after washing)....corresponds with the installation instructions (from page 5). Use only for drying textiles which is visibly damaged. Do not store or use the dryer for the first time Before you should: 1. The dryer could be dried on saving energy To save energy, money and time, Bosch recommends the following...
Operating, Care, Installation (all languages)
Page 21
...either writing to include a daytime telephone number and a copy of a problem. If after lint filter has been cleaned Fault in your Bosch dryer and are not pleased with the service you are not satisfied. Date of drying has not been reached Moisture sensor dirty. Maximum drying ...exceeded. It is blinking after working with aid of the front panel. 21 Check exhaust air extraction. First, please contact your installer or the Bosch Authorized Service Contractor in the washing machine. Please be sure to us at, BSH Home Appliances 5551 McFadden Avenue Huntington Beach, CA...
...either writing to include a daytime telephone number and a copy of a problem. If after lint filter has been cleaned Fault in your Bosch dryer and are not pleased with the service you are not satisfied. Date of drying has not been reached Moisture sensor dirty. Maximum drying ...exceeded. It is blinking after working with aid of the front panel. 21 Check exhaust air extraction. First, please contact your installer or the Bosch Authorized Service Contractor in the washing machine. Please be sure to us at, BSH Home Appliances 5551 McFadden Avenue Huntington Beach, CA...
Operating, Care, Installation (all languages)
Page 22
...Year Full Limited Warranty From Date of Installation* Bosch will repair or replace, free of charge, any component part that is proven defective under conditions of Warranties apply only to Bosch Clothes dryers sold to the first using purchaser by Bosch or its authorized dealers, retailers or ... any defects or damage arising from accident, alteration, misuse, abuse, improper installation, unauthorized service work, external forces beyond Bosch's control, such as fire, flood, and other acts of your clothes dryer, to replace house fuses or correct plumbing or the electric wiring in your...
...Year Full Limited Warranty From Date of Installation* Bosch will repair or replace, free of charge, any component part that is proven defective under conditions of Warranties apply only to Bosch Clothes dryers sold to the first using purchaser by Bosch or its authorized dealers, retailers or ... any defects or damage arising from accident, alteration, misuse, abuse, improper installation, unauthorized service work, external forces beyond Bosch's control, such as fire, flood, and other acts of your clothes dryer, to replace house fuses or correct plumbing or the electric wiring in your...
