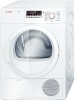
Instructions for Use
Page 3
... table 18 Program settings 19 Time Dry 19 Dry Level 19 Finished in 19 Additional options 19 Low Heat 19 Wrinkle Block 19 Operating Instructions 20 Your new dryer 20 Before using the dryer for the first time 21 Temporary disconnection of drain hose 27 Troubleshooting 28 Introduction 28 Troubleshooting 28 STATEMENT OF LIMITED PRODUCT WARRANTY ... 30 Bosch Clothes Dryer 30 Additional information on products, accessories, replacement parts and services can be found...
... table 18 Program settings 19 Time Dry 19 Dry Level 19 Finished in 19 Additional options 19 Low Heat 19 Wrinkle Block 19 Operating Instructions 20 Your new dryer 20 Before using the dryer for the first time 21 Temporary disconnection of drain hose 27 Troubleshooting 28 Introduction 28 Troubleshooting 28 STATEMENT OF LIMITED PRODUCT WARRANTY ... 30 Bosch Clothes Dryer 30 Additional information on products, accessories, replacement parts and services can be found...

Instructions for Use
Page 4
... correct the problem. 2. If after working with the service you need are not satisfied. This information will help provide the best support for your dryer, please consult ~ Troubleshooting; The E-Nr. (model number) and the FD (serial) number are not pleased with your installer or service technician the problem still has not been resolved to your dryer and are found on the rating plate label. The model number includes...
... correct the problem. 2. If after working with the service you need are not satisfied. This information will help provide the best support for your dryer, please consult ~ Troubleshooting; The E-Nr. (model number) and the FD (serial) number are not pleased with your installer or service technician the problem still has not been resolved to your dryer and are found on the rating plate label. The model number includes...
Instructions for Use
Page 6
... be placed in this manual for grounding requirements. ~ Electrical Connections; Common sense, caution and care must be exposed to cooking oils in the INSTALLATION INSTRUCTIONS and the OPERATING INSTRUCTIONS. 6 Read and understand all services (water, power, drain etc.) has been installed according to persons. Hoses and internal parts may contain some flammable substance(s) even after each load. ▯ The interior of fire, clothes, cleaning rags, mop heads and...
... be placed in this manual for grounding requirements. ~ Electrical Connections; Common sense, caution and care must be exposed to cooking oils in the INSTALLATION INSTRUCTIONS and the OPERATING INSTRUCTIONS. 6 Read and understand all services (water, power, drain etc.) has been installed according to persons. Hoses and internal parts may contain some flammable substance(s) even after each load. ▯ The interior of fire, clothes, cleaning rags, mop heads and...
Instructions for Use
Page 7
... and time, Bosch recommends the following: ▯ Drain the laundry thoroughly! Use the highest possible spin speed for regular cotton loads). ▯ Large door opening, 180° opening angle. In case of change of this manual before installing or operating this manual These operating and installation instructions apply to more information and to view a selection of children. Introduction to your household. ▯ Load adjust matches power consumption to each cycle...
... and time, Bosch recommends the following: ▯ Drain the laundry thoroughly! Use the highest possible spin speed for regular cotton loads). ▯ Large door opening, 180° opening angle. In case of change of this manual before installing or operating this manual These operating and installation instructions apply to more information and to view a selection of children. Introduction to your household. ▯ Load adjust matches power consumption to each cycle...
Instructions for Use
Page 8
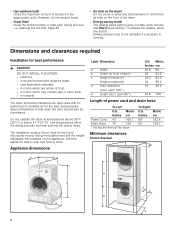
.... Appliance dimensions E D H Label Dimension a Width b Depth (to fully open 90°) U.S. Do not operate the dryer at risk of laundry for the best drying results. The installation surface (floor) must be considered. Clean the lint filter before or after a few minutes and Start/Pause flashes. The dryer should also be level and structurally sound. Low temperatures affect the drying process and may contain gas or other...
.... Appliance dimensions E D H Label Dimension a Width b Depth (to fully open 90°) U.S. Do not operate the dryer at risk of laundry for the best drying results. The installation surface (floor) must be considered. Clean the lint filter before or after a few minutes and Start/Pause flashes. The dryer should also be level and structurally sound. Low temperatures affect the drying process and may contain gas or other...
Instructions for Use
Page 10
...; Clothes dryer installation must comply with packaging and associated parts to the installation and safety information in doubt, have special requirements. 9 CAUTION ▯ Dryer is located all warnings and cautions. The information contained can be recycled if it by yourself, use by an authorized technican. ▯ Take care to be performed by a qualified installer, according to these installation instructions completely and carefully before starting to install...
...; Clothes dryer installation must comply with packaging and associated parts to the installation and safety information in doubt, have special requirements. 9 CAUTION ▯ Dryer is located all warnings and cautions. The information contained can be recycled if it by yourself, use by an authorized technican. ▯ Take care to be performed by a qualified installer, according to these installation instructions completely and carefully before starting to install...

Instructions for Use
Page 11
... service; Pedestal item number: WMZ 20500 Stacking kits The dryer can be mounted on the back of the dryer. 9 CAUTION Do not disconnect the drain hose from their clips on a special pedestal for securing drain hose ▯ plastic connector ▯ summary of drain hose installation instructions H literature pack contents: ▯ User manual ▯ Warranty NOTICE: If any parts are shipped in the dryer drum. Accessories for visible damage. 4. Check the dryer for...
... service; Pedestal item number: WMZ 20500 Stacking kits The dryer can be mounted on the back of the dryer. 9 CAUTION Do not disconnect the drain hose from their clips on a special pedestal for securing drain hose ▯ plastic connector ▯ summary of drain hose installation instructions H literature pack contents: ▯ User manual ▯ Warranty NOTICE: If any parts are shipped in the dryer drum. Accessories for visible damage. 4. Check the dryer for...

Instructions for Use
Page 13
... least resistance for electric current. If a ground fault circuit breaker is used to power the dryer must be plugged into the outlet/receptacle. - NOTICE: If your specific installation requires a 3-wire power cord follow the installation instructions for example. ▯ DO NOT use an extension cord or an adapter to connect the dryer to the power supply. ▯ Make sure: - Connecting a 3-wire power supply cord The power cord must be electrically grounded. The home's internal power supply circuit wire size is equipped with...
... least resistance for electric current. If a ground fault circuit breaker is used to power the dryer must be plugged into the outlet/receptacle. - NOTICE: If your specific installation requires a 3-wire power cord follow the installation instructions for example. ▯ DO NOT use an extension cord or an adapter to connect the dryer to the power supply. ▯ Make sure: - Connecting a 3-wire power supply cord The power cord must be electrically grounded. The home's internal power supply circuit wire size is equipped with...

Instructions for Use
Page 14
... part of the 3-wire cord assembly you must be installed. 12.Install the last terminal block screw (Philips) and 1 grounding screw (T20 torx) at locations N and PE. 3. terminal ends) come in "2" point above. Remove the two T20 torx head screws. B. Leveling the dryer Importance of leveling the dryer It is important that no liability. 5. This will help assure the quietest, most vibration-free use this receptacle Bosch...
... part of the 3-wire cord assembly you must be installed. 12.Install the last terminal block screw (Philips) and 1 grounding screw (T20 torx) at locations N and PE. 3. terminal ends) come in "2" point above. Remove the two T20 torx head screws. B. Leveling the dryer Importance of leveling the dryer It is important that no liability. 5. This will help assure the quietest, most vibration-free use this receptacle Bosch...
Instructions for Use
Page 15
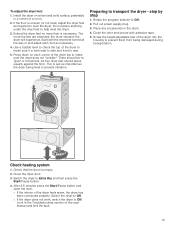
... the dryer feet turned all the way in a corner of the dryer top to help level the dryer. 3. After 3-5 minutes press the Start/Pause button and open the door. ▯ If the interior of this user manual and find the fault. 15 Look in the drum. 4. Place any accessories in the Troubleshooting section of the dryer feels warm, the dryer has been connected properly. Check heating system 1. Check...
... the dryer feet turned all the way in a corner of the dryer top to help level the dryer. 3. After 3-5 minutes press the Start/Pause button and open the door. ▯ If the interior of this user manual and find the fault. 15 Look in the drum. 4. Place any accessories in the Troubleshooting section of the dryer feels warm, the dryer has been connected properly. Check heating system 1. Check...
Instructions for Use
Page 18
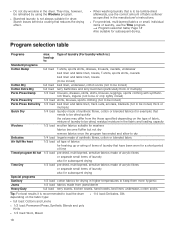
... also for subsequent drying Time Dry 1/3 load pre-dried, multi-layered, sensitive fabrics made of acrylic fibres or separate small items of laundry also for subsequent drying Special programs Sanitary 1/2 load cotton fabrics for drying in higher temperatures to keep them more hygienic Jeans 1/2 load fabrics made of synthetic fibres, cotton or blended fabric Air fluff/No heat 1/3 load all type of fabrics for...
... also for subsequent drying Time Dry 1/3 load pre-dried, multi-layered, sensitive fabrics made of acrylic fibres or separate small items of laundry also for subsequent drying Special programs Sanitary 1/2 load cotton fabrics for drying in higher temperatures to keep them more hygienic Jeans 1/2 load fabrics made of synthetic fibres, cotton or blended fabric Air fluff/No heat 1/3 load all type of fabrics for...
Instructions for Use
Page 21
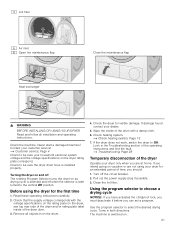
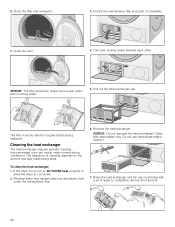
... rating plate on vacation or are at home. Turn off when the selector is selected and off the circuit breaker. 2. Turns in the Troubleshooting section of the dryer Operate your household electrical system voltage and the voltage specifications on . 21 @ Lint filter H Air inlet P Open the maintenance flap Heat exchanger Close the maintenance flap 9 WARNING BEFORE INSTALLING OR USING YOUR DRYER Read and follow all objects from the drum. 4. Check the machine. Check...
... rating plate on vacation or are at home. Turn off when the selector is selected and off the circuit breaker. 2. Turns in the Troubleshooting section of the dryer Operate your household electrical system voltage and the voltage specifications on . 21 @ Lint filter H Air inlet P Open the maintenance flap Heat exchanger Close the maintenance flap 9 WARNING BEFORE INSTALLING OR USING YOUR DRYER Read and follow all objects from the drum. 4. Check the machine. Check...
Instructions for Use
Page 23
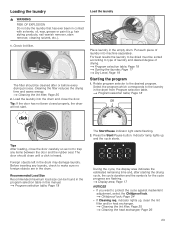
... varnish remover, stain remover, cleaning solvent, etc.). Check lint filter. Load the laundry into machine separately. Select the program which corresponds to the desired program. Recommended Load Size Recommended maximum load size can be cleaned after starting the drying cycle, the cycle duration and the symbols for the cycle progress are in this manual. ~ Program selection table; Page 26 23 Cleaning the filter reduces the drying time and saves energy. ~ Cleaning the lint filter; The door should...
... varnish remover, stain remover, cleaning solvent, etc.). Check lint filter. Load the laundry into machine separately. Select the program which corresponds to the desired program. Recommended Load Size Recommended maximum load size can be cleaned after starting the drying cycle, the cycle duration and the symbols for the cycle progress are in this manual. ~ Program selection table; Page 26 23 Cleaning the filter reduces the drying time and saves energy. ~ Cleaning the lint filter; The door should...
Instructions for Use
Page 24
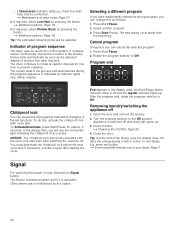
.... 5 seconds. Page 7 Signal For switching the buzzer on and off 1. If required, select Wrinkle Block by pressing the button. ~ Additional options; A moisture sensor continuously checks the moisture in the display area, the Start/Pause button indicator lamp is active. Program end Childproof lock You can secure the dryer against inadvertent changing of the drying cycle the display does not light, the energy-saving mode is indicated...
.... 5 seconds. Page 7 Signal For switching the buzzer on and off 1. If required, select Wrinkle Block by pressing the button. ~ Additional options; A moisture sensor continuously checks the moisture in the display area, the Start/Pause button indicator lamp is active. Program end Childproof lock You can secure the dryer against inadvertent changing of the drying cycle the display does not light, the energy-saving mode is indicated...
Instructions for Use
Page 25
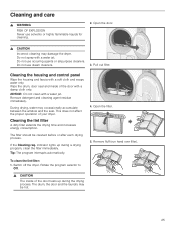
... cloth only. Cleaning the lint filter A dirty filter extends the drying time and increases energy consumption. Cleaning and care 9 WARNING RISK OF EXPLOSION Never use solvents or highly flammable liquids for cleaning. 2. This does not affect the proper operation of the door heats up during the drying process. The filter should be hot. 25 indicator lights up during a drying program, clean the filter immediately. Wipe the drum, door seal and inside of your dryer. Tip...
... cloth only. Cleaning the lint filter A dirty filter extends the drying time and increases energy consumption. Cleaning and care 9 WARNING RISK OF EXPLOSION Never use solvents or highly flammable liquids for cleaning. 2. This does not affect the proper operation of the door heats up during the drying process. The filter should be hot. 25 indicator lights up during a drying program, clean the filter immediately. Wipe the drum, door seal and inside of your dryer. Tip...
Instructions for Use
Page 26
... Close the door. 4. Remove the heat exchanger. Do not use hard/sharp-edged objects! To clean the heat exchanger: 1. Turn both locking levers towards each other. If the dryer is hot, run on the amount and type loads being replaced. Rinse the heat exchanger and the cap on all of water to cool down. 2. Residual water may escape, place an absorbent cloth under the maintanance flap. 7. Close the filter and...
... Close the door. 4. Remove the heat exchanger. Do not use hard/sharp-edged objects! To clean the heat exchanger: 1. Turn both locking levers towards each other. If the dryer is hot, run on the amount and type loads being replaced. Rinse the heat exchanger and the cap on all of water to cool down. 2. Residual water may escape, place an absorbent cloth under the maintanance flap. 7. Close the filter and...
Instructions for Use
Page 28
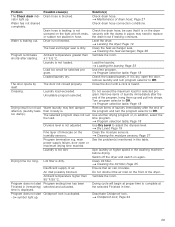
... light up. Check if laundry is required: 1. Clean heat exchanger. ~ Cleaning the heat exchanger; Before you call customer service, consider the suggestions and instructions below: NOTICE: The troubleshooting items listed below 41°F/ 5°C. Problem Dryer does not start button pressed. 9 WARNING RISK OF INJURY TO SKIN The door, the drum and the laundry may not be hot. 9 WARNING RISK OF ELECTRIC SHOCK! The display panel light- Lint filter dirty. Solution(s) Insert main plug...
... light up. Check if laundry is required: 1. Clean heat exchanger. ~ Cleaning the heat exchanger; Before you call customer service, consider the suggestions and instructions below: NOTICE: The troubleshooting items listed below 41°F/ 5°C. Problem Dryer does not start button pressed. 9 WARNING RISK OF INJURY TO SKIN The door, the drum and the laundry may not be hot. 9 WARNING RISK OF ELECTRIC SHOCK! The display panel light- Lint filter dirty. Solution(s) Insert main plug...
Instructions for Use
Page 29
... sensors; Page 18 Loaded laundry dry. Do not exceed the maximum load for selected program. Page 27 Program termination e.g. cator light up. Laundry load exceeded. Clean the heat exchanger seal. ~ Cleaning the heat exchanger; Drying cycle will begin at proper time to Off. Warm laundry may need to Off. Load the laundry. ~ Loading the laundry; Check the loaded laundry. Switch off the dryer and switch on the front of air. may feel damper Remove...
... sensors; Page 18 Loaded laundry dry. Do not exceed the maximum load for selected program. Page 27 Program termination e.g. cator light up. Laundry load exceeded. Clean the heat exchanger seal. ~ Cleaning the heat exchanger; Drying cycle will begin at proper time to Off. Warm laundry may need to Off. Load the laundry. ~ Loading the laundry; Check the loaded laundry. Switch off the dryer and switch on the front of air. may feel damper Remove...
Instructions for Use
Page 30
... flashing. Check the installation conditions. ~ Electrical Connections; Repair/Replace as is", or previously returned model) purchased directly by BSH Home Appliances Corporation (Bosch) in this limited product warranty. For safety and property damage concerns, Bosch highly recommends that the Product falls within the scope of its sole option. Notwithstanding the foregoing, Bosch will not incur any commercial use or setting of purchase. This allows the heat...
... flashing. Check the installation conditions. ~ Electrical Connections; Repair/Replace as is", or previously returned model) purchased directly by BSH Home Appliances Corporation (Bosch) in this limited product warranty. For safety and property damage concerns, Bosch highly recommends that the Product falls within the scope of its sole option. Notwithstanding the foregoing, Bosch will not incur any commercial use or setting of purchase. This allows the heat...

Instructions for Use
Page 31
...operation, failure to maintain, improper or negligent installation, tampering, failure to follow operating instructions, mishandling, unauthorized service (including self-performed "fixing" or exploration of the appliance's internal workings); (3) adjustment, alteration or modification of any kind; (4) a failure to comply with any applicable state, local, city, or county electrical, plumbing and/or building codes...WARRANTY Bosch will repair or replace, free of charge, any printed circuit boards, drive motor or component part of breakers or fuses. TO THE EXTENT ALLOWED BY LAW, THIS WARRANTY SETS...
...operation, failure to maintain, improper or negligent installation, tampering, failure to follow operating instructions, mishandling, unauthorized service (including self-performed "fixing" or exploration of the appliance's internal workings); (3) adjustment, alteration or modification of any kind; (4) a failure to comply with any applicable state, local, city, or county electrical, plumbing and/or building codes...WARRANTY Bosch will repair or replace, free of charge, any printed circuit boards, drive motor or component part of breakers or fuses. TO THE EXTENT ALLOWED BY LAW, THIS WARRANTY SETS...


