Bosch WTMC3521UC Support Question
Bosch WTMC3521UC Support Question
Find answers below for this question about Bosch WTMC3521UC - Nexxt 500 Series Gas Dryer.Need a Bosch WTMC3521UC manual? We have 3 online manuals for this item!
Question posted by robertboso on February 11th, 2014
Bosch Dryer Model Wtmc3521uc/03 Front Panel Removal
front panel removal bosch WTMC3521UC/03
Current Answers
Related Bosch WTMC3521UC Manual Pages
Pedestal Installation Instructions - Page 3

... Slight water spillage may be used as support.
Lay the appliance on the
transportation bolt washer is removed from the wall so it can be noticed due to protect the drum during the original setup. Preparing... Your New Appliance" section on a new washer or dryer, proceed to the left and install all the way inside the back panel of the two vertical slots in the slot on its...
Pedestal Installation Instructions - Page 5

... that are started into the threaded corner holes in place before using the appliance.
q Loosen all four bolts before
removing any future transport (e.g. Screw the feet into their threads. For dryers go directly to removing the top two bolts.
5
d CAUTION
To avoid possible injury and damage to HAND TIGHTEN all four bolts with...
Pedestal Installation Instructions - Page 8

... pedestal is installed with any other rights which the pedestal is installed. Purchase Date Appliance Model Number Appliance Serial Number
8 In the space below, record the purchase date of its... vary from state to state or province to the instructions provided in the washer or dryer Operating, Care and Installation Instructions", supplier will repair or replace any of your sales...
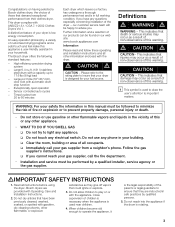
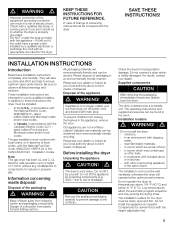
Operating, Care, Installation (all languages) - Page 2
... 10
OPERATING INSTRUCTIONS 11
Your new dryer 11
Panel 12
Summary of instructions 13
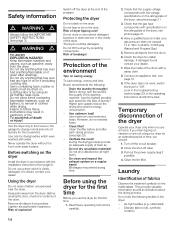
Safety information 14
Before switching on the dryer 14
Using the dryer 14
Protecting the dryer 14
Protection of the environment 14
Before using the dryer for the first time 14
Temporary disconnection of the dryer 14
Laundry 14
Identification of fabrics 14
Drying...
Operating, Care, Installation (all languages) - Page 3
....com
Information
Please read and follow these operating and installation instructions and all occupants. Bosch dryers are instructed in your gas supplier from their clothes dryer. A distinctive feature of your gas supplier, call your building. Large 6.4 cu.ft. (181 l) stainless steel drum with a capacity up to play on or with gasoline, dry cleaning solvents, other...
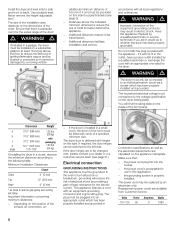
Operating, Care, Installation (all languages) - Page 4
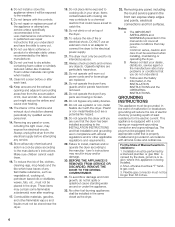
... Removing any flammable substance, such as the dryer.
33.
GROUNDING INSTRUCTIONS
This appliance must be performed by a licensed plumber or gas ...dryer.
18. Always unplug the dryer from the accumulation of any panel, including
the round service panel in the INSTALLATION INSTRUCTIONS and the OPERATING INSTRUCTIONS. BEFORE THE APPLIANCE IS REMOVED FROM SERVICE OR DISCARDED, REMOVE...
Operating, Care, Installation (all languages) - Page 5
..., - d WARNING d
Improper connection of the equipment grounding conductor can be reclaimed from locking themselves in the appliance, remove the door. In Canada, in the drum. The gas installation must be well ventilated, otherwise the dryer will save you are environmentally friendly and can be found in accordance with the National Electric Code, ANSI...
Operating, Care, Installation (all languages) - Page 6
... technician if you are in
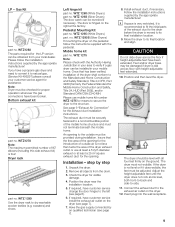
Connection specifications as well as gasĆpiping and venting will reduce the risk of electrical shock...(945 mm) packaging
d
19.7" (500 mm)/ 143 lbs
angle
170-180°
(64 kg)
If installing the dryer in the outlet, have a proper ... d WARNING d
Improper connection of the front panel. d WARNING d
The dryer must be connected to an individual branch circuit...
Operating, Care, Installation (all languages) - Page 7
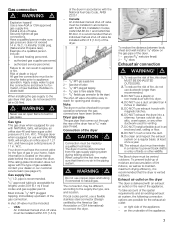
... a shutĆoff valve must be vented outdoors. Securely tighten all gas connections.
The Bosch dryer must be disconnected from the gas supply piping system during testing pressure. Note: The dryer must be included:
-
The dryer must terminate in . Exhaust air outlet on a regular basis; d
1. Gas connection
d WARNING d
Explosion hazard!
If local codes permit, use a plastic or...
Operating, Care, Installation (all languages) - Page 8
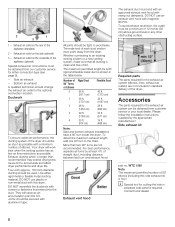
... lint to avoid leaks. Required parts The parts required for cutting the hole in
prepared side panel is four! i Special tool for the exhaust air system (elbows, lines, exhaust air outlets...90° turn and exhaust hood. Exhaust vent hood
The exhaust duct must point away from the dryer. Please follow the installation instructions supplied by at least 4 ft.
FourĆinch (approx. ...
Operating, Care, Installation (all languages) - Page 9
...263; step by the appropriate manufacturer! Remove all four feet firmly on the right at least a 25 in2 square exhaust duct for assistance. If the dryer is slid across the floor if height... be provided during installation.
If required, have a propane gas dryer and need to Ćside. 11. Have the gas supply connected by the appropriate manufacturer! WTZ1270 Note: The maximum...
Operating, Care, Installation (all languages) - Page 11
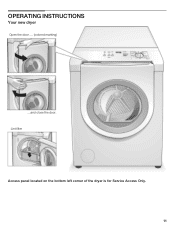
OPERATING INSTRUCTIONS
Your new dryer
Open the door .... (colored marking)
....and close the door. Lint filter
Access panel located on the bottom left corner of the dryer is for Service Access Only. 11
Operating, Care, Installation (all languages) - Page 12
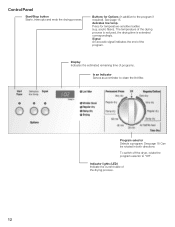
...acrylic fibers). See page 18 Can be rotated in addition to "Off". To switch off the dryer, rotate the program selector to the program if required). Buttons for temperatureĆsensitive textiles (e.g. ... end of the drying process.
12 Program selector Selects a program. delicates low temp. Control Panel
Start/Stop button Starts, interrupts and ends the drying process. See page 15.
Operating, Care, Installation (all languages) - Page 14
..., spin the laundry thoroughly in the dryer: - Clean filter! Check that the supply voltage corresponds with the installation instructions (from the dryer.
If you should:
1. Do not dry anything that has ever had anything that the gas type corresponds with water. Do not store or use solvent detergent boosters or stain remover in the house...
Operating, Care, Installation (all languages) - Page 17
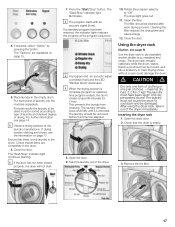
... a standard program has been selected, the indicator lights indicate the progress of the dryer.
10. This prevents the laundry from creasing. Clean the filter. Cleaning the filter reduces the drying time and saves energy.
12. Only dry prewashed shoes! Remove the lint filter.
17 Rotate the program selector to dry washable woolen textiles...
Operating, Care, Installation (all languages) - Page 18

... min. (shoes for time program
on the outside. Rotate program selector to hang over the dryer rack!
3. gloves)
30 min. q Loosen or remove shoeĆlaces.
Fold laundry to the laundry type. Place shoes on the dryer rack:
1. Lift the dryer rack horizontally into the drum. Close the door.
1. Select the drying time from becoming soiled...
Operating, Care, Installation (all languages) - Page 19

Open the door.
d WARNING d
Remove gas connection before and after each drying process.
Remove the lint filter. Cleaning the lint filter
A dirty filter extends the drying time and increases energy consumption. The filter should be cleaned before moving the dryer to be easily removed using your hand over the filter. Clean the moisture sensor once a month...
Operating, Care, Installation (all languages) - Page 20
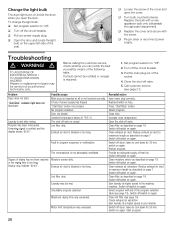
... socket.
4.
q Pull out power supply plug. q Loosen the screw of parts may indicate E:03". Troubleshooting
d WARNING! Repairs or replacement of the cover and open the door. Turn off /switch... the screw. Laundry is too long. Door not closed .
Switch off dryer, leave to off /switch on again.
A fuse of the following table. Laundry was too wet.
Spin laundry at all or...
Operating, Care, Installation (all languages) - Page 21
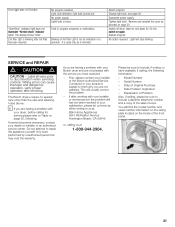
.... It is blinking after servicing. Remove and reinstall the cover as a.... Model Number
- The display shows 000".
Select program. Switch off dryer, ...leave to disconnection when servicing controls.
Any work performed by either writing to include a daytime telephone number and a copy of the front panel... your Bosch dryer and are not satisfied. The Bosch dryers require ...
Operating, Care, Installation (all languages) - Page 22
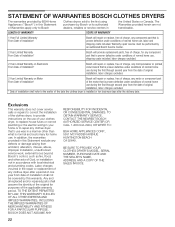
... SURE TO PROVIDE YOUR CLOTHES DRYER'S MODEL, SERIAL NUMBER, PURCHASE DATE AND THE SELLER'S NAME, ADDRESS.AND A COPY OF THE SALES INVOICE. STATEMENT OF WARRANTIES BOSCH CLOTHES DRYERS
The warranties provided by BSH Home Appliances (``Bosch'') in this Statement of Warranties apply only to Bosch
Clothes dryers sold to repair any clothes dryer that's use was in a manner...
Similar Questions


Bosch 500 Series Gas Dryer Wrinkle Block Will Not Run
(Posted by okrm 9 years ago)

Bosch Nexxt 500 Series Dryer Humming Wont Run
(Posted by camb1mindyn 9 years ago)

How To Remove Rear Panel On Bosch Nexxt 500 Series Dryer
(Posted by blackendri 10 years ago)

Bosch Nexxt 500 Series Dryer Won't Start
(Posted by Carldelt 10 years ago)