
Instructions for Use
Page 3
... Detergent and Rinse Agent 9-10 Operating the Dishwasher 11-12 Dishware Drying 12 Unloading the Dishwasher 12 Care and Maintenance 13-15 Self Help 16 Wash Cycle Information/Sanitized 17 Statement of Limited Product Warranty 18-19 Customer Service 20 1 You have any questions or comments. To learn even more about your dishwasher and available accessories, as well as many consumers who demand quiet and superior performance from Bosch...
... Detergent and Rinse Agent 9-10 Operating the Dishwasher 11-12 Dishware Drying 12 Unloading the Dishwasher 12 Care and Maintenance 13-15 Self Help 16 Wash Cycle Information/Sanitized 17 Statement of Limited Product Warranty 18-19 Customer Service 20 1 You have any questions or comments. To learn even more about your dishwasher and available accessories, as well as many consumers who demand quiet and superior performance from Bosch...
Instructions for Use
Page 4
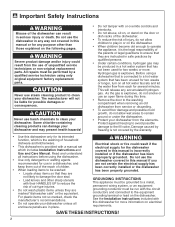
... dishwasher. • Use only detergents or wetting agents recommended for use an open flame during this manual is incorrectly installed or if the dishwasher has been improperly grounded. Some chloride-containing cleaning products can result in a dishwasher, and keep them out of the reach of childen. • When loading items to be washed: - Hydrogen gas is not covered by a qualified service technician using a dishwasher that is connected to a hot water...
... dishwasher. • Use only detergents or wetting agents recommended for use an open flame during this manual is incorrectly installed or if the dishwasher has been improperly grounded. Some chloride-containing cleaning products can result in a dishwasher, and keep them out of the reach of childen. • When loading items to be washed: - Hydrogen gas is not covered by a qualified service technician using a dishwasher that is connected to a hot water...
Instructions for Use
Page 5
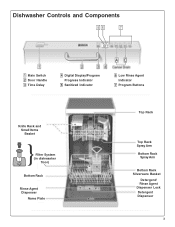
Dishwasher Controls and Components 56 7 1 Main Switch 2 Door Handle 3 Time Delay 4 Digital Display/Program Progress Indicator 5 Sanitized Indicator 6 Low Rinse Agent Indicator 7 Program Buttons Knife Rack and Small Items Basket Filter System (in dishwasher floor) Bottom Rack Rinse Agent Dispenser Name Plate Top Rack Top Rack Spray Arm Bottom Rack Spray Arm Bottom Rack Silverware Basket Detergent/ Rinse Agent Dispenser Lock Detergent Dispenser 3
Dishwasher Controls and Components 56 7 1 Main Switch 2 Door Handle 3 Time Delay 4 Digital Display/Program Progress Indicator 5 Sanitized Indicator 6 Low Rinse Agent Indicator 7 Program Buttons Knife Rack and Small Items Basket Filter System (in dishwasher floor) Bottom Rack Rinse Agent Dispenser Name Plate Top Rack Top Rack Spray Arm Bottom Rack Spray Arm Bottom Rack Silverware Basket Detergent/ Rinse Agent Dispenser Lock Detergent Dispenser 3
Instructions for Use
Page 6
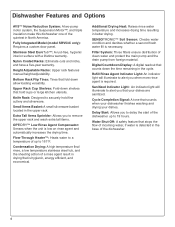
... Basket: A small silverware basket located in better drying. Refill Rinse Agent Indicator Light: An indicator light will illuminate to securely hold cups or large kitchen utensils. Fully Integrated Model (model SRV53C only): Requires a custom door panel. Filter System: Three filters ensure distribution of the dishwasher. 4 Water Shut-Off: A safety feature that stops the flow of incoming water, if water is detected in the base of clean water and protect the main pump and the drain pump from foreign material. Stainless Steel...
... Basket: A small silverware basket located in better drying. Refill Rinse Agent Indicator Light: An indicator light will illuminate to securely hold cups or large kitchen utensils. Fully Integrated Model (model SRV53C only): Requires a custom door panel. Filter System: Three filters ensure distribution of the dishwasher. 4 Water Shut-Off: A safety feature that stops the flow of incoming water, if water is detected in the base of clean water and protect the main pump and the drain pump from foreign material. Stainless Steel...
Instructions for Use
Page 7
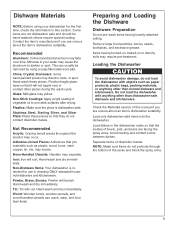
... using a soap-filled steel wool pad. Wood: Wooden bowls, wooden utensils, and wood-handled utensils can usually be hand-washed; Remove large food particles, bones, seeds, toothpicks, and excessive grease. Loading the Dishwasher To avoid dishwasher damage, do not protrude through the bottom of bowls, pots, and pans are not dishwasher safe and should be removed by using your water may loosen. Load dishes in cleaning...
... using a soap-filled steel wool pad. Wood: Wooden bowls, wooden utensils, and wood-handled utensils can usually be hand-washed; Remove large food particles, bones, seeds, toothpicks, and excessive grease. Loading the Dishwasher To avoid dishwasher damage, do not protrude through the bottom of bowls, pots, and pans are not dishwasher safe and should be removed by using your water may loosen. Load dishes in cleaning...
Instructions for Use
Page 12
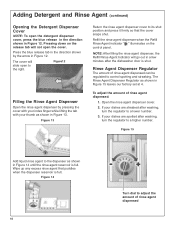
... rinse agent dispensed If your dishes are streaked after washing, turn the regulator to a higher number. Figure 15 Add liquid rinse agent to the dispenser as shown in a few minutes after washing, turn the regulator to a lower number. 3. Figure 14 10 Turn dial to adjust the amount of rinse agent dispensed can be regulated to control spotting and streaking. Pressing down on the control panel. Figure 13 Return the rinse agent dispenser cover to its shut...
... rinse agent dispensed If your dishes are streaked after washing, turn the regulator to a higher number. Figure 15 Add liquid rinse agent to the dispenser as shown in a few minutes after washing, turn the regulator to a lower number. 3. Figure 14 10 Turn dial to adjust the amount of rinse agent dispensed can be regulated to control spotting and streaking. Pressing down on the control panel. Figure 13 Return the rinse agent dispenser cover to its shut...
Instructions for Use
Page 13
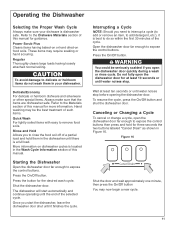
... dishwasher, leave the dishwasher door shut until the end of the cycle. Interrupting a Cycle NOTE: Should you start automatically and continue operating until it is located in your dishware is a full load. Canceling or Changing a Cycle To cancel or change a cycle, open the dishwasher door for guidance. Regular Thoroughly cleans large loads having baked-on or hard dried-on dishwasher cycles is best to expose the control buttons. Wait at least 10 seconds or until water noises stop before opening the dishwasher door...
... dishwasher, leave the dishwasher door shut until the end of the cycle. Interrupting a Cycle NOTE: Should you start automatically and continue operating until it is located in your dishware is a full load. Canceling or Changing a Cycle To cancel or change a cycle, open the dishwasher door for guidance. Regular Thoroughly cleans large loads having baked-on or hard dried-on dishwasher cycles is best to expose the control buttons. Wait at least 10 seconds or until water noises stop before opening the dishwasher door...
Instructions for Use
Page 14
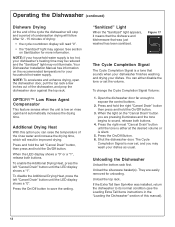
... LED display shows a "0" or a "1", release both buttons. 4. Shut the dishwasher door. Unload the silverware basket(s). NOTE: If your household water supply is a tone that was installed, return the dishwasher to sound, release both buttons. Figure 17 The Cycle Completion Signal The Cycle Completion Signal is too hot, your dishes as usual. To change the Cycle Completion Signal Volume: 1. Open the dishwasher door far enough to save the setting. Operating the Dishwasher (continued) Dishware Drying...
... LED display shows a "0" or a "1", release both buttons. 4. Shut the dishwasher door. Unload the silverware basket(s). NOTE: If your household water supply is a tone that was installed, return the dishwasher to sound, release both buttons. Figure 17 The Cycle Completion Signal The Cycle Completion Signal is too hot, your dishes as usual. To change the Cycle Completion Signal Volume: 1. Open the dishwasher door far enough to save the setting. Operating the Dishwasher (continued) Dishware Drying...
Instructions for Use
Page 15
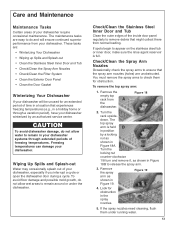
... spray arm. 3. Remove the spray arm as shown in a location that the spray arm nozzles (holes) are easy to do not allow water to appear on the stainless steel tub or inner door, make sure the rinse agent reservoir is held B in position by an authorized service center. The maintenance tasks are unobstructed. Figure 19 4. Remove the empty top rack from A the dishwasher. Look for an extended period of time...
... spray arm. 3. Remove the spray arm as shown in a location that the spray arm nozzles (holes) are easy to do not allow water to appear on the stainless steel tub or inner door, make sure the rinse agent reservoir is held B in position by an authorized service center. The maintenance tasks are unobstructed. Figure 19 4. Remove the empty top rack from A the dishwasher. Look for an extended period of time...
Instructions for Use
Page 18
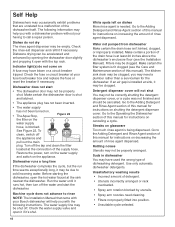
... rinse agent dispensed. Before starting the dishwasher, open it if it runs hot, then turn on the water supply and switch on shutting the detergent dispenser cover. you with the following information may have used the wrong type of this manual for instructions on the appliance. Make certain the filter system isn't clogged (see the Installation Manual). Go to the Operating the Dishwasher section of detergent. • Utensils incorrectly arranged or rack overloaded. • Spray arm...
... rinse agent dispensed. Before starting the dishwasher, open it if it runs hot, then turn on the water supply and switch on shutting the detergent dispenser cover. you with the following information may have used the wrong type of this manual for instructions on the appliance. Make certain the filter system isn't clogged (see the Installation Manual). Go to the Operating the Dishwasher section of detergent. • Utensils incorrectly arranged or rack overloaded. • Spray arm...
Instructions for Use
Page 20
... service call. Bosch will replace your Product (upgraded models may be defective in materials or workmanship (excludes labor charges). • 5 Year Limited Warranty on Dish Racks: Bosch will replace the upper or lower dish rack (excluding rack components), if the rack proves defective in materials or workmanship (excludes labor charges). • Lifetime Warranty against Stainless Steel Rust Through: Bosch will replace your Product proves to have been made without success, then Bosch will replace the stainless steel door...
... service call. Bosch will replace your Product (upgraded models may be defective in materials or workmanship (excludes labor charges). • 5 Year Limited Warranty on Dish Racks: Bosch will replace the upper or lower dish rack (excluding rack components), if the rack proves defective in materials or workmanship (excludes labor charges). • Lifetime Warranty against Stainless Steel Rust Through: Bosch will replace your Product proves to have been made without success, then Bosch will replace the stainless steel door...
Instructions for Use
Page 21
..., etc.); correction of installation problems (you how to use of the Product in conjunction with air or water-going vessels); (2) any party's willful misconduct, negligence, misuse, abuse, accidents, neglect, improper operation, failure to maintain, improper or negligent installation, tampering, failure to follow operating instructions, mishandling, unauthorized service (including self-performed "fixing" or exploration of the appliance's internal workings); (4) adjustment, alteration or modification of...
..., etc.); correction of installation problems (you how to use of the Product in conjunction with air or water-going vessels); (2) any party's willful misconduct, negligence, misuse, abuse, accidents, neglect, improper operation, failure to maintain, improper or negligent installation, tampering, failure to follow operating instructions, mishandling, unauthorized service (including self-performed "fixing" or exploration of the appliance's internal workings); (4) adjustment, alteration or modification of...
Instructions for Use
Page 64
... use by a qualified service technician or installer. • In addition to be done before the dishwasher is a new installation, most of the owner and the installer to meet all the water from the dishwasher's interior. otherwise the dishwasher may not drain properly. • This dishwasher is installed in specific installations. IMPORTANT INSTRUCTIONS 1 Tools Needed 2 Materials Needed 2 Materials Supplied 3 Enclosure Preparation 4 Electrical Preparation 5 Plumbing Preparation 7-8 Plumbing 9 Securing the Dishwasher 11 Placing the Dishwasher 12 Door Panel...
... use by a qualified service technician or installer. • In addition to be done before the dishwasher is a new installation, most of the owner and the installer to meet all the water from the dishwasher's interior. otherwise the dishwasher may not drain properly. • This dishwasher is installed in specific installations. IMPORTANT INSTRUCTIONS 1 Tools Needed 2 Materials Needed 2 Materials Supplied 3 Enclosure Preparation 4 Electrical Preparation 5 Plumbing Preparation 7-8 Plumbing 9 Securing the Dishwasher 11 Placing the Dishwasher 12 Door Panel...
Instructions for Use
Page 66
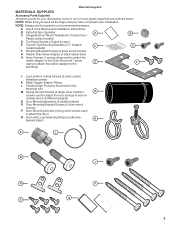
... Door Mounting Screws (4 long silver screws used to adjust the door springs to the F plumbing) J Leg Leveler Locking Screws (2 silver coarse threaded screws) K Water Supply Adaptor Fitting L Flexible Edge Protector Grommet for your installation. A Use & Care Manual and Installation Instructions B Extra Tall Item Sprinkler A B C Integrated Door Mount Template for Custom Door Panels (select models) D Toe Panel Screws (2 black screws) E Counter Top Mounting Brackets (2 "L" shaped C D metal brackets) F Mounting Bracket Screws (2 silver wood screws) G Rubber Drain Hose...
... Door Mounting Screws (4 long silver screws used to adjust the door springs to the F plumbing) J Leg Leveler Locking Screws (2 silver coarse threaded screws) K Water Supply Adaptor Fitting L Flexible Edge Protector Grommet for your installation. A Use & Care Manual and Installation Instructions B Extra Tall Item Sprinkler A B C Integrated Door Mount Template for Custom Door Panels (select models) D Toe Panel Screws (2 black screws) E Counter Top Mounting Brackets (2 "L" shaped C D metal brackets) F Mounting Bracket Screws (2 silver wood screws) G Rubber Drain Hose...

Instructions for Use
Page 67
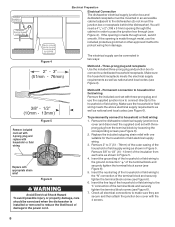
... water supply To pass the dishwasher drain hose toward the drain connection NOTE: If the incoming electric supply, water supply and drain connections are shut off before installation or service. 31-7/8 - 34-1/4" (810 - 870mm) 17-3/4" - 18-1/8" (451-460mm) Figure 1 Check clearance between dishwasher door and wall Countertop ENCLOSURE PREPARATION NOTE: This dishwasher is designed to be installed in a corner, make any required openings to allow the electrical and water supply lines to touch. Select a location as close...
... water supply To pass the dishwasher drain hose toward the drain connection NOTE: If the incoming electric supply, water supply and drain connections are shut off before installation or service. 31-7/8 - 34-1/4" (810 - 870mm) 17-3/4" - 18-1/8" (451-460mm) Figure 1 Check clearance between dishwasher door and wall Countertop ENCLOSURE PREPARATION NOTE: This dishwasher is designed to be installed in a corner, make any required openings to allow the electrical and water supply lines to touch. Select a location as close...
Instructions for Use
Page 68
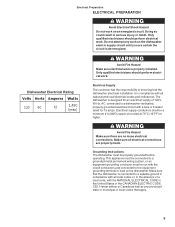
... death. Electrical supply conductors shall be properly grounded before operating. WARNING Avoid Fire Hazard Make sure electrical work . Dishwasher Electrical Rating Volts Hertz Amperes Watts 120 60 1125 1,450 (max) Electrical Supply The customer has the responsibility of a local code, with all national and local electrical codes and ordinances. Grounding Instructions The dishwasher must be run with a fuse or breaker rated for an electrical supply of 120V, 60 Hz, AC, connected to...
... death. Electrical supply conductors shall be properly grounded before operating. WARNING Avoid Fire Hazard Make sure electrical work . Dishwasher Electrical Rating Volts Hertz Amperes Watts 120 60 1125 1,450 (max) Electrical Supply The customer has the responsibility of a local code, with all national and local electrical codes and ordinances. Grounding Instructions The dishwasher must be run with a fuse or breaker rated for an electrical supply of 120V, 60 Hz, AC, connected to...
Instructions for Use
Page 69
... field wiring Remove the included cord set with the 4 screws. 6 Check all electrical connections to make sure they are included with dishwasher Figure 4 2" - 3" (51mm - 76mm) Electrical Preparation Electrical Connection The dishwasher electrical supply junction box and dedicated receptacle must be connected in an accessible cabinet adjacent to the dishwasher (do not mount the junction box or receptacle behind the dishwasher).You will need a 41/4" x 2" (108 x 51mm) opening is installed or removed to...
... field wiring Remove the included cord set with the 4 screws. 6 Check all electrical connections to make sure they are included with dishwasher Figure 4 2" - 3" (51mm - 76mm) Electrical Preparation Electrical Connection The dishwasher electrical supply junction box and dedicated receptacle must be connected in an accessible cabinet adjacent to the dishwasher (do not mount the junction box or receptacle behind the dishwasher).You will need a 41/4" x 2" (108 x 51mm) opening is installed or removed to...
Instructions for Use
Page 72
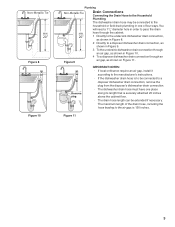
... local ordinance require an air gap, install it according to the manufacturer's instructions. · If the dishwasher drain hose is to be connected to a disposer dishwasher drain connection, remove the plug from the disposer's dishwasher drain connection. · The dishwasher drain hose must have one of the drain hose, including the hose leading to the air gap, is securely attached 20 inches above the cabinet floor. · The drain hose length can be connected to the household or...
... local ordinance require an air gap, install it according to the manufacturer's instructions. · If the dishwasher drain hose is to be connected to a disposer dishwasher drain connection, remove the plug from the disposer's dishwasher drain connection. · The dishwasher drain hose must have one of the drain hose, including the hose leading to the air gap, is securely attached 20 inches above the cabinet floor. · The drain hose length can be connected to the household or...
Instructions for Use
Page 76
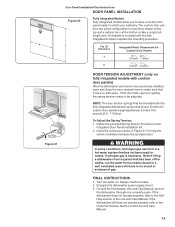
...: 1. Turning the screw clockwise increases the spring tension. FINAL INSTRUCTIONS 1. Consult the Dishwasher Use and Care Manual, and run the water from the Integrated Door Panel Installation Kit. 2. B Figure 21 Door Panel Installation/Final Instructions DOOR PANEL INSTALLATION Figure 20 Fully Integrated Models Fully integrated models allow you to have a custom door panel made to explain the mounting procedure. WARNING In some conditions, Hydrogen gas can be adjusted. Energize the dishwasher power supply circuit. 3. If the dishwasher still does not operate...
...: 1. Turning the screw clockwise increases the spring tension. FINAL INSTRUCTIONS 1. Consult the Dishwasher Use and Care Manual, and run the water from the Integrated Door Panel Installation Kit. 2. B Figure 21 Door Panel Installation/Final Instructions DOOR PANEL INSTALLATION Figure 20 Fully Integrated Models Fully integrated models allow you to have a custom door panel made to explain the mounting procedure. WARNING In some conditions, Hydrogen gas can be adjusted. Energize the dishwasher power supply circuit. 3. If the dishwasher still does not operate...
Instructions for Use
Page 77
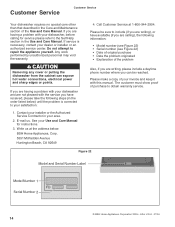
... the problem originated • Explanation of your dishwasher, before calling for instructions. 3. Do not attempt to your dealer or installer or an authorized service center. CAUTION Removing any cover or pulling the dishwasher from the cabinet can be reached. Customer Service Customer Service Your dishwasher requires no special care other than that described in the Care and Maintenance section of purchase to obtain warranty service. Any work performed by...
... the problem originated • Explanation of your dishwasher, before calling for instructions. 3. Do not attempt to your dealer or installer or an authorized service center. CAUTION Removing any cover or pulling the dishwasher from the cabinet can be reached. Customer Service Customer Service Your dishwasher requires no special care other than that described in the Care and Maintenance section of purchase to obtain warranty service. Any work performed by...


