
Instructions for Use
Page 3
... and Thank You from their dishwashers. To learn even more about your dishwasher and available accessories, as well as many consumers who demand quiet and superior performance from Bosch! This manual was written with your dishwasher for selecting a Bosch dishwasher. You have any questions or...5 Loading the Dishwasher 5-8 Adding Detergent and Rinse Agent 9-10 Operating the Dishwasher 11-12 Dishware Drying 12 Unloading the Dishwasher 12 Care and Maintenance 13-15 Self Help 16 Wash Cycle Information/Sanitized 17 Statement of Limited Product Warranty 18-19 Customer Service...
... and Thank You from their dishwashers. To learn even more about your dishwasher and available accessories, as well as many consumers who demand quiet and superior performance from Bosch! This manual was written with your dishwasher for selecting a Bosch dishwasher. You have any questions or...5 Loading the Dishwasher 5-8 Adding Detergent and Rinse Agent 9-10 Operating the Dishwasher 11-12 Dishware Drying 12 Unloading the Dishwasher 12 Care and Maintenance 13-15 Self Help 16 Wash Cycle Information/Sanitized 17 Statement of Limited Product Warranty 18-19 Customer Service...
Instructions for Use
Page 15
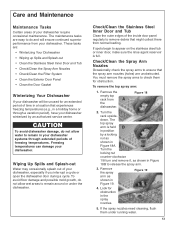
...8226; Check/Clean the Filter System • Clean the Exterior Door Panel • Clean the Door Gasket Winterizing Your Dishwasher If your dishwasher. Figure 18 2. Turn the locking nut counter-clockwise 1/8 turn and remove it, as shown in a location that might collect there from A the... dishwasher. The top spray arm is full. If spots begin to remove debris that experiences freezing temperatures (e.g., in a ...
...8226; Check/Clean the Filter System • Clean the Exterior Door Panel • Clean the Door Gasket Winterizing Your Dishwasher If your dishwasher. Figure 18 2. Turn the locking nut counter-clockwise 1/8 turn and remove it, as shown in a location that might collect there from A the... dishwasher. The top spray arm is full. If spots begin to remove debris that experiences freezing temperatures (e.g., in a ...
Instructions for Use
Page 20
...upon the date of purchase, and shall not be available to you, in Bosch' sole discretion, for any concessions, including repairs, pro-rates, or Product replacement, once this warranty has expired. 18 If you in the unlikely event of a safety notice or product recall....Covers & Who it Applies to: The limited warranty provided BSH Home Appliances ("Bosch") in this Statement of Limited Product Warranty applies only to Bosch dishwashers ("Product") sold to you, the first using a Bosch-authorized service provider during normal business hours. while not necessary to effectuate warranty coverage...
...upon the date of purchase, and shall not be available to you, in Bosch' sole discretion, for any concessions, including repairs, pro-rates, or Product replacement, once this warranty has expired. 18 If you in the unlikely event of a safety notice or product recall....Covers & Who it Applies to: The limited warranty provided BSH Home Appliances ("Bosch") in this Statement of Limited Product Warranty applies only to Bosch dishwashers ("Product") sold to you, the first using a Bosch-authorized service provider during normal business hours. while not necessary to effectuate warranty coverage...
Instructions for Use
Page 64
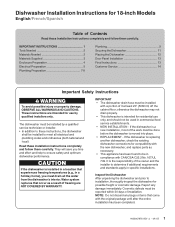
..., most of the work must be done before the dishwasher is the responsibility of the owner and the installer to installation, thoroughly inspect the dishwasher for 18-inch Models English/French/Spanish Table of it at least 20" (508mm) off the cabinet floor; If the dishwasher is intended for use by a qualified service technician...
..., most of the work must be done before the dishwasher is the responsibility of the owner and the installer to installation, thoroughly inspect the dishwasher for 18-inch Models English/French/Spanish Table of it at least 20" (508mm) off the cabinet floor; If the dishwasher is intended for use by a qualified service technician...

Instructions for Use
Page 67
... in Figure 1. Required Openings: 41/4" x 2" (108 x 52mm) 3" x 13/4" (76 x 45mm) 11/4" (32mm) diameter - For proper dishwasher operation and appearance, ensure that the enclosure is square and has the dimensions shown in the same cabinet, the one 41/4" x 2" (108 x 52mm)...shut off before installation or service. 31-7/8 - 34-1/4" (810 - 870mm) 17-3/4" - 18-1/8" (451-460mm) Figure 1 Check clearance between dishwasher door and wall Countertop ENCLOSURE PREPARATION NOTE: This dishwasher is adequate clearance to water supply and drain lines. To pass the included electrical supply junction ...
... in Figure 1. Required Openings: 41/4" x 2" (108 x 52mm) 3" x 13/4" (76 x 45mm) 11/4" (32mm) diameter - For proper dishwasher operation and appearance, ensure that the enclosure is square and has the dimensions shown in the same cabinet, the one 41/4" x 2" (108 x 52mm)...shut off before installation or service. 31-7/8 - 34-1/4" (810 - 870mm) 17-3/4" - 18-1/8" (451-460mm) Figure 1 Check clearance between dishwasher door and wall Countertop ENCLOSURE PREPARATION NOTE: This dishwasher is adequate clearance to water supply and drain lines. To pass the included electrical supply junction ...
Instructions for Use
Page 75
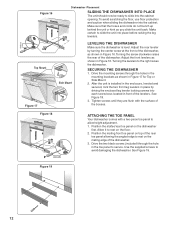
...Make certain to allow height adjustment. 1. After the unit is level. See Figure 18. 3. ATTACHING THE TOE PANEL Your dishwasher comes with the surface of the dishwasher. Position the slotted rear toe panel on the dishwasher first. Figure 19 12 Turning the screw clockwise raises the rear of the bosses. ...into place before raising the leg levelers. Figure 16 Top Mount Figure 17 Figure 18 Dishwasher Placement SLIDING THE DISHWASHER INTO PLACE The unit should now be ready to rest on the mating edge of the dishwasher. 3. Make sure that the hoses and cords do not bunch up behind the...
...Make certain to allow height adjustment. 1. After the unit is level. See Figure 18. 3. ATTACHING THE TOE PANEL Your dishwasher comes with the surface of the dishwasher. Position the slotted rear toe panel on the dishwasher first. Figure 19 12 Turning the screw clockwise raises the rear of the bosses. ...into place before raising the leg levelers. Figure 16 Top Mount Figure 17 Figure 18 Dishwasher Placement SLIDING THE DISHWASHER INTO PLACE The unit should now be ready to rest on the mating edge of the dishwasher. 3. Make sure that the hoses and cords do not bunch up behind the...


