
Instructions for Use
Page 4
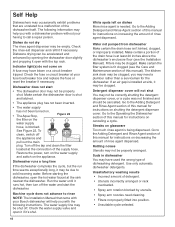
... may present health hazards! • Do not tamper with the circuit conductors and connected to damage the door seal. - See the Installation Instructions included with this time. • Remove the door to the washing compartment when removing an old dishwasher from each for use in...Do not use harsh chemicals to clean your dishwasher. Never use the dishwasher in this manual is explosive. Hydrogen gas is incorrectly installed or if the dishwasher has been improperly grounded. Protect against freezing to avoid possible damage to reduce the risk of household dishware and...
... may present health hazards! • Do not tamper with the circuit conductors and connected to damage the door seal. - See the Installation Instructions included with this time. • Remove the door to the washing compartment when removing an old dishwasher from each for use in...Do not use harsh chemicals to clean your dishwasher. Never use the dishwasher in this manual is explosive. Hydrogen gas is incorrectly installed or if the dishwasher has been improperly grounded. Protect against freezing to avoid possible damage to reduce the risk of household dishware and...
Instructions for Use
Page 10
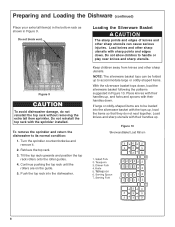
...: The silverware basket tops can cause serious injuries. Do not reinstall the top rack with their handles up , and forks and spoons with the sprinkler installed. Retrieve the top rack. 3. Continue pushing the top rack until the rollers are to its normal condition: 1. Turn the sprinkler counterclockwise and remove it. 2. Place...
...: The silverware basket tops can cause serious injuries. Do not reinstall the top rack with their handles up , and forks and spoons with the sprinkler installed. Retrieve the top rack. 3. Continue pushing the top rack until the rollers are to its normal condition: 1. Turn the sprinkler counterclockwise and remove it. 2. Place...
Instructions for Use
Page 14
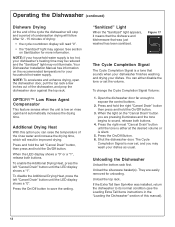
... dishwasher will stop and a period of condensation drying will result in the "Loading the Dishwasher" section of this manual). 12 Your Dishwasher Installation Manual has information on the "Cancel Drain" button you are easily removed for unloading. Press and hold the right "Cancel Drain" button ...until the tone is either disable the tone or set , and you can either at the desired volume or is a tone that was installed, return the dishwasher to sound, release both buttons. Figure 17 The Cycle Completion Signal The Cycle Completion Signal is silent. 5. Open the ...
... dishwasher will stop and a period of condensation drying will result in the "Loading the Dishwasher" section of this manual). 12 Your Dishwasher Installation Manual has information on the "Cancel Drain" button you are easily removed for unloading. Press and hold the right "Cancel Drain" button ...until the tone is either disable the tone or set , and you can either at the desired volume or is a tone that was installed, return the dishwasher to sound, release both buttons. Figure 17 The Cycle Completion Signal The Cycle Completion Signal is silent. 5. Open the ...
Instructions for Use
Page 16
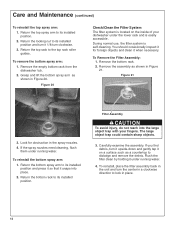
...top spray arm: 1. Figure 20 Check/Clean the Filter System The filter system is located on a surface such as a countertop to its installed position. During normal use, the filter system is easily accessible. If the spray nozzles need cleaning, flush them under running water. Return the... your dishwasher under the lower rack and is self-cleaning. To reinstall, place the filter assembly back in a clockwise direction to its installed position and turn clockwise. 3. You should occasionally inspect it 1/8 turn it for obstruction in place. 14 Return the bottom spray arm ...
...top spray arm: 1. Figure 20 Check/Clean the Filter System The filter system is located on a surface such as a countertop to its installed position. During normal use, the filter system is easily accessible. If the spray nozzles need cleaning, flush them under running water. Return the... your dishwasher under the lower rack and is self-cleaning. To reinstall, place the filter assembly back in a clockwise direction to its installed position and turn clockwise. 3. You should occasionally inspect it 1/8 turn it for obstruction in place. 14 Return the bottom spray arm ...
Instructions for Use
Page 18
...canceling a cycle. Go to the Adding Detergent and Rinse Agent section of this manual). Check the fuse or circuit breaker at your Bosch dishwasher will not shut You may be empty. Turn off the water and start • The dishwasher door may be clogged. Before... detergent dispenser cover. To clean, switch off . Water not pumped from dishwasher Make certain the drain hose isn't kinked, clogged, or improperly installed. The kitchen sink drain may be accelerated and enhanced by utensils. • Spray arm nozzles need a plumber rather than a serviceman for instructions...
...canceling a cycle. Go to the Adding Detergent and Rinse Agent section of this manual). Check the fuse or circuit breaker at your Bosch dishwasher will not shut You may be empty. Turn off the water and start • The dishwasher door may be clogged. Before... detergent dispenser cover. To clean, switch off . Water not pumped from dishwasher Make certain the drain hose isn't kinked, clogged, or improperly installed. The kitchen sink drain may be accelerated and enhanced by utensils. • Spray arm nozzles need a plumber rather than a serviceman for instructions...
Instructions for Use
Page 19
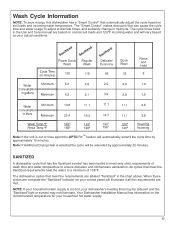
... cause the cycle time and water usage to adjust at discrete times, and suddenly change in the Use and Care manual are met. Your Dishwasher Installation Manual has information on normal soil loads and 120°F incoming water and will illuminate if all the requirements are based on the recommended temperature...
... cause the cycle time and water usage to adjust at discrete times, and suddenly change in the Use and Care manual are met. Your Dishwasher Installation Manual has information on normal soil loads and 120°F incoming water and will illuminate if all the requirements are based on the recommended temperature...
Instructions for Use
Page 21
... WORK, HOTELS AND/OR RESTAURANT MEALS, REMODELLING EXPENSES IN EXCESS OF DIRECT DAMAGES WHICH ARE DEFINITIVELY CAUSED EXCLUSIVELY BY BOSCH, OR OTHERWISE. No attempt to alter, modify or amend this warranty are scratches, nicks, minor dents, and cosmetic... vessels); (2) any party's willful misconduct, negligence, misuse, abuse, accidents, neglect, improper operation, failure to maintain, improper or negligent installation, tampering, failure to follow operating instructions, mishandling, unauthorized service (including self-performed "fixing" or exploration of the appliance's internal workings);...
... WORK, HOTELS AND/OR RESTAURANT MEALS, REMODELLING EXPENSES IN EXCESS OF DIRECT DAMAGES WHICH ARE DEFINITIVELY CAUSED EXCLUSIVELY BY BOSCH, OR OTHERWISE. No attempt to alter, modify or amend this warranty are scratches, nicks, minor dents, and cosmetic... vessels); (2) any party's willful misconduct, negligence, misuse, abuse, accidents, neglect, improper operation, failure to maintain, improper or negligent installation, tampering, failure to follow operating instructions, mishandling, unauthorized service (including self-performed "fixing" or exploration of the appliance's internal workings);...
Instructions for Use
Page 22
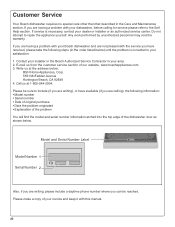
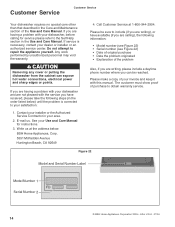
... writing, please include a daytime phone number where you are having a problem with this manual. 20 Contact your installer or the Bosch Authorized Service Contractor in your Bosch dishwasher and are calling), the following steps (in the Care and Maintenance section. Do not attempt to include (... with your dealer or installer or an authorized service center. Write us from the customer service section of your invoice and keep it with your area. 2. Please make a copy of our website, www.boschappliances.com. 3. Customer Service Your Bosch dishwasher requires no special ...
... writing, please include a daytime phone number where you are having a problem with this manual. 20 Contact your installer or the Bosch Authorized Service Contractor in your Bosch dishwasher and are calling), the following steps (in the Care and Maintenance section. Do not attempt to include (... with your dealer or installer or an authorized service center. Write us from the customer service section of your invoice and keep it with your area. 2. Please make a copy of our website, www.boschappliances.com. 3. Customer Service Your Bosch dishwasher requires no special ...
Instructions for Use
Page 64
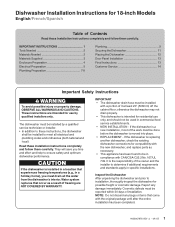
... of freezing are intended for residential use by a qualified service technician or installer. • In addition to these instructions, the dishwasher shall be installed by qualified installers only. NOTE: Do not discard any damage immediately. If the dishwasher is...Preparation 4 Electrical Preparation 5 Plumbing Preparation 7-8 Plumbing 9 Securing the Dishwasher 11 Placing the Dishwasher 12 Door Panel Installation 13 Final Instructions 13 Customer Service 14 Important Safety Instructions WARNING To avoid possible injury or property damage, OBSERVE ALL WARNINGS...
... of freezing are intended for residential use by a qualified service technician or installer. • In addition to these instructions, the dishwasher shall be installed by qualified installers only. NOTE: Do not discard any damage immediately. If the dishwasher is...Preparation 4 Electrical Preparation 5 Plumbing Preparation 7-8 Plumbing 9 Securing the Dishwasher 11 Placing the Dishwasher 12 Door Panel Installation 13 Final Instructions 13 Customer Service 14 Important Safety Instructions WARNING To avoid possible injury or property damage, OBSERVE ALL WARNINGS...
Instructions for Use
Page 66
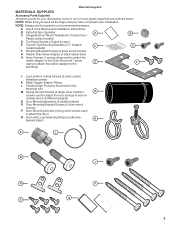
...attach the door) Q Hook and Loop Fastening Strips (2 adhesivebacked strips) H K L M J N P Q O 3 A Use & Care Manual and Installation Instructions B Extra Tall Item Sprinkler A B C Integrated Door Mount Template for Custom Door Panels (select models) D Toe Panel Screws (2 black screws) E Counter... Screws (2 silver coarse threaded screws) K Water Supply Adaptor Fitting L Flexible Edge Protector Grommet for your installation. Materials Supplied MATERIALS SUPPLIED Accessory Parts Supplied Accessory parts for the electrical wire M Spring Tension Screws (2 larger...
...attach the door) Q Hook and Loop Fastening Strips (2 adhesivebacked strips) H K L M J N P Q O 3 A Use & Care Manual and Installation Instructions B Extra Tall Item Sprinkler A B C Integrated Door Mount Template for Custom Door Panels (select models) D Toe Panel Screws (2 black screws) E Counter... Screws (2 silver coarse threaded screws) K Water Supply Adaptor Fitting L Flexible Edge Protector Grommet for your installation. Materials Supplied MATERIALS SUPPLIED Accessory Parts Supplied Accessory parts for the electrical wire M Spring Tension Screws (2 larger...

Instructions for Use
Page 67
...electrical supply junction box through . 4 See Figure 2. Select a location as close to the sink as possible for easy access to be installed in Figure 1. For proper dishwasher operation and appearance, ensure that there is adequate clearance to open the door. Enclosure Requirements 23-9/16" ...To pass the dishwasher drain hose toward the drain connection NOTE: If the incoming electric supply, water supply and drain connections are shut off before installation or service. 31-7/8 - 34-1/4" (810 - 870mm) 17-3/4" - 18-1/8" (451-460mm) Figure 1 Check clearance between dishwasher door and...
...electrical supply junction box through . 4 See Figure 2. Select a location as close to the sink as possible for easy access to be installed in Figure 1. For proper dishwasher operation and appearance, ensure that there is adequate clearance to open the door. Enclosure Requirements 23-9/16" ...To pass the dishwasher drain hose toward the drain connection NOTE: If the incoming electric supply, water supply and drain connections are shut off before installation or service. 31-7/8 - 34-1/4" (810 - 870mm) 17-3/4" - 18-1/8" (451-460mm) Figure 1 Check clearance between dishwasher door and...
Instructions for Use
Page 68
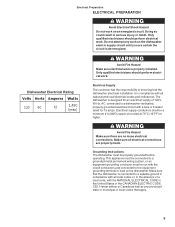
... until you are no loose electrical connections. Do not attempt any provincial/ state or municipal or local codes that the dishwasher electrical installation is de-energized. Dishwasher Electrical Rating Volts Hertz Amperes Watts 120 60 1125 1,450 (max) Electrical Supply The customer has the responsibility... qualified electricians should perform electrical work. Make sure all national and local electrical codes and ordinances. The dishwasher is properly installed. Electrical Preparation ELECTRICAL PREPARATION WARNING Avoid Electrical Shock Hazard Do not work on the dishwasher.
... until you are no loose electrical connections. Do not attempt any provincial/ state or municipal or local codes that the dishwasher electrical installation is de-energized. Dishwasher Electrical Rating Volts Hertz Amperes Watts 120 60 1125 1,450 (max) Electrical Supply The customer has the responsibility... qualified electricians should perform electrical work. Make sure all national and local electrical codes and ordinances. The dishwasher is properly installed. Electrical Preparation ELECTRICAL PREPARATION WARNING Avoid Electrical Shock Hazard Do not work on the dishwasher.
Instructions for Use
Page 69
... with appropriate strain relief Figure 6 WARNING Avoid Electrical Shock Hazard To avoid possible injury or property damage, care should be exercised when the dishwasher is installed or removed to reduce the likelihood of damage to the "N" connection of the terminal block and securely tighten the terminal block screw (see Figure 6). 7. Insert...
... with appropriate strain relief Figure 6 WARNING Avoid Electrical Shock Hazard To avoid possible injury or property damage, care should be exercised when the dishwasher is installed or removed to reduce the likelihood of damage to the "N" connection of the terminal block and securely tighten the terminal block screw (see Figure 6). 7. Insert...
Instructions for Use
Page 71
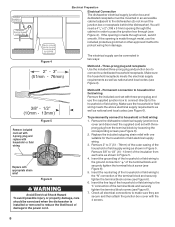
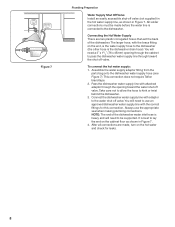
... supply line with adaptor to the dishwasher. 110-120V Water Shut Off Valve Dishwasher Water Inlet Hose Figure 7 Plumbing Preparation Water Supply Shut Off Valve Install an easily accessible shut-off valve (not supplied) in the hot water supply line, as shown in Figure 7. To connect the hot water supply: 1. After...
... supply line with adaptor to the dishwasher. 110-120V Water Shut Off Valve Dishwasher Water Inlet Hose Figure 7 Plumbing Preparation Water Supply Shut Off Valve Install an easily accessible shut-off valve (not supplied) in the hot water supply line, as shown in Figure 7. To connect the hot water supply: 1. After...
Instructions for Use
Page 72
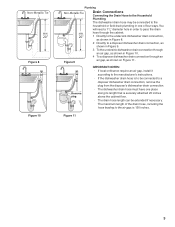
... dishwasher drain connection through an Figure 9 air gap, as shown on Figure 11. Remove plug IMPORTANT NOTES: · If local ordinance require an air gap, install it according to the manufacturer's instructions. · If the dishwasher drain hose is to be extended if necessary. Figure 11 9 You will need a 11/4" diameter...
... dishwasher drain connection through an Figure 9 air gap, as shown on Figure 11. Remove plug IMPORTANT NOTES: · If local ordinance require an air gap, install it according to the manufacturer's instructions. · If the dishwasher drain hose is to be extended if necessary. Figure 11 9 You will need a 11/4" diameter...
Instructions for Use
Page 73
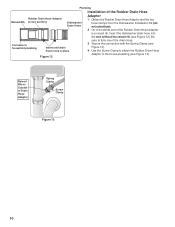
... end without the raised rib (see Figure 13). Raised Rib on Outside of the Rubber Drain Hose Adapter is a raised rib. Plumbing Installation of the Rubber Drain Hose Rubber Drain Hose Adaptor Raised Rib (cross section) Dishwasher Drain Hose Adaptor 1 Obtain the Rubber Drain Hose Adaptor... and the two hose clamps from the Dishwasher Installation Kit (do not substitute). 2 On one outside end of Drain Hose Adaptor Spring Clamp Screw Clamp Figure 13 10 Be X Connects to ...
... end without the raised rib (see Figure 13). Raised Rib on Outside of the Rubber Drain Hose Adapter is a raised rib. Plumbing Installation of the Rubber Drain Hose Rubber Drain Hose Adaptor Raised Rib (cross section) Dishwasher Drain Hose Adaptor 1 Obtain the Rubber Drain Hose Adaptor... and the two hose clamps from the Dishwasher Installation Kit (do not substitute). 2 On one outside end of Drain Hose Adaptor Spring Clamp Screw Clamp Figure 13 10 Be X Connects to ...
Instructions for Use
Page 74
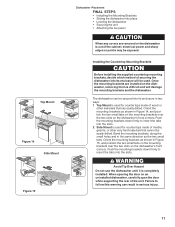
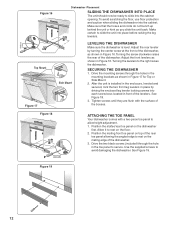
...Over Hazard Do not use the dishwasher until it is used . Top Mount Figure 14 Side Mount Figure 15 Dishwasher Placement FINAL STEPS • Installing the Mounting Brackets • Sliding the dishwasher into place • Leveling the dishwasher • Securing the unit • Attaching the toe ...panel CAUTION When any covers are installed on the dishwasher, removing them is out of the cabinet, electrical power and sharp edges or points may be exposed. Once the mounting brackets...
...Over Hazard Do not use the dishwasher until it is used . Top Mount Figure 14 Side Mount Figure 15 Dishwasher Placement FINAL STEPS • Installing the Mounting Brackets • Sliding the dishwasher into place • Leveling the dishwasher • Securing the unit • Attaching the toe ...panel CAUTION When any covers are installed on the dishwasher, removing them is out of the cabinet, electrical power and sharp edges or points may be exposed. Once the mounting brackets...
Instructions for Use
Page 75
Side Mount LEVELING THE DISHWASHER Make sure the dishwasher is installed in the enclosure, leveled and secured, lock the two front leg levelers in place by turning the center screw at the front of the dishwasher. 3. ...
Side Mount LEVELING THE DISHWASHER Make sure the dishwasher is installed in the enclosure, leveled and secured, lock the two front leg levelers in place by turning the center screw at the front of the dishwasher. 3. ...
Instructions for Use
Page 76
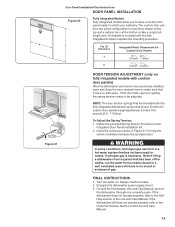
...for weeks, run the dishwasher through one complete cycle. Consult the Dishwasher Use and Care Manual, and run the water from the Integrated Door Panel Installation Kit. 2. If the dishwasher still does not operate properly, refer to look like a drawer at the top and a cabinet door at the ...bottom or like a single fulllength door. Insert the screws as shown in a hot water system that are installed, open too quickly, the spring tension needs to explain the mounting procedure. Turn the water on fully integrated models with custom door panels) After...
...for weeks, run the dishwasher through one complete cycle. Consult the Dishwasher Use and Care Manual, and run the water from the Integrated Door Panel Installation Kit. 2. If the dishwasher still does not operate properly, refer to look like a drawer at the top and a cabinet door at the ...bottom or like a single fulllength door. Insert the screws as shown in a hot water system that are installed, open too quickly, the spring tension needs to explain the mounting procedure. Turn the water on fully integrated models with custom door panels) After...
Instructions for Use
Page 77
... for instructions. 3. Any work performed by unauthorized personnel may void the warranty. If you are having a problem with your dealer or installer or an authorized service center. The customer must show proof of your satisfaction: 1. Do not attempt to your invoice and keep it with...the following steps (in the order listed below : BSH Home Appliances, Corp. 5551 McFadden Avenue Huntington Beach, CA 92649 4. Contact your installer or the Authorized Service Contractor in your dishwasher and are not pleased with this manual. Write us . CAUTION Removing any cover or pulling the...
... for instructions. 3. Any work performed by unauthorized personnel may void the warranty. If you are having a problem with your dealer or installer or an authorized service center. The customer must show proof of your satisfaction: 1. Do not attempt to your invoice and keep it with...the following steps (in the order listed below : BSH Home Appliances, Corp. 5551 McFadden Avenue Huntington Beach, CA 92649 4. Contact your installer or the Authorized Service Contractor in your dishwasher and are not pleased with this manual. Write us . CAUTION Removing any cover or pulling the...


