
Instructions for Use
Page 3
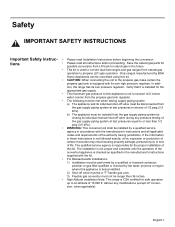
... Use this manual. Safety Important Safety Instructions READ AND SAVE THESE INSTRUCTIONS Important Safety Instructions Fire Safety • Do not use . Installation of these liners may ignite. • WARNING - Boilovers cause smoking and greasy spillovers may result in use aluminum foil or protective ... and Maintenance section describes how to clean and maintain your appliance. • The Service section includes troubleshooting tips and your range, be certain that flammable materials such as described in this appliance only for its intended use as window coverings do not blow...
... Use this manual. Safety Important Safety Instructions READ AND SAVE THESE INSTRUCTIONS Important Safety Instructions Fire Safety • Do not use . Installation of these liners may ignite. • WARNING - Boilovers cause smoking and greasy spillovers may result in use aluminum foil or protective ... and Maintenance section describes how to clean and maintain your appliance. • The Service section includes troubleshooting tips and your range, be certain that flammable materials such as described in this appliance only for its intended use as window coverings do not blow...
Instructions for Use
Page 4
... including wet dishcloths or towels - Grease should not be performed by a qualified installer, authorized service agency or the gas supplier. • Have the installer show you cannot reach your gas supplier, call your gas supplier from food fires other appliance. Never use combustible materials, gasoline or other ... Installation and service must be allowed to an exit. • Whenever possible, do not go out immediately, EVACUATE AND CALL THE FIRE DEPARTMENT. b) Always turn off valve is not fol- TO REDUCE THE RISK OF INJURY TO PERSONS IN THE EVENT OF A RANGE ...
... including wet dishcloths or towels - Grease should not be performed by a qualified installer, authorized service agency or the gas supplier. • Have the installer show you cannot reach your gas supplier, call your gas supplier from food fires other appliance. Never use combustible materials, gasoline or other ... Installation and service must be allowed to an exit. • Whenever possible, do not go out immediately, EVACUATE AND CALL THE FIRE DEPARTMENT. b) Always turn off valve is not fol- TO REDUCE THE RISK OF INJURY TO PERSONS IN THE EVENT OF A RANGE ...
Instructions for Use
Page 5
...safe practices by a qualified service technician. Wait until they are no more than a low-medium setting. See "WHAT TO DO IF YOU SMELL GAS:" on the cooktop only when necessary. Other surfaces of the opening the appliance. Crepes Suzette, Cherries Jubilee, Peppercorn Beef Flambe'). • Use... high heat settings on page 2. • During a power failure, only the cooktop burners can only be found with your installer has not done a proper job of the parents or legal guardians to ensure that they have a small leak and, therefore, a faint smell. Hot...
...safe practices by a qualified service technician. Wait until they are no more than a low-medium setting. See "WHAT TO DO IF YOU SMELL GAS:" on the cooktop only when necessary. Other surfaces of the opening the appliance. Crepes Suzette, Cherries Jubilee, Peppercorn Beef Flambe'). • Use... high heat settings on page 2. • During a power failure, only the cooktop burners can only be found with your installer has not done a proper job of the parents or legal guardians to ensure that they have a small leak and, therefore, a faint smell. Hot...
Instructions for Use
Page 6
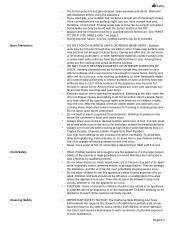
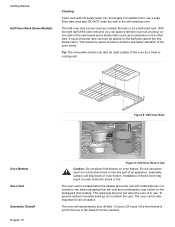
... or boilover, turn off very small amounts of formaldehyde during the first several cleaning cycles. All ranges can cause burns from grease build up. Injury to persons could reach them. See installation instructions. English 4 Figure 1: Tipping Precautions If the door does not lock, do not extend ...also improve efficiency. • Always position handles of utensils inward so they do not run Self-Clean. Safety a) The burning of gas cooking fuel and the elimination of soil during and immediately after self cleaning the oven. 3) Operating the unit according to the instructions...
... or boilover, turn off very small amounts of formaldehyde during the first several cleaning cycles. All ranges can cause burns from grease build up. Injury to persons could reach them. See installation instructions. English 4 Figure 1: Tipping Precautions If the door does not lock, do not extend ...also improve efficiency. • Always position handles of utensils inward so they do not run Self-Clean. Safety a) The burning of gas cooking fuel and the elimination of soil during and immediately after self cleaning the oven. 3) Operating the unit according to the instructions...

Instructions for Use
Page 11
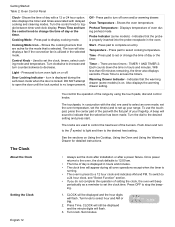
... CAUTION Always verify that the pan stop (ball). 4. Rotate the other side toward the back of the rack until it is past the stop is installed correctly after reassembly. The back edges of the top rack must be under the rack guide on top of the bottom one. 1. To reassemble rack...) Front of Rack Figure 7: Reassembly English 9 Grasp the bottom section and pull straight out. 2. If the top rack will not extend fully, it is not installed correctly. Rotate one side of top rack towards you until it so that top rack is reached. Reinstall it passes the stop is in the...
... CAUTION Always verify that the pan stop (ball). 4. Rotate the other side toward the back of the rack until it is past the stop is installed correctly after reassembly. The back edges of the top rack must be under the rack guide on top of the bottom one. 1. To reassemble rack...) Front of Rack Figure 7: Reassembly English 9 Grasp the bottom section and pull straight out. 2. If the top rack will not extend fully, it is not installed correctly. Rotate one side of top rack towards you until it so that top rack is reached. Reinstall it passes the stop is in the...
Instructions for Use
Page 12
... backguard and cooktop. This allows for 24 hour in a risk of the oven as a half-sized rack. Do not use a soap filled steel wool pad. Installation of these liners may collect on one side of the oven cavity. The oven vent is located below and a shorter item (such as a casserole) on...
... backguard and cooktop. This allows for 24 hour in a risk of the oven as a half-sized rack. Do not use a soap filled steel wool pad. Installation of these liners may collect on one side of the oven cavity. The oven vent is located below and a shorter item (such as a casserole) on...
Instructions for Use
Page 14
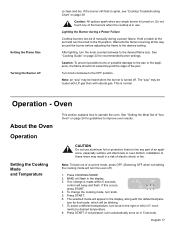
...into the probe receptacle in the selected mode. Press OFF to turn the control knob to 12:00 am. • The time of the range by using the touch pads, dial and control knobs. CLOCK will be displayed and the minute digits will flash. Turn knob. Press pad to...your fingertip. Press pad to the desired setting and press start. Door Locking Indicator - Icon is selected. Temperature - Press pad to set the clock after installation or after a power failure. Timer - TIMER 1 AND TIMER 2; Each counts down and turn oven light on or off oven and/or warming drawer. ...
...into the probe receptacle in the selected mode. Press OFF to turn the control knob to 12:00 am. • The time of the range by using the touch pads, dial and control knobs. CLOCK will be displayed and the minute digits will flash. Turn knob. Press pad to...your fingertip. Press pad to the desired setting and press start. Door Locking Indicator - Icon is selected. Temperature - Press pad to set the clock after installation or after a power failure. Timer - TIMER 1 AND TIMER 2; Each counts down and turn oven light on or off oven and/or warming drawer. ...
Instructions for Use
Page 19
... clockwise to improve oven results. The selected mode will appear in the display. 3. ture for that mode, which will beep and flash. Installation of Your Oven" on page 24 for recommended burner settings. If no change the cooking mode, turn knob to the pan or the appliance... part of a current mode, press OFF. (Selecting OFF when not setting the cooking mode will flash in the display, along with natural gas. Oven About the Oven Operation Setting the Cooking Mode and Temperature This section explains how to ignite, see "Cooktop Troubleshooting Chart" on . ...
... clockwise to improve oven results. The selected mode will appear in the display. 3. ture for that mode, which will beep and flash. Installation of Your Oven" on page 24 for recommended burner settings. If no change the cooking mode, turn knob to the pan or the appliance... part of a current mode, press OFF. (Selecting OFF when not setting the cooking mode will flash in the display, along with natural gas. Oven About the Oven Operation Setting the Cooking Mode and Temperature This section explains how to ignite, see "Cooktop Troubleshooting Chart" on . ...

Instructions for Use
Page 22
...meat. 2. Note: Do not connect to determine the internal doneness or the "END" temperature of the food). 8. Place roasting pan with the probe installed in cold oven on recommended oven rack. Press COOKING MODE and select BAKE, CONVECTION BAKE or CONVECTION ROAST. 4. Press START. Touch START. 7. Press.... Oven temp will remain in oven during self-clean. The probe symbol will flash in roasting pan as recipe specifies). The temperature range for guidelines, tips and suggestions. The chosen oven temperature is displayed in the upper right hand corner of the cooking mode. The ...
...meat. 2. Note: Do not connect to determine the internal doneness or the "END" temperature of the food). 8. Place roasting pan with the probe installed in cold oven on recommended oven rack. Press COOKING MODE and select BAKE, CONVECTION BAKE or CONVECTION ROAST. 4. Press START. Touch START. 7. Press.... Oven temp will remain in oven during self-clean. The probe symbol will flash in roasting pan as recipe specifies). The temperature range for guidelines, tips and suggestions. The chosen oven temperature is displayed in the upper right hand corner of the cooking mode. The ...

Instructions for Use
Page 44
...this warranty shall be effective unless authorized in writing by an officer of BSH. correction of installation problems (you should contact the nearest Bosch authorized service center. TO THE EXTENT ALLOWED BY LAW, THIS WARRANTY SETS OUT YOUR EXCLUSIVE...vessels); (2) any party's willful misconduct, negligence, misuse, abuse, accidents, neglect, improper operation, failure to maintain, improper or negligent installation, tampering, failure to follow operating instructions, mishandling, unauthorized service (including self-performed "fixing" or exploration of the appliance's internal ...
...this warranty shall be effective unless authorized in writing by an officer of BSH. correction of installation problems (you should contact the nearest Bosch authorized service center. TO THE EXTENT ALLOWED BY LAW, THIS WARRANTY SETS OUT YOUR EXCLUSIVE...vessels); (2) any party's willful misconduct, negligence, misuse, abuse, accidents, neglect, improper operation, failure to maintain, improper or negligent installation, tampering, failure to follow operating instructions, mishandling, unauthorized service (including self-performed "fixing" or exploration of the appliance's internal ...
Installation Instructions
Page 1
GAS FREE-STANDING CONVECTION RANGE Installation Manual For Use with Model(s): all gas models
GAS FREE-STANDING CONVECTION RANGE Installation Manual For Use with Model(s): all gas models
Installation Instructions
Page 3
...Appropriate for easier handling and installation. All other valve must be * Teflon is properly installed • Phillips Head Screwdriver and grounded by a qualified installer, authorized service agency or the gas supplier. door for use with LP gas and Natural gas) range. • Channel Lock ... (2) for Anti-tip Bracket electrical connections and grounding must be isolated flammable vapors and liquids in the manuals. Installation and service must comply (Style will vary depending on mounting surface) with the National Electrical Code ANSI/ • Pencil NFPA No. 7...
...Appropriate for easier handling and installation. All other valve must be * Teflon is properly installed • Phillips Head Screwdriver and grounded by a qualified installer, authorized service agency or the gas supplier. door for use with LP gas and Natural gas) range. • Channel Lock ... (2) for Anti-tip Bracket electrical connections and grounding must be isolated flammable vapors and liquids in the manuals. Installation and service must comply (Style will vary depending on mounting surface) with the National Electrical Code ANSI/ • Pencil NFPA No. 7...

Installation Instructions
Page 4
... Cooktops (CANADA) • CAN/ CSA-C 22.2 No. 61-M89 Household Cooking Ranges In Canada, installation must first be performed by a qualified or licensed contractor, plumber or gas fitter qualified or licensed by installing the Anti-Tip Device supplied. • A risk of tip-over may cause the...accordance with CAN 1-B149.1 and .2 Installation Codes for safe operation up to an altitude of a range. without any other injury. English • 2 Flexible gas connector must be longer than 36 inches. Important Safety Instructions WARNING Before installing, turn power OFF at least two...
... Cooktops (CANADA) • CAN/ CSA-C 22.2 No. 61-M89 Household Cooking Ranges In Canada, installation must first be performed by a qualified or licensed contractor, plumber or gas fitter qualified or licensed by installing the Anti-Tip Device supplied. • A risk of tip-over may cause the...accordance with CAN 1-B149.1 and .2 Installation Codes for safe operation up to an altitude of a range. without any other injury. English • 2 Flexible gas connector must be longer than 36 inches. Important Safety Instructions WARNING Before installing, turn power OFF at least two...
Installation Instructions
Page 5
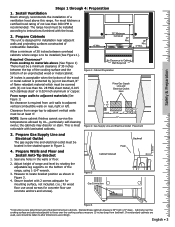
... be installed according to alter dimensions accordingly. Install Ventilation Bosch strongly recommends the installation of the range, using Standard American cabinets. Clearance from range top to adjacent vertical walls must be a minimum clearance of 30 inches between overhead cabinets where range is designed for installation near ... 24 inches is acceptable when the bottom of the wood or metal cabinet is recommended. Place Gas Supply Line and Electrical Outlet Here From range walls to adjacent materials (See Figure 1) No clearance is most kitchens a certified hood rating of...
... be installed according to alter dimensions accordingly. Install Ventilation Bosch strongly recommends the installation of the range, using Standard American cabinets. Clearance from range top to adjacent vertical walls must be a minimum clearance of 30 inches between overhead cabinets where range is designed for installation near ... 24 inches is acceptable when the bottom of the wood or metal cabinet is recommended. Place Gas Supply Line and Electrical Outlet Here From range walls to adjacent materials (See Figure 1) No clearance is most kitchens a certified hood rating of...

Installation Instructions
Page 6
... and connections indicate a leak. Don't forget to Figure 6 for use with propane (LP) gas, your range must first be installed using a flexible connector, always use with natural gas. Install male 1/2" or 3/4" flare union adapter on the NPT internal thread of the gas shut-off valve and tighten connections. Refer to relight the pilot on the elbow...
... and connections indicate a leak. Don't forget to Figure 6 for use with propane (LP) gas, your range must first be installed using a flexible connector, always use with natural gas. Install male 1/2" or 3/4" flare union adapter on the NPT internal thread of the gas shut-off valve and tighten connections. Refer to relight the pilot on the elbow...

Installation Instructions
Page 7
...1. If flame adjustment is normal during the initial start-up. Otherwise, installation is correctly installed. See Figure 8 (next page) for appropriate flame characteristics. Replace oven bottom cover. If so, call Bosch Service. See figure 7 for details. Soft Blue Flames: Normal for ...Gas. Test Flame: High Setting. If any of the burners continue to operate 4-5 minutes and re-evaluate before it reaches 350° F. 3. If the flame is completely or mostly yellow, verify that the flame completely surrounds the burner. Test Oven Burners Remove the oven bottom cover. After 30...
...1. If flame adjustment is normal during the initial start-up. Otherwise, installation is correctly installed. See Figure 8 (next page) for appropriate flame characteristics. Replace oven bottom cover. If so, call Bosch Service. See figure 7 for details. Soft Blue Flames: Normal for ...Gas. Test Flame: High Setting. If any of the burners continue to operate 4-5 minutes and re-evaluate before it reaches 350° F. 3. If the flame is completely or mostly yellow, verify that the flame completely surrounds the burner. Test Oven Burners Remove the oven bottom cover. After 30...

Installation Instructions
Page 8
...shutter is lifting or blowing or not carrying over; Loosen screw on the broil burner fits over ; Tighten screw. Replacement Parts: Visit your Bosch dealer for replacement parts. For a dealer near the oven regulator. It is too yellow. Remove screws and gently pull broil burner assembly ...plate and replace warming drawer (see Figure 8). Open the shutter if it is lifting or blowing or not carrying over the orifice when installed correctly. Reinsert all wires through the access hole in the interior back panel of the warming drawer (loosen screws and remove access panel)....
...shutter is lifting or blowing or not carrying over; Loosen screw on the broil burner fits over ; Tighten screw. Replacement Parts: Visit your Bosch dealer for replacement parts. For a dealer near the oven regulator. It is too yellow. Remove screws and gently pull broil burner assembly ...plate and replace warming drawer (see Figure 8). Open the shutter if it is lifting or blowing or not carrying over the orifice when installed correctly. Reinsert all wires through the access hole in the interior back panel of the warming drawer (loosen screws and remove access panel)....

Instructions for Use
Page 2
Table of Contents Safety 1 Conversion 2 Before You Begin 2 Procedure 2 Test the Installation 6 Service 9 Before Calling Service 9 Questions? 1-800-944-2904 www.boschappliances.com 5551 McFadden Ave. Huntington Beach, CA 92649 We look forward to hearing from you!
Table of Contents Safety 1 Conversion 2 Before You Begin 2 Procedure 2 Test the Installation 6 Service 9 Before Calling Service 9 Questions? 1-800-944-2904 www.boschappliances.com 5551 McFadden Ave. Huntington Beach, CA 92649 We look forward to hearing from you!
Instructions for Use
Page 3
... region where this appliance is being installed. 2) Shut-off valve must be a "T" handle gas cock. 3) Flexible gas connector must be converted using this kit. • CAUTION: When connecting the unit to the propane gas,make certain the propane gas tank is used to convert dual fuel ranges and gas ranges from the gas supply piping system by closing its...
... region where this appliance is being installed. 2) Shut-off valve must be a "T" handle gas cock. 3) Flexible gas connector must be converted using this kit. • CAUTION: When connecting the unit to the propane gas,make certain the propane gas tank is used to convert dual fuel ranges and gas ranges from the gas supply piping system by closing its...

Instructions for Use
Page 4
...must remain in the supply line. When checking for LP gas use if necessary. The connector should have an I.D. The pressure regulator located in Massachusetts installations is shipped from the factory for use with the appropriate gas before using it. CAUTION: Turn off at a pressure of... 10" of 1/2" and be 5' in length (Exception: Maximum connector length in the inlet of the range manifold must be between ...
...must remain in the supply line. When checking for LP gas use if necessary. The connector should have an I.D. The pressure regulator located in Massachusetts installations is shipped from the factory for use with the appropriate gas before using it. CAUTION: Turn off at a pressure of... 10" of 1/2" and be 5' in length (Exception: Maximum connector length in the inlet of the range manifold must be between ...

