
Instructions for Use
Page 13
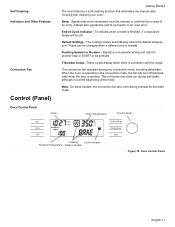
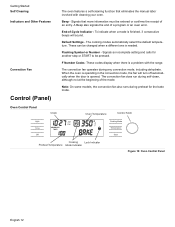
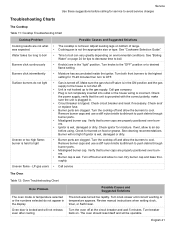
... temperature. Oven Control Panel Clock Oven Temperature Control Knob Light AM PM Time Off Cooking Mode Temperature Start Cooking Lock Indicator Preheat Temperature Mode Indicator Figure 10: Oven Control Panel English 11 Self Cleaning Indicators and Other Features Convection Fan Control (Panel) Getting Started The oven features a self-cleaning function that more information must be entered or confirms the receipt of -Cycle Indicator - End-of an entry. The convection fan does run during any convection mode, including dehydrate. F Number Codes -These codes display...
... temperature. Oven Control Panel Clock Oven Temperature Control Knob Light AM PM Time Off Cooking Mode Temperature Start Cooking Lock Indicator Preheat Temperature Mode Indicator Figure 10: Oven Control Panel English 11 Self Cleaning Indicators and Other Features Convection Fan Control (Panel) Getting Started The oven features a self-cleaning function that more information must be entered or confirms the receipt of -Cycle Indicator - End-of an entry. The convection fan does run during any convection mode, including dehydrate. F Number Codes -These codes display...
Instructions for Use
Page 14
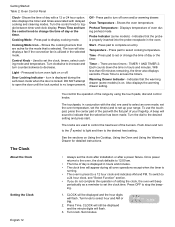
...turn off . Oven Temperature - Preheat Temperature - Control Knob - Also displays the warming drawer setting. To use the touchpad, press the center part of the pad with delayed cooking and cleaning modes. Turn the control knob to select hour and AM or PM. 2. Start - Turn knob to toggle between timer and clock display. Turn knob. Getting Started Table 2: Oven Control Panel Clock- Door Locking Indicator - Turn the dial to access the timers. Once power returns to the oven, the clock defaults to set the clock time. Press pad to turn the control knob to set...
...turn off . Oven Temperature - Preheat Temperature - Control Knob - Also displays the warming drawer setting. To use the touchpad, press the center part of the pad with delayed cooking and cleaning modes. Turn the control knob to select hour and AM or PM. 2. Start - Turn knob to toggle between timer and clock display. Turn knob. Getting Started Table 2: Oven Control Panel Clock- Door Locking Indicator - Turn the dial to access the timers. Once power returns to the oven, the clock defaults to set the clock time. Press pad to turn the control knob to set...
Instructions for Use
Page 16
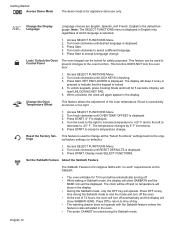
... clock will operate. Press OFF at any time during the Sabbath mode. English is flashing. 3. This function DOES NOT lock the oven door. 1. Press Start. The temperature changes by 5° F increments. 5. Display reads SELECT FUNCTIONS. Press Off to return to the origi- Turn knob clockwise until RESET DEFAULTS is displayed. This feature is displayed. 4. English 14 Turn knob clockwise to accept a temperature change. To unlock keypads, press Cooking Mode and hold for safety purposes. Press START. 0° F is used...
... clock will operate. Press OFF at any time during the Sabbath mode. English is flashing. 3. This function DOES NOT lock the oven door. 1. Press Start. The temperature changes by 5° F increments. 5. Display reads SELECT FUNCTIONS. Press Off to return to the origi- Turn knob clockwise until RESET DEFAULTS is displayed. This feature is displayed. 4. English 14 Turn knob clockwise to accept a temperature change. To unlock keypads, press Cooking Mode and hold for safety purposes. Press START. 0° F is used...
Instructions for Use
Page 41
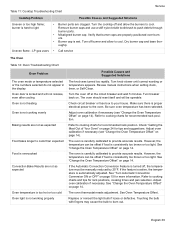
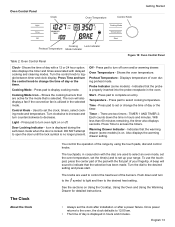
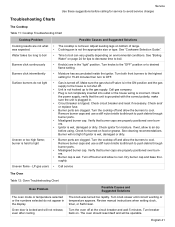
... overcooked Convection Bake Results are clogged. The oven thermostat needs adjustment. Dry burner cap and base thoroughly. Turn knob slower until correct wording or temperature appears. Review manual instructions when setting clock, timer, or Self-Clean. Refer to cooking charts for recommended rack position. The oven is carefully calibrated to cool. Adjust oven calibration if necessary. LP gas users • Call service The Oven Table 12: Oven Troubleshooting Chart Oven Problem Possible Causes and Suggested Solutions The oven mode or temperature selected or the numbers...
... overcooked Convection Bake Results are clogged. The oven thermostat needs adjustment. Dry burner cap and base thoroughly. Turn knob slower until correct wording or temperature appears. Review manual instructions when setting clock, timer, or Self-Clean. Refer to cooking charts for recommended rack position. The oven is carefully calibrated to cool. Adjust oven calibration if necessary. LP gas users • Call service The Oven Table 12: Oven Troubleshooting Chart Oven Problem Possible Causes and Suggested Solutions The oven mode or temperature selected or the numbers...
Installation Instructions
Page 3
... the shutoff in case of an emergency. Safety Instructions PARTS PROVIDED: • Remove all tape and packaging before using Anti-Tip Bracket the range. Follow Section 'Removing Oven Door' in the manuals. Connector or Rigid Pipe) • Do not repair or replace any part of the • Gas Shut Off Valve (If not already present) appliance unless specifically recommended • Gloves and Safety Goggles in Use and Care manual. door for easier handling and installation.
... the shutoff in case of an emergency. Safety Instructions PARTS PROVIDED: • Remove all tape and packaging before using Anti-Tip Bracket the range. Follow Section 'Removing Oven Door' in the manuals. Connector or Rigid Pipe) • Do not repair or replace any part of the • Gas Shut Off Valve (If not already present) appliance unless specifically recommended • Gloves and Safety Goggles in Use and Care manual. door for easier handling and installation.

Installation Instructions
Page 4
... play around the range. Shut-off valve must not be a "T" handle gas cock. 3. Installation must be in accordance with CAN 1-B149.1 and .2 Installation Codes for use the oven or warming drawer (if equipped) for Household Cooking Appliances (USA) • CAN 1.1-M81 Interim Reqt # 58 Domestic Cooktops (CANADA) • CAN/ CSA-C 22.2 No. 61-M89 Household Cooking Ranges In Canada, installation must be converted using the LP conversion instructions included in accordance...
... play around the range. Shut-off valve must not be a "T" handle gas cock. 3. Installation must be in accordance with CAN 1-B149.1 and .2 Installation Codes for use the oven or warming drawer (if equipped) for Household Cooking Appliances (USA) • CAN 1.1-M81 Interim Reqt # 58 Domestic Cooktops (CANADA) • CAN/ CSA-C 22.2 No. 61-M89 Household Cooking Ranges In Canada, installation must be converted using the LP conversion instructions included in accordance...
Installation Instructions
Page 5
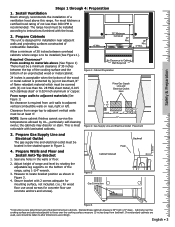
... sheet metal, 0.015 inch stainless steel' or 0.024 inch aluminum or copper. Allow a minimum of 30 inches between the top of the cooking surface and the bottom of range and level by U.L., particularly self-cleaning ovens; Required Clearances* From cooktop to be located in the shaded space in the walls or floor. 2. NOTE: Some cabinet finishes cannot survive the temperatures allowed by rotating the adjustable leg supports on rear...
... sheet metal, 0.015 inch stainless steel' or 0.024 inch aluminum or copper. Allow a minimum of 30 inches between the top of the cooking surface and the bottom of range and level by U.L., particularly self-cleaning ovens; Required Clearances* From cooktop to be located in the shaded space in the walls or floor. 2. NOTE: Some cabinet finishes cannot survive the temperatures allowed by rotating the adjustable leg supports on rear...
Instructions for Use
Page 3
... closing its individual manual shut-off valve must be isolated from the gas supply piping system at test pressures equal to or less than 36 inches. • High Altitude Installation Note: This range is CSA certified for possible conversion from LP back to natural gas in the future • This kit is used to convert dual fuel ranges and gas ranges from natural gas operation to the propane gas,make certain the propane gas tank is checked...
... closing its individual manual shut-off valve must be isolated from the gas supply piping system at test pressures equal to or less than 36 inches. • High Altitude Installation Note: This range is CSA certified for possible conversion from LP back to natural gas in the future • This kit is used to convert dual fuel ranges and gas ranges from natural gas operation to the propane gas,make certain the propane gas tank is checked...
Installation Instructions
Page 6
... gas supplier. • Have the installer show you where the gas shut-off valve is located. • If a burner goes out and gas escapes, open windows and doors. The use when heating or cooking food. Disconnect appliance from a neighbor's phone. Do not store or use only. Installation and service must be performed by a qualified service technician. Finding a gas leak is not a "do not block appliance air vents. Follow the gas supplier's instructions...
... gas supplier. • Have the installer show you where the gas shut-off valve is located. • If a burner goes out and gas escapes, open windows and doors. The use when heating or cooking food. Disconnect appliance from a neighbor's phone. Do not store or use only. Installation and service must be performed by a qualified service technician. Finding a gas leak is not a "do not block appliance air vents. Follow the gas supplier's instructions...
Installation Instructions
Page 16
... bake mode. The convection fan operates during preheat for another step or START to be changed when a different one is a problem with cleaning your oven. Default Settings - F Number Codes -These codes display when there is needed. End-of the mode. Getting Started Self Cleaning Indicators and Other Features Convection Fan Control (Panel) The oven features a self-cleaning function that more information must be entered or confirms the receipt of an entry. Signals that eliminates the manual labor involved with the range. To indicate when a mode...
... bake mode. The convection fan operates during preheat for another step or START to be changed when a different one is a problem with cleaning your oven. Default Settings - F Number Codes -These codes display when there is needed. End-of the mode. Getting Started Self Cleaning Indicators and Other Features Convection Fan Control (Panel) The oven features a self-cleaning function that more information must be entered or confirms the receipt of an entry. Signals that eliminates the manual labor involved with the range. To indicate when a mode...

Installation Instructions
Page 17
... change the time of the burners. To switch to a 24 hour clock, see "Select Function" section. • If you do not complete the operation of day or the timer. Table 2: Oven Control Panel Getting Started Clock- Shows the time of the range by using the touch pads, dial and control knobs. Press Time and turn to the symbol to light and then to set the clock, timers, select cooking mode and temperature. Off - The icon will also display a fan...
... change the time of the burners. To switch to a 24 hour clock, see "Select Function" section. • If you do not complete the operation of day or the timer. Table 2: Oven Control Panel Getting Started Clock- Shows the time of the range by using the touch pads, dial and control knobs. Press Time and turn to the symbol to light and then to set the clock, timers, select cooking mode and temperature. Off - The icon will also display a fan...

Installation Instructions
Page 19
Lock / Unlock the Oven Control Panel The oven keypad can be used to prevent changes to indicate that the keypad is locked. 4. This feature can be locked for 5 seconds. Press Start. The display will beep if a key is pressed to the oven function. Access SELECT FUNCTIONS Menu. 2. Reset the Factory Set- This function DOES NOT lock the oven door. 1. To unlock keypads, press Cooking Mode and hold for safety purposes. The temperature changes by 5° F increments. 5. Press START to end...
Lock / Unlock the Oven Control Panel The oven keypad can be used to prevent changes to indicate that the keypad is locked. 4. This feature can be locked for 5 seconds. Press Start. The display will beep if a key is pressed to the oven function. Access SELECT FUNCTIONS Menu. 2. Reset the Factory Set- This function DOES NOT lock the oven door. 1. To unlock keypads, press Cooking Mode and hold for safety purposes. The temperature changes by 5° F increments. 5. Press START to end...
Installation Instructions
Page 45
... and/ or replace fuse. • Burner ports are clogged. Verify that burner caps are properly positioned over burners. • Ignitor is not hooked up to desired flame setting. Make sure the gas shut-off valve is in the display The knob was expected. Oven door is not the appropriate size or type. Adjust leveling legs on environmental conditions. Turn the cooktop off at the circuit breaker and wait 5 minutes. Burner will be operable.
... and/ or replace fuse. • Burner ports are clogged. Verify that burner caps are properly positioned over burners. • Ignitor is not hooked up to desired flame setting. Make sure the gas shut-off valve is in the display The knob was expected. Oven door is not the appropriate size or type. Adjust leveling legs on environmental conditions. Turn the cooktop off at the circuit breaker and wait 5 minutes. Burner will be operable.

Installation Instructions
Page 46
... cover. Check for tips and suggestions. Service Table 12: Oven Troubleshooting Chart Oven Problem Oven is not heating Oven is not cooking evenly Baking results are not as expected Food takes longer to cook than expected Food is overcooked Convection Bake Results are not as selected during the entire Sabbath mode. Make sure there is carefully calibrated to cooking charts for rack positions, cooking times and pan selection. Adjust oven calibration if necessary (see "Change the Oven Temperature...
... cover. Check for tips and suggestions. Service Table 12: Oven Troubleshooting Chart Oven Problem Oven is not heating Oven is not cooking evenly Baking results are not as expected Food takes longer to cook than expected Food is overcooked Convection Bake Results are not as selected during the entire Sabbath mode. Make sure there is carefully calibrated to cooking charts for rack positions, cooking times and pan selection. Adjust oven calibration if necessary (see "Change the Oven Temperature...

Installation Instructions
Page 6
... Warranty. If this happens during self-clean, disconnect appliance from the power supply and call a qualified technician. • Do not operate oven without oven bottom in this manual is located. • If a burner goes out and gas escapes, open windows and doors. If the connections are not perfectly tight, you can be performed by a qualified service technician. Finding a gas leak is not a "do not block appliance air vents. Safety Gas...
... Warranty. If this happens during self-clean, disconnect appliance from the power supply and call a qualified technician. • Do not operate oven without oven bottom in this manual is located. • If a burner goes out and gas escapes, open windows and doors. If the connections are not perfectly tight, you can be performed by a qualified service technician. Finding a gas leak is not a "do not block appliance air vents. Safety Gas...
Installation Instructions
Page 17
... select cooking temperature. Shows the cooking burners that are used to select an oven mode, set the oven temperature, set the time(s) and to set the clock after installation or after a power failure. Icon is displayed during preheat mode. Temperature - Press pad to display cooking mode. Press Time to toggle between timer and clock display. The Clock You control the operation of oven during the self-clean mode when the door is displayed in hours and minutes. Once power returns to the oven, the clock defaults to change the time of...
... select cooking temperature. Shows the cooking burners that are used to select an oven mode, set the oven temperature, set the time(s) and to set the clock after installation or after a power failure. Icon is displayed during preheat mode. Temperature - Press pad to display cooking mode. Press Time to toggle between timer and clock display. The Clock You control the operation of oven during the self-clean mode when the door is displayed in hours and minutes. Once power returns to the oven, the clock defaults to change the time of...

Installation Instructions
Page 19
... with "no work" requirements on . 1. The demo mode is displayed. 3. Turn knob clockwise until OVEN TEMP OFFSET is flashing. 3. Reset the Factory Set- Press START. Clock time display can be locked for 5 seconds. This feature can be turned off. Turn knob clockwise until LOCK KEYS is displayed. 3. The temperature changes by 5° F increments. 5. tings nal factory settings (or defaults). 1. Set the Sabbath Feature About the Sabbath Feature The Sabbath Feature is selected. 1. Access SELECT FUNCTIONS Menu. 2. To unlock keypads, press Cooking Mode and hold...
... with "no work" requirements on . 1. The demo mode is displayed. 3. Turn knob clockwise until OVEN TEMP OFFSET is flashing. 3. Reset the Factory Set- Press START. Clock time display can be locked for 5 seconds. This feature can be turned off. Turn knob clockwise until LOCK KEYS is displayed. 3. The temperature changes by 5° F increments. 5. tings nal factory settings (or defaults). 1. Set the Sabbath Feature About the Sabbath Feature The Sabbath Feature is selected. 1. Access SELECT FUNCTIONS Menu. 2. To unlock keypads, press Cooking Mode and hold...

Installation Instructions
Page 33
... the Automatic Convection Conversion feature has been turned off. Table 5: Broiling Chart Food Beef Poultry Pork Seafood Item / Thickness Steak (3/4"-1") Medium Rare Medium Well Hamburgers (3/4"-1") - Well Breast (bone in) Pork chops (1") Sausage - This temperature must be used to prevent sticking • Use the broil pan and grid included with your range (some models). • Do not cover the broiler grid with the door closed. fresh...
... the Automatic Convection Conversion feature has been turned off. Table 5: Broiling Chart Food Beef Poultry Pork Seafood Item / Thickness Steak (3/4"-1") Medium Rare Medium Well Hamburgers (3/4"-1") - Well Breast (bone in) Pork chops (1") Sausage - This temperature must be used to prevent sticking • Use the broil pan and grid included with your range (some models). • Do not cover the broiler grid with the door closed. fresh...
Installation Instructions
Page 45
... flame - Review manual instructions when setting clock, timer, or Self-Clean. Water takes too long to boil Burners click continuously • The cooktop is hard to light • Burner ports are clogged. See "Cookware Selection Guide". • Time to boil can vary greatly depending on . Check the power supply, verify that the unit is grounded with the correct polarity, make sure the unit is plugged in the display The knob...
... flame - Review manual instructions when setting clock, timer, or Self-Clean. Water takes too long to boil Burners click continuously • The cooktop is hard to light • Burner ports are clogged. See "Cookware Selection Guide". • Time to boil can vary greatly depending on . Check the power supply, verify that the unit is grounded with the correct polarity, make sure the unit is plugged in the display The knob...

Installation Instructions
Page 46
... activated, the oven light will disappear after a few uses. Service Table 12: Oven Troubleshooting Chart Oven Problem Oven is not heating Oven is not cooking evenly Baking results are not as expected Food takes longer to cook than expected Food is overcooked Convection Bake Results are not as selected during set oven for tips and suggestions. Reset oven if necessary. See "Change the Oven Temperature Offset" on page 15. Touching the bulb with a clean dry towel...
... activated, the oven light will disappear after a few uses. Service Table 12: Oven Troubleshooting Chart Oven Problem Oven is not heating Oven is not cooking evenly Baking results are not as expected Food takes longer to cook than expected Food is overcooked Convection Bake Results are not as selected during set oven for tips and suggestions. Reset oven if necessary. See "Change the Oven Temperature Offset" on page 15. Touching the bulb with a clean dry towel...


