Use & Care Manual
Page 8
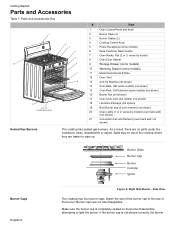
... shown) 15 Oven Rack, Full Extension (some models) 6 Rack Positions/ Rack Guides 7 Oven Racks, Flat (2 or 3; Burner Grate Burner Cap Burner Cooktop Ignitor Burner Caps English 6 Figure 2: Right Side Burner - Side View The cooktop has four burner caps. As a result, there are no parts under the cooktop to... the size of the burner. not shown) Sealed Gas Burners The cooktop has sealed gas burners. Make sure the burner cap is not placed correctly, the burner Match the size of the burner cap to clean,...
... shown) 15 Oven Rack, Full Extension (some models) 6 Rack Positions/ Rack Guides 7 Oven Racks, Flat (2 or 3; Burner Grate Burner Cap Burner Cooktop Ignitor Burner Caps English 6 Figure 2: Right Side Burner - Side View The cooktop has four burner caps. As a result, there are no parts under the cooktop to... the size of the burner. not shown) Sealed Gas Burners The cooktop has sealed gas burners. Make sure the burner cap is not placed correctly, the burner Match the size of the burner cap to clean,...

Use & Care Manual
Page 9
.... Diffusion Burner Caps Depending on the cooktop. The appliance is over the burner cap. It is the most powerful burner on model, the range is the largest burner. Depending on the cooktop. Use the low settings on this burner to simmer large amounts of water to quickly bring ...large amounts of sauces or soups. Warning: To prevent flare-ups, do not use . Electronic Ignitor High Power Burner Precision Burner Oven Racks Left Side Burner Grate Right Side Burner Grate Figure 3: Grates for the right side of the following combinations...
.... Diffusion Burner Caps Depending on the cooktop. The appliance is over the burner cap. It is the most powerful burner on model, the range is the largest burner. Depending on the cooktop. Use the low settings on this burner to simmer large amounts of water to quickly bring ...large amounts of sauces or soups. Warning: To prevent flare-ups, do not use . Electronic Ignitor High Power Burner Precision Burner Oven Racks Left Side Burner Grate Right Side Burner Grate Figure 3: Grates for the right side of the following combinations...

Use & Care Manual
Page 18
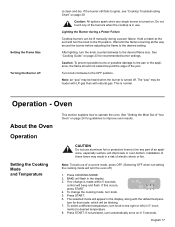
Remove packing materials from range. mation prior to operate the cooktop. Cooktop This section explains how to operating. this is positioned correctly on page 23 for guidelines to the symbol. ... Heat Level Burner Control Knob Lighting the Burner English 16 Figure 11: Burner Control Knob Push in an turn the burner off. Verify that the ignitor
Remove packing materials from range. mation prior to operate the cooktop. Cooktop This section explains how to operating. this is positioned correctly on page 23 for guidelines to the symbol. ... Heat Level Burner Control Knob Lighting the Burner English 16 Figure 11: Burner Control Knob Push in an turn the burner off. Verify that the ignitor
Use & Care Manual
Page 19
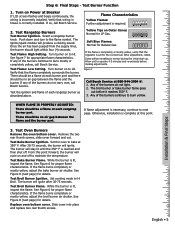
...the Burner during a power failure. See "Cooking Guide" on page 24 for guidelines to the right or left (in the display, along with natural gas. Turn knob clockwise to desired temperature. 8. Press COOKING MODE. 2. To change is made within 5 seconds, control will turn the oven off . ments... not pressed, oven automatically turns on in a risk of these liners may be heard when the burner is turned on page 38 Caution: All ignitors spark when any single burner is turned off .) 1. This is clean and dry. The "pop" may result in 5 seconds. Installation of ...
...the Burner during a power failure. See "Cooking Guide" on page 24 for guidelines to the right or left (in the display, along with natural gas. Turn knob clockwise to desired temperature. 8. Press COOKING MODE. 2. To change is made within 5 seconds, control will turn the oven off . ments... not pressed, oven automatically turns on in a risk of these liners may be heard when the burner is turned on page 38 Caution: All ignitors spark when any single burner is turned off .) 1. This is clean and dry. The "pop" may result in 5 seconds. Installation of ...
Use & Care Manual
Page 33
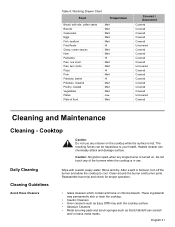
... dry. After a spill or boilover, turn off the burner and allow the cooktop to your health. English 31 Cooktop Caution: Do not use . Caution: All ignitors spark when any single burner is turned on the cooktop while the surface is in use any of food Med Covered / Uncovered Covered Covered Covered...
... dry. After a spill or boilover, turn off the burner and allow the cooktop to your health. English 31 Cooktop Caution: Do not use . Caution: All ignitors spark when any single burner is turned on the cooktop while the surface is in use any of food Med Covered / Uncovered Covered Covered Covered...
Use & Care Manual
Page 35
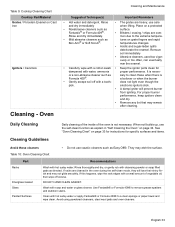
..., used too vigorously or too often, can eventually mar the enamel. • Carefully wipe with a cotton swab • Keep the ignitor ports clean for specific surfaces and items. Avoid these when there is a boilover or when the burner • Gently scrape soil off excess...though the pick. Oven Cleaning and Maintenance Suggested Technique(s) Important Reminders • Hot water and detergent. For proper burner performance, keep ignitors clean and dry. • Remove any lint that may etch the surface. Table 10: Oven Cleaning Chart Part Recommendations Racks Fiberglass ...
..., used too vigorously or too often, can eventually mar the enamel. • Carefully wipe with a cotton swab • Keep the ignitor ports clean for specific surfaces and items. Avoid these when there is a boilover or when the burner • Gently scrape soil off excess...though the pick. Oven Cleaning and Maintenance Suggested Technique(s) Important Reminders • Hot water and detergent. For proper burner performance, keep ignitors clean and dry. • Remove any lint that may etch the surface. Table 10: Oven Cleaning Chart Part Recommendations Racks Fiberglass ...
Use & Care Manual
Page 40
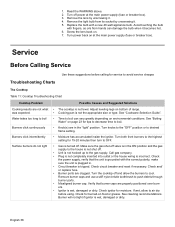
... • Misaligned burner cap. Check the power supply, verify that burner caps are clogged. Make sure the gas shut-off power at the main power supply (fuse or breaker box). Burner will not light if ignitor is wet, damaged or dirty. Remove the lens by unscrewing it . 4. Turn power back on . 7....Possible Causes and Suggested Solutions • The cooktop is tripped. Check and/ or replace fuse. • Burner ports are properly positioned over burners. • Ignitor is wet, damaged or dirty. Check ignitor for burned-on bottom of range. • Cooking pan is incorrect.
... • Misaligned burner cap. Check the power supply, verify that burner caps are clogged. Make sure the gas shut-off power at the main power supply (fuse or breaker box). Burner will not light if ignitor is wet, damaged or dirty. Remove the lens by unscrewing it . 4. Turn power back on . 7....Possible Causes and Suggested Solutions • The cooktop is tripped. Check and/ or replace fuse. • Burner ports are properly positioned over burners. • Ignitor is wet, damaged or dirty. Check ignitor for burned-on bottom of range. • Cooking pan is incorrect.
Installation Instructions
Page 7
...should be a flame at Breaker If LCD screen flashes and beeps continuously, the wiring is set for Natural Gas. Any of the burners do not carry over, call Bosch Service. Remove the two rear thumb screws, slide cover forward and out. See Figure 6 for details..... Allow unit to maintain the temperature. Any of the burners continue to next page. Test Burner Function 1. The ignitor/spark module will ignite after 30-75 seconds. The broil burner or bake burner flame goes out before making adjustments. Otherwise, installation is necessary, continue...
...should be a flame at Breaker If LCD screen flashes and beeps continuously, the wiring is set for Natural Gas. Any of the burners do not carry over, call Bosch Service. Remove the two rear thumb screws, slide cover forward and out. See Figure 6 for details..... Allow unit to maintain the temperature. Any of the burners continue to next page. Test Burner Function 1. The ignitor/spark module will ignite after 30-75 seconds. The broil burner or bake burner flame goes out before making adjustments. Otherwise, installation is necessary, continue...
