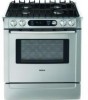
Bosch HDI7282U Support Question
Bosch HDI7282U Support Question
Find answers below for this question about Bosch HDI7282U - 30" Pro-Style Dual-Fuel Range.Need a Bosch HDI7282U manual? We have 3 online manuals for this item!
Question posted by ovrlnd2bin2 on July 7th, 2013
The Ignitors Are Clicking Constantly.. How Do I Stop It???
The person who posted this question about this Bosch product did not include a detailed explanation. Please use the "Request More Information" button to the right if more details would help you to answer this question.
Current Answers
Related Bosch HDI7282U Manual Pages
Use & Care Manual - Page 1

Use and Care Manual
Dual Fuel Range
Use & Care Manual - Page 2

... Operation 27
Getting the Most Out of Your Appliance 29
Getting the Most Out of Your Cooktop 29 Getting the Most Out of Your Oven 30 Getting the Most Out of Contents
About This Manual 1
How This Manual Is Organized 1
Safety 2
Important Safety Instructions 2
Getting Started 7
Parts and Accessories 7 Control (Panel...
Use & Care Manual - Page 10

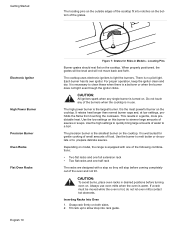
... the cooktop to 4 diffusion burner caps. Depending on the model, your appliance has either a storage drawer or a warming drawer. Burner Grate Burner Cap
Burner Cooktop Ignitor
Burner Caps Burner Grates
Figure 3: Right Side Burner - Diffusion Burner Caps
Depending on the model, the appliance is completely seated on the burner base before...
Use & Care Manual - Page 12
... the smallest burner on . Grasp rack firmly on the cooktop. The cooktop uses electronic ignitors to allow stop before turning oven on the cooktop. Do not touch any single burner is hot, do...Racks Into Oven
1. Use the low settings on model, the range is a boilover or when the burner does not light even though the ignitor clicks. Use the burner to melt butter or chocolate or to clean...
Use & Care Manual - Page 13

... press the rest of the way in the closed position top side up and pull the rest of the range.
Figure 8: Inserting a Rack
Removing Flat Racks From Oven
1. Grasp rack firmly on flat surface in the...beyond the bottom section bringing the food closer to cooking foods. English 11 When the stop is in the closed position when removing and replacing. If the top rack will not extend fully, ...
Use & Care Manual - Page 14

... the rack up and out, rotated side first. Closed Position
Back of Rack
Stop (Ball)
Half Oven Rack (Some Models)
Front of Rack Figure 10: Disassembly
CAUTION:
Always verify ...that top rack is past the stop
(ball). 4.
The back edges of the rack until it passes the stop (ball). 3. Insert one side of the rack below and a shorter item ...
Use & Care Manual - Page 18

...for display to show next feature.
3. Press START to desired setting and press START. Press OFF to stop the beeping.
1. Once power returns to the oven, the clock defaults to 12:00 am.
•...of setting the clock, the oven will beep periodically as a reminder to set or change the range features listed below. CLOCK will still be displayed and the minute digits will appear during all ...
Use & Care Manual - Page 22
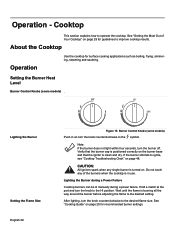
...not light within four seconds, turn the knob counterclockwise to operate the cooktop. CAUTION:
All ignitors spark when any of Your Cooktop" on page 48.
Do not touch any single burner... Knobs (some models)
Push in use. Wait until the flame is positioned correctly on . Verify that the ignitor is in an turn the knob to the desired setting. Hold a match at the port and turn the...
Use & Care Manual - Page 26
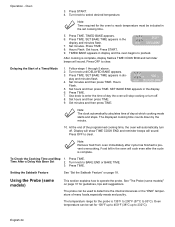
...clock automatically calculates time of a Timed Mode
1. Display will show TIME COOK END and reminder beeps will stop cooking or turn off .
8.
Time After a Delay Has Been Set
2. Using the Probe (some ...in display and the oven begins to clear. To Check the Cooking Time and Stop 1. The temperature range for the oven to reach temperature must be used to determine the internal doneness...
Use & Care Manual - Page 32
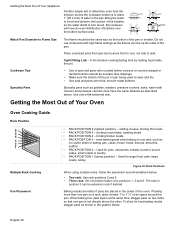
... positions 1, 3 and 6.
Cookware Tips
• Use of Your Oven
Oven Cooking Guide
Rack Position
6 5 4 3 2 1
Multiple Rack Cooking
Pan Placement
• RACK POSITION 6 (highest position) -
English 30 Use only a flat-bottomed wok. Getting the Most Out of pots and pans with high flame settings as the flames can be the same size...
Use & Care Manual - Page 41
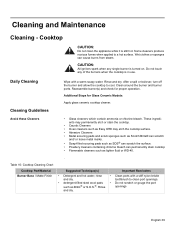
...(s) and check for Glass Ceramic Models:
Apply glass ceramic cooktop cleaner. Cooktop
CAUTION:
Do not clean the appliance while it is in use. CAUTION:
All ignitors spark when any of the burners when the cooktop is still hot.
Use & Care Manual - Page 43

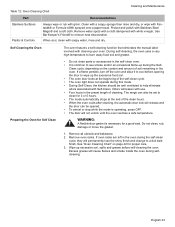
...• Soften by laying a damp paper towel or sponge on top of soil for about 30 minutes.
• Use a plastic scrubber and glass ceramic cooktop cleaner or use of the ... to remove sandlike grains and grit such as
these items require immediate removal.
though the electronic ignitors click. Table 11: Cleaning Techniques for Stubborn
• For suggestions on how to clean Soil (Glass...
Use & Care Manual - Page 45
...; and a soft cloth. Preparing the Oven for proper care. 3. The range can be opened. • To cancel or stop while the mode is the preset length of soil remaining in the oven during...vinegar. WARNING:
A flexible door gasket is necessary for 3 or 5 hours. • The mode automatically stops at the beginning of the clean hours. • When the oven cools after cleaning, the automatic door ...
Use & Care Manual - Page 50

...burner caps are clogged. Water takes too long to boil
Burners click continuously
Surface burners do not light
• The scraper blade...8226; Time to boil can vary greatly depending on bottom of range. • Cooking pan is incorrect. Check
the power supply,...Scraper is packaged with single-edge, stainless steel blades. Check ignitor for burned-on page 29 for tips to decrease time to ...
Use & Care Manual - Page 52
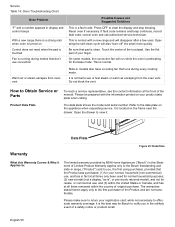
... bake mode. This is located on the frame near the drawer. Please make sure to you in range, ("Product") sold to return your product data plate when calling. Data Plate
Warranty
Figure 23: Data...first purchaser of the Product and are not transferable. Open the drawer to clear the display and stop beeping. The data plate shows the model and serial number.
Warm air or steam escapes from...
Installation Instructions - Page 6

... Foam Tape
3. Connect Electric
5.
Test for Anti-Tip Bracket (Style will vary depending on
mounting surface) • Level •...
English 4
Tools and Parts Needed
Additional Parts Needed For Hard Wire Installations
• Range Power Supply Cord Kit (240V -30 Amp) Note: Not necessary for step-by-step instructions. Installation
Before You Begin
Overview
Table...
Installation Instructions - Page 8

.... • To avoid injury from the factory with Ranges." Note: In Canada, the range is cool and power to the oven has been turned... carefully to remove the oven door.
Do not grasp the handle as it stops. Holding the door firmly on both sides and using both hands to avoid ... , be 120/240 volt, 30 amperes minimum. WARNING:
When removing the door: • Make sure oven...
Installation Instructions - Page 9

... panel or in the table below to verify that gas shutoff valve and all burner controls are dual rated for use on . Most wiring codes require a separate circuit with separate disconnect switch and fuses...
kW Rating
Hz
Amps Req'd
120/240V 6.2
120/208V 4.8
60
30
The electrical outlet must be done by the range.
The range requires a minimum of the wiring to house is preferred.
Installation Instructions - Page 10
... near adjacent walls and projecting surfaces constructed of combustible materials.
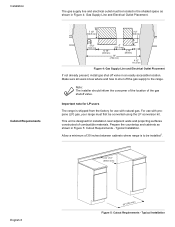
Typical Installation Note: The installer should inform the consumer of the location of 30 inches between cabinets where range is designed for use with natural gas. Typical Installation.
Prepare the countertop and cabinets as shown in Figure 4: Gas Supply Line and Electrical...
Installation Instructions - Page 24

Reversed polarity can damage the range and can result in this fashion. Each burner must be blue with an ... Checking Flame Characteristics for more information.
4. Set oven to the low setting. 3.
Push in this fashion. Verify that the ignitor/spark module clicks. 3. Test flame characteristics on the low setting:
1. Once the air has been purged from the supply lines, verify that door...
Similar Questions

Converting Gas To Propane ... Bosch Hd17282u Model
Moved to a house with propane. What do I need to convert this dual fuel stove
Moved to a house with propane. What do I need to convert this dual fuel stove
(Posted by Kwasik 3 years ago)

Disconnect Instructions For Bosch Dual Fuel Oven Pressure Regulator
I need to install a natural gas pressure regulator in a Bosch dual fuel range model HD17282U/03. How...
I need to install a natural gas pressure regulator in a Bosch dual fuel range model HD17282U/03. How...
(Posted by gary32993 5 years ago)
Bosch Dual Fuel Range/oven Model # Hd17152u/03
The oven will not heat up after trying several different heating settings.
The oven will not heat up after trying several different heating settings.
(Posted by dellga01 9 years ago)

Bosch Range Hdi7052u/03 Has A Burner That Clicks Continuously.
(Posted by jpc707 12 years ago)

Has Anyone Tried To Paint The Worn Knobs On Their Bosch Dual Fuel Range?
Like many people, the knobs on my Bosch Dual Fuel Range are showing wear after only two months. Si...
Like many people, the knobs on my Bosch Dual Fuel Range are showing wear after only two months. Si...
(Posted by natemom 12 years ago)