
Use & Care Manual
Page 3
... to line any part of an appliance, especially surface unit drip bowls or oven bottom. Never use . TO REDUCE THE RISK OF A RANGE TOP GREASE FIRE: English 1 About This Manual How This Manual Is Organized This manual contains several sections: • The Getting Started section describes the features and functionality of the range, including a description of how to set up the range and operate the control panel. • The Operation...
... to line any part of an appliance, especially surface unit drip bowls or oven bottom. Never use . TO REDUCE THE RISK OF A RANGE TOP GREASE FIRE: English 1 About This Manual How This Manual Is Organized This manual contains several sections: • The Getting Started section describes the features and functionality of the range, including a description of how to set up the range and operate the control panel. • The Operation...
Use & Care Manual
Page 4
... UP A FLAMING PAN - Grease should not be allowed to turn it started. 3) The fire department is small and contained in the area where it off. WHAT TO DO IF YOU SMELL GAS: •Do not try to extinguish flames. • Smother flames from fans or forced air vents do not operate the ventilation system during a cooktop fire. c) Clean ventilating fans frequently. Never use cookware appropriate...
... UP A FLAMING PAN - Grease should not be allowed to turn it started. 3) The fire department is small and contained in the area where it off. WHAT TO DO IF YOU SMELL GAS: •Do not try to extinguish flames. • Smother flames from fans or forced air vents do not operate the ventilation system during a cooktop fire. c) Clean ventilating fans frequently. Never use cookware appropriate...

Use & Care Manual
Page 5
... and injury. • Never move a pan of an appliance, especially a door, warming drawer, or storage drawer. If a rack must be lit manually. • DO NOT TOUCH SURFACE UNITS OR AREAS NEAR UNITS - Crepes Suzette, Cherries Jubilee, Peppercorn Beef Flambe'). • Use high heat settings on page 2. • During a power failure, only the cooktop burners can have had sufficient time to cause burns. To avoid bubbling...
... and injury. • Never move a pan of an appliance, especially a door, warming drawer, or storage drawer. If a rack must be lit manually. • DO NOT TOUCH SURFACE UNITS OR AREAS NEAR UNITS - Crepes Suzette, Cherries Jubilee, Peppercorn Beef Flambe'). • Use high heat settings on page 2. • During a power failure, only the cooktop burners can have had sufficient time to cause burns. To avoid bubbling...
Use & Care Manual
Page 6
...'s directions when using cooking or roasting bags. • Hold the handle of the pan. • Use Proper Pan Size. This helps prevent spills and movement of the pan when stirring or turning food. Proper relationship of cookware to properly grounded outlet. All ranges can cause burns from grease build up. Install anti-tip device packaged with gas. 2) Providing good ventilation during and immediately after self cleaning the oven. 3) Operating...
...'s directions when using cooking or roasting bags. • Hold the handle of the pan. • Use Proper Pan Size. This helps prevent spills and movement of the pan when stirring or turning food. Proper relationship of cookware to properly grounded outlet. All ranges can cause burns from grease build up. Install anti-tip device packaged with gas. 2) Providing good ventilation during and immediately after self cleaning the oven. 3) Operating...
Use & Care Manual
Page 7
... NOT use the warming drawer to heat cold food (exception: it is safe to use of an error the display flashes and beeps continuously. Refer all servicing to maintain proper food temperature. Disconnect appliance from the power supply and call a qualified technician. • Do not operate oven without oven bottom in this manual. Contact an authorized servicer. • Do not obstruct oven vents. • Do not repair or replace any...
... NOT use the warming drawer to heat cold food (exception: it is safe to use of an error the display flashes and beeps continuously. Refer all servicing to maintain proper food temperature. Disconnect appliance from the power supply and call a qualified technician. • Do not operate oven without oven bottom in this manual. Contact an authorized servicer. • Do not obstruct oven vents. • Do not repair or replace any...
Use & Care Manual
Page 8
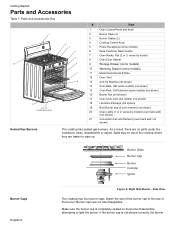
... cooktop has sealed gas burners. Getting Started Parts and Accessories Table 1: Parts and Accessories Key 1 2 3 4 5 12 6 7 8 11 9 or 10 (model dependent) # Part 1 Oven Control Panel and Knob 2 Burner Caps (4) 3 Burner Grates (2) 4 Cooktop Control Knob 5 Probe Receptacle (some models) (not shown) 16 Broiler Pan (not shown) 17 Oven Door Lock (not visible) (not shown) 18 Literature Package (not shown) 19 Broil Burner (top of oven interior) (not shown) 20 Oven Lights (1 or 2; varies by model) (oven back wall) (not shown) 21 Convection Fan and Element (oven...
... cooktop has sealed gas burners. Getting Started Parts and Accessories Table 1: Parts and Accessories Key 1 2 3 4 5 12 6 7 8 11 9 or 10 (model dependent) # Part 1 Oven Control Panel and Knob 2 Burner Caps (4) 3 Burner Grates (2) 4 Cooktop Control Knob 5 Probe Receptacle (some models) (not shown) 16 Broiler Pan (not shown) 17 Oven Door Lock (not visible) (not shown) 18 Literature Package (not shown) 19 Broil Burner (top of oven interior) (not shown) 20 Oven Lights (1 or 2; varies by model) (oven back wall) (not shown) 21 Convection Fan and Element (oven...
Use & Care Manual
Page 13
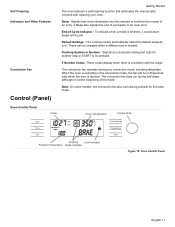
... Convection Fan Control (Panel) Getting Started The oven features a self-cleaning function that more information must be changed when a different one is needed. Flashing Symbol or Number - F Number Codes -These codes display when there is a problem with cleaning your oven. End-of a program or an oven error. A Beep also signals the end of -Cycle Indicator - Signals an incomplete setting and calls for the bake mode. When the oven is opened. Oven Control Panel Clock Oven Temperature Control Knob Light AM PM Time Off Cooking Mode Temperature Start Cooking Lock...
... Convection Fan Control (Panel) Getting Started The oven features a self-cleaning function that more information must be changed when a different one is needed. Flashing Symbol or Number - F Number Codes -These codes display when there is a problem with cleaning your oven. End-of a program or an oven error. A Beep also signals the end of -Cycle Indicator - Signals an incomplete setting and calls for the bake mode. When the oven is opened. Oven Control Panel Clock Oven Temperature Control Knob Light AM PM Time Off Cooking Mode Temperature Start Cooking Lock...

Use & Care Manual
Page 14
... turn the control knob to set the clock time. Turn knob to access the timers. Press Time to select hour and AM or PM. 2. Indicates that is locked. The knobs are used to a 24 hour clock, see "Select Function" section. • If you do not complete the operation of day or the timer. Shows the time of oven during the self-clean mode when the door is selected. Oven Temperature - To switch to control the heat level of the burners. Press Time...
... turn the control knob to set the clock time. Turn knob to access the timers. Press Time to select hour and AM or PM. 2. Indicates that is locked. The knobs are used to a 24 hour clock, see "Select Function" section. • If you do not complete the operation of day or the timer. Shows the time of oven during the self-clean mode when the door is selected. Oven Temperature - To switch to control the heat level of the burners. Press Time...
Use & Care Manual
Page 16
... Start to accept a language change . Lock / Unlock the Oven Control Panel The oven keypad can be displayed. This function DOES NOT lock the oven door. 1. Turn knob clockwise until RESET DEFAULTS is the default language. The display will beep if a key is pressed to end the mode and turn off and no work" requirements on the Sabbath. • The oven will be used during the Sabbath mode to indicate that the keypad is flashing. 3. Change the Oven Temperature Offset This feature...
... Start to accept a language change . Lock / Unlock the Oven Control Panel The oven keypad can be displayed. This function DOES NOT lock the oven door. 1. Turn knob clockwise until RESET DEFAULTS is the default language. The display will beep if a key is pressed to end the mode and turn off and no work" requirements on the Sabbath. • The oven will be used during the Sabbath mode to indicate that the keypad is flashing. 3. Change the Oven Temperature Offset This feature...
Use & Care Manual
Page 17
... oven and warming drawer operate for 73 hours and then turn off . 3. Setting the Sabbath Feature for use with the Sabbath feature unless the feature is turned off automatically. Change the Time Format The clock can be set oven temperature. 6. Press Start. 4. This feature automatically converts package or recipe temperatures for the Warming Drawer Only The warming drawer does not operate with tion Conversion ON or the convection bake mode. The default setting is displayed. 3. Turn knob clockwise until AUTO CONVECT BAKE is "on if desired (press LIGHT). Turn oven light on...
... oven and warming drawer operate for 73 hours and then turn off . 3. Setting the Sabbath Feature for use with the Sabbath feature unless the feature is turned off automatically. Change the Time Format The clock can be set oven temperature. 6. Press Start. 4. This feature automatically converts package or recipe temperatures for the Warming Drawer Only The warming drawer does not operate with tion Conversion ON or the convection bake mode. The default setting is displayed. 3. Turn knob clockwise until AUTO CONVECT BAKE is "on if desired (press LIGHT). Turn oven light on...
Use & Care Manual
Page 19
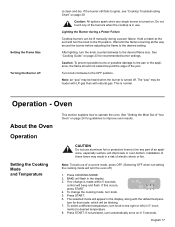
..., oven automatically turns on page 23 for recommended burner settings. English 17 Note: To back out of electric shock or fire. If no change the cooking mode, turn the knob to the right or left (in use aluminum foil or protective liners to ignite, see "Cooktop Troubleshooting Chart" on page 38 Caution: All ignitors spark when any part of the pan. ments) to operate the oven. Wait until the flame...
..., oven automatically turns on page 23 for recommended burner settings. English 17 Note: To back out of electric shock or fire. If no change the cooking mode, turn the knob to the right or left (in use aluminum foil or protective liners to ignite, see "Cooktop Troubleshooting Chart" on page 38 Caution: All ignitors spark when any part of the pan. ments) to operate the oven. Wait until the flame...

Use & Care Manual
Page 37
... operate oven without light bulb and cover in "Setting Up Your Range". 1. Press START. 3. Press START. Press START again to remove oven racks. 6. The default cleaning time is designed to change number of the cycle; Press START. Setting the Self-Clean Mode Delaying the Start of the Self-Clean Do hand-clean door area outside the gasket. Use a soapy sponge or plastic scrubber or a detergent-filled S.O.S.® pad. SELF CLEAN flashes. The door lock symbol will damage the finish or part. 1. See section "Setting the Clock...
... operate oven without light bulb and cover in "Setting Up Your Range". 1. Press START. 3. Press START. Press START again to remove oven racks. 6. The default cleaning time is designed to change number of the cycle; Press START. Setting the Self-Clean Mode Delaying the Start of the Self-Clean Do hand-clean door area outside the gasket. Use a soapy sponge or plastic scrubber or a detergent-filled S.O.S.® pad. SELF CLEAN flashes. The door lock symbol will damage the finish or part. 1. See section "Setting the Clock...

Use & Care Manual
Page 41
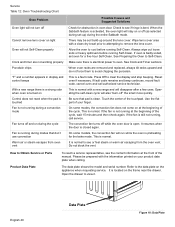
... cooking charts and tips for more information. If the Automatic Convection Conversion Feature is locked and will be manually reduced by 25°F. Remove burner caps and use a stiff nylon bristle toothbrush to provide accurate results. LP gas users • Call service The Oven Table 12: Oven Troubleshooting Chart Oven Problem Possible Causes and Suggested Solutions The oven mode or temperature selected or the numbers selected do not appear in the display Oven door is turned...
... cooking charts and tips for more information. If the Automatic Convection Conversion Feature is locked and will be manually reduced by 25°F. Remove burner caps and use a stiff nylon bristle toothbrush to provide accurate results. LP gas users • Call service The Oven Table 12: Oven Troubleshooting Chart Oven Problem Possible Causes and Suggested Solutions The oven mode or temperature selected or the numbers selected do not appear in the display Oven door is turned...
Use & Care Manual
Page 42
... or warm air escaping from oven vent Possible Causes and Suggested Solutions Check for the bake mode. If the fan is activated, the oven light will stay on the appliance when requesting service. When the Sabbath feature is not running Self-Clean. This is closed again. On some models, the convection fan will also "burn-off while the oven door is preheating for obstruction in display and control beeps With a new range there...
... or warm air escaping from oven vent Possible Causes and Suggested Solutions Check for the bake mode. If the fan is activated, the oven light will stay on the appliance when requesting service. When the Sabbath feature is not running Self-Clean. This is closed again. On some models, the convection fan will also "burn-off while the oven door is preheating for obstruction in display and control beeps With a new range there...
Use & Care Manual
Page 43
... for labor and parts and ship the parts to the nearest authorized service provider, but you would still be available to you, in Bosch 's sole discretion, for resale, or commercial use an unauthorized servicer; Repair/Replace as is", or previously returned model), and not for an additional charge). in any concessions, including repairs, pro-rates, or Product replacement, once this warranty has expired...
... for labor and parts and ship the parts to the nearest authorized service provider, but you would still be available to you, in Bosch 's sole discretion, for resale, or commercial use an unauthorized servicer; Repair/Replace as is", or previously returned model), and not for an additional charge). in any concessions, including repairs, pro-rates, or Product replacement, once this warranty has expired...
Installation Instructions
Page 3
... gas and Natural gas) range. • Channel Lock Pliers • Ask your closing its indiviual shut-off valve. • Never modify or alter the construction of a range by removing leveling legs, panels, wire covers, anti-tip brackets/screws, or any part of the • Gas Shut Off Valve (If not already present) appliance unless specifically recommended • Gloves and Safety Goggles in the manuals. door for use with all applicable codes. • Pipe Wrench (2) • Install...
... gas and Natural gas) range. • Channel Lock Pliers • Ask your closing its indiviual shut-off valve. • Never modify or alter the construction of a range by removing leveling legs, panels, wire covers, anti-tip brackets/screws, or any part of the • Gas Shut Off Valve (If not already present) appliance unless specifically recommended • Gloves and Safety Goggles in the manuals. door for use with all applicable codes. • Pipe Wrench (2) • Install...
Installation Instructions
Page 4
... requires at the service panel. WARNING RANGE TIPPING HAZARD • All ranges can result in this appliance is pulled away from the wall for cleaning, service, or any modifications. CAUTION Unit is CSA certified for use the oven or warming drawer (if equipped) for Gas Burning Appliances and/or local codes. CAUTION Do not use with these instructions. • If the range is being turned ON accidentally. Flexible gas...
... requires at the service panel. WARNING RANGE TIPPING HAZARD • All ranges can result in this appliance is pulled away from the wall for cleaning, service, or any modifications. CAUTION Unit is CSA certified for use the oven or warming drawer (if equipped) for Gas Burning Appliances and/or local codes. CAUTION Do not use with these instructions. • If the range is being turned ON accidentally. Flexible gas...
Installation Instructions
Page 5
... The gas supply line and electrical outlet must be located in the shaded space in Figure 2. If nonstandard cabinets are used, care should be installed according to adjacent vertical combustible walls on the bottom of combustible materials. 4" Min. 30" Minimum Centered 30" Min. 18" Min. 4" Min. Clearance from backwall. Adjust height of range and level by U.L., particularly self-cleaning ovens; Install Ventilation Bosch strongly recommends the installation of a ventilation hood...
... The gas supply line and electrical outlet must be located in the shaded space in Figure 2. If nonstandard cabinets are used, care should be installed according to adjacent vertical combustible walls on the bottom of combustible materials. 4" Min. 30" Minimum Centered 30" Min. 18" Min. 4" Min. Clearance from backwall. Adjust height of range and level by U.L., particularly self-cleaning ovens; Install Ventilation Bosch strongly recommends the installation of a ventilation hood...
Installation Instructions
Page 6
... slides under the anti-tip bracket. Connect Gas Supply Important note for details. 1. Shut off main gas supply valve before disconnecting the old range and leave it off valve. 3. Install male 1/2" or 3/4" flare union adapter on other gas appliances when you plug in an electrical cord, be installed using the LP conversion kit. Connect flexible metal appliance connector. 4. Carefully tip range forward to avoid damage. 2. Wipe off and then plug range cord in this section. CAUTION Before you turn off supply line gas shut...
... slides under the anti-tip bracket. Connect Gas Supply Important note for details. 1. Shut off main gas supply valve before disconnecting the old range and leave it off valve. 3. Install male 1/2" or 3/4" flare union adapter on other gas appliances when you plug in an electrical cord, be installed using the LP conversion kit. Connect flexible metal appliance connector. 4. Carefully tip range forward to avoid damage. 2. Wipe off and then plug range cord in this section. CAUTION Before you turn off supply line gas shut...
Installation Instructions
Page 7
... correct fuel. If the flame burns completely or mostly yellow, adjust the broil burner air shutter. See Figure 8 (next page) for Natural Gas. Step 6: Final Steps - If so, call Bosch Service. Flame Characteristics Yellow Flames: Further adjustment is set for LP Gas. Push down and turn to operate 4-5 minutes and re-evaluate before it reaches 350° F. 3. Once the air has been purged from the supply lines, the burner should be a flame...
... correct fuel. If the flame burns completely or mostly yellow, adjust the broil burner air shutter. See Figure 8 (next page) for Natural Gas. Step 6: Final Steps - If so, call Bosch Service. Flame Characteristics Yellow Flames: Further adjustment is set for LP Gas. Push down and turn to operate 4-5 minutes and re-evaluate before it reaches 350° F. 3. Once the air has been purged from the supply lines, the burner should be a flame...


