Installation Instructions
Page 6
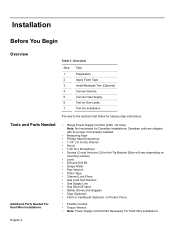
... and Goggles • Tape (Optional) • Cloth or Cardboard (Optional - Tools and Parts Needed Additional Parts Needed For Hard Wire Installations • Range Power Supply Cord Kit (240V -30 Amp) Note: Not necessary for step-by-step instructions. Test the Installation Proceed to Protect Floor) • Flexible Conduit • Torque Wrench •...
... and Goggles • Tape (Optional) • Cloth or Cardboard (Optional - Tools and Parts Needed Additional Parts Needed For Hard Wire Installations • Range Power Supply Cord Kit (240V -30 Amp) Note: Not necessary for step-by-step instructions. Test the Installation Proceed to Protect Floor) • Flexible Conduit • Torque Wrench •...
Installation Instructions
Page 8
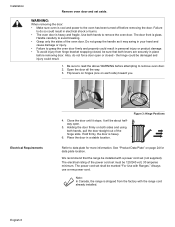
...way. 3. Flip levers on hinges (one on both sides and using both hands to remove oven door. 2. It will be 120/240 volt, 30 amperes minimum. Handle carefully to grasp the oven door firmly and properly could result. 1. Figure 3: Hinge Positions Refer to the oven has been turned...is heavy. 6. We recommend that both levers are securely in personal injury or product damage. • To avoid injury from the factory with the range cord already installed. Be sure to do not force door open . 5. Installation Remove oven door and set (not supplied). Failure to read the...
...way. 3. Flip levers on hinges (one on both sides and using both hands to remove oven door. 2. It will be 120/240 volt, 30 amperes minimum. Handle carefully to grasp the oven door firmly and properly could result. 1. Figure 3: Hinge Positions Refer to the oven has been turned...is heavy. 6. We recommend that both levers are securely in personal injury or product damage. • To avoid injury from the factory with the range cord already installed. Be sure to do not force door open . 5. Installation Remove oven door and set (not supplied). Failure to read the...
Installation Instructions
Page 9
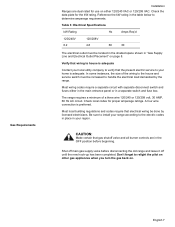
... building regulations and codes require that gas shutoff valve and all burner controls are dual rated for use on either in the main entrance panel or in the OFF position before disconnecting the old range and leave it off until the new hook-up has been completed. Don't forget... and Electrical Outlet Placement" on . Table 3: Electrical Specifications kW Rating Hz Amps Req'd 120/240V 6.2 120/208V 4.8 60 30 The electrical outlet must be done by the range. Verify that wiring to house is adequate Contact your local utility company to verify that the present electric service to handle...
... building regulations and codes require that gas shutoff valve and all burner controls are dual rated for use on either in the main entrance panel or in the OFF position before disconnecting the old range and leave it off until the new hook-up has been completed. Don't forget... and Electrical Outlet Placement" on . Table 3: Electrical Specifications kW Rating Hz Amps Req'd 120/240V 6.2 120/208V 4.8 60 30 The electrical outlet must be done by the range. Verify that wiring to house is adequate Contact your local utility company to verify that the present electric service to handle...

Installation Instructions
Page 10
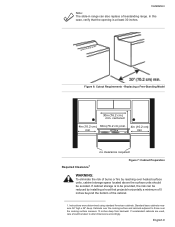
Allow a minimum of 30 inches between cabinets where range is to the range. Important note for LP users The range is designed for use with natural gas. For use with propane (LP) gas, your range must be located in the shaded space as shown in an easily accessible location. ... Supply Line and Electrical Outlet Placement. 7 1/2" (190.5 mm) 3 1/2" 88.9 mm 4 1/2" 114.3 mm 4" (101.6 mm) 13 1/8 " (333 mm) 3 7/8" (98 mm) 30" (762 mm) 4 1/2" 114.3 mm Figure 4: Gas Supply Line and Electrical Outlet Placement If not already present, install gas shut off the gas supply to be...
Allow a minimum of 30 inches between cabinets where range is to the range. Important note for LP users The range is designed for use with natural gas. For use with propane (LP) gas, your range must be located in the shaded space as shown in an easily accessible location. ... Supply Line and Electrical Outlet Placement. 7 1/2" (190.5 mm) 3 1/2" 88.9 mm 4 1/2" 114.3 mm 4" (101.6 mm) 13 1/8 " (333 mm) 3 7/8" (98 mm) 30" (762 mm) 4 1/2" 114.3 mm Figure 4: Gas Supply Line and Electrical Outlet Placement If not already present, install gas shut off the gas supply to be...
Installation Instructions
Page 11
...cooking surface measure 13 inches deep from backwall. In this case, verify that the opening is to be provided, the risk can also replace a freestanding range. English 9 Standard base cabinets measure 36" high x 24" deep. Replacing a Free-Standing Model 30in (76.2 cm ) min. If nonstandard cabinets... taken to those over the cooking surface and cabinets adjacent to alter dimensions accordingly. If cabinet storage is at least 30 inches. Installation Note: The slide-in range can be reduced by installing a hood that projects horizontally a minimum of 5 inches beyond the bottom of burns or...
...cooking surface measure 13 inches deep from backwall. In this case, verify that the opening is to be provided, the risk can also replace a freestanding range. English 9 Standard base cabinets measure 36" high x 24" deep. Replacing a Free-Standing Model 30in (76.2 cm ) min. If nonstandard cabinets... taken to those over the cooking surface and cabinets adjacent to alter dimensions accordingly. If cabinet storage is at least 30 inches. Installation Note: The slide-in range can be reduced by installing a hood that projects horizontally a minimum of 5 inches beyond the bottom of burns or...

Installation Instructions
Page 12
... finishes cannot survive the temperatures allowed by (a) not less than 1/4" of a ventilation hood above : There must be a minimum clearance of 30 inches between the top of the cooking surface and the bottom of not less than No. 28 MSG sheet metal, 0.015 inch stainless steel...surface (i.e., for wood floor use wood screws, for concrete floor use concrete anchors and screws). Countertops must be smooth and level. From range walls to adjacent materials: See Figure 7: Cabinet Preparation. the cabinets may discolor or stain. Installation Prepare Walls and Floor Countertop Requirements ...
... finishes cannot survive the temperatures allowed by (a) not less than 1/4" of a ventilation hood above : There must be a minimum clearance of 30 inches between the top of the cooking surface and the bottom of not less than No. 28 MSG sheet metal, 0.015 inch stainless steel...surface (i.e., for wood floor use wood screws, for concrete floor use concrete anchors and screws). Countertops must be smooth and level. From range walls to adjacent materials: See Figure 7: Cabinet Preparation. the cabinets may discolor or stain. Installation Prepare Walls and Floor Countertop Requirements ...
Installation Instructions
Page 15
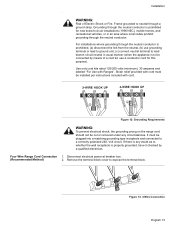
...by means of Electric Shock or Fire. Figure 12: Grounding Requirements WARNING: To prevent electrical shock, the grounding prong on the range cord should not be plugged into a matching grounding type receptacle and connected to a correctly polarized 240- If there is any circumstances. Four ...Wire Range Cord Connection 1. Use only cord kits rated 125/250 volts (minimum), 30 amperes and labeled "For Use with cord must be cut or removed under any doubt as to be ...
...by means of Electric Shock or Fire. Figure 12: Grounding Requirements WARNING: To prevent electrical shock, the grounding prong on the range cord should not be plugged into a matching grounding type receptacle and connected to a correctly polarized 240- If there is any circumstances. Four ...Wire Range Cord Connection 1. Use only cord kits rated 125/250 volts (minimum), 30 amperes and labeled "For Use with cord must be cut or removed under any doubt as to be ...