Installation Instructions
Page 8
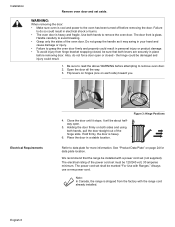
...door is glass. Place the door in place before removing the door. We recommend that both levers are securely in a stable location. Installation Remove oven door and set must be 120/240 volt, 30 amperes minimum. Also, do so could result. 1. Electrical Requirements 4. See "Product Data Plate" on... injury. • Failure to grasp the oven door firmly and properly could be about halfway open or closed , be sure that the range be installed with Ranges." Handle carefully to remove oven door. 2. Always use a new power cord. Holding the door firmly on each side) toward you. ...
...door is glass. Place the door in place before removing the door. We recommend that both levers are securely in a stable location. Installation Remove oven door and set must be 120/240 volt, 30 amperes minimum. Also, do so could result. 1. Electrical Requirements 4. See "Product Data Plate" on... injury. • Failure to grasp the oven door firmly and properly could be about halfway open or closed , be sure that the range be installed with Ranges." Handle carefully to remove oven door. 2. Always use a new power cord. Holding the door firmly on each side) toward you. ...

Installation Instructions
Page 12
... wall properly. Secure bracket with laminated cabinets. For most noticeable with 2 screws adequate for mounting surface (i.e., for wood floor use wood screws, for concrete floor use concrete anchors and screws). Seal any obstructions (extra electrical or gas connections, etc.) so that range will rest against...a ventilation hood above : There must be a minimum clearance of 30 inches between the top of the cooking surface and the bottom of an unprotected wood or metal cabinet. Install Anti-Tip Bracket 1. The range hood must be smooth and level. English 10 See Figure 7: Cabinet...
... wall properly. Secure bracket with laminated cabinets. For most noticeable with 2 screws adequate for mounting surface (i.e., for wood floor use wood screws, for concrete floor use concrete anchors and screws). Seal any obstructions (extra electrical or gas connections, etc.) so that range will rest against...a ventilation hood above : There must be a minimum clearance of 30 inches between the top of the cooking surface and the bottom of an unprotected wood or metal cabinet. Install Anti-Tip Bracket 1. The range hood must be smooth and level. English 10 See Figure 7: Cabinet...

Installation Instructions
Page 16
...nut, star washer, and round washer from center post, rotate so that wide end is at this time. Properly secure strain relief (see previous section). Note: DO NOT plug in range at top and attach wide end to center post. 8. green ground screw ground strap ground wire Figure 14: Four...each post. Ground Strap and Wire 6. Attach black wire, round washer, star washer and nut IN THIS ORDER to left post. 7. Tighten all connections securely and replace terminal block cover. 10. Attach green wire on top of ground strap. 5. Attach white wire, round washer, star washer and nut IN...
...nut, star washer, and round washer from center post, rotate so that wide end is at this time. Properly secure strain relief (see previous section). Note: DO NOT plug in range at top and attach wide end to center post. 8. green ground screw ground strap ground wire Figure 14: Four...each post. Ground Strap and Wire 6. Attach black wire, round washer, star washer and nut IN THIS ORDER to left post. 7. Tighten all connections securely and replace terminal block cover. 10. Attach green wire on top of ground strap. 5. Attach white wire, round washer, star washer and nut IN...
Installation Instructions
Page 18
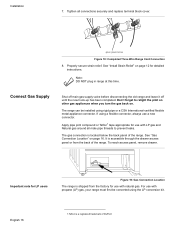
...Strain Relief" on page 12 for use with LP gas and Natural gas around all connections securely and replace terminal block cover. Important note for LP users Figure 19: Gas Connection Location The range is a registered trademark of DuPont Apply pipe joint compound or Teflon1 tape appropriate for use...the pilot on other gas appliances when you turn the gas back on page 16. Properly secure strain relief. To reach access panel, remove drawer. For use with propane (LP) gas, your range must first be installed using rigid pipe or a CSA International-certified flexible metal appliance connector....
...Strain Relief" on page 12 for use with LP gas and Natural gas around all connections securely and replace terminal block cover. Important note for LP users Figure 19: Gas Connection Location The range is a registered trademark of DuPont Apply pipe joint compound or Teflon1 tape appropriate for use...the pilot on other gas appliances when you turn the gas back on page 16. Properly secure strain relief. To reach access panel, remove drawer. For use with propane (LP) gas, your range must first be installed using rigid pipe or a CSA International-certified flexible metal appliance connector....