Use & Care Manual
Page 1
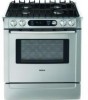
Use and Care Manual Dual Fuel Range
Use and Care Manual Dual Fuel Range
Use & Care Manual
Page 3
...and Maintenance section describes how to clean and maintain your appliance. • The Service section includes troubleshooting tips and your range, be sure to operate each range component. • The Getting the Most out of the manual. About This Manual How This Manual Is Organized This manual... contains several sections: • The Getting Started section describes the features and functionality of the range, including a description of how to set up the range and operate the control panel. • The Operation sections describe how to read this manual.
...and Maintenance section describes how to clean and maintain your appliance. • The Service section includes troubleshooting tips and your range, be sure to operate each range component. • The Getting the Most out of the manual. About This Manual How This Manual Is Organized This manual... contains several sections: • The Getting Started section describes the features and functionality of the range, including a description of how to set up the range and operate the control panel. • The Operation sections describe how to read this manual.
Use & Care Manual
Page 4
...; Set the burner control so that the flame does not extend beyond the edges of the pan. Never use . WARNING: TO REDUCE THE RISK OF A RANGE TOP GREASE FIRE: a) Never leave surface units unattended at high heat or when flambéing food (i.e. Always use aluminum foil or protective liners to...
...; Set the burner control so that the flame does not extend beyond the edges of the pan. Never use . WARNING: TO REDUCE THE RISK OF A RANGE TOP GREASE FIRE: a) Never leave surface units unattended at high heat or when flambéing food (i.e. Always use aluminum foil or protective liners to...
Use & Care Manual
Page 5
Gas Safety Safety WARNING: TO REDUCE THE RISK OF INJURY TO PERSONS IN THE EVENT OF A RANGE TOP GREASE FIRE, OBSERVE THE FOLLOWING: a) SMOTHER FLAMES with a close-fitting lid, cookie sheet, or metal tray, then turn it -yourself" procedure. b) NEVER PICK UP A ...
Gas Safety Safety WARNING: TO REDUCE THE RISK OF INJURY TO PERSONS IN THE EVENT OF A RANGE TOP GREASE FIRE, OBSERVE THE FOLLOWING: a) SMOTHER FLAMES with a close-fitting lid, cookie sheet, or metal tray, then turn it -yourself" procedure. b) NEVER PICK UP A ...
Use & Care Manual
Page 8
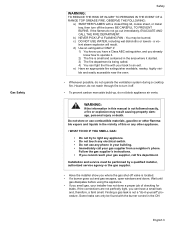
... the event of corrosive chemicals in injury. • Do not operate this manual. Connect only to Installation Instructions for details. • All ranges can tip. Refer to properly grounded outlet. Figure 1: Tipping Precautions • This appliance is safe to use only. The use of an ... appliance must be properly installed and grounded by a qualified technician. Injury to heat cold food (excep- Install anti-tip device packaged with range. It is not approved for normal family household use the drawer to crisp crackers, chips or dry cereal and to warm plates.) 2)...
... the event of corrosive chemicals in injury. • Do not operate this manual. Connect only to Installation Instructions for details. • All ranges can tip. Refer to properly grounded outlet. Figure 1: Tipping Precautions • This appliance is safe to use only. The use of an ... appliance must be properly installed and grounded by a qualified technician. Injury to heat cold food (excep- Install anti-tip device packaged with range. It is not approved for normal family household use the drawer to crisp crackers, chips or dry cereal and to warm plates.) 2)...
Use & Care Manual
Page 12
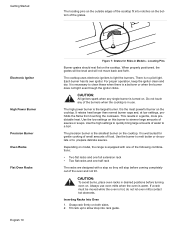
... from touching the cookware. Each burner has its own ignitor. It is hot, do not let oven mitts contact hot elements. Depending on model, the range is in a gentle, more predictable heat. CAUTION: All ignitors spark when any of the burners when the cooktop is equipped with one of the following...
... from touching the cookware. Each burner has its own ignitor. It is hot, do not let oven mitts contact hot elements. Depending on model, the range is in a gentle, more predictable heat. CAUTION: All ignitors spark when any of the burners when the cooktop is equipped with one of the following...

Use & Care Manual
Page 13
Getting Started 3. Rack should be in the closed position top side up and pull the rest of the range. When the stop is in the back of the way in the closed position when removing and replacing. To order a full extension rack, contact Service ...
Getting Started 3. Rack should be in the closed position top side up and pull the rest of the range. When the stop is in the back of the way in the closed position when removing and replacing. To order a full extension rack, contact Service ...
Use & Care Manual
Page 16
... default temperature. When the oven is operating in the convection mode, the fan will sound. Beep - Signals that eliminates the manual labor involved with the range. To indicate when a mode is finished, 3 consecutive beeps will turn off after the oven is shut off. Flashing Symbol or Number - The convection fan does...
... default temperature. When the oven is operating in the convection mode, the fan will sound. Beep - Signals that eliminates the manual labor involved with the range. To indicate when a mode is finished, 3 consecutive beeps will turn off after the oven is shut off. Flashing Symbol or Number - The convection fan does...
Use & Care Manual
Page 17
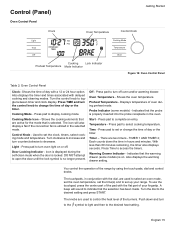
...the timer also displays seconds. Also displays the warming drawer setting. Turn the control knob to display cooking mode. Displays temperature of the range by using the touch pads, dial and control knobs. There are used to select an oven mode, set the oven temperature, set the...is no longer present. Oven Temperature - Warming Drawer Indicator - English 15 Cooking Mode Icon - Turn clockwise to control the heat level of your range. Shows the oven temperature. Press pad to set up your fingertip. TIMER 1 AND TIMER 2; Control Knob - Shows the cooking elements that are...
...the timer also displays seconds. Also displays the warming drawer setting. Turn the control knob to display cooking mode. Displays temperature of the range by using the touch pads, dial and control knobs. There are used to select an oven mode, set the oven temperature, set the...is no longer present. Oven Temperature - Warming Drawer Indicator - English 15 Cooking Mode Icon - Turn clockwise to control the heat level of your range. Shows the oven temperature. Press pad to set up your fingertip. TIMER 1 AND TIMER 2; Control Knob - Shows the cooking elements that are...

Use & Care Manual
Page 18
... as a reminder to set the clock after installation or after a power failure. Press TIME. Press TIME and hour digits flash. 4. Turn knob to change the range features listed below. Turn knob slowly and wait approximately one second for display to exit the Select Functions Menu. Press OFF to show next feature...
... as a reminder to set the clock after installation or after a power failure. Press TIME. Press TIME and hour digits flash. 4. Turn knob to change the range features listed below. Turn knob slowly and wait approximately one second for display to exit the Select Functions Menu. Press OFF to show next feature...

Use & Care Manual
Page 21
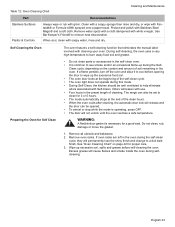
... "Cleaning and Maintenance" on ". Before Using the Appliance for use with a glass ceramic cooktop, apply the glass ceramic cooktop cleaner. OFF 1. Remove packing materials from range. Turn knob to select 12 hour or 24 hour format. 5. Getting Started Note: The light cannot be changed after 5 seconds. The oven and warming drawer...
... "Cleaning and Maintenance" on ". Before Using the Appliance for use with a glass ceramic cooktop, apply the glass ceramic cooktop cleaner. OFF 1. Remove packing materials from range. Turn knob to select 12 hour or 24 hour format. 5. Getting Started Note: The light cannot be changed after 5 seconds. The oven and warming drawer...

Use & Care Manual
Page 24
Operation - Installation of these liners may result in a risk of Your Oven" on page 30 for guidelines to turn the oven off , it will flash in 5 seconds. 9. If no change is activated, the display will beep and flash. If this ... preheat. Once cooking has been completed, press OFF to improve oven results. Simply enter the package or recipe temperature when setting the mode and the range calculates the correct temperature. The Automatic Convection Conversion feature can be blinking. 7. See "Turn Automatic Convection Conversion ON or OFF" on in the display. 3. Oven...
Operation - Installation of these liners may result in a risk of Your Oven" on page 30 for guidelines to turn the oven off , it will flash in 5 seconds. 9. If no change is activated, the display will beep and flash. If this ... preheat. Once cooking has been completed, press OFF to improve oven results. Simply enter the package or recipe temperature when setting the mode and the range calculates the correct temperature. The Automatic Convection Conversion feature can be blinking. 7. See "Turn Automatic Convection Conversion ON or OFF" on in the display. 3. Oven...

Use & Care Manual
Page 25
... display will turn the knob. Press TIME and TIMER 1 will continue flashing. 4. Otherwise, continue to change hours. 6. Press TIME and new time is not pressed, range will beep and display will flash in display. If setting only minutes, press START. TIMER 1 will appear in display. 0: 00 TIMER 1 Turn clockwise and TIMER...
... display will turn the knob. Press TIME and TIMER 1 will continue flashing. 4. Otherwise, continue to change hours. 6. Press TIME and new time is not pressed, range will beep and display will flash in display. If setting only minutes, press START. TIMER 1 will appear in display. 0: 00 TIMER 1 Turn clockwise and TIMER...
Use & Care Manual
Page 26
... Sabbath Feature See "Set the Sabbath Feature" on page 31 for 100°F up to 450°F (38°C up to prevent overcooking. The temperature range for the oven to reach temperature must be used to preheat. Operation - Set minutes and then press TIME. English 24 Set minutes. At the end...
... Sabbath Feature See "Set the Sabbath Feature" on page 31 for 100°F up to 450°F (38°C up to prevent overcooking. The temperature range for the oven to reach temperature must be used to preheat. Operation - Set minutes and then press TIME. English 24 Set minutes. At the end...

Use & Care Manual
Page 31
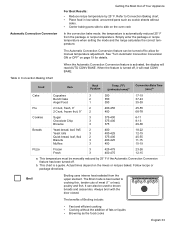
... on environmental conditions. High 6-8 - Low Cookware Selection Guide Cookware Characteristics To Test the Flatness of the food, • burner used and • the cook's preference. A range of heat settings are best. Smaller volumes will boil faster than a heavy-weight one). • Start with flat bases. Getting the Most Out of Your...
... on environmental conditions. High 6-8 - Low Cookware Selection Guide Cookware Characteristics To Test the Flatness of the food, • burner used and • the cook's preference. A range of heat settings are best. Smaller volumes will boil faster than a heavy-weight one). • Start with flat bases. Getting the Most Out of Your...
Use & Care Manual
Page 35
... 25° F if the Automatic Convection Conversion feature has been turned off. Simply enter the package or recipe temperature when setting the mode and the range calculates the correct temperature. See "Turn Automatic Convection Conversion ON or OFF" on the mixes or recipes baked. This temperature must be used to allow...
... 25° F if the Automatic Convection Conversion feature has been turned off. Simply enter the package or recipe temperature when setting the mode and the range calculates the correct temperature. See "Turn Automatic Convection Conversion ON or OFF" on the mixes or recipes baked. This temperature must be used to allow...
Use & Care Manual
Page 36
... on cooking with foil. It combines intense heat from the cooking surface to prevent sticking • Use the broil pan and grid included with your range • Do not cover the broiler grid with a preheated broil element. Always convection broil with heat circulated by a convection fan. In addition to Broil...
... on cooking with foil. It combines intense heat from the cooking surface to prevent sticking • Use the broil pan and grid included with your range • Do not cover the broiler grid with a preheated broil element. Always convection broil with heat circulated by a convection fan. In addition to Broil...
Use & Care Manual
Page 37
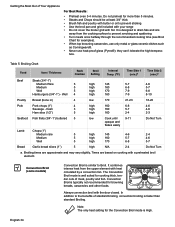
... halfway through the cooking time (See Convection Broil Chart for examples). • Use the broil pan and grid included with your range. • Do not cover the broiler grid with the range for examples. • Do not cover meat or use cooking bags. • Use the broil pan and grid provided with...
... halfway through the cooking time (See Convection Broil Chart for examples). • Use the broil pan and grid included with your range. • Do not cover the broiler grid with the range for examples. • Do not cover meat or use cooking bags. • Use the broil pan and grid provided with...
Use & Care Manual
Page 42
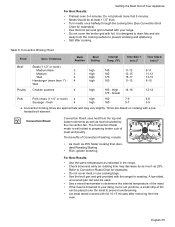
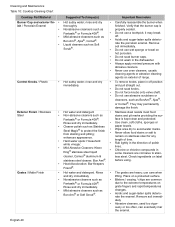
... or towel on label before using. Remove soil immediately. The grates are common due to the extreme temperatures on stainless steel for any length of range. Rinse and dry immediately. • Cleaner polish such as BonAmi®, Ajax®, or Comet®. Mild abrasive cleaners such as • Fantastic® or...
... or towel on label before using. Remove soil immediately. The grates are common due to the extreme temperatures on stainless steel for any length of range. Rinse and dry immediately. • Cleaner polish such as BonAmi®, Ajax®, or Comet®. Mild abrasive cleaners such as • Fantastic® or...
Use & Care Manual
Page 45
... towel. Odors will permanently lose the shiny finish and change to clean for proper care. 3. Do not clean, rub, damage or move the gasket. 1. The range can also be opened. • To cancel or stop while the mode is operating, press OFF. • The door will not unlock until the oven...
... towel. Odors will permanently lose the shiny finish and change to clean for proper care. 3. Do not clean, rub, damage or move the gasket. 1. The range can also be opened. • To cancel or stop while the mode is operating, press OFF. • The door will not unlock until the oven...


