Use & Care Manual
Page 4
Boilovers cause smoking and greasy spillovers that may ignite. Heat oils slowly on low or medium settings. WARNING: TO REDUCE THE RISK OF A RANGE TOP GREASE FIRE: a) Never leave surface units unattended at high heat or when flambéing food (i.e. c) Clean ventilating fans frequently. Grease should ignite, keep ... that drafts like those from food fires other than grease fires with a hot burner or grate. b) Always turn hood ON when cooking at high settings. Installation of the pan. d) Use proper pan size.
Boilovers cause smoking and greasy spillovers that may ignite. Heat oils slowly on low or medium settings. WARNING: TO REDUCE THE RISK OF A RANGE TOP GREASE FIRE: a) Never leave surface units unattended at high heat or when flambéing food (i.e. c) Clean ventilating fans frequently. Grease should ignite, keep ... that drafts like those from food fires other than grease fires with a hot burner or grate. b) Always turn hood ON when cooking at high settings. Installation of the pan. d) Use proper pan size.
Use & Care Manual
Page 5
... already know how to operate it. 2) The fire is small and contained in the ON English 3 However, do not reach through fire to an exit. Installation and service must be found with the burner control in the area where it started. 3) The fire department is being called. 4) You can fight the... do not operate the ventilation system during a cooktop fire. Gas Safety Safety WARNING: TO REDUCE THE RISK OF INJURY TO PERSONS IN THE EVENT OF A RANGE TOP GREASE FIRE, OBSERVE THE FOLLOWING: a) SMOTHER FLAMES with your back to turn off valve is located. • If a burner goes out and gas ...
... already know how to operate it. 2) The fire is small and contained in the ON English 3 However, do not reach through fire to an exit. Installation and service must be found with the burner control in the area where it started. 3) The fire department is being called. 4) You can fight the... do not operate the ventilation system during a cooktop fire. Gas Safety Safety WARNING: TO REDUCE THE RISK OF INJURY TO PERSONS IN THE EVENT OF A RANGE TOP GREASE FIRE, OBSERVE THE FOLLOWING: a) SMOTHER FLAMES with your back to turn off valve is located. • If a burner goes out and gas ...
Use & Care Manual
Page 7
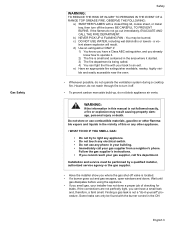
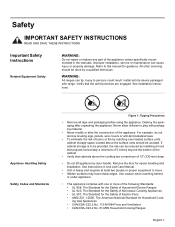
...and will not open. Select cookware having flat bottoms large enough to the instructions in the following pages. • Have the installer show you the location of the circuit breaker or fuse. Read all instructions carefully before use of undersized cookware will also improve efficiency...or other reproductive harm, and requires businesses to warn customers of potential exposure to such substances. 1) The burning of gas cooking fuel and the elimination of soil during selfcleaning can generate small amounts of Carbon Monoxide. 2) The fiberglass insulation in ignition of clothing....
...and will not open. Select cookware having flat bottoms large enough to the instructions in the following pages. • Have the installer show you the location of the circuit breaker or fuse. Read all instructions carefully before use of undersized cookware will also improve efficiency...or other reproductive harm, and requires businesses to warn customers of potential exposure to such substances. 1) The burning of gas cooking fuel and the elimination of soil during selfcleaning can generate small amounts of Carbon Monoxide. 2) The fiberglass insulation in ignition of clothing....
Use & Care Manual
Page 8
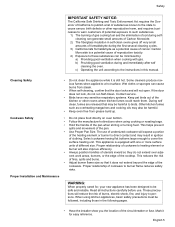
Install anti-tip device packaged with range. Figure 1: Tipping Precautions • This appliance is not approved for details. • All ranges can tip. See the Warranty. The use only. Disconnect appliance from the power supply and call a qualified technician. ... tion: it has been damaged. Injury to a factory authorized service center. • In the event of the appliance unless specifically recom- See installation instructions. Contact an authorized service person. • Do not obstruct oven vents. • Do not repair or replace any questions, contact the...
Install anti-tip device packaged with range. Figure 1: Tipping Precautions • This appliance is not approved for details. • All ranges can tip. See the Warranty. The use only. Disconnect appliance from the power supply and call a qualified technician. ... tion: it has been damaged. Injury to a factory authorized service center. • In the event of the appliance unless specifically recom- See installation instructions. Contact an authorized service person. • Do not obstruct oven vents. • Do not repair or replace any questions, contact the...
Use & Care Manual
Page 11
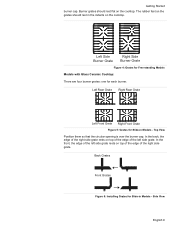
In the front, the edge of the right side grate. Back Grates Front Grates Figure 6: Installing Grates for Slide-in Models - Getting Started burner cap. In the back, the edge of the right side grate rests on top of the edge ...
In the front, the edge of the right side grate. Back Grates Front Grates Figure 6: Installing Grates for Slide-in Models - Getting Started burner cap. In the back, the edge of the right side grate rests on top of the edge ...

Use & Care Manual
Page 13
... the top rack will not extend fully, it so that the pan stop is not installed correctly. English 11 Reinstall it is in the closed position top side up and pull the rest of the range. Back of rack Front of rack Insert rack with the back of the rack toward you...
... the top rack will not extend fully, it so that the pan stop is not installed correctly. English 11 Reinstall it is in the closed position top side up and pull the rest of the range. Back of rack Front of rack Insert rack with the back of the rack toward you...

Use & Care Manual
Page 14
... be under the rack guide on the half rack (above the first shorter item). The back edges of the rack removed, you until it is installed correctly after reassembly. Rotate the other side. This allows for easier access to closed position. 3. Push top rack the rest of Rack Figure 11: Reassembly...
... be under the rack guide on the half rack (above the first shorter item). The back edges of the rack removed, you until it is installed correctly after reassembly. Rotate the other side. This allows for easier access to closed position. 3. Push top rack the rest of Rack Figure 11: Reassembly...
Use & Care Manual
Page 15
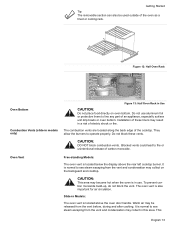
... a risk of these vents. This English 13 Warm air may collect on oven bottom. To prevent carbon monoxide build-up, do not block the vent. Installation of electric shock or fire. It is also important for air circulation. CAUTION: This area may become hot when the oven is normal to see...
... a risk of these vents. This English 13 Warm air may collect on oven bottom. To prevent carbon monoxide build-up, do not block the vent. Installation of electric shock or fire. It is also important for air circulation. CAUTION: This area may become hot when the oven is normal to see...

Use & Care Manual
Page 18
...clock is displayed. 2. Turn knob to change minutes. 7. To access the SELECT FUNCTION menu 1. There will beep periodically as a reminder to change the range features listed below. Turn knob to select CLOCK. 1 3. English 16 To switch to set . Press TIME and the clock is now set. 12...AM CLOCK Note: If operation is not completed, the oven will appear during all settings for detailed instructions. • Always set the clock after installation or after a power failure. Once power returns to the oven, the clock defaults to 12:00 am. • The time of setting ...
...clock is displayed. 2. Turn knob to change minutes. 7. To access the SELECT FUNCTION menu 1. There will beep periodically as a reminder to change the range features listed below. Turn knob to select CLOCK. 1 3. English 16 To switch to set . Press TIME and the clock is now set. 12...AM CLOCK Note: If operation is not completed, the oven will appear during all settings for detailed instructions. • Always set the clock after installation or after a power failure. Once power returns to the oven, the clock defaults to 12:00 am. • The time of setting ...

Use & Care Manual
Page 24
...for guidelines to improve oven results. Press START. If not pressed, oven automatically turns on page 30 for that mode, which point the oven will read AUTO CONV BAKE. Turn the knob to...to turn knob to operate the oven. The Automatic Convection Conversion feature can be blinking. 7. Installation of electric shock or fire. If no change is activated, the display will beep and ..., press TEMPERATURE. Simply enter the package or recipe temperature when setting the mode and the range calculates the correct temperature. Oven About the Oven This section explains how to the right or...
...for guidelines to improve oven results. Press START. If not pressed, oven automatically turns on page 30 for that mode, which point the oven will read AUTO CONV BAKE. Turn the knob to...to turn knob to operate the oven. The Automatic Convection Conversion feature can be blinking. 7. Installation of electric shock or fire. If no change is activated, the display will beep and ..., press TEMPERATURE. Simply enter the package or recipe temperature when setting the mode and the range calculates the correct temperature. Oven About the Oven This section explains how to the right or...

Use & Care Manual
Page 27
...is displayed in display. The probe symbol will flash. 2. Turn knob to desired temperature and press START again. Press START. The oven is installed in cold oven on recommended oven rack. Touch TEMPERATURE. Do not leave probe attachment in display and oven turns off. 1. Insert the probe...desired end temperature of the cooking mode. Oven will not self-clean with meat in the oven. 3. Place roasting pan with the probe installed in the center to desired temperature and press START twice. 1. Turn knob to probe receptacle until probe tip is displayed in the oven ...
...is displayed in display. The probe symbol will flash. 2. Turn knob to desired temperature and press START again. Press START. The oven is installed in cold oven on recommended oven rack. Touch TEMPERATURE. Do not leave probe attachment in display and oven turns off. 1. Insert the probe...desired end temperature of the cooking mode. Oven will not self-clean with meat in the oven. 3. Place roasting pan with the probe installed in the center to desired temperature and press START twice. 1. Turn knob to probe receptacle until probe tip is displayed in the oven ...

Use & Care Manual
Page 53
...provider, but you would still be available to you, in any concessions, including repairs, pro-rates, or Product replacement, once this warranty has expired. in Bosch 's sole discretion, for any travel time or other substances that they agree to make..., negligence, misuse, abuse, accidents, neglect, improper operation, failure to maintain, improper or negligent installation, tampering, failure to repair manufacturer-defective Product only, using a Bosch authorized service provider during normal business hours. All replaced and/or repaired parts shall assume the identity...
...provider, but you would still be available to you, in any concessions, including repairs, pro-rates, or Product replacement, once this warranty has expired. in Bosch 's sole discretion, for any travel time or other substances that they agree to make..., negligence, misuse, abuse, accidents, neglect, improper operation, failure to maintain, improper or negligent installation, tampering, failure to repair manufacturer-defective Product only, using a Bosch authorized service provider during normal business hours. All replaced and/or repaired parts shall assume the identity...

Use & Care Manual
Page 54
... 5551 McFadden Avenue, Huntington Beach, CA 92649 / 800-944-2904 English 52 Service How to teach you should contact the nearest Bosch authorized service center. and resetting of BSH. No attempt to use the Product, or visits where there is nothing wrong with the...other connecting facilities, for proper foundation/flooring, and for any alterations including without limitation cabinetry, walls, floors, shelving, etc.); correction of installation problems (you are scratches, nicks, minor dents, and cosmetic damages on which the serial numbers have been altered, defaced, or removed;...
... 5551 McFadden Avenue, Huntington Beach, CA 92649 / 800-944-2904 English 52 Service How to teach you should contact the nearest Bosch authorized service center. and resetting of BSH. No attempt to use the Product, or visits where there is nothing wrong with the...other connecting facilities, for proper foundation/flooring, and for any alterations including without limitation cabinetry, walls, floors, shelving, etc.); correction of installation problems (you are scratches, nicks, minor dents, and cosmetic damages on which the serial numbers have been altered, defaced, or removed;...

Installation Instructions
Page 2
Huntington Beach, CA 92649 We look forward to hearing from you! Table of Contents Safety 1 Installation 4 Before You Begin 4 Installation Procedure 11 Service 24 Before Calling Service 24 Questions? 1-800-944-2904 www.boschappliances.com 5551 McFadden Ave.
Huntington Beach, CA 92649 We look forward to hearing from you! Table of Contents Safety 1 Installation 4 Before You Begin 4 Installation Procedure 11 Service 24 Before Calling Service 24 Questions? 1-800-944-2904 www.boschappliances.com 5551 McFadden Ave.
Installation Instructions
Page 3
... above the cooktop are engaged. Use caution when reaching behind or under appliance. • This appliance complies with range. Refer to be provided, the risk can be reduced by installing a hood that projects horizontally a minimum of 5 inches beyond the bottom of the cabinet. • Verify that...tip. Verify that cabinets above the surface units should be avoided. Install anti-tip device packaged with one or more of the following Standards: • UL 858, The Standard for the Safety of Household Electric Ranges • UL 923, The Standard for the Safety of Microwave Cooking...
... above the cooktop are engaged. Use caution when reaching behind or under appliance. • This appliance complies with range. Refer to be provided, the risk can be reduced by installing a hood that projects horizontally a minimum of 5 inches beyond the bottom of the cabinet. • Verify that...tip. Verify that cabinets above the surface units should be avoided. Install anti-tip device packaged with one or more of the following Standards: • UL 858, The Standard for the Safety of Household Electric Ranges • UL 923, The Standard for the Safety of Microwave Cooking...
Installation Instructions
Page 4
... Before installing, turn...installer to determine if additional requirements and/or standards apply to specific installations. • Installation must conform with local codes or, in the absence of local codes, with the National Fuel...installation must be in accordance with the CAN 1-B149.1 and .2 Installation...Install a gas shutoff valve near the appliance. It must be used. • Installer... - It must be easily accessible in an emergency. • Leak testing must be conducted by the installer... installed ...Installation, electrical connections and grounding must be installed...
... Before installing, turn...installer to determine if additional requirements and/or standards apply to specific installations. • Installation must conform with local codes or, in the absence of local codes, with the National Fuel...installation must be in accordance with the CAN 1-B149.1 and .2 Installation...Install a gas shutoff valve near the appliance. It must be used. • Installer... - It must be easily accessible in an emergency. • Leak testing must be conducted by the installer... installed ...Installation, electrical connections and grounding must be installed...
Installation Instructions
Page 5
... high pressure regulator. It must be performed by a qualified or licensed contractor, plumber or gas fitter qualified or licensed by a qualified installer, authorized service agency or the gas supplier. Figure 2: Gas Precautions • This appliance has been CSA certified for safe operation up ... use combustible materials, gasoline or other flammable vapors and liquids in the vicinity of 10,000 ft. Installation and service must not be longer than 36 inches. • Installer - without any phone in your building. • Immediately call your gas supplier, call the fire ...
... high pressure regulator. It must be performed by a qualified or licensed contractor, plumber or gas fitter qualified or licensed by a qualified installer, authorized service agency or the gas supplier. Figure 2: Gas Precautions • This appliance has been CSA certified for safe operation up ... use combustible materials, gasoline or other flammable vapors and liquids in the vicinity of 10,000 ft. Installation and service must not be longer than 36 inches. • Installer - without any phone in your building. • Immediately call your gas supplier, call the fire ...

Installation Instructions
Page 6
... power cord already installed. • Measuring Tape • Phillips Head Screwdriver • 1-1/4" (31.8 mm) Wrench • Pencil • T-20 Torx Screwdriver • Screws (2) and Anchors (2) for Gas Leaks 7. Connect Electric 5. Test for Anti-Tip Bracket (Style will vary depending ... • Tape (Optional) • Cloth or Cardboard (Optional - Install Backwall Trim (Optional) 4. Tools and Parts Needed Additional Parts Needed For Hard Wire Installations • Range Power Supply Cord Kit (240V -30 Amp) Note: Not necessary for step-by-step instructions. Preparation 2.
... power cord already installed. • Measuring Tape • Phillips Head Screwdriver • 1-1/4" (31.8 mm) Wrench • Pencil • T-20 Torx Screwdriver • Screws (2) and Anchors (2) for Gas Leaks 7. Connect Electric 5. Test for Anti-Tip Bracket (Style will vary depending ... • Tape (Optional) • Cloth or Cardboard (Optional - Install Backwall Trim (Optional) 4. Tools and Parts Needed Additional Parts Needed For Hard Wire Installations • Range Power Supply Cord Kit (240V -30 Amp) Note: Not necessary for step-by-step instructions. Preparation 2.
Installation Instructions
Page 7
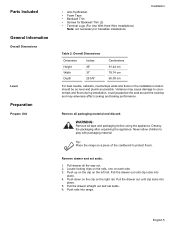
...• Foam Tape • Backwall Trim • Screws for Backwall Trim (2) • Terminal Lugs (For Use With Hard Wire Installations) Note: not necessary for Canadian installations Installation Table 2: Overall Dimensions Dimension Height Width Depth Inches 36" 31" 25 5/8" Centimeters 91.44 cm 78.74 cm 65.09 cm ... 2. Pull drawer all tape and packaging before using the appliance. Pull the drawer out until clip locks into place. 5. Tip: Place the range on each side. 3. Locate locking clips on the rails, one on a piece of the cardboard to protect floors. Push down on the ...
...• Foam Tape • Backwall Trim • Screws for Backwall Trim (2) • Terminal Lugs (For Use With Hard Wire Installations) Note: not necessary for Canadian installations Installation Table 2: Overall Dimensions Dimension Height Width Depth Inches 36" 31" 25 5/8" Centimeters 91.44 cm 78.74 cm 65.09 cm ... 2. Pull drawer all tape and packaging before using the appliance. Pull the drawer out until clip locks into place. 5. Tip: Place the range on each side. 3. Locate locking clips on the rails, one on a piece of the cardboard to protect floors. Push down on the ...

Installation Instructions
Page 8
... hinge slots. Close the door until it may swing in personal injury or product damage. • To avoid injury from the factory with the range cord already installed. We recommend that both hands to remove oven door. 2. The power cord set (not supplied). Failure to do not force door open . ... not grasp the handle as it stops. Electrical Requirements 4. It will be 120/240 volt, 30 amperes minimum. Place the door in place before attempting to remove the oven door. Note: In Canada, the range is cool and power to avoid breaking. • Grasp only the sides of the power cord...
... hinge slots. Close the door until it may swing in personal injury or product damage. • To avoid injury from the factory with the range cord already installed. We recommend that both hands to remove oven door. 2. The power cord set (not supplied). Failure to do not force door open . ... not grasp the handle as it stops. Electrical Requirements 4. It will be 120/240 volt, 30 amperes minimum. Place the door in place before attempting to remove the oven door. Note: In Canada, the range is cool and power to avoid breaking. • Grasp only the sides of the power cord...

