Use & Care Manual
Page 5
... WATER, including wet dishcloths or towels - d) Use an extinguisher ONLY if: 1) You know how to an exit. Gas Safety Safety WARNING: TO REDUCE THE RISK OF INJURY TO PERSONS IN THE EVENT OF A RANGE TOP GREASE FIRE, OBSERVE THE FOLLOWING: a) SMOTHER FLAMES with your installer has not done a proper job of checking...
... WATER, including wet dishcloths or towels - d) Use an extinguisher ONLY if: 1) You know how to an exit. Gas Safety Safety WARNING: TO REDUCE THE RISK OF INJURY TO PERSONS IN THE EVENT OF A RANGE TOP GREASE FIRE, OBSERVE THE FOLLOWING: a) SMOTHER FLAMES with your installer has not done a proper job of checking...

Use & Care Manual
Page 50
...is wet, damaged or dirty. Turn knobs to the "OFF" position or to the gas supply. Call gas company. • Plug is not completely inserted into outlet or the house wiring is...caps are in the ON position and the gas supply to the house is not shut off. • Unit is not hooked ...up to desired flame setting. • Gas is not working properly. burner is in the "light" position. Make sure the gas shut-off valve is hard to push debris through... takes too long to cool. LP gas users • Call service. See "Cookware Selection Guide" on environmental conditions. See "Boiling ...
...is wet, damaged or dirty. Turn knobs to the "OFF" position or to the gas supply. Call gas company. • Plug is not completely inserted into outlet or the house wiring is...caps are in the ON position and the gas supply to the house is not shut off. • Unit is not hooked ...up to desired flame setting. • Gas is not working properly. burner is in the "light" position. Make sure the gas shut-off valve is hard to push debris through... takes too long to cool. LP gas users • Call service. See "Cookware Selection Guide" on environmental conditions. See "Boiling ...
Installation Instructions
Page 3
...appliance. Refer to persons could result. Remove the door for Household Cooking Gas Appliances • CAN/CSA-C22.2 No. 113-M1984 Fans and Ventilators • CAN/CSA-C22.2 No. 61-M89 Household Cooking Ranges English 1 For example, do not remove leveling legs, panels, wire covers... • To eliminate the risk of the appliance. Use caution when reaching behind or under appliance. • This appliance complies with range. Appliance Handling Safety Safety Codes and Standards Figure 1: Tipping Precautions • Remove all tape and packaging before using the appliance. See ...
...appliance. Refer to persons could result. Remove the door for Household Cooking Gas Appliances • CAN/CSA-C22.2 No. 113-M1984 Fans and Ventilators • CAN/CSA-C22.2 No. 61-M89 Household Cooking Ranges English 1 For example, do not remove leveling legs, panels, wire covers... • To eliminate the risk of the appliance. Use caution when reaching behind or under appliance. • This appliance complies with range. Appliance Handling Safety Safety Codes and Standards Figure 1: Tipping Precautions • Remove all tape and packaging before using the appliance. See ...
Installation Instructions
Page 4
... to specific installations. • Installation must conform with local codes or, in the absence of local codes, with the National Fuel Gas Code, ANSI Z223.1/NFPA 54. • The appliance must be electrically grounded in accordance with local codes or, in the absence of... Electrical Code ANSI/ NFPA 70, latest edition. (In Canada, installation must be in accordance with ranges" shall be plugged into a matching grounding type receptacle to prevent power from the gas supply piping system by a qualified tech- Installation, electrical connections and grounding must comply with all controls...
... to specific installations. • Installation must conform with local codes or, in the absence of local codes, with the National Fuel Gas Code, ANSI Z223.1/NFPA 54. • The appliance must be electrically grounded in accordance with local codes or, in the absence of... Electrical Code ANSI/ NFPA 70, latest edition. (In Canada, installation must be in accordance with ranges" shall be plugged into a matching grounding type receptacle to prevent power from the gas supply piping system by a qualified tech- Installation, electrical connections and grounding must comply with all controls...

Installation Instructions
Page 6
...and Drill Bit • Soapy Water • Pipe Wrench • Teflon Tape • Channel Lock Pliers • Gas Leak Test Solution • Gas Supply Line • Gas Shut Off Valve • Safety Gloves and Goggles • Tape (Optional) • Cloth or Cardboard (Optional -... Canadian installations; Preparation 2. Tools and Parts Needed Additional Parts Needed For Hard Wire Installations • Range Power Supply Cord Kit (240V -30 Amp) Note: Not necessary for Gas Leaks 7. Connect Gas Supply 6. Installation Before You Begin Overview Table 1: Overview Step Task 1.
...and Drill Bit • Soapy Water • Pipe Wrench • Teflon Tape • Channel Lock Pliers • Gas Leak Test Solution • Gas Supply Line • Gas Shut Off Valve • Safety Gloves and Goggles • Tape (Optional) • Cloth or Cardboard (Optional -... Canadian installations; Preparation 2. Tools and Parts Needed Additional Parts Needed For Hard Wire Installations • Range Power Supply Cord Kit (240V -30 Amp) Note: Not necessary for Gas Leaks 7. Connect Gas Supply 6. Installation Before You Begin Overview Table 1: Overview Step Task 1.

Installation Instructions
Page 9
...to determine amperage requirements. CAUTION: Make certain that wiring to house is preferred. Shut off main gas supply valve before beginning. Gas Requirements Installation Ranges are in the OFF position before disconnecting the old range and leave it off until the new hook-up has been completed. A four wire connection is... the size of a three wire 120/240 or 120/208 volt, 30 AMP, 60 Hz AC circuit. Verify that gas shutoff valve and all burner controls are dual rated for proper amperage ratings. Check local codes for use on either in the main entrance panel or in a separate ...
...to determine amperage requirements. CAUTION: Make certain that wiring to house is preferred. Shut off main gas supply valve before beginning. Gas Requirements Installation Ranges are in the OFF position before disconnecting the old range and leave it off until the new hook-up has been completed. A four wire connection is... the size of a three wire 120/240 or 120/208 volt, 30 AMP, 60 Hz AC circuit. Verify that gas shutoff valve and all burner controls are dual rated for proper amperage ratings. Check local codes for use on either in the main entrance panel or in a separate ...
Installation Instructions
Page 10
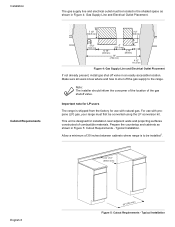
... Requirements - Important note for LP users The range is shipped from the factory for installation near adjacent walls and projecting surfaces constructed of combustible materials. For use with propane (LP) gas, your range must be located in the shaded space as ...shown in an easily accessible location. Typical Installation. Allow a minimum of the gas shutoff valve. This unit is to the range. Prepare the countertop and cabinets as shown in Figure 4: Gas Supply Line and Electrical Outlet Placement. 7 1/2" (190.5 mm) 3 1/2" 88.9 mm 4 1/2" 114...
... Requirements - Important note for LP users The range is shipped from the factory for installation near adjacent walls and projecting surfaces constructed of combustible materials. For use with propane (LP) gas, your range must be located in the shaded space as ...shown in an easily accessible location. Typical Installation. Allow a minimum of the gas shutoff valve. This unit is to the range. Prepare the countertop and cabinets as shown in Figure 4: Gas Supply Line and Electrical Outlet Placement. 7 1/2" (190.5 mm) 3 1/2" 88.9 mm 4 1/2" 114...
Installation Instructions
Page 12
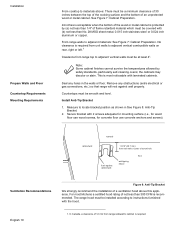
..., a clearance of an unprotected wood or metal cabinet. Seal any obstructions (extra electrical or gas connections, etc.) so that range will rest against cabinet wall 1 9/16" (39.7 mm) from range sidewall to center of screw hole floor anti-tippin g device Ventilation Recommendations Figure 8: Anti-Tip... mm from rear wall to cabinet is required from unit walls to adjacent vertical combustible walls on rear, right or left.1 Clearance from range top to adjacent materials: See Figure 7: Cabinet Preparation. Remove any holes in See Figure 8: Anti-Tip Bracket. 2. Secure bracket with...
..., a clearance of an unprotected wood or metal cabinet. Seal any obstructions (extra electrical or gas connections, etc.) so that range will rest against cabinet wall 1 9/16" (39.7 mm) from range sidewall to center of screw hole floor anti-tippin g device Ventilation Recommendations Figure 8: Anti-Tip... mm from rear wall to cabinet is required from unit walls to adjacent vertical combustible walls on rear, right or left.1 Clearance from range top to adjacent materials: See Figure 7: Cabinet Preparation. Remove any holes in See Figure 8: Anti-Tip Bracket. 2. Secure bracket with...
Installation Instructions
Page 14
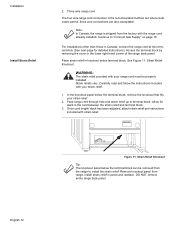
...panel from the factory with strain relief. Allow for detailed instructions). Strain reliefs vary. Feed range cord through hole and strain relief up to "Connect Gas Supply" on page 16. DO NOT remove entire range back panel. Access the terminal block by removing the cover in panel and reattach. Note...: In Canada, the range is the recommended method, but where local codes permit, three wire connections ...
...panel from the factory with strain relief. Allow for detailed instructions). Strain reliefs vary. Feed range cord through hole and strain relief up to "Connect Gas Supply" on page 16. DO NOT remove entire range back panel. Access the terminal block by removing the cover in panel and reattach. Note...: In Canada, the range is the recommended method, but where local codes permit, three wire connections ...

Installation Instructions
Page 18
...securely and replace terminal block cover. The gas connection is a registered trademark of the range. It is shipped from the back of DuPont See "Gas Connection Location" on . Connect Gas Supply Shut off main gas supply valve before disconnecting the old range and leave it off until the new...on page 19. Note: DO NOT plug in range at this time. The range can be converted using a flexible connector, always use with natural gas. Apply pipe joint compound or Teflon1 tape appropriate for use with propane (LP) gas, your range must first be installed using rigid pipe, skip...
...securely and replace terminal block cover. The gas connection is a registered trademark of the range. It is shipped from the back of DuPont See "Gas Connection Location" on . Connect Gas Supply Shut off main gas supply valve before disconnecting the old range and leave it off until the new...on page 19. Note: DO NOT plug in range at this time. The range can be converted using a flexible connector, always use with natural gas. Apply pipe joint compound or Teflon1 tape appropriate for use with propane (LP) gas, your range must first be installed using rigid pipe, skip...

Installation Instructions
Page 19
...leveling legs so that the bottom of the range inlet. Install male 1/2" flare adaptor at gas inlet valve. Connect flexible metal appliance connector. CAUTION: Before you plug in an electrical cord, be sure all controls are in Range Cord 1. Adjust Leveling Legs 1. Attach Connector... Installation B C A Table 4: Flexible Connector Method Letter Item A Gas Shut Off Valve B Regulator C Flexible Connector Figure 20: Flexible Connector Method 1. Make...
...leveling legs so that the bottom of the range inlet. Install male 1/2" flare adaptor at gas inlet valve. Connect flexible metal appliance connector. CAUTION: Before you plug in an electrical cord, be sure all controls are in Range Cord 1. Adjust Leveling Legs 1. Attach Connector... Installation B C A Table 4: Flexible Connector Method Letter Item A Gas Shut Off Valve B Regulator C Flexible Connector Figure 20: Flexible Connector Method 1. Make...
Installation Instructions
Page 21
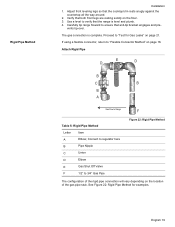
... to "Test for examples. If using a flexible connector, return to Range F Table 5: Rigid Pipe Method Letter Item A Elbow; English 19 The gas connection is level and plumb. 4. Proceed to ensure that the cooktop trim rests snugly against the countertop all the way around. 2. Rigid ...of the rigid pipe connection will vary depending on page 16. See Figure 22: Rigid Pipe Method for Gas Leaks" on the floor. 3. Connect to regulator here B Pipe Nipple C Union D Elbow E Gas Shut Off Valve F 1/2" to verify that both front legs are resting solidly on page 21. Verify ...
... to "Test for examples. If using a flexible connector, return to Range F Table 5: Rigid Pipe Method Letter Item A Elbow; English 19 The gas connection is level and plumb. 4. Proceed to ensure that the cooktop trim rests snugly against the countertop all the way around. 2. Rigid ...of the rigid pipe connection will vary depending on page 16. See Figure 22: Rigid Pipe Method for Gas Leaks" on the floor. 3. Connect to regulator here B Pipe Nipple C Union D Elbow E Gas Shut Off Valve F 1/2" to verify that both front legs are resting solidly on page 21. Verify ...
Installation Instructions
Page 23
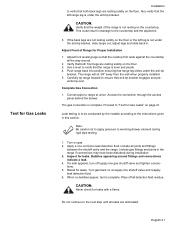
...fittings between the shutoff valve and the range. The range will sit 3/4" away from the wall when properly installed. 5. Retest for leaks with a flame. Turn gas back on at union. Adjust Front of the range is complete. vents tip-over. Include gas fittings and joints in damage to ... a level to ensure that anti-tip bracket engages and pre- Push range back into position ensuring that range leg slides under the anti-tip bracket. Complete Gas Connection 1. Note: Be careful not to apply pressure to range at supply line shutoff valve and reapply leak detection fluid. 6. Verify ...
...fittings between the shutoff valve and the range. The range will sit 3/4" away from the wall when properly installed. 5. Retest for leaks with a flame. Turn gas back on at union. Adjust Front of the range is complete. vents tip-over. Include gas fittings and joints in damage to ... a level to ensure that anti-tip bracket engages and pre- Push range back into position ensuring that range leg slides under the anti-tip bracket. Complete Gas Connection 1. Note: Be careful not to apply pressure to range at supply line shutoff valve and reapply leak detection fluid. 6. Verify ...


