Use & Care Manual
Page 4
... air vents do not blow over or near a window, forced air vent, or fan, be certain that flammable materials such as window coverings do not push the flames so that the flame does not extend beyond the edges of an appliance, especially surface unit drip bowls or oven bottom. Always use water on low or medium settings. c) Clean ventilating fans frequently. Grease should ignite, keep door closed. Turn...
... air vents do not blow over or near a window, forced air vent, or fan, be certain that flammable materials such as window coverings do not push the flames so that the flame does not extend beyond the edges of an appliance, especially surface unit drip bowls or oven bottom. Always use water on low or medium settings. c) Clean ventilating fans frequently. Grease should ignite, keep door closed. Turn...
Use & Care Manual
Page 5
... block appliance air vents. Do not store or use combustible materials, gasoline or other appliance. • WHAT TO DO IF YOU SMELL GAS: • Do not try to an exit. b) NEVER PICK UP A FLAMING PAN - d) Use an extinguisher ONLY if: 1) You know how to turn off valve is located. • If a burner goes out and gas escapes, open windows and doors. c) DO NOT USE WATER...
... block appliance air vents. Do not store or use combustible materials, gasoline or other appliance. • WHAT TO DO IF YOU SMELL GAS: • Do not try to an exit. b) NEVER PICK UP A FLAMING PAN - d) Use an extinguisher ONLY if: 1) You know how to turn off valve is located. • If a burner goes out and gas escapes, open windows and doors. c) DO NOT USE WATER...
Use & Care Manual
Page 7
... of the circuit breaker or fuse. This appliance is equipped with gas. This reduces the risk of fires, spills and burns. • Adjust burner flame size so that the door locks and will also improve efficiency. • Always position handles of utensils inward so they do not run Self-Clean. Proper Installation and Maintenance WARNING: When properly cared for easy reference. c) Operating the unit according...
... of the circuit breaker or fuse. This appliance is equipped with gas. This reduces the risk of fires, spills and burns. • Adjust burner flame size so that the door locks and will also improve efficiency. • Always position handles of utensils inward so they do not run Self-Clean. Proper Installation and Maintenance WARNING: When properly cared for easy reference. c) Operating the unit according...
Use & Care Manual
Page 8
... of the appliance unless specifically recom- English 6 Install anti-tip device packaged with range. It is safe to use the warming drawer to Installation Instructions for details. • All ranges can tip. Disconnect appliance from the power supply and call a qualified technician. tion: it has been damaged. See the Warranty. Contact an authorized service person. • Do not obstruct oven vents. • Do not repair or replace any questions, contact...
... of the appliance unless specifically recom- English 6 Install anti-tip device packaged with range. It is safe to use the warming drawer to Installation Instructions for details. • All ranges can tip. Disconnect appliance from the power supply and call a qualified technician. tion: it has been damaged. See the Warranty. Contact an authorized service person. • Do not obstruct oven vents. • Do not repair or replace any questions, contact...
Use & Care Manual
Page 16
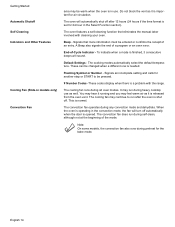
... be warm when the oven is in use as well. Flashing Symbol or Number - You may hear it running and you may feel warm air as it is opened. To indicate when a mode is finished, 3 consecutive beeps will automatically shut off automatically when the door is released from the oven vent. This is needed. Getting Started Automatic Shutoff Self Cleaning Indicators and Other Features Cooling Fan (Slide-in models only) Convection Fan area...
... be warm when the oven is in use as well. Flashing Symbol or Number - You may hear it running and you may feel warm air as it is opened. To indicate when a mode is finished, 3 consecutive beeps will automatically shut off automatically when the door is released from the oven vent. This is needed. Getting Started Automatic Shutoff Self Cleaning Indicators and Other Features Cooling Fan (Slide-in models only) Convection Fan area...
Use & Care Manual
Page 17
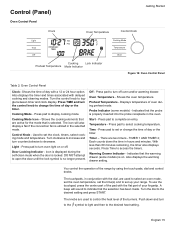
... displays the timer and times associated with the dial, are used to select an oven mode, set the oven temperature, set the time(s) and to set or change the time of day or the timer. Timer - Press TIME and turn counterclockwise to control the heat level of your range. Indicates that the warming drawer (some models) - The touchpads, in the oven. Control (Panel) Oven Control Panel Getting Started Clock Oven Temperature Control Knob Light AM PM Time Off Cooking Mode Temperature Start Cooking Lock Indicator Preheat Temperature Mode Indicator Figure 14: Oven Control Panel...
... displays the timer and times associated with the dial, are used to select an oven mode, set the oven temperature, set the time(s) and to set or change the time of day or the timer. Timer - Press TIME and turn counterclockwise to control the heat level of your range. Indicates that the warming drawer (some models) - The touchpads, in the oven. Control (Panel) Oven Control Panel Getting Started Clock Oven Temperature Control Knob Light AM PM Time Off Cooking Mode Temperature Start Cooking Lock Indicator Preheat Temperature Mode Indicator Figure 14: Oven Control Panel...

Use & Care Manual
Page 18
... clock time will be a slight delay before each message (or feature) can set the clock time. Press OFF. 1. Press TIME. SELECT FUNCTION is displayed in the display. Turn knob to select hour and AM or PM. 2. Getting Started The Clock About the Clock Setting the Clock Changing the Clock The Select Functions Menu See the sections on Using the Cooktop, Using the Oven and Using the Warming Drawer for detailed instructions. • Always set . Turn knob to desired setting and press START. Press TIME and...
... clock time will be a slight delay before each message (or feature) can set the clock time. Press OFF. 1. Press TIME. SELECT FUNCTION is displayed in the display. Turn knob to select hour and AM or PM. 2. Getting Started The Clock About the Clock Setting the Clock Changing the Clock The Select Functions Menu See the sections on Using the Cooktop, Using the Oven and Using the Warming Drawer for detailed instructions. • Always set . Turn knob to desired setting and press START. Press TIME and...

Use & Care Manual
Page 19
... can be used to prevent changes to accept new selection. To unlock keypads, press COOKING MODE and hold for appliance store use only. Turn knob to select ON or OFF 5. Press START to the oven function. Lock / Unlock the Oven Control Panel Change the Oven Temperature Offset Note: The SELECT FUNCTIONS menu is displayed in the display. This function DOES NOT lock the oven door. 1. Turn knob clockwise until VOLUME is locked. 4. Press START. 0° F is displayed. 3. English is displayed. 3. play will...
... can be used to prevent changes to accept new selection. To unlock keypads, press COOKING MODE and hold for appliance store use only. Turn knob to select ON or OFF 5. Press START to the oven function. Lock / Unlock the Oven Control Panel Change the Oven Temperature Offset Note: The SELECT FUNCTIONS menu is displayed in the display. This function DOES NOT lock the oven door. 1. Turn knob clockwise until VOLUME is locked. 4. Press START. 0° F is displayed. 3. English is displayed. 3. play will...

Use & Care Manual
Page 21
... a glass ceramic cooktop, apply the glass ceramic cooktop cleaner. See "Cleaning and Maintenance" on or off automatically. The oven and warming drawer operate for the Warming Drawer Only The warming drawer does not operate with tion Conversion ON or the convection bake mode. Change the Time Format The clock can be a slight odor during the entire Sabbath mode. 8. Press START. 4. Turn knob to accept new selection. 0.0 Turn Automatic Convec- Press START. Press START to select ON or OFF. 5. Remove packing materials from range...
... a glass ceramic cooktop, apply the glass ceramic cooktop cleaner. See "Cleaning and Maintenance" on or off automatically. The oven and warming drawer operate for the Warming Drawer Only The warming drawer does not operate with tion Conversion ON or the convection bake mode. Change the Time Format The clock can be a slight odor during the entire Sabbath mode. 8. Press START. 4. Turn knob to accept new selection. 0.0 Turn Automatic Convec- Press START. Press START to select ON or OFF. 5. Remove packing materials from range...

Use & Care Manual
Page 24
..., especially surface unit drip bowls or oven bottom. If no change is made within 5 seconds, control will flash in 5 seconds. 9. To select a different temperature, turn knob. 5. If not pressed, oven automatically turns on page 19 for guidelines to improve oven results. The actual temperature increases until set temperature is displayed, starting at which will read AUTO CONV BAKE. Automatic Convection Conversion (models with the default temper- The Automatic Convection Conversion feature can be...
..., especially surface unit drip bowls or oven bottom. If no change is made within 5 seconds, control will flash in 5 seconds. 9. To select a different temperature, turn knob. 5. If not pressed, oven automatically turns on page 19 for guidelines to improve oven results. The actual temperature increases until set temperature is displayed, starting at which will read AUTO CONV BAKE. Automatic Convection Conversion (models with the default temper- The Automatic Convection Conversion feature can be...

Use & Care Manual
Page 27
... remove probe from oven when cooking is displayed in oven during self-clean. See "Inserting the Probe" on rack in cold oven on recommended oven rack. Plug probe into the meat. Do not leave probe attachment in the upper right hand corner of the display. Insert the probe into the probe receptacle. Turn knob to the left of the food). 8. The oven temperature will flash in display. Press COOKING MODE and select BAKE, CONVECTION BAKE or CONVECTION ROAST. 4. Press START. Oven temp will...
... remove probe from oven when cooking is displayed in oven during self-clean. See "Inserting the Probe" on rack in cold oven on recommended oven rack. Plug probe into the meat. Do not leave probe attachment in the upper right hand corner of the display. Insert the probe into the probe receptacle. Turn knob to the left of the food). 8. The oven temperature will flash in display. Press COOKING MODE and select BAKE, CONVECTION BAKE or CONVECTION ROAST. 4. Press START. Oven temp will...

Use & Care Manual
Page 47
... spots. • The glass ceramic cooking surface is a durable material resistant to impact but not unbreakable if a pan or other object is dropped on it does not drip into door slots. • Dry to avoid water marks. The display shows DELAYED CLEAN. Wipe off . Drawers (Storage or Warming) Daily Cleaning Maintenance Wash with a soapy sponge, rinsed and dried. The self-clean will remove the soil. •...
... spots. • The glass ceramic cooking surface is a durable material resistant to impact but not unbreakable if a pan or other object is dropped on it does not drip into door slots. • Dry to avoid water marks. The display shows DELAYED CLEAN. Wipe off . Drawers (Storage or Warming) Daily Cleaning Maintenance Wash with a soapy sponge, rinsed and dried. The self-clean will remove the soil. •...

Use & Care Manual
Page 51
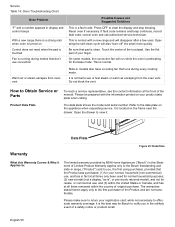
... selected during set oven for a five-hour Self-Clean. See Clock and Timer sections on page 17. Review manual instructions when setting clock, timer, or Self-Clean. Refer to cooking charts and tips for Self Clean" on page 17). There may cause the bulb to burn out. English 49 Turn breaker back on page 17. Check circuit breaker or fuse box to your house. The oven is electrical power to oven. If the Automatic Convection Conversion Feature is not working properly...
... selected during set oven for a five-hour Self-Clean. See Clock and Timer sections on page 17. Review manual instructions when setting clock, timer, or Self-Clean. Refer to cooking charts and tips for Self Clean" on page 17). There may cause the bulb to burn out. English 49 Turn breaker back on page 17. Check circuit breaker or fuse box to your house. The oven is electrical power to oven. If the Automatic Convection Conversion Feature is not working properly...
Use & Care Manual
Page 52
... a service representative, see or feel steam or warm air escaping from oven vent Slide-in models also have a cooling fan that pad is clean. Press OFF to effectuate warranty coverage, it . Be sure that runs during modes that the Product was purchased: (1) for resale, or commercial use convection Possible Causes and Suggested Solutions This is a fault code. How to return your finger. Open the drawer to view...
... a service representative, see or feel steam or warm air escaping from oven vent Slide-in models also have a cooling fan that pad is clean. Press OFF to effectuate warranty coverage, it . Be sure that runs during modes that the Product was purchased: (1) for resale, or commercial use convection Possible Causes and Suggested Solutions This is a fault code. How to return your finger. Open the drawer to view...

Use & Care Manual
Page 53
... installation, tampering, failure to follow operating instructions, mishandling, unauthorized service (including self-performed "fixing" or exploration of the appliance's internal workings); (4) adjustment, alteration or modification of any kind; (5) a failure to comply with any concessions, including repairs, pro-rates, or Product replacement, once this warranty shall not be available to surrounding property, including cabinetry, floors, ceilings, and English 51 Notwithstanding the foregoing, Bosch...
... installation, tampering, failure to follow operating instructions, mishandling, unauthorized service (including self-performed "fixing" or exploration of the appliance's internal workings); (4) adjustment, alteration or modification of any kind; (5) a failure to comply with any concessions, including repairs, pro-rates, or Product replacement, once this warranty shall not be available to surrounding property, including cabinetry, floors, ceilings, and English 51 Notwithstanding the foregoing, Bosch...
Installation Instructions
Page 3
.... 61-M89 Household Cooking Ranges English 1 Install anti-tip device packaged with packaging material. • Never modify or alter the construction of the appliance unless specifically recommended in Use and Care Manual. • Unit is to move. • Hidden surfaces may have sharp edges. Destroy the packaging after unpacking the appliance. For example, do not remove leveling legs, panels, wire covers or anti-tip brackets/screws. • To...
.... 61-M89 Household Cooking Ranges English 1 Install anti-tip device packaged with packaging material. • Never modify or alter the construction of the appliance unless specifically recommended in Use and Care Manual. • Unit is to move. • Hidden surfaces may have sharp edges. Destroy the packaging after unpacking the appliance. For example, do not remove leveling legs, panels, wire covers or anti-tip brackets/screws. • To...
Installation Instructions
Page 4
... tech- Installation, electrical connections and grounding must be sure all controls are in an electrical cord, be 1" water column above the manifold pressure printed on a separate branch circuit. • Only a power-supply cord kit rated for this manual. • The appliance and its individual manual shutoff valve during any pressure testing of the gas supply piping system at the service panel. Save these instructions for Gas Burning Appliances and/ or local codes). •...
... tech- Installation, electrical connections and grounding must be sure all controls are in an electrical cord, be 1" water column above the manifold pressure printed on a separate branch circuit. • Only a power-supply cord kit rated for this manual. • The appliance and its individual manual shutoff valve during any pressure testing of the gas supply piping system at the service panel. Save these instructions for Gas Burning Appliances and/ or local codes). •...
Installation Instructions
Page 12
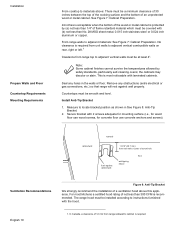
... rear wall flush against wall properly. Secure bracket with the hood. In Canada, a clearance of not less than 300 CFM is protected by safety standards, particularly self-cleaning ovens; See Figure 7: Cabinet Preparation. 24 inches is acceptable when the bottom of flame retardant material which must be installed according to instructions furnished with 2 screws adequate for mounting surface (i.e., for wood floor use...
... rear wall flush against wall properly. Secure bracket with the hood. In Canada, a clearance of not less than 300 CFM is protected by safety standards, particularly self-cleaning ovens; See Figure 7: Cabinet Preparation. 24 inches is acceptable when the bottom of flame retardant material which must be installed according to instructions furnished with 2 screws adequate for mounting surface (i.e., for wood floor use...

Installation Instructions
Page 18
... to relight the pilot on other gas appliances when you turn the gas back on page 16. Note: DO NOT plug in range at this time. It is located below the back panel of the range. For use a new connector. green ground screw Figure 18: Completed Three Wire Range Cord Connection 8. If using a flexible connector, always use with propane (LP) gas, your range must first be installed using the LP conversion kit. English 16...
... to relight the pilot on other gas appliances when you turn the gas back on page 16. Note: DO NOT plug in range at this time. It is located below the back panel of the range. For use a new connector. green ground screw Figure 18: Completed Three Wire Range Cord Connection 8. If using a flexible connector, always use with propane (LP) gas, your range must first be installed using the LP conversion kit. English 16...

Installation Instructions
Page 24
... 22 Set oven to self-clean. Cancel self-clean mode. After burner lights, turn the knob to the flame symbol. 2. Test flame characteristics on the high setting: 1. If any flame goes out, does not carry over properly, contact service. It should be blue with an inner and outer cone. Verify that the burner lights within four (4) seconds. Test each rangetop burner in electrical shock hazard. Installation Test the Installation Turn on power at the breaker...
... 22 Set oven to self-clean. Cancel self-clean mode. After burner lights, turn the knob to the flame symbol. 2. Test flame characteristics on the high setting: 1. If any flame goes out, does not carry over properly, contact service. It should be blue with an inner and outer cone. Verify that the burner lights within four (4) seconds. Test each rangetop burner in electrical shock hazard. Installation Test the Installation Turn on power at the breaker...


