
Use & Care Manual
Page 48
...in place. 4. Do not grasp the handle as described in a convenient and stable location for cleaning. 1. Holding the door firmly on hinge toward range). 3. Hold firmly, the door is glass. Open door all the way to avoid breaking. • Grasp only the sides of the hinge slots.... Cleaning and Maintenance Stainless Steel Cooktop Models Oven Maintenance Removing the Door No maintenance is required other than daily cleaning as it is correctly and securely in electrical shock or burns. • The oven door is heavy and fragile. Fail- ure to remove oven door. 2. The door front ...
...in place. 4. Do not grasp the handle as described in a convenient and stable location for cleaning. 1. Holding the door firmly on hinge toward range). 3. Hold firmly, the door is glass. Open door all the way to avoid breaking. • Grasp only the sides of the hinge slots.... Cleaning and Maintenance Stainless Steel Cooktop Models Oven Maintenance Removing the Door No maintenance is required other than daily cleaning as it is correctly and securely in electrical shock or burns. • The oven door is heavy and fragile. Fail- ure to remove oven door. 2. The door front ...

Installation Instructions
Page 8
... Electrical Requirements 4. The electrical rating of the power cord set (not supplied). Installation Remove oven door and set shall be 120/240 volt, 30 amperes minimum. Do not grasp the handle as it stops. Also, do so could result in electrical shock or burns. • The oven... already installed. Holding the door firmly on both sides and using both levers are securely in personal injury or product damage. • To avoid injury from the factory with Ranges." Figure 3: Hinge Positions Refer to remove the oven door. Always use a new power cord. Place the door...
... Electrical Requirements 4. The electrical rating of the power cord set (not supplied). Installation Remove oven door and set shall be 120/240 volt, 30 amperes minimum. Do not grasp the handle as it stops. Also, do so could result in electrical shock or burns. • The oven... already installed. Holding the door firmly on both sides and using both levers are securely in personal injury or product damage. • To avoid injury from the factory with Ranges." Figure 3: Hinge Positions Refer to remove the oven door. Always use a new power cord. Place the door...
Installation Instructions
Page 12
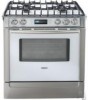
Secure bracket with (b) not less than No. 28 MSG sheet metal, 0.015 inch stainless steel' or 0.024 inch aluminum or copper. From range walls to locate bracket position as shown in the walls or floor. No clearance is required from unit walls to adjacent vertical ...g device Ventilation Recommendations Figure 8: Anti-Tip Bracket We strongly recommend the installation of a ventilation hood above : There must be a minimum clearance of 30 inches between the top of the cooking surface and the bottom of the wood or metal cabinet is protected by safety standards, particularly self-cleaning...
Secure bracket with (b) not less than No. 28 MSG sheet metal, 0.015 inch stainless steel' or 0.024 inch aluminum or copper. From range walls to locate bracket position as shown in the walls or floor. No clearance is required from unit walls to adjacent vertical ...g device Ventilation Recommendations Figure 8: Anti-Tip Bracket We strongly recommend the installation of a ventilation hood above : There must be a minimum clearance of 30 inches between the top of the cooking surface and the bottom of the wood or metal cabinet is protected by safety standards, particularly self-cleaning...
Installation Instructions
Page 16
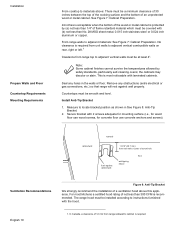
... wire Figure 14: Four Wire Range Cord Connection - Attach black wire, round washer, star washer and nut IN THIS ORDER to left post. 7. Ground Strap and Wire 6. Remove screw from bottom end of ground strap. Tighten all connections securely and replace terminal block cover. 10...last nut or internal wiring leads. 4. Attach green wire on top of ground strap. 5. Tighten Screw. Properly secure strain relief (see previous section). Three Wire Range Cord Connection The Four Wire Connection (above) is preferred, but where local codes and ordinances permit grounding through neutral ...
... wire Figure 14: Four Wire Range Cord Connection - Attach black wire, round washer, star washer and nut IN THIS ORDER to left post. 7. Ground Strap and Wire 6. Remove screw from bottom end of ground strap. Tighten all connections securely and replace terminal block cover. 10...last nut or internal wiring leads. 4. Attach green wire on top of ground strap. 5. Tighten Screw. Properly secure strain relief (see previous section). Three Wire Range Cord Connection The Four Wire Connection (above) is preferred, but where local codes and ordinances permit grounding through neutral ...

Installation Instructions
Page 18
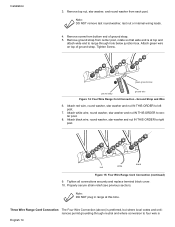
...Apply pipe joint compound or Teflon1 tape appropriate for use with propane (LP) gas, your range must first be installed using a flexible connector, always use with LP gas and Natural gas around all connections securely and replace terminal block cover. Don't forget to "Rigid Pipe Method" on page 16.... The gas connection is shipped from the back of the range. Important note for LP users Flexible Connector Method Figure 19: Gas...
...Apply pipe joint compound or Teflon1 tape appropriate for use with propane (LP) gas, your range must first be installed using a flexible connector, always use with LP gas and Natural gas around all connections securely and replace terminal block cover. Don't forget to "Rigid Pipe Method" on page 16.... The gas connection is shipped from the back of the range. Important note for LP users Flexible Connector Method Figure 19: Gas...