Use & Care Manual
Page 1
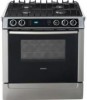
Use and Care Manual Dual Fuel Range
Use and Care Manual Dual Fuel Range
Use & Care Manual
Page 3
... several sections: • The Getting Started section describes the features and functionality of the range, including a description of how to set up the range and operate the control panel. • The Operation sections describe how to operate each range component. • The Getting the Most out of the manual. Pay special attention to...
... several sections: • The Getting Started section describes the features and functionality of the range, including a description of how to set up the range and operate the control panel. • The Operation sections describe how to operate each range component. • The Getting the Most out of the manual. Pay special attention to...
Use & Care Manual
Page 4
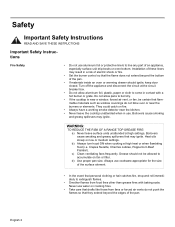
... Safety • Do not use water on fire. • Always have a working smoke detector near the burners or elements. WARNING: TO REDUCE THE RISK OF A RANGE TOP GREASE FIRE: a) Never leave surface units unattended at high heat or when flambéing food (i.e. Heat oils slowly on fan or filter. Grease...
... Safety • Do not use water on fire. • Always have a working smoke detector near the burners or elements. WARNING: TO REDUCE THE RISK OF A RANGE TOP GREASE FIRE: a) Never leave surface units unattended at high heat or when flambéing food (i.e. Heat oils slowly on fan or filter. Grease...
Use & Care Manual
Page 5
.... c) DO NOT USE WATER, including wet dishcloths or towels - Gas Safety Safety WARNING: TO REDUCE THE RISK OF INJURY TO PERSONS IN THE EVENT OF A RANGE TOP GREASE FIRE, OBSERVE THE FOLLOWING: a) SMOTHER FLAMES with a close-fitting lid, cookie sheet, or metal tray, then turn it started. 3) The fire department is...
.... c) DO NOT USE WATER, including wet dishcloths or towels - Gas Safety Safety WARNING: TO REDUCE THE RISK OF INJURY TO PERSONS IN THE EVENT OF A RANGE TOP GREASE FIRE, OBSERVE THE FOLLOWING: a) SMOTHER FLAMES with a close-fitting lid, cookie sheet, or metal tray, then turn it started. 3) The fire department is...
Use & Care Manual
Page 8
...if it is not approved for normal family household use . It is intended for outdoor use only. English 6 Install anti-tip device packaged with range. See the Warranty. Disconnect appliance from the power supply and call a qualified technician. CAUTION: To maintain food safety, follow these guidelines: 1)... appliance. The USDA recommends holding hot food at 140°F or warmer. 3) DO NOT warm food for details. • All ranges can tip. It is safe to maintain proper food temperature. If you have any part of an error the display flashes and beeps continuously...
...if it is not approved for normal family household use . It is intended for outdoor use only. English 6 Install anti-tip device packaged with range. See the Warranty. Disconnect appliance from the power supply and call a qualified technician. CAUTION: To maintain food safety, follow these guidelines: 1)... appliance. The USDA recommends holding hot food at 140°F or warmer. 3) DO NOT warm food for details. • All ranges can tip. It is safe to maintain proper food temperature. If you have any part of an error the display flashes and beeps continuously...
Use & Care Manual
Page 12
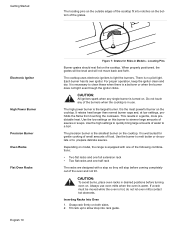
When properly positioned, the grates will be moved while the oven is well suited for Slide-in a gentle, more predictable heat. It is the smallest burner on the cooktop. It retains heat longer than normal burner caps and, at low settings, ...prohibits the flame from touching the cookware. The precision burner is the most powerful burner on the cooktop. Depending on model, the range is no pilot light. Inserting Racks Into Oven 1. The cooktop uses electronic ignitors to allow stop so they will not move back and forth. Grasp...
When properly positioned, the grates will be moved while the oven is well suited for Slide-in a gentle, more predictable heat. It is the smallest burner on the cooktop. It retains heat longer than normal burner caps and, at low settings, ...prohibits the flame from touching the cookware. The precision burner is the most powerful burner on the cooktop. Depending on model, the range is no pilot light. Inserting Racks Into Oven 1. The cooktop uses electronic ignitors to allow stop so they will not move back and forth. Grasp...

Use & Care Manual
Page 13
... Extension Rack Removing and Replacing Note: The full extension rack must be straight and flat, not crooked. Disassembly (for cleaning) The two sections of the range.
... Extension Rack Removing and Replacing Note: The full extension rack must be straight and flat, not crooked. Disassembly (for cleaning) The two sections of the range.
Use & Care Manual
Page 16
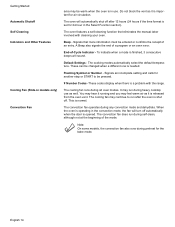
... also runs during self-clean, although not at the beginning of an entry. Getting Started Automatic Shutoff Self Cleaning Indicators and Other Features Cooling Fan (Slide-in models only) Convection Fan area may be warm when the oven is in use as well. Do not block the vent as it is... normal. Signals that eliminates the manual labor involved with the range. End-of a program or an oven error. Default Settings - F Number Codes -These codes display when there is released from the oven vent. You may hear...
... also runs during self-clean, although not at the beginning of an entry. Getting Started Automatic Shutoff Self Cleaning Indicators and Other Features Cooling Fan (Slide-in models only) Convection Fan area may be warm when the oven is in use as well. Do not block the vent as it is... normal. Signals that eliminates the manual labor involved with the range. End-of a program or an oven error. Default Settings - F Number Codes -These codes display when there is released from the oven vent. You may hear...
Use & Care Manual
Page 17
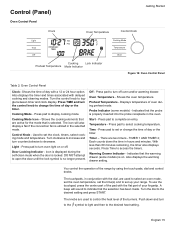
... set up your fingertip. Indicates that is on or off oven and/or warming drawer. To use the touchpad, press the center part of your range. Push down the time in the selected mode. Turn the control knob to select cooking temperature. Probe Indicator (some models) is selected. Indicates that ...timer and times associated with the flat part of the pad with delayed cooking and cleaning modes. Shows the oven temperature. Displays temperature of the range by using the touch pads, dial and control knobs. Press pad to turn to the symbol to light and then to control the heat level...
... set up your fingertip. Indicates that is on or off oven and/or warming drawer. To use the touchpad, press the center part of your range. Push down the time in the selected mode. Turn the control knob to select cooking temperature. Probe Indicator (some models) is selected. Indicates that ...timer and times associated with the flat part of the pad with delayed cooking and cleaning modes. Shows the oven temperature. Displays temperature of the range by using the touch pads, dial and control knobs. Press pad to turn to the symbol to light and then to control the heat level...

Use & Care Manual
Page 18
... cancel the TIME selection when setting the clock, press OFF anytime while in the display. There will flash. 3. Turn knob to set or change the range features listed below. When all oven operations except when the timer is running. • The oven is now set the clock time. Press TIME and...
... cancel the TIME selection when setting the clock, press OFF anytime while in the display. There will flash. 3. Turn knob to set or change the range features listed below. When all oven operations except when the timer is running. • The oven is now set the clock time. Press TIME and...

Use & Care Manual
Page 21
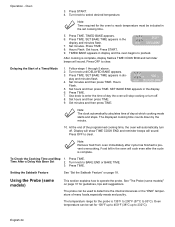
... may be a slight odor during the entire Sabbath mode. 8. Press START. 4. OFF 1. See "Cleaning and Maintenance" on page 18. Press START. 4. Remove packing materials from range. Press START. Getting Started Note: The light cannot be changed after 5 seconds. Turn knob to operating.
... may be a slight odor during the entire Sabbath mode. 8. Press START. 4. OFF 1. See "Cleaning and Maintenance" on page 18. Press START. 4. Remove packing materials from range. Press START. Getting Started Note: The light cannot be changed after 5 seconds. Turn knob to operating.

Use & Care Manual
Page 24
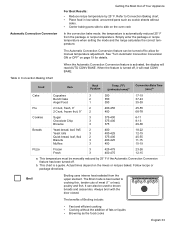
...turn knob to select new temperature and press START. 11. Simply enter the package or recipe temperature when setting the mode and the range calculates the correct temperature. When the feature is made within 5 seconds, control will read CONV BAKE. Setting the Cooking Mode and Temperature... BAKE 4. When the Automatic Convection Conversion feature is reached, at 100ºF. See "Turn Automatic Convection Conversion ON or OFF" on page 30 for that mode, which point the oven will appear in the display. 3. If no change temperature during cooking, press TEMPERATURE. To change...
...turn knob to select new temperature and press START. 11. Simply enter the package or recipe temperature when setting the mode and the range calculates the correct temperature. When the feature is made within 5 seconds, control will read CONV BAKE. Setting the Cooking Mode and Temperature... BAKE 4. When the Automatic Convection Conversion feature is reached, at 100ºF. See "Turn Automatic Convection Conversion ON or OFF" on page 30 for that mode, which point the oven will appear in the display. 3. If no change temperature during cooking, press TEMPERATURE. To change...

Use & Care Manual
Page 25
Press TIME again and the hours will continue flashing. 4. Turn knob to rise (i.e.; Press TIME. Press TIME once. If TIME pad is not pressed, range will beep and display will flash. The TIMED COOK feature sets the oven to a cooking mode for each of the following oven modes: Bake, Convection ...
Press TIME again and the hours will continue flashing. 4. Turn knob to rise (i.e.; Press TIME. Press TIME once. If TIME pad is not pressed, range will beep and display will flash. The TIMED COOK feature sets the oven to a cooking mode for each of the following oven modes: Bake, Convection ...
Use & Care Manual
Page 26
... 18. Press START. 4. TIMED BAKE appears. 6. Hours Flash. Set hours and then press TIME. Note: The clock automatically calculates time of a Timed Mode 1. The temperature range for guidelines, tips and suggestions. Set hours. SET BAKE TIME appears in the display. 6. SET BAKE TIME appears in display and the oven begins to...
... 18. Press START. 4. TIMED BAKE appears. 6. Hours Flash. Set hours and then press TIME. Note: The clock automatically calculates time of a Timed Mode 1. The temperature range for guidelines, tips and suggestions. Set hours. SET BAKE TIME appears in the display. 6. SET BAKE TIME appears in display and the oven begins to...

Use & Care Manual
Page 31
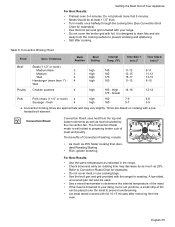
...éing, browning meat, deep fat frying Most frying, eggs, pancakes, slow boil Simmering, finish cooking, covered foods, steaming Melting butter and chocolate Heat Settings 9 - A range of the pan. Table 3: Cooking Guide Uses Bringing water to boil can vary greatly depending on page 29 for heat settings. Turn the pan upside...
...éing, browning meat, deep fat frying Most frying, eggs, pancakes, slow boil Simmering, finish cooking, covered foods, steaming Melting butter and chocolate Heat Settings 9 - A range of the pan. Table 3: Cooking Guide Uses Bringing water to boil can vary greatly depending on page 29 for heat settings. Turn the pan upside...
Use & Care Manual
Page 35
Simply enter the package or recipe temperature when setting the mode and the range calculates the correct temperature. See "Turn Automatic Convection Conversion ON or OFF" on page 19 for manual temperature adjustment. This chart is activated, the display ...
Simply enter the package or recipe temperature when setting the mode and the range calculates the correct temperature. See "Turn Automatic Convection Conversion ON or OFF" on page 19 for manual temperature adjustment. This chart is activated, the display ...
Use & Care Manual
Page 36
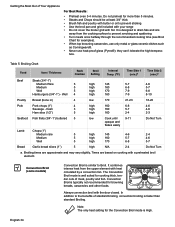
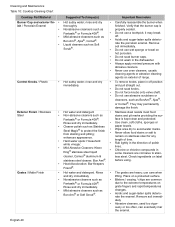
... 7-9 Hamburgers (3/4"-1") - Getting the Most Out of standard broiling, convection broiling is designed to prevent sticking • Use the broil pan and grid included with your range • Do not cover the broiler grid with heat circulated by a convection fan. Note: The only heat setting for the Convection Broil mode is well...
... 7-9 Hamburgers (3/4"-1") - Getting the Most Out of standard broiling, convection broiling is designed to prevent sticking • Use the broil pan and grid included with your range • Do not cover the broiler grid with heat circulated by a convection fan. Note: The only heat setting for the Convection Broil mode is well...
Use & Care Manual
Page 37
... to Convection Roast Chart for examples. • Do not cover meat or use cooking bags. • Use the broil pan and grid provided with the range for examples). • Use the broil pan and grid included with your liking, but is designed to drain fats and oils away from the cooking... surface to your range. • Do not cover the broiler grid with foil 10-15 minutes after cooking. English 35 Times are approximate and may decrease by the convection...
... to Convection Roast Chart for examples. • Do not cover meat or use cooking bags. • Use the broil pan and grid provided with the range for examples). • Use the broil pan and grid included with your liking, but is designed to drain fats and oils away from the cooking... surface to your range. • Do not cover the broiler grid with foil 10-15 minutes after cooking. English 35 Times are approximate and may decrease by the convection...
Use & Care Manual
Page 42
... food stains or salt to avoid water marks. Check ingredients on grate fingers and rapid temperatures changes. Place on stainless steel for any length of range.
... food stains or salt to avoid water marks. Check ingredients on grate fingers and rapid temperatures changes. Place on stainless steel for any length of range.
Use & Care Manual
Page 45
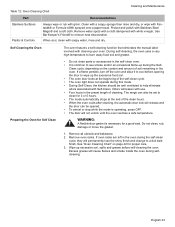
... smoke inside the oven during the self-clean cycle, they will release and the door can also be set to clean for proper care. 3. The range can be well ventilated to a dull dark finish. WARNING: A flexible door gasket is common to see smoke and/or an occasional flame-up the excessive...
... smoke inside the oven during the self-clean cycle, they will release and the door can also be set to clean for proper care. 3. The range can be well ventilated to a dull dark finish. WARNING: A flexible door gasket is common to see smoke and/or an occasional flame-up the excessive...


