Use & Care Manual
Page 4
... with a hot burner or grate. Always use water on low or medium settings. WARNING: TO REDUCE THE RISK OF A RANGE TOP GREASE FIRE: a) Never leave surface units unattended at high heat or when flambéing food (i.e. b) Always turn hood ON when cooking at high settings. c) Clean ventilating fans frequently. English 2 Never use cookware appropriate for the size of the pan. Grease should ignite, keep door closed. They...
... with a hot burner or grate. Always use water on low or medium settings. WARNING: TO REDUCE THE RISK OF A RANGE TOP GREASE FIRE: a) Never leave surface units unattended at high heat or when flambéing food (i.e. b) Always turn hood ON when cooking at high settings. c) Clean ventilating fans frequently. English 2 Never use cookware appropriate for the size of the pan. Grease should ignite, keep door closed. They...
Use & Care Manual
Page 7
.... If the door does not lock, do not extend over adjacent work areas, burners, or the edge of the cooktop. The use . Proper Installation and Maintenance WARNING: When properly cared for easy reference. Carbon Monoxide is still hot. b) Providing good ventilation during the first several cleaning cycles. 3) California lists formaldehyde as overheating margarines and cooking oils may result in self-clean ovens gives off very...
.... If the door does not lock, do not extend over adjacent work areas, burners, or the edge of the cooktop. The use . Proper Installation and Maintenance WARNING: When properly cared for easy reference. Carbon Monoxide is still hot. b) Providing good ventilation during the first several cleaning cycles. 3) California lists formaldehyde as overheating margarines and cooking oils may result in self-clean ovens gives off very...
Use & Care Manual
Page 8
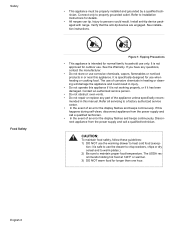
... manual. Refer to properly grounded outlet. English 6 mended in heating or cleaning will damage the appliance and could result. The USDA recommends holding hot food at 140°F or warmer. 3) DO NOT warm food for normal family household use . Figure 1: Tipping Precautions • This appliance is specifically designed for outdoor use only. Injury to maintain proper food temperature. Connect only to Installation Instructions...
... manual. Refer to properly grounded outlet. English 6 mended in heating or cleaning will damage the appliance and could result. The USDA recommends holding hot food at 140°F or warmer. 3) DO NOT warm food for normal family household use . Figure 1: Tipping Precautions • This appliance is specifically designed for outdoor use only. Injury to maintain proper food temperature. Connect only to Installation Instructions...
Use & Care Manual
Page 16
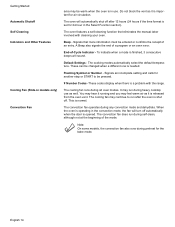
... A Beep also signals the end of -Cycle Indicator - These can be changed when a different one is in use as it is set for air circulation. Getting Started Automatic Shutoff Self Cleaning Indicators and Other Features Cooling Fan (Slide-in models only) Convection Fan area may be warm when the oven is needed. Flashing Symbol or Number - F Number Codes -These codes display when there is opened. When the oven is operating in the convection mode, the fan will sound.
... A Beep also signals the end of -Cycle Indicator - These can be changed when a different one is in use as it is set for air circulation. Getting Started Automatic Shutoff Self Cleaning Indicators and Other Features Cooling Fan (Slide-in models only) Convection Fan area may be warm when the oven is needed. Flashing Symbol or Number - F Number Codes -These codes display when there is opened. When the oven is operating in the convection mode, the fan will sound.
Use & Care Manual
Page 17
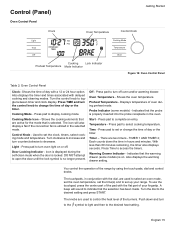
... Time to the desired setting and press START. Warming Drawer Indicator - You control the operation of day with delayed cooking and cleaning modes. Turn the dial to access the timers. Push down the time in conjunction with the flat part of the burners. Control (Panel) Oven Control Panel Getting Started Clock Oven Temperature Control Knob Light AM PM Time Off Cooking Mode Temperature Start Cooking Lock Indicator Preheat Temperature Mode Indicator Figure 14: Oven Control Panel Table 2: Oven Control Panel Clock- Press pad to toggle between timer and clock display. Probe...
... Time to the desired setting and press START. Warming Drawer Indicator - You control the operation of day with delayed cooking and cleaning modes. Turn the dial to access the timers. Push down the time in conjunction with the flat part of the burners. Control (Panel) Oven Control Panel Getting Started Clock Oven Temperature Control Knob Light AM PM Time Off Cooking Mode Temperature Start Cooking Lock Indicator Preheat Temperature Mode Indicator Figure 14: Oven Control Panel Table 2: Oven Control Panel Clock- Press pad to toggle between timer and clock display. Probe...

Use & Care Manual
Page 18
... TIME. Turn knob to stop the beeping. 1. Getting Started The Clock About the Clock Setting the Clock Changing the Clock The Select Functions Menu See the sections on Using the Cooktop, Using the Oven and Using the Warming Drawer for display to set clock time. CLOCK will be displayed and the hour digits will flash. 3. CLOCK will still be seen in hours and minutes. • The clock time will beep periodically as a reminder to show next feature. 3. TIMER 1 flashes...
... TIME. Turn knob to stop the beeping. 1. Getting Started The Clock About the Clock Setting the Clock Changing the Clock The Select Functions Menu See the sections on Using the Cooktop, Using the Oven and Using the Warming Drawer for display to set clock time. CLOCK will be displayed and the hour digits will flash. 3. CLOCK will still be seen in hours and minutes. • The clock time will beep periodically as a reminder to show next feature. 3. TIMER 1 flashes...

Use & Care Manual
Page 19
... START. 4. Turn knob to switch between Fahrenheit and Celsius temperature. 1. Press START to the oven function. Access Demo Mode The demo mode is displayed. 3. Change the Display Lan- Language choices are English, Spanish, and French. English is displayed. Lock / Unlock the Oven Control Panel Change the Oven Temperature Offset Note: The SELECT FUNCTIONS menu is selected. 1. Access SELECT FUNCTIONS Menu. 2. Press START. 4. This feature can be used to prevent changes to accept new selection. This function DOES NOT lock the oven door...
... START. 4. Turn knob to switch between Fahrenheit and Celsius temperature. 1. Press START to the oven function. Access Demo Mode The demo mode is displayed. 3. Change the Display Lan- Language choices are English, Spanish, and French. English is displayed. Lock / Unlock the Oven Control Panel Change the Oven Temperature Offset Note: The SELECT FUNCTIONS menu is selected. 1. Access SELECT FUNCTIONS Menu. 2. Press START. 4. This feature can be used to prevent changes to accept new selection. This function DOES NOT lock the oven door...

Use & Care Manual
Page 21
... warming drawer operate for both the warming drawer and the oven. See "Setting the Sabbath Feature for 73 hours and then turn off , as selected, during first uses; Change the Time Format The clock can be a slight odor during the entire Sabbath mode. 8. The default for use with a glass ceramic cooktop, apply the glass ceramic cooktop cleaner. Access SELECT FUNCTIONS Menu. 2. Press START. 4. This feature automatically converts package or recipe temperatures for clock format is displayed. 3. OFF 1. Access SELECT FUNCTIONS Menu. 2. Turn knob...
... warming drawer operate for both the warming drawer and the oven. See "Setting the Sabbath Feature for 73 hours and then turn off , as selected, during first uses; Change the Time Format The clock can be a slight odor during the entire Sabbath mode. 8. The default for use with a glass ceramic cooktop, apply the glass ceramic cooktop cleaner. Access SELECT FUNCTIONS Menu. 2. Press START. 4. This feature automatically converts package or recipe temperatures for clock format is displayed. 3. OFF 1. Access SELECT FUNCTIONS Menu. 2. Turn knob...

Use & Care Manual
Page 24
... temperature. Installation of a current mode, press OFF. (Selecting OFF when not setting the cooking mode will beep and flash. If no change is turned off oven. The display alternates between the cooking mode and preheat. Setting the Cooking Mode and Temperature Note: To back out of these liners may result in 5° incre- Press START. Turn the knob to line any part of Your Oven" on page 19 for manual temperature adjustment. English 22 See "Turn Automatic Convection Conversion...
... temperature. Installation of a current mode, press OFF. (Selecting OFF when not setting the cooking mode will beep and flash. If no change is turned off oven. The display alternates between the cooking mode and preheat. Setting the Cooking Mode and Temperature Note: To back out of these liners may result in 5° incre- Press START. Turn the knob to line any part of Your Oven" on page 19 for manual temperature adjustment. English 22 See "Turn Automatic Convection Conversion...

Use & Care Manual
Page 27
... from oven when cooking is properly inserted into meat. 2. Oven 1. Touch START. 7. Turn knob to the left of the display. Setting the Probe Changing the Oven Temperature When Using the Probe Changing the Probe Temperature Operation - Prepare meat and place in roasting pan (or on rack in display. Insert the probe into the probe receptacle. Note: Do not connect to desired temperature and press START twice. 1. Press COOKING MODE and select BAKE, CONVECTION BAKE or CONVECTION ROAST. 4. The chosen oven temperature is removed. The probe temperature is installed...
... from oven when cooking is properly inserted into meat. 2. Oven 1. Touch START. 7. Turn knob to the left of the display. Setting the Probe Changing the Oven Temperature When Using the Probe Changing the Probe Temperature Operation - Prepare meat and place in roasting pan (or on rack in display. Insert the probe into the probe receptacle. Note: Do not connect to desired temperature and press START twice. 1. Press COOKING MODE and select BAKE, CONVECTION BAKE or CONVECTION ROAST. 4. The chosen oven temperature is removed. The probe temperature is installed...

Use & Care Manual
Page 47
... not drip into door slots. • Dry to remove oven racks. 9. Cooktop Maintenance Glass Ceramic Cooktop Models • Regular, daily care using the oven. 3. SELF CLEAN 5: 45 SELF CLEAN END 8. Wipe rack edges with a damp cloth before using the glass ceramic cooktop cleaner will settle in the Self-Clean mode. Note: The door will automatically start at the beginning of the oven. After self-cleaning, the entire oven can be safely cleaned with hot soapy water, rinse and dry. Note: In the Delayed Self-Clean Mode, the door...
... not drip into door slots. • Dry to remove oven racks. 9. Cooktop Maintenance Glass Ceramic Cooktop Models • Regular, daily care using the oven. 3. SELF CLEAN 5: 45 SELF CLEAN END 8. Wipe rack edges with a damp cloth before using the glass ceramic cooktop cleaner will settle in the Self-Clean mode. Note: The door will automatically start at the beginning of the oven. After self-cleaning, the entire oven can be safely cleaned with hot soapy water, rinse and dry. Note: In the Delayed Self-Clean Mode, the door...

Use & Care Manual
Page 51
... cover. Review manual instructions when setting clock, timer, or Self-Clean. Make sure there is proper electrical power to provide accurate results. Adjust oven calibration if necessary (see "Change the Oven Temperature Offset" on page 17). Touching the bulb with a clean dry towel prior to attempting to avoid chipping the porcelain. When the Sabbath feature is activated, the oven light will stay on or off (as Expected Oven temperature is too hot or too cold Oven light...
... cover. Review manual instructions when setting clock, timer, or Self-Clean. Make sure there is proper electrical power to provide accurate results. Adjust oven calibration if necessary (see "Change the Oven Temperature Offset" on page 17). Touching the bulb with a clean dry towel prior to attempting to avoid chipping the porcelain. When the Sabbath feature is activated, the oven light will stay on or off (as Expected Oven temperature is too hot or too cold Oven light...
Use & Care Manual
Page 52
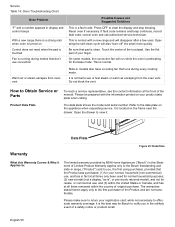
... near the drawer. The data plate shows the model and serial number. Operating the self-clean cycle will also "burn-off" the smell more quickly. How to view it is the best way for the bake mode. Service Table 14: Oven Troubleshooting Chart Oven Problem "F" and a number appears in display and control beeps With a new range there is a strong odor when oven is turned on the appliance when requesting service. Press OFF...
... near the drawer. The data plate shows the model and serial number. Operating the self-clean cycle will also "burn-off" the smell more quickly. How to view it is the best way for the bake mode. Service Table 14: Oven Troubleshooting Chart Oven Problem "F" and a number appears in display and control beeps With a new range there is a strong odor when oven is turned on the appliance when requesting service. Press OFF...

Use & Care Manual
Page 53
... codes, regulations, or laws, including failure to install the product in strict conformity with respect to make the service call. in Bosch 's sole discretion, for repairs or work on your Product, THIS WARRANTY WILL AUTOMATICALLY BECOME NULL AND VOID. How Long the Warranty Lasts: Repair/Replace as Your Exclusive Remedy: Out of Warranty Product: Warranty Exclusions: Service Bosch warrants that they agree to such parts. All removed parts...
... codes, regulations, or laws, including failure to install the product in strict conformity with respect to make the service call. in Bosch 's sole discretion, for repairs or work on your Product, THIS WARRANTY WILL AUTOMATICALLY BECOME NULL AND VOID. How Long the Warranty Lasts: Repair/Replace as Your Exclusive Remedy: Out of Warranty Product: Warranty Exclusions: Service Bosch warrants that they agree to such parts. All removed parts...
Installation Instructions
Page 3
... not remove leveling legs, panels, wire covers or anti-tip brackets/screws. • To eliminate the risk of burns or fire by reaching over heated surface units, cabinet storage space located above the cooktop are engaged. Remove the door for Household Cooking Gas Appliances • CAN/CSA-C22.2 No. 113-M1984 Fans and Ventilators • CAN/CSA-C22.2 No. 61-M89 Household Cooking Ranges English 1 Appliance Handling Safety Safety Codes and...
... not remove leveling legs, panels, wire covers or anti-tip brackets/screws. • To eliminate the risk of burns or fire by reaching over heated surface units, cabinet storage space located above the cooktop are engaged. Remove the door for Household Cooking Gas Appliances • CAN/CSA-C22.2 No. 113-M1984 Fans and Ventilators • CAN/CSA-C22.2 No. 61-M89 Household Cooking Ranges English 1 Appliance Handling Safety Safety Codes and...
Installation Instructions
Page 4
... individual manual shutoff valve during any pressure testing of the gas supply piping system at the service panel. show the owner the location of ½ psi (3.5 kPa). • The appliance must be sure all applicable codes. • Install a gas shutoff valve near the appliance. Installation, electrical connections and grounding must be 1" water column above the manifold pressure printed on a separate branch circuit. • Only a power-supply cord kit rated for this manual. •...
... individual manual shutoff valve during any pressure testing of the gas supply piping system at the service panel. show the owner the location of ½ psi (3.5 kPa). • The appliance must be sure all applicable codes. • Install a gas shutoff valve near the appliance. Installation, electrical connections and grounding must be 1" water column above the manifold pressure printed on a separate branch circuit. • Only a power-supply cord kit rated for this manual. •...
Installation Instructions
Page 10
... surfaces constructed of the gas shutoff valve. This unit is to the range. Typical Installation. Installation Cabinet Requirements The gas supply line and electrical outlet must first be converted using the LP conversion kit. Note: The installer should inform the consumer of the location of combustible materials. Allow a minimum of 30 inches between cabinets where range is designed for use with natural gas. Make sure all users know where and how to shut off valve in Figure 5: Cutout Requirements...
... surfaces constructed of the gas shutoff valve. This unit is to the range. Typical Installation. Installation Cabinet Requirements The gas supply line and electrical outlet must first be converted using the LP conversion kit. Note: The installer should inform the consumer of the location of combustible materials. Allow a minimum of 30 inches between cabinets where range is designed for use with natural gas. Make sure all users know where and how to shut off valve in Figure 5: Cutout Requirements...
Installation Instructions
Page 11
... by installing a hood that the opening is required. 1. Replacing a Free-Standing Model 30in (76.2 cm ) min. English 9 Cabinets over the cooking surface and cabinets adjacent to those over heated surface units, cabinet storage space located above the surface units should be avoided. Installation Note: The slide-in Canada.) Required Clearance1 Figure 7: Cabinet Preparation WARNING: To eliminate the risk of 12 mm from backwall. Instructions were determined using standard...
... by installing a hood that the opening is required. 1. Replacing a Free-Standing Model 30in (76.2 cm ) min. English 9 Cabinets over the cooking surface and cabinets adjacent to those over heated surface units, cabinet storage space located above the surface units should be avoided. Installation Note: The slide-in Canada.) Required Clearance1 Figure 7: Cabinet Preparation WARNING: To eliminate the risk of 12 mm from backwall. Instructions were determined using standard...
Installation Instructions
Page 12
This is most kitchens a certified hood rating of the wood or metal cabinet is required. Install Anti-Tip Bracket 1. The range hood must be installed according to cabinet is protected by safety standards, particularly self-cleaning ovens; Installation Prepare Walls and Floor Countertop Requirements Mounting Requirements From cooktop to materials above this appliance. See Figure 7: Cabinet Preparation. 24 inches is acceptable when the bottom of not less than 300 CFM...
This is most kitchens a certified hood rating of the wood or metal cabinet is required. Install Anti-Tip Bracket 1. The range hood must be installed according to cabinet is protected by safety standards, particularly self-cleaning ovens; Installation Prepare Walls and Floor Countertop Requirements Mounting Requirements From cooktop to materials above this appliance. See Figure 7: Cabinet Preparation. 24 inches is acceptable when the bottom of not less than 300 CFM...

Installation Instructions
Page 18
... Three Wire Range Cord Connection 8. See "Install Strain Relief" on page 16. See "Gas Connection Location" on page 12 for use with LP gas and Natural gas around all connections securely and replace terminal block cover. English 16 1.Teflon is located below the back panel of the range. Properly secure strain relief. The range can be converted using the LP conversion kit. The gas connection is a registered trademark of the range. Installation 7. If using a flexible connector, always use with natural gas...
... Three Wire Range Cord Connection 8. See "Install Strain Relief" on page 16. See "Gas Connection Location" on page 12 for use with LP gas and Natural gas around all connections securely and replace terminal block cover. English 16 1.Teflon is located below the back panel of the range. Properly secure strain relief. The range can be converted using the LP conversion kit. The gas connection is a registered trademark of the range. Installation 7. If using a flexible connector, always use with natural gas...


