
Use & Care Manual
Page 2
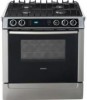
... Appliance 29 Getting the Most Out of Your Cooktop 29 Getting the Most Out of Your Oven 30 Getting the Most Out of Contents About This Manual 1 How This Manual Is Organized 1 Safety 2 Important Safety Instructions 2 Getting Started 7 Parts and Accessories 7 Control (Panel 15 Before Using the Appliance for the First Time...
... Appliance 29 Getting the Most Out of Your Cooktop 29 Getting the Most Out of Your Oven 30 Getting the Most Out of Contents About This Manual 1 How This Manual Is Organized 1 Safety 2 Important Safety Instructions 2 Getting Started 7 Parts and Accessories 7 Control (Panel 15 Before Using the Appliance for the First Time...
Use & Care Manual
Page 4
..., especially surface unit drip bowls or oven bottom. Crepes Suzette, Cherries Jubilee, Peppercorn Beef Flambe'). Safety Important Safety Instructions READ AND SAVE THESE INSTRUCTIONS Important Safety Instructions Fire Safety • Do not use . Turn off the appliance and disconnect the circuit at the circuit breaker box... of electric shock or fire. • Set the burner control so that may ignite. WARNING: TO REDUCE THE RISK OF A RANGE TOP GREASE FIRE: a) Never leave surface units unattended at high heat or when flambéing food (i.e. Installation of these liners ...
..., especially surface unit drip bowls or oven bottom. Crepes Suzette, Cherries Jubilee, Peppercorn Beef Flambe'). Safety Important Safety Instructions READ AND SAVE THESE INSTRUCTIONS Important Safety Instructions Fire Safety • Do not use . Turn off the appliance and disconnect the circuit at the circuit breaker box... of electric shock or fire. • Set the burner control so that may ignite. WARNING: TO REDUCE THE RISK OF A RANGE TOP GREASE FIRE: a) Never leave surface units unattended at high heat or when flambéing food (i.e. Installation of these liners ...
Use & Care Manual
Page 5
...any electrical switch. • Do not use combustible materials, gasoline or other flammable vapors and liquids in the ON English 3 Follow the gas supplier's instructions. • If you smell gas, your back to light any appliance. • Do not touch any phone in your building. • Immediately ...you have a small leak and, therefore, a faint smell. Gas Safety Safety WARNING: TO REDUCE THE RISK OF INJURY TO PERSONS IN THE EVENT OF A RANGE TOP GREASE FIRE, OBSERVE THE FOLLOWING: a) SMOTHER FLAMES with a close-fitting lid, cookie sheet, or metal tray, then turn it off. • To...
...any electrical switch. • Do not use combustible materials, gasoline or other flammable vapors and liquids in the ON English 3 Follow the gas supplier's instructions. • If you smell gas, your back to light any appliance. • Do not touch any phone in your building. • Immediately ...you have a small leak and, therefore, a faint smell. Gas Safety Safety WARNING: TO REDUCE THE RISK OF INJURY TO PERSONS IN THE EVENT OF A RANGE TOP GREASE FIRE, OBSERVE THE FOLLOWING: a) SMOTHER FLAMES with a close-fitting lid, cookie sheet, or metal tray, then turn it off. • To...

Use & Care Manual
Page 6
... unless necessary for its vicinity, whether or not the appliance is cool. Build-up of an oven become old enough to ensure that they are instructed in safe practices by qualified persons. • Do not allow children to use this appliance unless closely supervised by a qualified service technician. They should not...
... unless necessary for its vicinity, whether or not the appliance is cool. Build-up of an oven become old enough to ensure that they are instructed in safe practices by qualified persons. • Do not allow children to use this appliance unless closely supervised by a qualified service technician. They should not...
Use & Care Manual
Page 7
... a potential cause of the cooktop. The use . During self clean, fumes are released that may also be safe and reliable. Read all instructions carefully before use of different size. Cleaning Safety • Do not clean the appliance while it for , your new appliance has been designed... kitchen or other reproductive harm, and requires businesses to warn customers of potential exposure to such substances. 1) The burning of gas cooking fuel and the elimination of utensils inward so they do not run Self-Clean. This helps prevent spills and movement of clothing. Select cookware...
... a potential cause of the cooktop. The use . During self clean, fumes are released that may also be safe and reliable. Read all instructions carefully before use of different size. Cleaning Safety • Do not clean the appliance while it for , your new appliance has been designed... kitchen or other reproductive harm, and requires businesses to warn customers of potential exposure to such substances. 1) The burning of gas cooking fuel and the elimination of utensils inward so they do not run Self-Clean. This helps prevent spills and movement of clothing. Select cookware...
Use & Care Manual
Page 8
Injury to heat cold food (excep- Install anti-tip device packaged with range. See installation instructions. See the Warranty. Connect only to Installation Instructions for longer than one hour. It is safe to use the warming drawer to persons could result in this ...a qualified technician. The USDA recommends holding hot food at 140°F or warmer. 3) DO NOT warm food for details. • All ranges can tip. Refer all servicing to maintain proper food temperature. Disconnect appliance from the power supply and call a qualified technician. English 6 Verify ...
Injury to heat cold food (excep- Install anti-tip device packaged with range. See installation instructions. See the Warranty. Connect only to Installation Instructions for longer than one hour. It is safe to use the warming drawer to persons could result in this ...a qualified technician. The USDA recommends holding hot food at 140°F or warmer. 3) DO NOT warm food for details. • All ranges can tip. Refer all servicing to maintain proper food temperature. Disconnect appliance from the power supply and call a qualified technician. English 6 Verify ...

Use & Care Manual
Page 18
... Clock Changing the Clock The Select Functions Menu See the sections on Using the Cooktop, Using the Oven and Using the Warming Drawer for detailed instructions. • Always set clock time. Press TIME and the clock is now set. 12: 00 AM CLOCK Note: If operation is not completed, the oven... do not complete the operation of setting the clock, the oven will be a slight delay before each message (or feature) can set or change the range features listed below. Press OFF to exit the Select Functions Menu. CLOCK will be seen in hours and minutes. • The clock time will flash...
... Clock Changing the Clock The Select Functions Menu See the sections on Using the Cooktop, Using the Oven and Using the Warming Drawer for detailed instructions. • Always set clock time. Press TIME and the clock is now set. 12: 00 AM CLOCK Note: If operation is not completed, the oven... do not complete the operation of setting the clock, the oven will be a slight delay before each message (or feature) can set or change the range features listed below. Press OFF to exit the Select Functions Menu. CLOCK will be seen in hours and minutes. • The clock time will flash...

Use & Care Manual
Page 23
This instruction is turned off Operation - Turning the Burner off . Cooktop CAUTION: To prevent possible burns, the flame should not extend beyond the edge of the cookware. Turn knob clockwise to the cookware or the appliance may be heard when the burner is based on safety considerations. Note: A "pop" may be louder with LP gas than with natural gas. English 21 This is normal. Damage to the OFF position. The "pop" may also result.
This instruction is turned off Operation - Turning the Burner off . Cooktop CAUTION: To prevent possible burns, the flame should not extend beyond the edge of the cookware. Turn knob clockwise to the cookware or the appliance may be heard when the burner is based on safety considerations. Note: A "pop" may be louder with LP gas than with natural gas. English 21 This is normal. Damage to the OFF position. The "pop" may also result.

Use & Care Manual
Page 27
... ROAST. 4. Oven 1. Make sure the probe is removed. Touch TEMPERATURE. Press START and PROBE TEMP will remain in cold oven on page 31 for detailed instructions. Oven will not self-clean with meat in the display until probe tip is reached. Turn the knob to change oven temperature if necessary. 6. The...
... ROAST. 4. Oven 1. Make sure the probe is removed. Touch TEMPERATURE. Press START and PROBE TEMP will remain in cold oven on page 31 for detailed instructions. Oven will not self-clean with meat in the display until probe tip is reached. Turn the knob to change oven temperature if necessary. 6. The...
Use & Care Manual
Page 44
Hold the scraper at a 30° angle. Wipe with a clean, damp sponge or paper towel. Clean with hot sudsy water or apply Fantastik® or Formula 409® to a damp ... and dry, or gently rub with soap and water or glass cleaner. If racks are cleaned in "Self Cleaning the Oven" on page 42 for instructions for porcelain to show fine lines with a small amount of the cooktop. If this happens, wipe the rack edges with age due to exposure to...
Hold the scraper at a 30° angle. Wipe with a clean, damp sponge or paper towel. Clean with hot sudsy water or apply Fantastik® or Formula 409® to a damp ... and dry, or gently rub with soap and water or glass cleaner. If racks are cleaned in "Self Cleaning the Oven" on page 42 for instructions for porcelain to show fine lines with a small amount of the cooktop. If this happens, wipe the rack edges with age due to exposure to...

Use & Care Manual
Page 51
..."Change the Oven Temperature Offset" on page 17. If the Automatic Convection Conversion Feature is activated, the oven light will stay on page 30 for rack positions, cooking times and pan selection. Refer to cooking charts and tips for tips and suggestions. See"Change the Oven Temperature Offset...oven. Check to see "Change the Oven Temperature Offset" on page 16. If oven is consistently too brown or too light. Review manual instructions when setting clock, timer, or Self-Clean. However, the temperature can be offset if food is electrical power to cooking charts for a five...
..."Change the Oven Temperature Offset" on page 17. If the Automatic Convection Conversion Feature is activated, the oven light will stay on page 30 for rack positions, cooking times and pan selection. Refer to cooking charts and tips for tips and suggestions. See"Change the Oven Temperature Offset...oven. Check to see "Change the Oven Temperature Offset" on page 16. If oven is consistently too brown or too light. Review manual instructions when setting clock, timer, or Self-Clean. However, the temperature can be offset if food is electrical power to cooking charts for a five...

Use & Care Manual
Page 53
... floods, fires, mud slides, freezing temperatures, excessive moisture or extended exposure to repair manufacturer-defective Product only, using a Bosch authorized service provider during normal business hours. Notwithstanding the foregoing, Bosch will replace your Product proves..., abuse, accidents, neglect, improper operation, failure to maintain, improper or negligent installation, tampering, failure to follow operating instructions, mishandling, unauthorized service (including self-performed "fixing" or exploration of the appliance's internal workings); (4) adjustment, alteration or...
... floods, fires, mud slides, freezing temperatures, excessive moisture or extended exposure to repair manufacturer-defective Product only, using a Bosch authorized service provider during normal business hours. Notwithstanding the foregoing, Bosch will replace your Product proves..., abuse, accidents, neglect, improper operation, failure to maintain, improper or negligent installation, tampering, failure to follow operating instructions, mishandling, unauthorized service (including self-performed "fixing" or exploration of the appliance's internal workings); (4) adjustment, alteration or...
Installation Instructions
Page 3
...servicing should be avoided. Destroy the packaging after unpacking the appliance. WARNING: All ranges can cause injury or property damage. Never allow children to play with range. See instructions in the manuals. Use caution when reaching behind or under appliance. • ...INSTRUCTIONS Important Safety Instructions Related Equipment Safety WARNING: Do not repair or replace any part of the appliance unless specifically recommended in Use and Care Manual. • Unit is to be provided, the risk can be reduced by installing a hood that projects horizontally a minimum of 5 inches...
...servicing should be avoided. Destroy the packaging after unpacking the appliance. WARNING: All ranges can cause injury or property damage. Never allow children to play with range. See instructions in the manuals. Use caution when reaching behind or under appliance. • ...INSTRUCTIONS Important Safety Instructions Related Equipment Safety WARNING: Do not repair or replace any part of the appliance unless specifically recommended in Use and Care Manual. • Unit is to be provided, the risk can be reduced by installing a hood that projects horizontally a minimum of 5 inches...
Installation Instructions
Page 4
... must conform with local codes or, in the absence of local codes, with the National Fuel Gas Code, ANSI Z223.1/NFPA 54. • The appliance must be electrically grounded in ... this appliance must comply with all controls are in the OFF position. • For appliances equipped with ranges" shall be used. • Installer - If there is any pressure testing of the circuit breaker or...show the owner the location of the gas supply piping system at the service panel. Save these instructions for Gas Burning Appliances and/ or local codes). • Before you plug in accordance with the...
... must conform with local codes or, in the absence of local codes, with the National Fuel Gas Code, ANSI Z223.1/NFPA 54. • The appliance must be electrically grounded in ... this appliance must comply with all controls are in the OFF position. • For appliances equipped with ranges" shall be used. • Installer - If there is any pressure testing of the circuit breaker or...show the owner the location of the gas supply piping system at the service panel. Save these instructions for Gas Burning Appliances and/ or local codes). • Before you plug in accordance with the...
Installation Instructions
Page 5
...for use any modifications. show the owner where the gas shut-off valve must be longer than 36 inches. • Installer - It must not exceed 14.0 inches water column (34.9Millibars). Propane Gas Installation Safety • The maximum supply pressure must be converted ... shipped from a neighbor's phone. English 3 In addition, the regulator supplied with propane the appliance must be converted per the LP conversion instructions. • For Massachusetts installations: • Installation must be performed by a qualified or licensed contractor, plumber or gas fitter qualified or ...
...for use any modifications. show the owner where the gas shut-off valve must be longer than 36 inches. • Installer - It must not exceed 14.0 inches water column (34.9Millibars). Propane Gas Installation Safety • The maximum supply pressure must be converted ... shipped from a neighbor's phone. English 3 In addition, the regulator supplied with propane the appliance must be converted per the LP conversion instructions. • For Massachusetts installations: • Installation must be performed by a qualified or licensed contractor, plumber or gas fitter qualified or ...

Installation Instructions
Page 6
...Canadian installations; Install Backwall Trim (Optional) 4. Tools and Parts Needed Additional Parts Needed For Hard Wire Installations • Range Power Supply Cord Kit (240V -30 Amp) Note: Not necessary for Anti-Tip Bracket (Style will vary depending on mounting surface) • Level •...Valve • Safety Gloves and Goggles • Tape (Optional) • Cloth or Cardboard (Optional - Test for step-by-step instructions. Connect Electric 5. to the sections that follow for Gas Leaks 7. Test the Installation Proceed to Protect Floor) • Flexible Conduit &#...
...Canadian installations; Install Backwall Trim (Optional) 4. Tools and Parts Needed Additional Parts Needed For Hard Wire Installations • Range Power Supply Cord Kit (240V -30 Amp) Note: Not necessary for Anti-Tip Bracket (Style will vary depending on mounting surface) • Level •...Valve • Safety Gloves and Goggles • Tape (Optional) • Cloth or Cardboard (Optional - Test for step-by-step instructions. Connect Electric 5. to the sections that follow for Gas Leaks 7. Test the Installation Proceed to Protect Floor) • Flexible Conduit &#...
Installation Instructions
Page 11
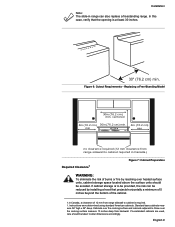
...units should be reduced by reaching over the cooking surface measure 13 inches deep from range sidewall to alter dimensions accordingly. In this case, verify that projects horizontally a minimum of 5 inches beyond the bottom of the cabinet. 1.In Canada, a clearance...clearance required (12 mm clearance from range sidewall to cabinet required in range can be taken to cabinet is at least 30 inches. 30" (76.2 cm) min. Instructions were determined using standard American cabinets. Figure 6: Cutout Requirements - Installation Note: The slide-in Canada.) Required Clearance1 Figure ...
...units should be reduced by reaching over the cooking surface measure 13 inches deep from range sidewall to alter dimensions accordingly. In this case, verify that projects horizontally a minimum of 5 inches beyond the bottom of the cabinet. 1.In Canada, a clearance...clearance required (12 mm clearance from range sidewall to cabinet required in range can be taken to cabinet is at least 30 inches. 30" (76.2 cm) min. Instructions were determined using standard American cabinets. Figure 6: Cutout Requirements - Installation Note: The slide-in Canada.) Required Clearance1 Figure ...
Installation Instructions
Page 12
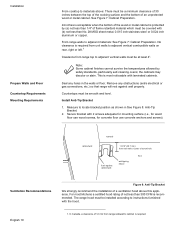
.... the cabinets may discolor or stain. From range walls to locate bracket position as shown in the walls or floor. Secure bracket with (b) not less than 1/4" of a ventilation hood above : There must be a minimum clearance of 30 inches between the top of the cooking surface and the... bottom of not less than 300 CFM is recommended. Remove any holes in See Figure 8: Anti-Tip Bracket. 2. The range hood must be installed according to instructions furnished with laminated cabinets. Seal any...
.... the cabinets may discolor or stain. From range walls to locate bracket position as shown in the walls or floor. Secure bracket with (b) not less than 1/4" of a ventilation hood above : There must be a minimum clearance of 30 inches between the top of the cooking surface and the... bottom of not less than 300 CFM is recommended. Remove any holes in See Figure 8: Anti-Tip Bracket. 2. The range hood must be installed according to instructions furnished with laminated cabinets. Seal any...
Installation Instructions
Page 14
Continue to terminal block. Once cord length/ slack has been adjusted, attach strain relief per instructions included with your range cord must be removed from the range to install the strain relief: Remove knockout panel from the factory with your strain relief. 2. See Figure ... knockout that fits your strain relief. 1. Carefully read and follow the instructions included with the range cord already installed. Allow for detailed instructions). For installations other than those in Canada, connect the range cord at the terminal block (See next page for slack in panel ...
Continue to terminal block. Once cord length/ slack has been adjusted, attach strain relief per instructions included with your range cord must be removed from the range to install the strain relief: Remove knockout panel from the factory with your strain relief. 2. See Figure ... knockout that fits your strain relief. 1. Carefully read and follow the instructions included with the range cord already installed. Allow for detailed instructions). For installations other than those in Canada, connect the range cord at the terminal block (See next page for slack in panel ...
Installation Instructions
Page 15
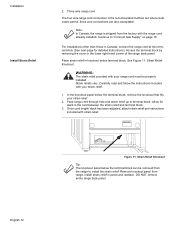
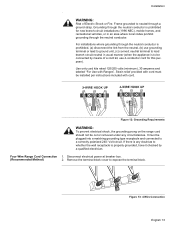
... 2. Frame grounded to expose the terminal block. Figure 12: Grounding Requirements WARNING: To prevent electrical shock, the grounding prong on the range cord should not be installed per instructions included with Ranges". Remove the terminal block cover to neutral through the neutral conductor is properly grounded, have it checked by means of Electric... type receptacle and connected to a correctly polarized 240- Installation . Figure 13: 4 Wire Connection English 13 Use only cord kits rated 125/250 volts (minimum), 30 amperes and labeled "For Use with cord. Four Wire...
... 2. Frame grounded to expose the terminal block. Figure 12: Grounding Requirements WARNING: To prevent electrical shock, the grounding prong on the range cord should not be installed per instructions included with Ranges". Remove the terminal block cover to neutral through the neutral conductor is properly grounded, have it checked by means of Electric... type receptacle and connected to a correctly polarized 240- Installation . Figure 13: 4 Wire Connection English 13 Use only cord kits rated 125/250 volts (minimum), 30 amperes and labeled "For Use with cord. Four Wire...
