Use & Care Manual
Page 4
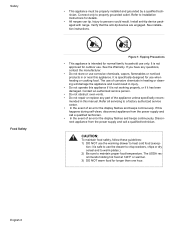
... leave the cooktop unattended when in contact with baking soda. Heat oils slowly on fan or filter. WARNING: TO REDUCE THE RISK OF A RANGE TOP GREASE FIRE: a) Never leave surface units unattended at high heat or when flambéing food (i.e. Crepes Suzette, Cherries Jubilee, Peppercorn...from food fires other than grease fires with a hot burner or grate. b) Always turn hood ON when cooking at high settings. Installation of an appliance, especially surface unit drip bowls or oven bottom. Safety Important Safety Instructions READ AND SAVE THESE INSTRUCTIONS Important Safety ...
... leave the cooktop unattended when in contact with baking soda. Heat oils slowly on fan or filter. WARNING: TO REDUCE THE RISK OF A RANGE TOP GREASE FIRE: a) Never leave surface units unattended at high heat or when flambéing food (i.e. Crepes Suzette, Cherries Jubilee, Peppercorn...from food fires other than grease fires with a hot burner or grate. b) Always turn hood ON when cooking at high settings. Installation of an appliance, especially surface unit drip bowls or oven bottom. Safety Important Safety Instructions READ AND SAVE THESE INSTRUCTIONS Important Safety ...
Use & Care Manual
Page 5
...Do not use any phone in your building. • Immediately call fire department. Some leaks can fight the fire with your gas supplier, call your installer has not done a proper job of this manual is not a "do-it-yourself" procedure. You may result causing property damage, personal injury or... service agency or the gas supplier. • Have the installer show you have a small leak and, therefore, a faint smell. Gas Safety Safety WARNING: TO REDUCE THE RISK OF INJURY TO PERSONS IN THE EVENT OF A RANGE TOP GREASE FIRE, OBSERVE THE FOLLOWING: a) SMOTHER FLAMES with the burner control ...
...Do not use any phone in your building. • Immediately call fire department. Some leaks can fight the fire with your gas supplier, call your installer has not done a proper job of this manual is not a "do-it-yourself" procedure. You may result causing property damage, personal injury or... service agency or the gas supplier. • Have the installer show you have a small leak and, therefore, a faint smell. Gas Safety Safety WARNING: TO REDUCE THE RISK OF INJURY TO PERSONS IN THE EVENT OF A RANGE TOP GREASE FIRE, OBSERVE THE FOLLOWING: a) SMOTHER FLAMES with the burner control ...
Use & Care Manual
Page 7
...other reproductive harm, and requires businesses to warn customers of potential exposure to such substances. 1) The burning of gas cooking fuel and the elimination of soil during selfcleaning can be safe and reliable. Proper relationship of cookware to heating element or burner will... of cookware to cover the surface heating unit. Select cookware having flat bottoms large enough to burner flame reduces safety risks. Proper Installation and Maintenance WARNING: When properly cared for easy reference. These precautions will not open. This appliance is a potential cause of reproductive...
...other reproductive harm, and requires businesses to warn customers of potential exposure to such substances. 1) The burning of gas cooking fuel and the elimination of soil during selfcleaning can be safe and reliable. Proper relationship of cookware to heating element or burner will... of cookware to cover the surface heating unit. Select cookware having flat bottoms large enough to burner flame reduces safety risks. Proper Installation and Maintenance WARNING: When properly cared for easy reference. These precautions will not open. This appliance is a potential cause of reproductive...
Use & Care Manual
Page 8
...in heating or cleaning will damage the appliance and could result. Disconnect appliance from the power supply and call a qualified technician. See installation instructions. Contact an authorized service person. • Do not obstruct oven vents. • Do not repair or replace any questions... Injury to maintain proper food temperature. Safety Food Safety • This appliance must be properly installed and grounded by a qualified technician. Install anti-tip device packaged with range. Verify that the anti-tip devices are engaged. The use the drawer to crisp crackers, ...
...in heating or cleaning will damage the appliance and could result. Disconnect appliance from the power supply and call a qualified technician. See installation instructions. Contact an authorized service person. • Do not obstruct oven vents. • Do not repair or replace any questions... Injury to maintain proper food temperature. Safety Food Safety • This appliance must be properly installed and grounded by a qualified technician. Install anti-tip device packaged with range. Verify that the anti-tip devices are engaged. The use the drawer to crisp crackers, ...
Use & Care Manual
Page 11
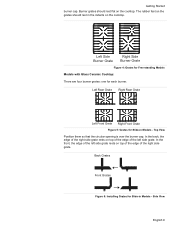
... Burner Grate Figure 4: Grates for Free-standing Models Models with Glass Ceramic Cooktop: There are four burner grates: one for Slide-in Models - Back Grates Front Grates Figure 6: Installing Grates for Slide-in the indents on top of the edge of the left side grate. Getting Started burner cap. Burner grates should rest...
... Burner Grate Figure 4: Grates for Free-standing Models Models with Glass Ceramic Cooktop: There are four burner grates: one for Slide-in Models - Back Grates Front Grates Figure 6: Installing Grates for Slide-in the indents on top of the edge of the left side grate. Getting Started burner cap. Burner grates should rest...

Use & Care Manual
Page 13
...) Rack Guide Top Rack Rest Front of the oven. If the top rack will not extend fully, it so that the pan stop is not installed correctly. English 11 Bring rack to a horizontal position and press the rest of the way in the closed position top side up and pull the... stop is reached, grasp the top section and pull straight out until the second stop is reached. Disassembly (for cleaning) The two sections of the range.
...) Rack Guide Top Rack Rest Front of the oven. If the top rack will not extend fully, it so that the pan stop is not installed correctly. English 11 Bring rack to a horizontal position and press the rest of the way in the closed position top side up and pull the... stop is reached, grasp the top section and pull straight out until the second stop is reached. Disassembly (for cleaning) The two sections of the range.

Use & Care Manual
Page 14
... rack. Getting Started 2. DO NOT simply rest the top rack on top of the bottom one side of the rack removed, you until it is installed correctly after reassembly. DO NOT clean the rack in . This allows for easier access to closed position. 3. Pull the rack up and out, rotated side...
... rack. Getting Started 2. DO NOT simply rest the top rack on top of the bottom one side of the rack removed, you until it is installed correctly after reassembly. DO NOT clean the rack in . This allows for easier access to closed position. 3. Pull the rack up and out, rotated side...
Use & Care Manual
Page 15
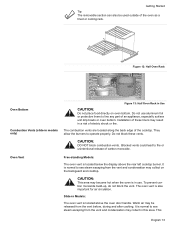
Figure 12: Half Oven Rack Oven Bottom Combustion Vents (slide-in models only) Figure 13: Half Oven Rack in a risk of these vents. Installation of electric shock or fire. CAUTION: This area may become hot when the oven is normal to see steam escaping from the vent and condensation ... normal to line any part of carbon monoxide. To prevent carbon monoxide build-up, do not block the vent. Warm air may collect in use. Slide-in Models: The oven vent is also important for air circulation. Do not use aluminum foil or protective liners to see steam escaping from the...
Figure 12: Half Oven Rack Oven Bottom Combustion Vents (slide-in models only) Figure 13: Half Oven Rack in a risk of these vents. Installation of electric shock or fire. CAUTION: This area may become hot when the oven is normal to see steam escaping from the vent and condensation ... normal to line any part of carbon monoxide. To prevent carbon monoxide build-up, do not block the vent. Warm air may collect in use. Slide-in Models: The oven vent is also important for air circulation. Do not use aluminum foil or protective liners to see steam escaping from the...

Use & Care Manual
Page 18
..., SELECT FUNCTION flashes again. 5. When all oven operations except when the timer is running. • The oven is set the clock after installation or after a power failure. Getting Started The Clock About the Clock Setting the Clock Changing the Clock The Select Functions Menu See the sections... section. • If you can be a slight delay before each message (or feature) can set the clock time. Turn knob to change the range features listed below. Press TIME. Press TIME and hour digits flash. 4. Turn knob to select hour and AM or PM. 2. Press START to ...
..., SELECT FUNCTION flashes again. 5. When all oven operations except when the timer is running. • The oven is set the clock after installation or after a power failure. Getting Started The Clock About the Clock Setting the Clock Changing the Clock The Select Functions Menu See the sections... section. • If you can be a slight delay before each message (or feature) can set the clock time. Turn knob to change the range features listed below. Press TIME. Press TIME and hour digits flash. 4. Turn knob to select hour and AM or PM. 2. Press START to ...

Use & Care Manual
Page 24
...read CONV BAKE. Simply enter the package or recipe temperature when setting the mode and the range calculates the correct temperature. BAKE will appear in the display. 3. The selected mode will...with the default temper- Operation - When the feature is reached, at 100ºF. English 22 Installation of electric shock or fire. To select a different temperature, turn off to improve oven results....not use aluminum foil or protective liners to line any part of Your Oven" on page 30 for guidelines to allow for details. If no change is activated, the display will read ...
...read CONV BAKE. Simply enter the package or recipe temperature when setting the mode and the range calculates the correct temperature. BAKE will appear in the display. 3. The selected mode will...with the default temper- Operation - When the feature is reached, at 100ºF. English 22 Installation of electric shock or fire. To select a different temperature, turn off to improve oven results....not use aluminum foil or protective liners to line any part of Your Oven" on page 30 for guidelines to allow for details. If no change is activated, the display will read ...

Use & Care Manual
Page 27
Press COOKING MODE and select BAKE, CONVECTION BAKE or CONVECTION ROAST. 4. Oven 1. Place roasting pan with the probe installed in the display. 2. Touch START. 7. The probe temperature is reached. Touch TEMPERATURE. Note: Always remove probe from oven when cooking is not... probe receptacle until probe tip is preheated when the beep signals once. Note: The probe temperature can only be set when the probe is installed in 5°F increments until the probe is reached, END appears in oven during self-clean. Turn knob to desired temperature and press START ...
Press COOKING MODE and select BAKE, CONVECTION BAKE or CONVECTION ROAST. 4. Oven 1. Place roasting pan with the probe installed in the display. 2. Touch START. 7. The probe temperature is reached. Touch TEMPERATURE. Note: Always remove probe from oven when cooking is not... probe receptacle until probe tip is preheated when the beep signals once. Note: The probe temperature can only be set when the probe is installed in 5°F increments until the probe is reached, END appears in oven during self-clean. Turn knob to desired temperature and press START ...

Use & Care Manual
Page 53
...); (2) any party's willful misconduct, negligence, misuse, abuse, accidents, neglect, improper operation, failure to maintain, improper or negligent installation, tampering, failure to follow operating instructions, mishandling, unauthorized service (including self-performed "fixing" or exploration of the appliance's internal ...without limitation, rain, wind, sand, floods, fires, mud slides, freezing temperatures, excessive moisture or extended exposure to repair the Product have been made without success, then Bosch will have any liability or responsibility whatsoever for repairs or work ...
...); (2) any party's willful misconduct, negligence, misuse, abuse, accidents, neglect, improper operation, failure to maintain, improper or negligent installation, tampering, failure to follow operating instructions, mishandling, unauthorized service (including self-performed "fixing" or exploration of the appliance's internal ...without limitation, rain, wind, sand, floods, fires, mud slides, freezing temperatures, excessive moisture or extended exposure to repair the Product have been made without success, then Bosch will have any liability or responsibility whatsoever for repairs or work ...

Use & Care Manual
Page 54
...FOR A PARTICULAR PURPOSE, OR OTHERWISE, SHALL BE EFFECTIVE ONLY FOR THE PERIOD THAT THIS EXPRESS LIMITED WARRANTY IS EFFECTIVE. correction of installation problems (you are scratches, nicks, minor dents, and cosmetic damages on which the serial numbers have been altered, defaced, or removed... for any alterations including without limitation cabinetry, walls, floors, shelving, etc.); No attempt to teach you should contact the nearest Bosch authorized service center. service visits to alter, modify or amend this warranty are solely responsible for any structure and setting for the...
...FOR A PARTICULAR PURPOSE, OR OTHERWISE, SHALL BE EFFECTIVE ONLY FOR THE PERIOD THAT THIS EXPRESS LIMITED WARRANTY IS EFFECTIVE. correction of installation problems (you are scratches, nicks, minor dents, and cosmetic damages on which the serial numbers have been altered, defaced, or removed... for any alterations including without limitation cabinetry, walls, floors, shelving, etc.); No attempt to teach you should contact the nearest Bosch authorized service center. service visits to alter, modify or amend this warranty are solely responsible for any structure and setting for the...

Installation Instructions
Page 2
Huntington Beach, CA 92649 We look forward to hearing from you! Table of Contents Safety 1 Installation 4 Before You Begin 4 Installation Procedure 11 Service 24 Before Calling Service 24 Questions? 1-800-944-2904 www.boschappliances.com 5551 McFadden Ave.
Huntington Beach, CA 92649 We look forward to hearing from you! Table of Contents Safety 1 Installation 4 Before You Begin 4 Installation Procedure 11 Service 24 Before Calling Service 24 Questions? 1-800-944-2904 www.boschappliances.com 5551 McFadden Ave.
Installation Instructions
Page 3
...C22.2 No. 61-M89 Household Cooking Ranges English 1 All other servicing should be done by reaching over heated surface units, cabinet storage space located above the surface units should be reduced by installing a hood that projects horizontally a minimum of 5 inches beyond the bottom of the cabinet. &#...8226; Verify that the anti-tip devices are a maximum of 13" (330 mm) deep. • Do not lift appliance by door handle. See installation instructions. If cabinet...
...C22.2 No. 61-M89 Household Cooking Ranges English 1 All other servicing should be done by reaching over heated surface units, cabinet storage space located above the surface units should be reduced by installing a hood that projects horizontally a minimum of 5 inches beyond the bottom of the cabinet. &#...8226; Verify that the anti-tip devices are a maximum of 13" (330 mm) deep. • Do not lift appliance by door handle. See installation instructions. If cabinet...
Installation Instructions
Page 4
... reference. • Important - Save these instructions for the local electrical inspector's use with ranges" shall be used. • Installer - show the owner the location of the circuit breaker or fuse. Installation, electrical connections and grounding must comply with a cord and plug, do not cut or ...It is the responsibility of the owner and the installer to determine if additional requirements and/or standards apply to specific installations. • Installation must conform with local codes or, in the absence of local codes, with the National Fuel Gas Code, ANSI Z223.1/NFPA 54. •...
... reference. • Important - Save these instructions for the local electrical inspector's use with ranges" shall be used. • Installer - show the owner the location of the circuit breaker or fuse. Installation, electrical connections and grounding must comply with a cord and plug, do not cut or ...It is the responsibility of the owner and the installer to determine if additional requirements and/or standards apply to specific installations. • Installation must conform with local codes or, in the absence of local codes, with the National Fuel Gas Code, ANSI Z223.1/NFPA 54. •...
Installation Instructions
Page 5
.... • Do not use with propane. Exception: For use with natural gas. A qualified technician or installer must not exceed 14.0 inches water column (34.9Millibars). Installation and service must be performed by a qualified or licensed contractor, plumber or gas fitter qualified or licensed by... store or use with propane the appliance must be converted per the LP conversion instructions. • For Massachusetts installations: • Installation must be longer than 36 inches. • Installer - show the owner where the gas shut-off valve must be a "T" handle gas cock. • ...
.... • Do not use with propane. Exception: For use with natural gas. A qualified technician or installer must not exceed 14.0 inches water column (34.9Millibars). Installation and service must be performed by a qualified or licensed contractor, plumber or gas fitter qualified or licensed by... store or use with propane the appliance must be converted per the LP conversion instructions. • For Massachusetts installations: • Installation must be longer than 36 inches. • Installer - show the owner where the gas shut-off valve must be a "T" handle gas cock. • ...

Installation Instructions
Page 6
... 3. Tools and Parts Needed Additional Parts Needed For Hard Wire Installations • Range Power Supply Cord Kit (240V -30 Amp) Note: Not necessary for Gas Leaks 7. Connect Electric 5. Test for Canadian installations; to the sections that follow for Anti-Tip Bracket (Style ... Goggles • Tape (Optional) • Cloth or Cardboard (Optional - Connect Gas Supply 6. Canadian units are shipped with the power cord already installed. • Measuring Tape • Phillips Head Screwdriver • 1-1/4" (31.8 mm) Wrench • Pencil • T-20 Torx Screwdriver •...
... 3. Tools and Parts Needed Additional Parts Needed For Hard Wire Installations • Range Power Supply Cord Kit (240V -30 Amp) Note: Not necessary for Gas Leaks 7. Connect Electric 5. Test for Canadian installations; to the sections that follow for Anti-Tip Bracket (Style ... Goggles • Tape (Optional) • Cloth or Cardboard (Optional - Connect Gas Supply 6. Canadian units are shipped with the power cord already installed. • Measuring Tape • Phillips Head Screwdriver • 1-1/4" (31.8 mm) Wrench • Pencil • T-20 Torx Screwdriver •...
Installation Instructions
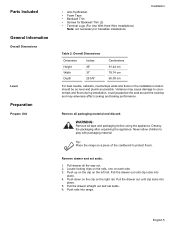
Page 7
... • Screws for Backwall Trim (2) • Terminal Lugs (For Use With Hard Wire Installations) Note: not necessary for Canadian installations Installation Table 2: Overall Dimensions Dimension Height Width Depth Inches 36" 31" 25 5/8" Centimeters 91.44 cm 78.74 cm 65.09 cm For best... results, cabinets, countertops walls and floors in the installation location should be as level and plumb as possible. WARNING: Remove all packaging material and discard. Never allow children to protect floors. Tip: Place the range...
... • Screws for Backwall Trim (2) • Terminal Lugs (For Use With Hard Wire Installations) Note: not necessary for Canadian installations Installation Table 2: Overall Dimensions Dimension Height Width Depth Inches 36" 31" 25 5/8" Centimeters 91.44 cm 78.74 cm 65.09 cm For best... results, cabinets, countertops walls and floors in the installation location should be as level and plumb as possible. WARNING: Remove all packaging material and discard. Never allow children to protect floors. Tip: Place the range...

Installation Instructions
Page 8
It will be about halfway open or closed , be sure that the range be installed with a power cord set must be 120/240 volt, 30 amperes minimum. Always use a new power cord. the hinge could be damaged and injury could result in personal injury or product damage. • To ...avoid injury from the factory with the range cord already installed. Close the door until it may swing in electrical...
It will be about halfway open or closed , be sure that the range be installed with a power cord set must be 120/240 volt, 30 amperes minimum. Always use a new power cord. the hinge could be damaged and injury could result in personal injury or product damage. • To ...avoid injury from the factory with the range cord already installed. Close the door until it may swing in electrical...

