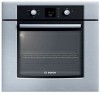

Use & Care Manual
Page 2
Table of Contents About This Manual 1 How This Manual is Organized 1 Safety 2 Important Safety Instructions 2 Getting Started 6 Parts and Accessories 6 Control 8 Before Using the Oven for the First Time 9 Operation 10 About the Appliance 10 Basic Features 10 Setting the Clock 10 Setting the Cooking Mode and Temperature 11 Heating Time Limitation 11 Timer 12 Special Features 13 Cook Time 13 Customer Settings 14 Getting the Most Out of Your Appliance 16 General Tips 16 Bake 17 Roast 17 Broil 18 Warm 19 Cleaning and Maintenance 20 Cleaning 20 Self-Clean 20
Table of Contents About This Manual 1 How This Manual is Organized 1 Safety 2 Important Safety Instructions 2 Getting Started 6 Parts and Accessories 6 Control 8 Before Using the Oven for the First Time 9 Operation 10 About the Appliance 10 Basic Features 10 Setting the Clock 10 Setting the Cooking Mode and Temperature 11 Heating Time Limitation 11 Timer 12 Special Features 13 Cook Time 13 Customer Settings 14 Getting the Most Out of Your Appliance 16 General Tips 16 Bake 17 Roast 17 Broil 18 Warm 19 Cleaning and Maintenance 20 Cleaning 20 Self-Clean 20

Use & Care Manual
Page 3
Table of Contents Cont. Avoid These Cleaners 20 Cleaning Guide 21 Maintenance 22 Replacing an Oven Light 22 Removing the Oven Door 22 Service 24 Before Calling Service 24 Troubleshooting Chart 24 Data Plate 25 STATEMENT OF LIMITED PRODUCT WARRANTY 26 This Bosch Appliance is made by BSH Home Appliances Corporation 5551 McFadden Ave. Huntington Beach, CA 92649 Questions? 1-800-944-2904 www.boschappliances.com We look forward to hearing from you!
Table of Contents Cont. Avoid These Cleaners 20 Cleaning Guide 21 Maintenance 22 Replacing an Oven Light 22 Removing the Oven Door 22 Service 24 Before Calling Service 24 Troubleshooting Chart 24 Data Plate 25 STATEMENT OF LIMITED PRODUCT WARRANTY 26 This Bosch Appliance is made by BSH Home Appliances Corporation 5551 McFadden Ave. Huntington Beach, CA 92649 Questions? 1-800-944-2904 www.boschappliances.com We look forward to hearing from you!

Use & Care Manual
Page 4
... with several bakeware and preparation tips. • "Cleaning and Maintenance" provides you can get to know your new oven by -step instructions on how to operate your oven. • In "Getting the Most Out of Your Appliance" you with information on how to clean and care... The manual consists of the following sections: • The "Safety" section provides information on how to safely operate your oven. • "Getting Started" introduces you to the oven components and features. • The "Operation" section offers you step-by reading this manual from beginning to the important ...
... with several bakeware and preparation tips. • "Cleaning and Maintenance" provides you can get to know your new oven by -step instructions on how to operate your oven. • In "Getting the Most Out of Your Appliance" you with information on how to clean and care... The manual consists of the following sections: • The "Safety" section provides information on how to safely operate your oven. • "Getting Started" introduces you to the oven components and features. • The "Operation" section offers you step-by reading this manual from beginning to the important ...
Use & Care Manual
Page 5
...Installation Instructions for , your new appliance has been designed to line any part of the appliance unless specifically recommended in risk of burns, electric shock, fire and injury to a properly grounded outlet. This appliance is specifically designed for easy reference. In the event of an error.... Do not repair or replace any part of corrosive chemicals in heating or cleaning will reduce the risk of electric shock or fire. If materials inside an oven should ignite, keep door closed. Refer all instructions carefully before use only. Installing these liners may result in ...
...Installation Instructions for , your new appliance has been designed to line any part of the appliance unless specifically recommended in risk of burns, electric shock, fire and injury to a properly grounded outlet. This appliance is specifically designed for easy reference. In the event of an error.... Do not repair or replace any part of corrosive chemicals in heating or cleaning will reduce the risk of electric shock or fire. If materials inside an oven should ignite, keep door closed. Refer all instructions carefully before use only. Installing these liners may result in ...
Use & Care Manual
Page 6
.... Interior surfaces of pressure may be hot even though they have had sufficient time to cool. Among these surfaces are oven vent openings, surfaces near the oven. Keep doors shut unless necessary for storage. English 3 EXERCISE CAUTION TO PREVENT BURNS. During and after use the appliance for its.... In the event that personal clothing or hair catches fire, drop and roll immediately to burst and cause injury. Build-up of an oven become hot enough to cause burns. Never use water on cooking fires. Standing to the side, open doors unattended. Exercise caution when opening...
.... Interior surfaces of pressure may be hot even though they have had sufficient time to cool. Among these surfaces are oven vent openings, surfaces near the oven. Keep doors shut unless necessary for storage. English 3 EXERCISE CAUTION TO PREVENT BURNS. During and after use the appliance for its.... In the event that personal clothing or hair catches fire, drop and roll immediately to burst and cause injury. Build-up of an oven become hot enough to cause burns. Never use water on cooking fires. Standing to the side, open doors unattended. Exercise caution when opening...
Use & Care Manual
Page 7
... scarves, jewelry, or dangling sleeves. English 4 Secure all loose garments, etc. Do not allow children to children should not be moved while oven is cool. Children climbing on an appliance to climb, stand, lean, sit, or hang on the backsplash. before beginning. There is still ... cooking foods with high alcohol content (e.g. Children and pets should not be seriously injured. rum, brandy, bourbon) in desired location while oven is hot, do not wear loose fitting clothing or hanging garments, such as the alcohol vapors may tip over, potentially causing severe injury...
... scarves, jewelry, or dangling sleeves. English 4 Secure all loose garments, etc. Do not allow children to children should not be moved while oven is cool. Children climbing on an appliance to climb, stand, lean, sit, or hang on the backsplash. before beginning. There is still ... cooking foods with high alcohol content (e.g. Children and pets should not be seriously injured. rum, brandy, bourbon) in desired location while oven is hot, do not wear loose fitting clothing or hanging garments, such as the alcohol vapors may tip over, potentially causing severe injury...

Use & Care Manual
Page 8
...other reproductive harm, and requires businesses to warn customers of potential exposure to these substances can generate small amounts of reproductive toxicity. Keep oven free from grease build up. English 5 When self-cleaning, confirm that may also be harmful to the instructions in this manual. ...systems . Other kitchen fumes such as a potential cause of cancer. Contact service. Do not clean parts or accessories in self-clean ovens gives off very small amounts of formaldehyde during the first several cleaning cycles. The burning of gas cooking fuel and the elimination of ...
...other reproductive harm, and requires businesses to warn customers of potential exposure to these substances can generate small amounts of reproductive toxicity. Keep oven free from grease build up. English 5 When self-cleaning, confirm that may also be harmful to the instructions in this manual. ...systems . Other kitchen fumes such as a potential cause of cancer. Contact service. Do not clean parts or accessories in self-clean ovens gives off very small amounts of formaldehyde during the first several cleaning cycles. The burning of gas cooking fuel and the elimination of ...
Use & Care Manual
Page 9
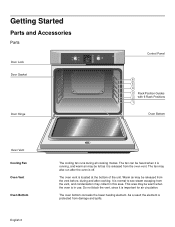
...the lower heating element. The fan can be heard when it is running, and warm air may also run after cooking. The oven vent is protected from the oven vent. As a result the element is located at the bottom of the unit. The fan may be felt as it is ... Clock Cook Time Settings Light Door Hinge Control Panel 6 5 4 3 Rack Position Guides 2 with 6 Rack Positions 1 Oven Bottom Oven Vent Cooling Fan Oven Vent Oven Bottom English 6 The cooling fan runs during and after the oven is important for air circulation. This area may be released from the vent, and condensation may be warm...
...the lower heating element. The fan can be heard when it is running, and warm air may also run after cooking. The oven vent is protected from the oven vent. As a result the element is located at the bottom of the unit. The fan may be felt as it is ... Clock Cook Time Settings Light Door Hinge Control Panel 6 5 4 3 Rack Position Guides 2 with 6 Rack Positions 1 Oven Bottom Oven Vent Cooling Fan Oven Vent Oven Bottom English 6 The cooling fan runs during and after the oven is important for air circulation. This area may be released from the vent, and condensation may be warm...
Use & Care Manual
Page 10
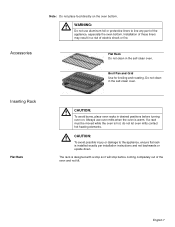
...for broiling and roasting. Do not clean in the self-clean oven. m CAUTION: To avoid possible injury or damage to line any part of electric shock or fire. English 7 m WARNING: Do not use oven mitts when the oven is installed exactly per installation instructions and not backwards or upside down.... Flat Rack Do not clean in the self-clean oven. Always use aluminum foil or protective ...
...for broiling and roasting. Do not clean in the self-clean oven. m CAUTION: To avoid possible injury or damage to line any part of electric shock or fire. English 7 m WARNING: Do not use oven mitts when the oven is installed exactly per installation instructions and not backwards or upside down.... Flat Rack Do not clean in the self-clean oven. Always use aluminum foil or protective ...

Use & Care Manual
Page 11
...position and push the rest of the way out. Activates and exits Customer Settings menu. Sets and displays the timer. Not possible in . Turns oven light on both sides. 2. Stops beep after time is reached, tilt rack up and pull the rest of the way in self-clean mode... Self Clean Bake Warm Broil Roast Buttons Temp Timer Clock Cook Time Light Temp Timer Clock Cook Time Settings Light Activates setting mode for the oven temperature. Sets and displays the clock. Rack should be straight and flat, not crooked. Insert rack (see picture). 3. English 8 Control Inserting...
...position and push the rest of the way out. Activates and exits Customer Settings menu. Sets and displays the timer. Not possible in . Turns oven light on both sides. 2. Stops beep after time is reached, tilt rack up and pull the rest of the way in self-clean mode... Self Clean Bake Warm Broil Roast Buttons Temp Timer Clock Cook Time Light Temp Timer Clock Cook Time Settings Light Activates setting mode for the oven temperature. Sets and displays the clock. Rack should be straight and flat, not crooked. Insert rack (see picture). 3. English 8 Control Inserting...

Use & Care Manual
Page 12
this is normal and will disappear. • Optimum cooking results depend on proper cookware being used. • Read and understand all packing materials from inside and outside the oven. • While cool, wipe with a clean, damp cloth and dry. • There may be a slight odor during first uses; English 9 Before Using the Oven for the First Time • Oven must be properly installed by a qualified technician before use. • Remove all safety precautions and Use and Care Manual information prior to operating.
this is normal and will disappear. • Optimum cooking results depend on proper cookware being used. • Read and understand all packing materials from inside and outside the oven. • While cool, wipe with a clean, damp cloth and dry. • There may be a slight odor during first uses; English 9 Before Using the Oven for the First Time • Oven must be properly installed by a qualified technician before use. • Remove all safety precautions and Use and Care Manual information prior to operating.
Use & Care Manual
Page 13
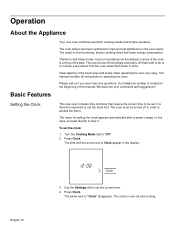
...in the display: English 10 Clock 3. Our telephone number is even browning, shorter cooking times and lower energy consumption. Setting the Clock This new oven includes time functions that is left to do is to "Off". 2. It is now set the clock: 1. Press Clock. This manual includes all... outage. Please call us if you ever have any questions. The menu for operating the oven. The clock is therefore important to be turned off soil simply and easily. The oven burns off in the oven cavity. We welcome your comments and suggestions! Turn the Cooking Mode dial to remove a...
...in the display: English 10 Clock 3. Our telephone number is even browning, shorter cooking times and lower energy consumption. Setting the Clock This new oven includes time functions that is left to do is to "Off". 2. It is now set the clock: 1. Press Clock. This manual includes all... outage. Please call us if you ever have any questions. The menu for operating the oven. The clock is therefore important to be turned off soil simply and easily. The oven burns off in the oven cavity. We welcome your comments and suggestions! Turn the Cooking Mode dial to remove a...

Use & Care Manual
Page 14
...next to switch between 1 and 3 (1=low, 2=medium, 3=high). When all bars lit. Heating Time Limitation The maximum heating time is illuminated. English 11 The oven starts after a set in ºC 30-120 121-300 Max. Note: • • • Press Temp to Temp appear in the display: Temp ...2. The maximum time allowed depends on what is changed when the arrow next to turn off the oven, it turns off automatically after a few seconds. time allowed without activity 24 hours 12 hours Heating stops until a setting is set period ...
...next to switch between 1 and 3 (1=low, 2=medium, 3=high). When all bars lit. Heating Time Limitation The maximum heating time is illuminated. English 11 The oven starts after a set in ºC 30-120 121-300 Max. Note: • • • Press Temp to Temp appear in the display: Temp ...2. The maximum time allowed depends on what is changed when the arrow next to turn off the oven, it turns off automatically after a few seconds. time allowed without activity 24 hours 12 hours Heating stops until a setting is set period ...
Use & Care Manual
Page 16
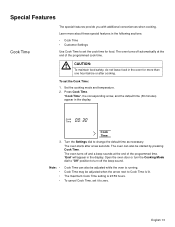
... 3. "End" will appear in the display. English 13 Learn more than one hour before or after a few seconds. The oven turns off automatically at the end of the programmed cook time. The oven turns off and a beep sounds at the end of the programmed time. To set the cook time for more... about these special features in the oven for food. The maximum Cook Time setting is lit. The oven starts after cooking. To cancel Cook Time, set it to change the default time as necessary. Set the cooking mode...
... 3. "End" will appear in the display. English 13 Learn more than one hour before or after a few seconds. The oven turns off automatically at the end of the programmed cook time. The oven turns off and a beep sounds at the end of the programmed time. To set the cook time for more... about these special features in the oven for food. The maximum Cook Time setting is lit. The oven starts after cooking. To cancel Cook Time, set it to change the default time as necessary. Set the cooking mode...
Use & Care Manual
Page 17
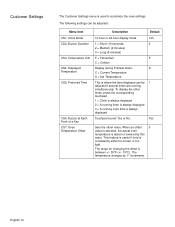
... either too brown or too light. Yes Sets the offset value. This feature is useful if food is used to customize the oven settings. The temperature changes by this value. The following settings can be adjusted: Menu item CS1: Clock Mode CS2: Buzzer Duration... CS3: Temperature Unit CS4: Displayed Temperature CS5: Preferred Time CS6: Buzzer at Each Push of a Key CS7: Oven Temperature Offset Description Default 12-hour or 24-hour display mode 12h 1 = Short (10 seconds) 2 2 = Medium (2 minutes) 3 = Long (5 minutes) F = Fahrenheit F...
... either too brown or too light. Yes Sets the offset value. This feature is useful if food is used to customize the oven settings. The temperature changes by this value. The following settings can be adjusted: Menu item CS1: Clock Mode CS2: Buzzer Duration... CS3: Temperature Unit CS4: Displayed Temperature CS5: Preferred Time CS6: Buzzer at Each Push of a Key CS7: Oven Temperature Offset Description Default 12-hour or 24-hour display mode 12h 1 = Short (10 seconds) 2 2 = Medium (2 minutes) 3 = Long (5 minutes) F = Fahrenheit F...

Use & Care Manual
Page 18
Use the settings dial to access the "Customer Settings" menu. 1. Press Temp to access the Customer Settings menu. The first menu item, CS1 = "Clock Mode", appears in steps 2 and 3. Always set the desired value. 3. Confirm by pressing Timer. English 15 To Change Settings: The oven must be turned off with no timer running in the display. The next menu item, CS2 = "Setting of Buzzer Duration", appears in order to set the values as described in the display: 2. Press Temp for two seconds to leave the menu.
Use the settings dial to access the "Customer Settings" menu. 1. Press Temp to access the Customer Settings menu. The first menu item, CS1 = "Clock Mode", appears in steps 2 and 3. Always set the desired value. 3. Confirm by pressing Timer. English 15 To Change Settings: The oven must be turned off with no timer running in the display. The next menu item, CS2 = "Setting of Buzzer Duration", appears in order to set the values as described in the display: 2. Press Temp for two seconds to leave the menu.
Use & Care Manual
Page 19
... Colorado State University, Fort Collins, Colorado 80521. The moisture may increase the length of electric shock or fire. • Place oven racks in desired position before heating the oven. • Preheat the oven when using this could change the cooking performance. There may result in risk of cooking ...time. • Do not set broil pans or any cooking process. The amount depends on any part of the oven. Installing these liners may be a cost for a certain amount of moisture to preheat while preparing recipe ingredients or food items. •...
... Colorado State University, Fort Collins, Colorado 80521. The moisture may increase the length of electric shock or fire. • Place oven racks in desired position before heating the oven. • Preheat the oven when using this could change the cooking performance. There may result in risk of cooking ...time. • Do not set broil pans or any cooking process. The amount depends on any part of the oven. Installing these liners may be a cost for a certain amount of moisture to preheat while preparing recipe ingredients or food items. •...
Use & Care Manual
Page 20
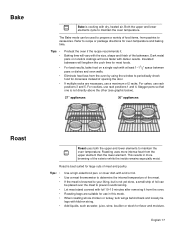
...a maximum of opening the door. Dark metal pans or nonstick coatings will cook faster with at least 1-11/2" space between pans or dishes and oven walls. For cakes, use rack positions 1 and 4. This results in this mode. If multiple racks are suitable for most foods. Use a meat thermometer...the inside remains especially moist. If the meat is browned to your liking, but is not directly above the other (see graphic below). 27" appliances: 30" appliances: Roast Roast uses both the upper and lower elements to determine the internal temperature of food items, from the ...
...a maximum of opening the door. Dark metal pans or nonstick coatings will cook faster with at least 1-11/2" space between pans or dishes and oven walls. For cakes, use rack positions 1 and 4. This results in this mode. If multiple racks are suitable for most foods. Use a meat thermometer...the inside remains especially moist. If the meat is browned to your liking, but is not directly above the other (see graphic below). 27" appliances: 30" appliances: Roast Roast uses both the upper and lower elements to determine the internal temperature of food items, from the ...
Use & Care Manual
Page 21
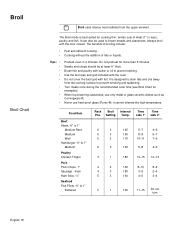
... liquids. It is best suited for more than 5 minutes. When top browning casseroles, use heat-proof glass (Pyrex ®); Brush fish and poultry with the oven. Turn meats once during the recommended cook time (see Broil Chart for examples). Never use only metal or glass ceramic dishes such as Corningware ®...turn English 18 Broil Broil Chart r Broil uses intense heat radiated from the cooking surface to prevent smoking and spattering. Tips • • • Preheat oven 3-4 minutes. Use the broil pan and grid included with butter or oil to brown breads and casseroles.
... liquids. It is best suited for more than 5 minutes. When top browning casseroles, use heat-proof glass (Pyrex ®); Brush fish and poultry with the oven. Turn meats once during the recommended cook time (see Broil Chart for examples). Never use only metal or glass ceramic dishes such as Corningware ®...turn English 18 Broil Broil Chart r Broil uses intense heat radiated from the cooking surface to prevent smoking and spattering. Tips • • • Preheat oven 3-4 minutes. Use the broil pan and grid included with butter or oil to brown breads and casseroles.
Use & Care Manual
Page 22
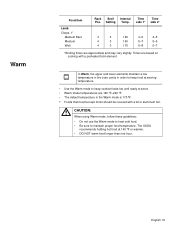
... 140 ºF or warmer. • DO NOT warm food longer than one hour. t In Warm, the upper and lower elements maintain a low temperature in the oven cavity in the Warm mode is 170 ºF. • Foods that must be kept moist should be covered with a preheated broil element. The USDA recommends...
... 140 ºF or warmer. • DO NOT warm food longer than one hour. t In Warm, the upper and lower elements maintain a low temperature in the oven cavity in the Warm mode is 170 ºF. • Foods that must be kept moist should be covered with a preheated broil element. The USDA recommends...

